
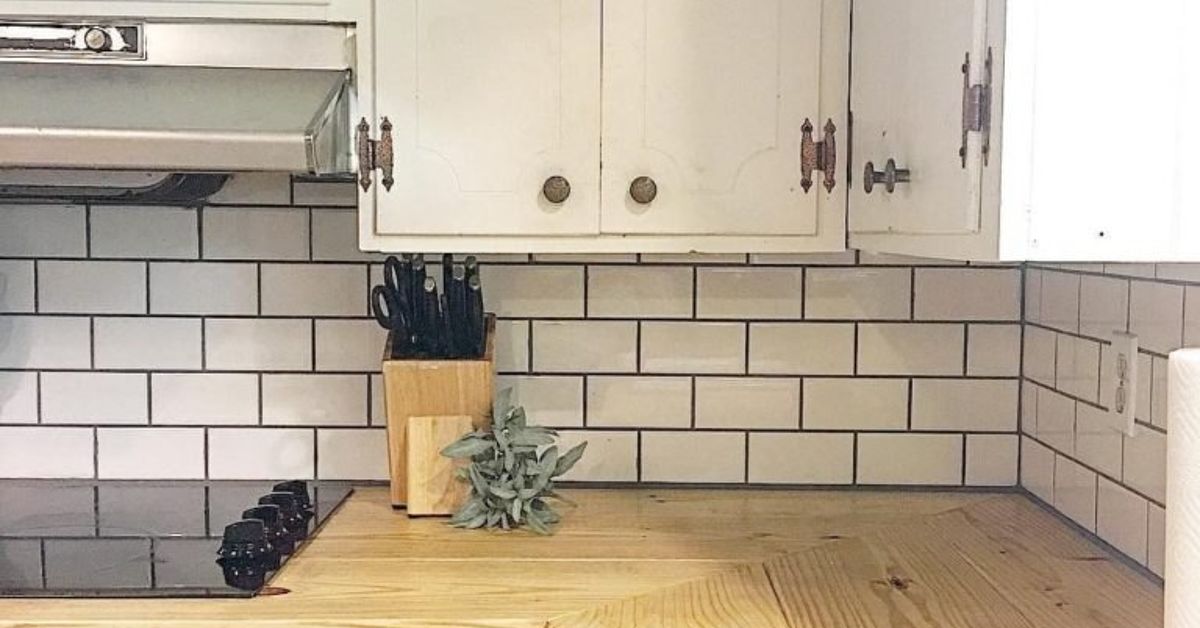
Real butcher block countertops are beautiful, warm, and capable of making even a frozen pizza feel slightly artisanal. Unfortunately, real wood counters can also be expensive, heavy, and needy in the way only natural materials can be. They want sealing, careful cleaning, protection from standing water, and the occasional emotional reassurance that you still appreciate their grain pattern.
The good news: you can create a convincing butcher block look-alike countertop for under $100 in many small kitchens, bathrooms, laundry rooms, RVs, rental spaces, and coffee bars. The secret is not pretending paint is lumber. The secret is using layered color, subtle grain lines, a realistic finish, and enough surface preparation that your countertop does not start peeling like a sunburned tourist two weeks later.
This project works best on existing laminate, Formica-style counters, sealed wood, or older vanity tops that are structurally sound but visually tragic. Think “beige laminate from 1998,” not “countertop held together by hope and caulk.”
What Is a Butcher Block Look-Alike Countertop?
A butcher block look-alike countertop is a decorative surface treatment designed to imitate the color and grain of natural wood without installing a solid hardwood slab. The most affordable versions usually use one of three methods: a painted faux wood finish, wood-look adhesive vinyl, or a thin laminate/veneer overlay for a small surface.
Modern laminate can convincingly imitate wood because printed surface patterns have improved dramatically over the years. Still, a faux finish has an advantage: you can choose your own tone, grain direction, and level of rustic character. Want pale Scandinavian oak? Warm honey maple? Moody walnut that says, “I own seven cookbooks but only use three recipes”? You can make it happen.
For most people trying to stay under $100, a painted faux butcher block countertop offers the best balance of realism, cost, and durability. Countertop-specific coatings and clear protective finishes are made to handle more wear than ordinary wall paint, but surface preparation and cure time still matter enormously.
Choose the Right Budget-Friendly Method
Option 1: Painted Faux Butcher Block Countertops
This is the best choice when you want a custom color and a more durable finish than peel-and-stick film can usually provide. You start with a warm wood-colored base coat, layer on darker grain lines, soften them with a brush or rag, and protect the finished surface with a countertop-rated clear coat.
The goal is not to paint every inch with aggressive zebra stripes. Real wood grain has variation, but it also has quiet areas. A few knots, long flowing lines, and slightly darker streaks near the edges will look more believable than turning your counter into a cartoon tree trunk.
Option 2: Wood-Look Peel-and-Stick Vinyl
Wood-look vinyl or contact paper is the fastest way to change a countertop’s appearance, especially for renters or anyone who wants a low-commitment makeover. It is also useful for a small bathroom vanity, laundry-room folding counter, desk, bar cart, or temporary apartment kitchen refresh.
However, vinyl needs a very clean surface, careful pattern matching, and patience around seams and sink cutouts. Buy more material than your measurements suggest, because wrapping edges and correcting one crooked cut can quickly consume your extra inches. Contact paper is best treated as a cosmetic layer rather than a forever countertop solution.
Option 3: Small-Surface Laminate or Veneer Overlay
If you are updating a narrow island, a bathroom vanity, a coffee station, or a compact laundry counter, a wood-look laminate sheet or thin overlay may fit the budget. This route can look excellent, but it requires more measuring, trimming, adhesive work, and edge finishing. It is usually less practical for a large kitchen counter unless you already own the needed tools.
For a first-time DIYer, paint is often more forgiving. For a renter, vinyl is often more removable. For a tiny countertop that receives light use, an overlay may be the most polished-looking option.
Can You Really Stay Under $100?
Yes, but the answer depends on the size of your countertop, what tools you already own, and whether you are shopping during a sale or wandering into the paint aisle with the confidence of someone who has never checked a receipt.
The following budget works best for approximately 20 to 30 square feet of countertop surface. Prices vary by store, region, taxes, and whether your cart mysteriously acquires decorative drawer pulls.
| Material | Estimated Budget | Why You Need It |
|---|---|---|
| Degreaser, sponge, and cleaning cloths | $8–$12 | Removes grease, residue, and mystery kitchen history |
| Fine-grit sanding sponge or sandpaper | $5–$10 | Creates a slightly rough surface for adhesion |
| Bonding primer or countertop base coating | $18–$25 | Helps the finish grip smooth laminate |
| Warm tan base paint | $12–$18 | Creates the main wood color |
| Darker brown paint or gel stain | $8–$15 | Creates realistic grain and depth |
| Small rollers, chip brushes, and painter’s tape | $10–$15 | Applies color and keeps nearby surfaces clean |
| Countertop-rated clear topcoat | $20–$30 | Protects against routine moisture, scratches, and stains |
Typical total: about $75 to $98 when you choose basic supplies and already own a drop cloth, paint tray, screwdriver, and a little patience. If you need every tool from scratch or have a large U-shaped kitchen, the project may exceed $100. That is still usually far less than replacing the entire countertop.
How to Create a Faux Butcher Block Countertop
1. Inspect the Existing Countertop First
Before buying paint, inspect the counter carefully. Small chips, faded color, and light scratches are fine. Swollen particleboard, loose laminate, deep cracks, soft spots near the sink, or water damage are not. Paint can refresh an ugly surface, but it cannot perform structural therapy.
Pay close attention to seams and the area around the sink. Water that reaches the substrate beneath laminate can cause swelling, which is why manufacturers recommend avoiding excessive moisture at seams and drying surfaces after cleaning.
2. Clean Like You Mean It
Degrease the countertop thoroughly before sanding. Cooking oils, polish, residue, and cleaning-product buildup can interfere with paint adhesion. Use a kitchen degreaser, rinse with clean water if the product instructions call for it, and allow the surface to dry completely.
This step is boring, but boring is usually where durable DIY projects are born. Skipping cleaning is like putting frosting on a dirty plate and hoping the cake will respect you.
3. Sand Lightly, Not Aggressively
Use fine-grit sandpaper or a sanding sponge to dull the shine. You are not trying to grind through the laminate or uncover the countertop’s previous life. You simply want to create enough texture for the primer or coating to grip.
Vacuum or wipe away all sanding dust before moving on. Thorough cleaning and light sanding are common preparation steps recommended for painting smooth kitchen surfaces because coatings need a clean, lightly abraded surface to adhere well.
4. Apply a Durable Base Coat
Choose a base color that resembles the lightest part of the wood species you want to imitate. For a natural butcher block style, try a warm beige, pale caramel, soft oak, light maple, or muted honey brown. Avoid bright orange unless your design goal is “1980s bowling alley.”
Apply thin, even coats with a small foam or microfiber roller. Use a brush around the sink, backsplash, corners, and edges. Let each coat dry according to the product instructions before adding another.
5. Build the Wood Grain in Layers
Once the base coat is dry, use a darker brown paint, glaze, or gel stain to create grain. Work in manageable sections, usually two to three feet at a time. Drag a dry brush, graining tool, soft cloth, or slightly damp rag along the length of the countertop.
Keep the grain moving mostly in one direction, especially on long counter runs. Use a lighter hand in the center and slightly more contrast near a few “plank” boundaries. For a butcher block-inspired pattern, add subtle rectangular sections across the surface so it resembles strips of wood joined together.
Do not make every section identical. Real wood naturally varies in color, grain density, and darkness. Add a few gentle knots or darker streaks, then soften them immediately. Your objective is “natural wood,” not “a haunted oak tree.”
6. Let the Design Rest Before You Seal It
Stand back and look at the countertop from normal kitchen distance. The finish should look warm and layered, not like a collection of dark marker lines. If the grain looks too dramatic, soften it with a dry brush or lightly glaze over it with a thin layer of your base color.
This is also the moment to check whether the countertop color works with your cabinets, backsplash, and floor. A warm walnut-style counter can make cool gray cabinets look more inviting. A pale oak finish can brighten a small kitchen without making it feel like a rental-property waiting room.
7. Protect the Finish With a Countertop-Safe Topcoat
Use a protective coating designed for countertops or recommended by the paint manufacturer. Apply thin coats and follow the exact dry-time instructions on the label. A countertop coating system generally includes a protective topcoat intended to improve resistance to everyday scratches, stains, and heat compared with ordinary paint alone.
Do not rush the cure. Painted countertops can feel dry long before they are ready for normal use. Better Homes & Gardens notes that painted counters may need up to 14 days of curing before regular use, depending on the product and conditions.
How to Make the Finish Look More Expensive
The difference between “convincing butcher block” and “someone painted brown streaks on my counter” is usually restraint. Keep the color palette simple: one light base color, one medium grain shade, and one slightly darker accent tone.
Use satin or low-sheen protection instead of extremely glossy shine if you want a more natural wood appearance. A mirror-like finish may protect the surface, but it can also make faux grain look like it is trapped under a layer of melted candy.
Also consider the surrounding details. Matte black hardware, cream cabinets, warm white walls, woven baskets, wood cutting boards, and under-cabinet lighting can make a budget counter look far more intentional. A countertop does not exist alone. It has roommates: cabinets, backsplash, appliances, and the toaster that refuses to match anything.
Durability, Food Safety, and Everyday Care
A faux butcher block countertop is decorative. It should not be treated exactly like a genuine, food-safe hardwood butcher block surface. Do not chop directly on it, do not place hot pans on it, and do not use harsh abrasive cleaners. Use cutting boards, trivets, and soft cleaning cloths.
Laminate-care guidance from major surface manufacturers similarly recommends mild cleaning methods, avoiding abrasive pads, using cutting boards to protect the surface, and placing hot cookware on trivets or hot pads.
For food preparation, use a separate cutting board rather than slicing produce, meat, or bread directly on a painted or vinyl surface. The USDA advises cleaning and sanitizing cutting boards used for food preparation, which is another reason to keep food-contact tasks on a dedicated board instead of a decorative faux finish.
Clean your finished countertop with a damp nonabrasive cloth and mild soap. Wipe spills quickly, especially near seams and around the sink. Avoid dragging heavy appliances across the surface, and place a protective mat beneath countertop appliances that generate heat.
Common Mistakes That Can Ruin a Budget Countertop Makeover
- Skipping degreasing: Paint may peel because invisible cooking oils prevent adhesion.
- Using ordinary wall paint: Walls do not face coffee rings, grocery bags, hot mugs, and random lemon juice on a daily basis.
- Making the grain too dark: Wood grain should add depth, not announce itself from another zip code.
- Applying thick coats: Thick paint can dry unevenly, show roller texture, or remain soft longer.
- Ignoring cure time: Early use is one of the fastest ways to scratch, dent, or damage a new finish.
- Painting over water damage: Swollen substrate and loose laminate need repair or replacement first.
- Working without ventilation: Use fresh-air ventilation and follow all product-label precautions when sanding, priming, painting, or sealing indoors. The EPA recommends controlling renovation pollutants and using ventilation, including exhausting air outdoors when practical.
Real-World DIY Experiences and Lessons From a Faux Butcher Block Makeover
The experience of creating a butcher block look-alike countertop is usually more emotional than people expect. At the beginning, the old counter looks so dated that almost any change feels like an improvement. Then comes the first coat of tan paint, which often looks suspiciously like someone spilled latte-colored primer across the kitchen. This is the stage where many DIYers panic. Do not panic. Faux wood finishes almost always look awkward before the grain layer gives them depth.
The second lesson is that preparation quietly determines whether the project feels successful six months later. The fun part is dragging a brush through darker paint and pretending to be a decorative-finishing wizard. The unglamorous part is cleaning grease around the stove, taping backsplash edges, sanding every shiny patch, and waiting for dust to settle. Yet those boring steps are what keep the coating attached when a family member sets down a grocery bag, slides a coffee maker, or decides the countertop is a suitable landing pad for a cast-iron skillet.
Many people also discover that smaller counters are easier to make believable. A bathroom vanity, laundry counter, coffee nook, or compact apartment kitchen can look dramatically different with a warm wood finish because the eye sees the entire surface at once. In a large kitchen, repeating the same grain pattern across long runs can look artificial if you are not careful. The best approach is to vary the tones slightly from section to section and step back frequently. If the counter looks too uniform, add softness. If it looks too busy, glaze over it. The paint does not have feelings, even if you do.
Another real-world experience is learning that color changes throughout the day. A warm honey-toned countertop may look like light oak in morning sunlight, caramel at noon, and unexpectedly orange under warm evening bulbs. Before committing to a full counter, test your chosen colors on a scrap board, cardboard panel, or hidden countertop section. Look at the sample in daylight and under your kitchen lighting. This tiny test can prevent a full weekend of repainting because the “rich walnut” shade turned out to be “pumpkin spice laminate.”
Sink areas deserve extra attention. These spots receive splashes, dish soap, wet sponges, and the occasional panicked attempt to rinse a giant baking sheet. A careful bead of caulk where appropriate, a thorough topcoat application, and a habit of wiping standing water can help the finish last longer. Still, a painted faux wood countertop will never be invincible. It is best for homeowners who understand that a budget makeover is a smart visual upgrade, not an indestructible commercial kitchen surface.
The happiest results usually happen when expectations are realistic. A faux butcher block counter can make a tired kitchen feel warmer, friendlier, and more modern for a fraction of replacement cost. It can help a renter enjoy a temporary space, help a homeowner stretch a renovation budget, or help a laundry room stop looking like it was designed by a filing cabinet. The finish may not fool a cabinetmaker standing six inches away, but from normal room distance, it can look charming, intentional, and surprisingly expensive.
Final takeaway: If your countertop is structurally sound, your budget is limited, and you are willing to prepare carefully and let the finish cure fully, a butcher block look-alike countertop can be one of the highest-impact DIY upgrades available for under $100.














