
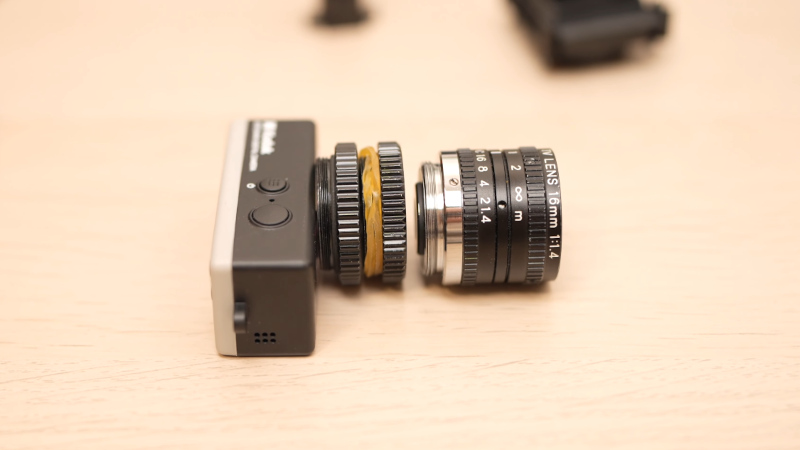
Research synthesis: Kodak’s official Charmera page confirms the licensed RETO product; Hackaday documents the C-mount conversion; Raspberry Pi, Adafruit, Edmund Optics, B&H, Nikon, Sony, and CNX Software provide supporting information on lens mounts, crop factor, flange distance, adapters, and electronic lens control.
A keychain camera wearing a full-size photography lens looks like a joke, yet the optics can work. Remove the fixed-focus lens, install a carefully aligned C-mount, add the right adapter, and the tiny camera can use vintage SLR, DSLR, cinema, or machine-vision glass. The result is not a pocket-sized professional camera. It is a wonderfully odd, ultra-cropped image machine with surprising reach, demanding manual focus, and enough personality to make an ordinary houseplant look like evidence from a miniature spy operation.
Why Put a Full-Size Lens on a Tiny Camera?
The reason is partly practical and partly the same reason people install racing engines in shopping carts: the mismatch is irresistible. The Kodak Charmera is a playful keychain camera built around a 1/4-inch CMOS sensor, 1.6-megapixel output, and a fixed-focus lens with an approximately 35mm-equivalent view. Attach a chunky SLR lens and the camera becomes both an optics experiment and a very confident conversation starter.
A removable mount opens the door to macro lenses, vintage primes, CCTV optics, microscope adapters, and long telephoto glass. Because the sensor is extremely small, it records only the center of the lens’s image circle. A familiar 50mm lens can therefore deliver a field of view resembling a powerful super-telephoto setup.
The focal length itself does not change. The sensor simply crops the projected image. Calling it a long “full-frame-equivalent” view is more accurate than saying the lens magically became longer overnight.
Charmera specifications and project description are supported by product and project coverage.
How the Tiny Camera Lens Modification Works
The basic method is simple to describe: remove the original lens assembly, position a standard mount at the correct distance from the sensor, and adapt a larger lens to it. The documented Charmera modification uses C-mount as the bridge. C-mount is widely used for industrial cameras, microscopes, machine vision, older movie equipment, and small camera modules, so adapters are easy to find.
Flange Distance Is the Critical Measurement
Every lens mount expects a fixed distance between its mounting surface and the sensor. C-mount uses a 17.526mm flange distance. CS-mount has the same thread but places the lens 5mm closer. Mixing the two without the correct spacer can prevent proper focus.
If the adapted lens sits too far from the sensor, it behaves like it is on an extension tube: close focus improves, but infinity focus disappears. If it sits too close, the focus scale becomes inaccurate and the lens may focus beyond infinity. Careful spacing, centering, and testing matter more than the adapter’s shiny finish.
Why C-Mount Makes Sense
A custom mount for every lens family would be tedious. A C-mount conversion creates one compact, stable interface, after which separate adapters can accept Nikon F, Canon EF, Pentax K, M42, and other lenses. It also lets the builder test alignment with a lightweight C-mount lens before attaching glass that weighs ten times more than the camera.
C/CS dimensions and the importance of flange distance are documented by Edmund Optics and Thorlabs.
Parts and Tools
A typical build needs the tiny camera, a C-mount flange or threaded holder, a C-mount-to-lens adapter, precision screwdrivers, plastic opening picks, tweezers, calipers, a hand blower, thin shims, non-fogging adhesive, and a rigid support bracket. A tripod plate or 3D-printed frame is strongly recommended for anything larger than a small CCTV lens.
Vintage manual lenses are easiest because they usually provide mechanical focus and a physical aperture ring. Many modern electronic lenses may stay wide open, lose autofocus, or provide no useful focus control when disconnected from their native body. Specialized controllers can restore electronic aperture and autofocus for some lens systems, but they add cost and complexity.
Passive adapters commonly lose electronic functions; purpose-built controllers can restore them in supported systems.
Step-by-Step: Attach a Full-Size Lens to a Tiny Camera
1. Open the Camera Carefully
Find screws beneath labels, panels, or rubber plugs, and use plastic tools to separate the shell. Tiny ribbon cables and a lithium battery may sit directly behind the cover. Work slowly and never pry against the battery.
2. Record the Original Lens Position
Photograph the assembly before removing it. Measure the lens holder’s position relative to the sensor board and mark the sensor centerline on removable tape. These references are valuable when the new mount must be centered within a very small tolerance.
3. Remove the Fixed-Focus Lens
The lens may unscrew or sit in a plastic holder attached to the sensor board. Avoid touching the sensor or cover glass. One speck of dust can become a recurring guest in every image, usually near the subject you cared about most.
4. Position the C-Mount
Temporarily place the mount over the opening. It must be centered, square to the sensor, and spaced correctly. Attach a manual lens, point the camera toward a high-contrast distant target, and adjust the mount until infinity focus becomes possible.
5. Shim, Test, and Check the Corners
Use thin shims to correct small spacing errors. Test close, medium, and distant subjects. If one side is sharp while the other remains soft, the mount is tilted rather than merely out of focus.
6. Secure the Mount and Support the Lens
Fix the mount to a rigid frame or reinforced part of the shell. Do not ask the sensor circuit board to carry a heavy lens. Mount larger lenses by their collar, adapter, or tripod plate and let the tiny camera ride behind them like a digital back.
Crop Factor: The Biggest Surprise
A small sensor sees only the center of the image circle, creating a narrow field of view. The Raspberry Pi High Quality Camera, whose sensor diagonal is about 7.9mm, has a crop factor of roughly 5.5x; a 50mm lens gives a view comparable to about 275mm on full frame. A 1/4-inch sensor can crop more aggressively, although the exact multiplier depends on its active dimensions.
Wide lenses stop looking wide. A 24mm lens may frame like a long telephoto, while a 100mm lens can become so narrow that locating the subject feels like searching through a drinking straw. This is useful for insects, circuit boards, distant signs, miniature sets, and moon experiments. It is less useful for group portraits unless the group is standing several zip codes away.
Crop factor does not create resolution. A 1.6-megapixel sensor still records 1.6 megapixels. Better glass may improve contrast, flare control, focus, and center sharpness, but it cannot manufacture missing pixels.
Sensor size changes field of view rather than the physical focal length.
Focus, Aperture, and Exposure Challenges
Manual Focus Is Unforgiving
The narrow view exaggerates shake, while the tiny rear screen makes critical focus difficult. Use a tripod, bright light, and a stationary high-contrast subject. Take several frames with tiny focus adjustments instead of trusting one heroic twist of the ring.
Aperture Control May Vanish
A mechanical aperture ring is ideal. Passive adapters often leave electronic lenses wide open. Some adapters include a mechanical lever, while specialized electronic controllers work with selected lenses. Compatibility must be verified before buying parts.
The Camera Processor Still Sets the Ceiling
The camera may apply strong sharpening, noise reduction, automatic exposure, and heavy JPEG compression designed around its original lens. Adapted glass changes the light reaching the sensor, but the tiny processor still decides how that light becomes a file. Expect character rather than laboratory perfection.
Which Lenses Work Best?
Vintage 28mm to 50mm manual primes are affordable and easy to control. Their aperture rings are especially useful. Stopping down to f/4 or f/5.6 often improves contrast and makes focus less punishing.
Macro lenses suit the extreme crop beautifully. Coins, watch parts, circuit boards, plants, and insects can fill the frame, although high magnification demands strong lighting and solid support.
Old C-mount cinema or CCTV lenses keep the system compact and are excellent for checking mount alignment. Their flare, soft edges, or swirly backgrounds may complement the camera’s low-fi files better than clinically perfect modern glass.
Common Problems and Fixes
- No infinity focus: Reduce spacing between the lens and sensor or remove an unnecessary shim.
- One side is soft: Realign the mount so it sits square to the sensor.
- Black corners: Check for an undersized adapter opening or an internal obstruction.
- Overexposure: Close a manual aperture, add neutral-density filtration, or shoot in dimmer light.
- Constant shake: Support the lens on a tripod and touch the shutter gently.
- Flexing shell: Stop and move the load to a separate bracket before the camera becomes two smaller cameras.
Is the Modification Worth It?
Yes, when the goal is experimentation, education, unusual imagery, or the joy of persuading incompatible objects to cooperate. No, when the goal is an economical route to professional image quality. A used mirrorless camera or a purpose-built Raspberry Pi module will be easier to control.
The real value is seeing optical theory become physical. A spacer that is slightly too thick removes infinity focus. A tilted mount softens one edge. A heavy lens becomes a structural-engineering lesson. Few tutorials make those ideas quite so memorable.
Hands-On Experience: What Builders Commonly Discover
The First Sharp Image Feels Like a Major Victory
The early stage is rarely glamorous. The open camera sits on the bench with wires exposed, the adapter is held by tape, and the lens points in approximately the right direction. The first frame is usually a blur. The second is a different blur. Then, after moving the mount by a barely visible amount, a distant sign becomes readable. At that moment the project stops being a novelty and becomes a working optical system.
The Field of View Is Narrower Than Expected
Even photographers who understand crop factor can be surprised by the experience. A familiar 50mm lens no longer feels familiar. Indoors, it may show only part of a bookshelf. Outdoors, photographing a distant window can be easier than photographing the building. Finding moving subjects is difficult because the display shows such a limited slice of the scene. Builders quickly learn to start with shorter lenses and stationary targets.
Focusing Rewards Patience, Not Confidence
The useful zone of sharp focus can be tiny. A tripod helps, as does stopping down, but the miniature screen remains the weak link. A practical routine is to focus slowly, take several pictures, move the ring slightly in each direction, and compare the files later on a larger monitor. This focus-bracketing method sounds cautious because it is. Tiny sensors are not impressed by optimism.
The Lens Becomes the Camera Body
Normal handling instincts must change. Picking up the system by the keychain camera is an excellent way to test adhesives and personal regret. Hold the lens, support the adapter, and treat the camera as a sensor module attached to the rear. A lens collar, rail, or tripod plate changes the build from fragile sculpture into usable equipment.
Image Quality Improvesand Stays Delightfully Toy-Like
A good lens can provide stronger contrast, smoother focusing, better flare control, and sharper central detail than the stock plastic optic. However, the files still come from a tiny, low-resolution sensor with aggressive processing. Fine textures may look crunchy, highlights may clip, and shadows may become noisy. The combination can be appealing: serious optical rendering mixed with digital grit, creating images that feel neither professionally polished nor completely accidental.
Small, Bright, Patient Subjects Work Best
Coins, electronics, flowers, model cars, distant signs, architectural details, and the moon cooperate better than pets or sports. Bright daylight reduces noise and allows smaller apertures. Static subjects provide time to locate focus. Macro experiments are especially satisfying because the awkward crop becomes an advantage, isolating details the original fixed lens could never reach.
The Project Changes How You See Camera Design
After the modification, an interchangeable-lens camera feels less mysterious. Mount alignment, image-circle coverage, sensor position, aperture control, and mechanical support become obvious rather than abstract. The tiny camera may never replace a practical tool, but it can become one of the most educational. It also starts conversations instantly, because a keychain camera attached to a full-size lens has the visual subtlety of a hamster driving a forklift.













