
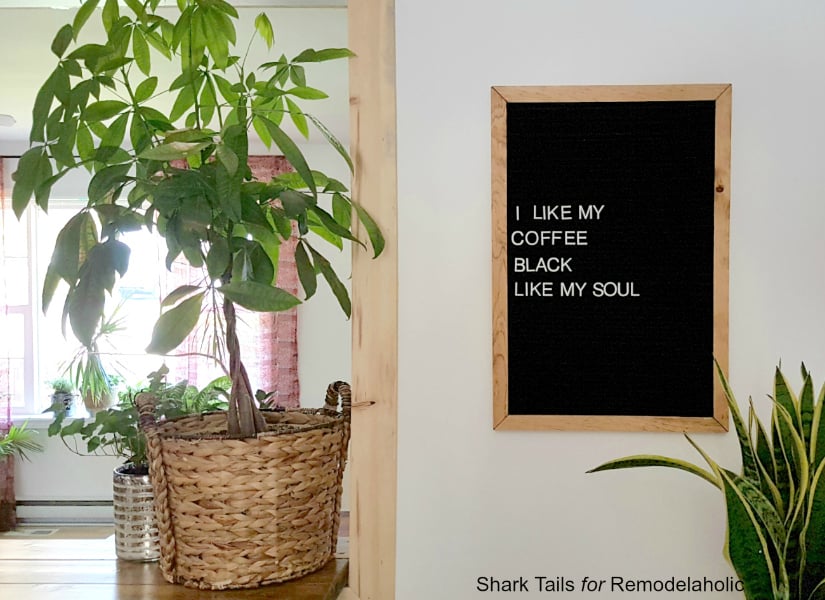
A felt letter board has a strangely powerful talent: it can turn a completely ordinary wall into a place for jokes, reminders, holiday greetings, motivational quotes, dinner menus, or passive-aggressive messages about replacing the toilet paper roll. Better yet, you do not have to buy a designer version to get the classic ridged look.
With a picture frame, wooden dowels, felt, hot glue, and a set of plastic letter-board letters, you can build your own DIY felt letter board in almost any size or color. The project requires patience more than advanced woodworking skills, making it approachable for beginners who are comfortable using basic craft tools.
Traditional DIY versions commonly create the characteristic grooves by wrapping narrow wooden dowels in felt or another fabric and packing them tightly into a frame. Oversized alternatives can use foam core with carefully cut slots, but the dowel method creates a particularly convincing vintage-style surface for standard tabbed letters.
This guide explains the entire process, including material choices, measurements, common mistakes, customization ideas, and some lessons that can save you from spending an evening arguing with a hot glue gun.
What Is a Felt Letter Board?
A felt letter board is a reusable message board made with closely spaced horizontal grooves covered in fabric. Plastic letters have small tabs on the back that slide between the grooves, allowing you to rearrange the message whenever inspirationor sarcasmstrikes.
Commercial boards are available in many sizes, colors, and frame styles. Michaels, for example, currently sells felt letter boards in multiple dimensions and colors, illustrating how flexible the basic format has become for home décor, announcements, menus, and event signs.
Making one yourself gives you far more control. You can choose mustard yellow felt and a walnut frame, pale pink with brass-colored letters, traditional black with white letters, or something gloriously strange that matches absolutely nothing else in your house.
Materials and Tools You Will Need
Basic Materials
- A picture frame with enough depth to hold the wrapped dowels
- Approximately 1/4-inch wooden dowels
- Craft felt or another thin, non-fraying fabric
- Letter-board letters with tabs on the back
- Hot glue sticks
- Frame backing, thin plywood, hardboard, or sturdy cardboard if needed
Recommended Tools
- Hot glue gun
- Fabric scissors
- Measuring tape or ruler
- Pencil
- Miter saw, hand saw, or another suitable tool for cutting dowels
- Utility knife
- Lint roller
- Cutting mat
- Small clamps, optional
A ready-made frame is usually the easiest starting point. If you prefer to build a custom frame, standard picture-frame construction can also be done from wood molding or framing stock. Home Depot’s DIY framing guidance, for example, demonstrates how simple lumber and basic tools can be used to make customized frames.
Choosing the Right Felt and Frame
Pick Fabric That Behaves Itself
Felt works especially well because its cut edges generally stay tidy instead of unraveling into a miniature fabric disaster. Velvet can create a rich appearance, but DIY builders have reported considerably more fraying and loose fibers when using it.
Choose material thin enough to wrap tightly around each dowel. If the fabric is extremely thick, the finished rows can become bulky and leave too little room for the tabs on your letters.
Before committing to the entire project, make one wrapped test dowel. Place another beside it and push a letter tab between them. If the letter slides in securely without requiring superhero-level thumb strength, your fabric thickness is probably suitable.
Do Not Ignore Frame Depth
The frame needs enough interior depth to contain the wrapped dowels while still allowing the back to close or be secured. A beautiful shallow frame can quickly become an expensive rectangular object that refuses to cooperate.
Remove the glass because you will not need it. Save it for another project rather than balancing it somewhere in your craft room until gravity makes the decision for you.
How to Make a DIY Felt Letter Board Step by Step
Step 1: Measure the Inside of Your Frame
Remove the backing and glass. Measure the exact interior width where the dowels will sit, not merely the advertised photo size.
A frame labeled 16 by 20 inches does not necessarily provide a full 16-inch interior opening for your dowels. Measure twice. Then, because this is DIY and the universe enjoys comedy, measure one more time.
Also measure the interior height. This helps estimate how many dowels you will need.
Step 2: Cut the Wooden Dowels
Cut each dowel to match the interior width of the frame. You want them to fit snugly without bowing.
If the inside measures 16 inches wide, for example, cut a test dowel first and place it in the frame. Adjust your measurement before cutting the rest.
Keep the ends as square as possible. Uneven ends can create gaps along the sides of the finished board.
Step 3: Cut Felt Into Strips
Cut your felt into long strips slightly wider than the circumference needed to cover each dowel completely. For a roughly 1/4-inch dowel, a strip around 1 inch wide is a reasonable starting point, although the ideal width depends on the thickness of your material.
Make each strip slightly longer than the dowel. The extra fabric can be trimmed or tucked away later.
Perfect mathematical precision is unnecessary, but consistent strips produce straighter rows.
Step 4: Wrap Each Dowel
Place one felt strip flat on your work surface. Run a thin bead of hot glue lengthwise down its center and press the dowel into the glue.
Add another small bead of glue near one long edge of the fabric. Roll that edge around the dowel. Repeat with the other side until the wood is completely covered.
This center-first wrapping method is used in established DIY felt letter-board tutorials because it helps keep the fabric positioned evenly while the edges are secured.
Keep the seam on the back of each dowel. The front should be smooth.
And remember: more hot glue is not more professional. Huge blobs create lumps and may interfere with the spacing between rows.
Step 5: Repeat Until You Question Your Life Choices
Continue wrapping dowels until you have enough to fill the frame from top to bottom.
This is usually the most repetitive part of the project. Put on music, a podcast, or a movie you have already seen enough times that looking away for thirty seconds will not cause narrative confusion.
Periodically place several finished dowels together and test your plastic letters between them. Making this check early prevents the unpleasant discovery that you have wrapped 47 beautifully useless sticks.
Step 6: Install the First Row
Place the frame face down on a protected surface.
Run a controlled line of hot glue along the backing or interior support where your first dowel will sit. Press the wrapped dowel firmly into position, keeping it straight.
Let the adhesive set before installing the next row.
Step 7: Pack the Remaining Rows Tightly
Add the wrapped dowels one at a time, pressing each firmly against the previous row.
The spacing is critical. The dowels need to sit close enough to grip the tabs on the letters while still allowing those tabs to slide between the fabric-covered rows.
Established DIY instructions emphasize placing the dowels as snugly together as possible inside the frame.
Every few rows, insert a test letter. If it falls out, tighten the spacing. If it cannot be inserted without bending, ease the rows apart slightly before the glue fully hardens.
Step 8: Finish the Edges
When the entire frame is filled, inspect the perimeter.
Use a utility knife or small tool to gently tuck exposed fabric ends behind the dowels. Remove loose threads and dried glue strings.
A lint roller is surprisingly useful for removing felt fibers and hot-glue wisps from the finished surface, particularly if you used a darker fabric. This cleanup technique is also specifically recommended in tested DIY versions of the project.
Step 9: Test Your Letters
Insert several letters across different parts of the boardnot just in the middle.
They should remain upright when the board is vertical. If a row is loose, carefully add support behind the affected dowels or reposition them.
Once everything works, reinstall or reinforce the frame backing as necessary.
Alternative Method: Make an Oversized Letter Board
If you want a dramatic letter board for a party, business, classroom, photo booth, or large wall, wrapping dozens of dowels can become tedious.
An alternative demonstrated by A Beautiful Mess uses foam core covered with thin fabric. Narrow horizontal slots are cut into the foam core with a craft knife and metal ruler, and the tabs of large letter-board letters slide into those openings.
This technique is especially practical for a 24-by-36-inch board or larger. The trade-off is that slot placement needs to be extremely consistent. Crooked cuts produce crooked text, and crooked inspirational quotes somehow feel less inspirational.
How to Customize Your Homemade Felt Letter Board
Experiment With Color
Black felt with white letters gives you the familiar vintage menu-board look, but there is no rule requiring it.
Try:
- Navy felt with cream letters
- Forest green with white letters
- Blush pink with gold-tone letters
- Mustard felt with black letters
- Light gray with black letters
- Red felt with white letters for holiday décor
Modern decorating examples demonstrate letter boards in neutral, colorful, rustic, holiday, nursery, office, and party settings, making them unusually adaptable pieces of DIY wall décor.
Upgrade the Frame
A thrift-store frame can be sanded and painted. Raw wood can be stained. An ornate vintage frame creates an entertaining contrast with modern typography.
DIY decorating publications frequently recommend repurposing existing or inexpensive frames for custom memo boards and wall art, which makes this project a good candidate for using something you already own.
Add a Storage Solution
The letters are wonderful until you own 400 tiny plastic characters and urgently need three E’s.
Store them in a divided organizer intended for beads, hardware, or craft supplies. Sort commonly used letters into separate compartments. At minimum, separate letters, numbers, punctuation, and symbols.
Your future self will appreciate not having to excavate an archaeological layer of ampersands every time you want to spell “WELCOME.”
Common DIY Felt Letter Board Mistakes
Using Too Much Glue
Excess hot glue can create hard ridges underneath the felt. Apply thin lines rather than enthusiastic puddles.
Making the Rows Too Loose
Loose dowels cannot grip the tabs properly, causing letters to tilt or fall.
Making the Rows Too Tight
The opposite problem is equally annoying. Test frequently with the actual letters you plan to use.
Buying Letters After Building the Board
Different letter sets may have different tab sizes. Buy your letters first so you can test spacing during construction.
Choosing a Frame That Is Too Shallow
Check frame depth before spending an afternoon wrapping dowels. The components have to fit behind the front edge of the frame.
Skipping the Test Section
Build three or four sample rows before committing to the full board. This tiny experiment can expose problems with felt thickness, glue placement, dowel diameter, or letter tabs.
Ideas for Using Your DIY Felt Letter Board
Once your homemade letter board is finished, it can serve far more purposes than displaying motivational quotations that you secretly ignore.
- Weekly family reminders
- Kitchen menus
- Birthday messages
- Pregnancy or baby announcements
- Wedding and party signage
- Holiday greetings
- Classroom vocabulary
- Home office reminders
- Funny movie quotes
- Children’s spelling activities
- Photo props
- Small-business menus or announcements
Letter boards are particularly effective because the message can change without replacing the décor itself. Decorating sources show them used for birthdays, nurseries, laundry rooms, kitchens, home offices, seasonal displays, and children’s learning activities.
Final Thoughts
Learning how to make your own DIY felt letter board is less complicated than the polished finished product suggests. The basic formula is simple: build or reuse a frame, cut a collection of dowels, wrap them neatly in felt, pack them tightly together, and test the spacing with tabbed letters as you work.
The project rewards patience. The first few dowels may take some experimentation, but once you establish the correct strip width and wrapping technique, the process becomes pleasantly repetitive.
More importantly, making the board yourself gives you complete control over size, fabric color, frame finish, and overall style. Instead of adjusting your room to fit a store-bought sign, you can build a sign that actually belongs in the room.
And unlike wall art with one permanent message, your felt letter board can change whenever you want. Today it might display a thoughtful quote. Tomorrow it might say, “WE ARE OUT OF COFFEE.” Both are legitimate forms of emotional expression.
My Experience Making a DIY Felt Letter Board: What I Would Do Differently
The biggest lesson from making a felt letter board is that the project looks much faster on paper than it feels when you are wrapping dowel number 28. None of the individual steps is difficult, but consistency determines whether the finished piece looks homemade in the charming sense or homemade in the “something happened here” sense.
If I were beginning again, the very first thing I would do is create a four-row prototype outside the final frame. I would wrap four short scraps of dowel, press them tightly together, and test several real letters. That tiny sample answers almost every important question: Is the felt too thick? Do the letters grip? Are my glue seams getting in the way? Do the dowels need to be closer?
I learned that testing only one letter is not enough. An “I” may behave beautifully while a wider “M” or a symbol with a different tab fights you. Trying several characters gives a much more realistic picture of how the board will perform.
I would also cut all the dowels at the same time after confirming the first measurement. Cutting one, wrapping it, cutting another, and repeatedly changing tasks slows everything down. Batch work makes this project dramatically easier: cut every dowel, cut every fabric strip, then start wrapping.
The same principle applies to glue. At first, it is tempting to use generous amounts because you want everything permanently attached. Unfortunately, extra glue has to go somewhere. Usually that somewhere becomes a hard lump underneath the fabric or a shiny blob between rows. A narrow continuous bead works better than a miniature lava flow.
Another surprisingly important lesson is to keep the fabric seam facing backward. On the first few pieces, it is easy to focus so much on getting the felt attached that you forget orientation. When all the seams line up behind the board, the front develops that clean, uninterrupted ribbed texture that makes a DIY version look professionally made.
I also recommend installing several rows and then standing the frame upright temporarily. Gravity reveals problems that are invisible while the board is lying flat. Letters that seemed secure may lean forward or drop out. Discovering this after five rows is a minor adjustment. Discovering it after the entire board has been glued together is a character-building exercise.
For a first project, I would choose a medium-sized frame rather than an enormous one. Something around 12 by 16 inches or 16 by 20 inches provides plenty of space for quotes while keeping the amount of repetitive wrapping reasonable. Once you understand the technique, scaling up becomes much easier.
Finally, I would spend more time planning letter storage. The board itself stays beautifully organized while the unused alphabet somehow transforms into an unruly plastic avalanche. A compartment box turns message changes from a scavenger hunt into a two-minute task.
The finished board is worth the repetitive work because it feels unusually personal for such a simple craft. You choose every visible element, from the frame and felt to the letters and messages. And after you have made one successfully, you start looking at empty frames in thrift stores with dangerous confidence. Suddenly every rectangle seems to be whispering, “You could turn me into another letter board.”
Note: Material dimensions can vary by frame, felt thickness, dowel diameter, and letter-tab design. Test several wrapped dowels with your actual letters before assembling the full board for the most reliable fit.













