
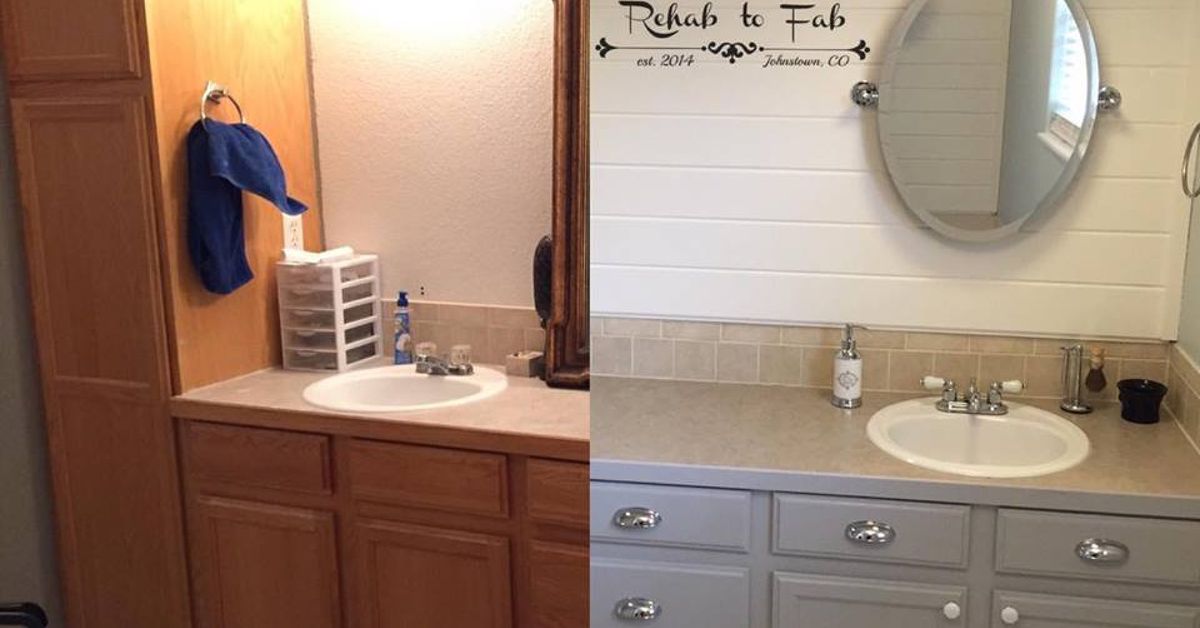
My master bathroom was perfectly functional, but it had all the personality of an unopened package of paper towels. The walls were plain, the finishes felt disconnected, and the room lacked the warm, finished character I wanted. Rather than tearing out every fixture and introducing my savings account to complete emotional devastation, I focused on one high-impact upgrade: bathroom shiplap.
The transformation was dramatic. Shiplap gave the room architectural texture, made the existing vanity look more intentional, and created a relaxed modern-farmhouse atmosphere without requiring a full-scale remodel. However, a bathroom is not an ordinary room. Steam, condensation, splashes, and changing humidity can turn an innocent decorating decision into a swollen-board science experiment. Here is how I planned the project, chose suitable materials, installed the planks, and learned to live happily with shiplap in a master bath.
Why Shiplap Was the Right Choice for My Master Bathroom
Shiplap consists of boards with overlapping or rabbeted edges that create clean, repeated shadow lines. Traditional shiplap was used as exterior siding, but today the term is also commonly applied to decorative planked walls with a similar appearance.
What attracted me was the balance between simplicity and detail. A painted wall provides color, but shiplap adds color, texture, depth, and a subtle pattern. It can make a basic bathroom feel custom without competing with mirrors, tile, faucets, or lighting.
It Added Character Without Making the Room Busy
My bathroom already contained several hard, smooth surfaces: a stone countertop, porcelain flooring, glass, and polished fixtures. The linear texture of the shiplap softened those materials and made the space feel warmer. I kept the profile simple and selected a quiet off-white paint, allowing the wall treatment to support the design rather than behave like a guest who brings a karaoke machine to brunch.
It Helped the Room Feel Larger
Board direction affects how a room is perceived. Horizontal shiplap can visually stretch a wall, while vertical boards draw the eye upward and may make a low ceiling feel taller. I chose a layout that emphasized the room’s strongest dimension and carefully aligned the boards around the vanity and mirror.
It Worked With More Than Farmhouse Style
Shiplap is strongly associated with farmhouse interiors, but it does not have to arrive carrying a galvanized milk jug. Crisp white boards, black hardware, and streamlined lighting can look modern. Muted blue or sage shiplap creates a coastal feeling, while charcoal boards paired with warm wood produce a moodier, more contemporary bathroom.
Planning a Moisture-Smart Shiplap Bathroom
The most important part of this master bath makeover happened before the first board reached the wall. Bathrooms routinely generate water vapor, and decorative paneling cannot compensate for leaks, inadequate ventilation, or an unsuitable wall assembly.
I Checked for Moisture Problems First
I inspected the walls, baseboards, ceiling, vanity connections, and areas around the tub for stains, softened drywall, peeling paint, mildew, and plumbing leaks. Any existing moisture problem needs to be corrected before it is covered. Installing beautiful boards over damp drywall is simply gift-wrapping trouble.
The wall also had to be flat, dry, sound, and clean. Minor holes could be repaired, but loose drywall and damaged material required proper replacement. In a full bathroom, moisture-resistant drywall may be appropriate for walls outside direct-wet zones. Shower enclosures and other continuously wet surfaces require approved waterproof backer materials and waterproofing systemsnot ordinary drywall with decorative planks placed over it.
I Took Bathroom Ventilation Seriously
Moisture control is the foundation of a durable shiplap bathroom. An effective exhaust fan should vent outdoors, not into an attic or another enclosed space. I run the fan during bathing and leave it operating afterward so lingering humidity can escape. A timer or humidity-sensing switch is useful if household members tend to forget that the fan exists.
Indoor humidity should generally remain below 60 percent, with a range around 30 to 50 percent preferred when practical. If mirrors stay fogged for a long time, condensation repeatedly forms on the walls, or the room smells musty, ventilation needs attention before decorative wood paneling is installed.
I Kept Shiplap Out of the Shower
My shiplap was installed on bathroom walls outside the shower enclosure and away from persistent direct spray. Real wood paneling is not a substitute for tile, solid-surface panels, or a manufacturer-approved shower system. Even moisture-resistant PVC must be installed as part of an assembly specifically rated for its intended location if it will be exposed to substantial water.
Choosing the Best Shiplap Material for a Bathroom
Not every product labeled “shiplap” belongs in a steamy bathroom. Material selection should reflect the room’s ventilation, expected splash exposure, manufacturer instructions, desired finish, and maintenance requirements.
Solid Wood Shiplap
Primed pine and other solid-wood boards provide an authentic appearance and can be sanded, painted, stained, or refinished. Wood naturally expands and contracts as humidity changes, so it should be acclimated indoors according to the manufacturer’s guidance. All cut ends, exposed edges, and faces should receive the recommended primer or finish.
Wood works best on well-ventilated walls away from direct water. It rewards careful preparation but does not appreciate being treated like pool decking.
PVC or Composite Shiplap
PVC and moisture-resistant composite boards are practical choices for high-humidity rooms. They do not absorb water in the same way unfinished wood does, and many are easier to clean. Because expansion, fastening, adhesive compatibility, and painting requirements vary, product-specific installation instructions matter.
Standard MDF Shiplap
Standard medium-density fiberboard offers a smooth surface and often costs less than solid wood, but it can swell, crumble, or warp when water reaches an unfinished edge. Unless a product is explicitly rated for bathroom or high-moisture use, I would reserve MDF for dry rooms. A coat of paint does not magically give ordinary MDF gills.
How I Installed the Master Bath Shiplap
Step 1: Measuring and Creating a Layout
I measured the height and width of each wall, subtracted openings, and added extra material for cuts, defects, and mistakes. Roughly 10 percent additional material is a reasonable planning allowance for many straightforward layouts, although complicated rooms may require more.
Before cutting, I planned where the first and last boards would land. This prevented a narrow, awkward strip from appearing in the most visible corner. I also mapped the vanity, window, door trim, outlets, plumbing penetrations, and mirror.
Step 2: Removing Obstacles and Finding Studs
I removed wall accessories, outlet covers, and trim that interfered with the installation. After switching off power at the breaker, electrical boxes could be handled safely and extended if necessary so devices would sit correctly against the new wall thickness. Electrical work must comply with local codes, and uncertain situations belong to a licensed electrician.
Using a stud finder, I marked framing locations beyond the work area with painter’s tape. That simple preparation made fastening quicker and eliminated the popular DIY game called “Where Did the Stud Go?”
Step 3: Installing a Level First Course
The first row determined the alignment of every row after it. Floors, ceilings, and countertops are not always level, regardless of how confidently they present themselves. I used a long level and reference line instead of trusting an existing surface.
Depending on the board system, horizontal installation may begin at the bottom, while some decorative projects are designed from the top down. Vertical installations require their own layout and fastening strategy. I followed the product instructions for orientation, expansion clearance, adhesive placement, and nail position.
Step 4: Fastening the Boards
Where recommended, I applied compatible construction adhesive in controlled beads and secured the boards to framing with finish nails. Adhesive provides additional contact, while mechanical fasteners keep the wall secure. I checked frequently for level or plumb because a tiny error repeated across an entire wall eventually becomes a very visible error.
For outlets and plumbing penetrations, I measured from fixed reference points and transferred those dimensions to the board. A jigsaw or oscillating tool helped make accurate openings. Cuts were large enough to avoid binding but small enough to remain hidden by covers or trim.
Step 5: Finishing Corners, Gaps, and Nail Holes
Corner molding gave the project a deliberate, built-in appearance and concealed necessary expansion space where appropriate. I filled visible nail holes with a compatible filler and used paintable bathroom-grade caulk only where a flexible finished seam was needed.
I did not fill the decorative shadow lines between boards. Those lines are the entire point; erasing them would turn a weekend of carpentry into an unusually expensive flat wall.
Step 6: Priming and Painting
For wood boards, I sealed cut ends and primed exposed areas before applying a durable bathroom-appropriate coating. A quality acrylic paint formulated to resist moisture and mildew is a sensible choice. Satin and semigloss finishes are commonly used because they are more washable and generally tolerate splashes better than flat paint.
I allowed the coating to cure according to its instructions before generating heavy steam. Paint may feel dry while the film is still vulnerable. Giving it adequate curing time helps prevent streaking, adhesion trouble, and marks from premature cleaning.
Design Decisions That Made the Transformation Work
A Warm White Instead of a Harsh White
The bathroom received cool natural light, so a bright blue-white looked slightly clinical. I chose a softer off-white that coordinated with the countertop and floor. Testing large paint samples at different times of day prevented an expensive surprise.
Simple Hardware With Strong Contrast
Dark hardware outlined the pale shiplap and helped the vanity, mirror, towel hooks, and light fixtures feel related. Mixed metals can also work when repeated intentionally. One isolated brass faucet may look accidental; brass repeated in a faucet, frame, and sconce looks like a plan.
Restraint With Decorative Accessories
Because shiplap already supplies pattern, I limited extra wall decor. A large mirror, compact artwork, natural textiles, and a few practical accessories were enough. This kept the master bathroom calm instead of turning it into a farmhouse-themed gift shop.
My Real-Life Experience After the Shiplap Transformation
The biggest surprise was how much the wall treatment changed features I did not replace. The same vanity looked more expensive against a textured background. The mirror felt properly framed by the horizontal lines, and the previously forgettable lighting suddenly appeared intentional. Shiplap did not merely decorate the room; it organized it visually.
The Installation Took Longer Than the Highlight Reel
Installing long boards across an open wall was satisfying and relatively quick. Working around outlets, corners, the vanity, and plumbing was where the project began collecting hours. Every interruption in the wall required measuring, test-fitting, trimming, and occasionally standing silently while reconsidering my life choices.
Prepainting the grooves and board edges would have saved time. Once the planks were installed, pushing paint into narrow shadow lines without creating drips required patience. On a future project, I would apply the first finish coat before installation, touch up the fasteners afterward, and then add the final coat to create a consistent surface.
The First Board Deserved More Attention Than I Expected
I knew the starting row needed to be level, but I underestimated how much every later row depended on it. When the level said the floor and my first board disagreed, the level won. That decision left an uneven gap near the base, but trim concealed it. Had I followed the floor, the upper boards would have gradually tilted and the mistake would have become obvious beside the mirror.
Humidity Management Became Part of the Routine
Living with bathroom shiplap has been easy because ventilation is no longer optional in our house. The fan goes on before the shower and stays on afterward. We wipe up substantial splashes instead of allowing water to sit near the baseboard. These habits also protect the ceiling, vanity, paint, and grout, so they are worthwhile even without wood paneling.
After particularly long showers, I check whether condensation remains on the boards. Persistent moisture would signal a ventilation problem rather than a decorating problem. So far, the properly finished surface and consistent fan use have kept the wall stable and clean.
Dust Does Collect in the Grooves
Shiplap is not difficult to maintain, but its horizontal ledges collect more dust than a flat wall. Every few weeks, I use a microfiber duster or the soft brush attachment on a vacuum. For small marks, a lightly damp cloth works well. I avoid saturating the boards or using abrasive cleaners that could dull the paint.
Bathrooms also introduce hairspray, cosmetic residue, and fingerprints, especially near the vanity. A washable coating has made those spots much easier to remove. This is one place where choosing the cheapest paint would have produced false economy.
I Would Use Shiplap AgainWith Boundaries
I would happily repeat the project on a vanity wall, behind a freestanding tub with adequate clearance, or as bathroom wainscoting. I would not install ordinary wood or MDF inside a shower or along a surface that receives frequent direct spray. Tile and approved waterproof wall systems still deserve the wettest jobs.
I would also consider vertical shiplap for a smaller bathroom. Its upward lines could make the ceiling seem higher, and the look feels slightly more contemporary. For a future powder room, I might choose deep green or navy instead of white. Shiplap does not need to be pale, rustic, or predictable.
The Best Result Was How the Room Felt
Before the renovation, the master bath was a place to hurry through. After the transformation, it felt warmer, calmer, and more connected to the rest of the home. The wall texture catches morning light, makes ordinary fixtures feel considered, and gives the room a handcrafted quality that paint alone could not provide.
Most importantly, the project delivered a meaningful visual change without forcing us to replace usable materials. Keeping the existing vanity, countertop, flooring, and major plumbing reduced waste, expense, and disruption. The shiplap became the design upgrade that allowed everything else to look new again.
Final Thoughts on My Master Bath Shiplap Makeover
My master bath shiplap transformation proved that one thoughtfully planned surface can redefine an entire room. The finished bathroom has more warmth, architectural character, and visual balance, yet it still feels clean and practical.
The successful result depended on more than attractive boards. I inspected for leaks, improved moisture control, selected a bathroom-suitable material, followed the installation instructions, sealed vulnerable surfaces, and used a washable coating. With those details handled, shiplap became a durable design feature rather than a future repair project.
If your bathroom feels bland but its fixtures still work, a shiplap accent wall or paneled wainscoting may offer the transformation you want. Measure carefully, respect the moisture, and remember: caulk can refine a seam, but it cannot repair optimism with a nail gun.













