
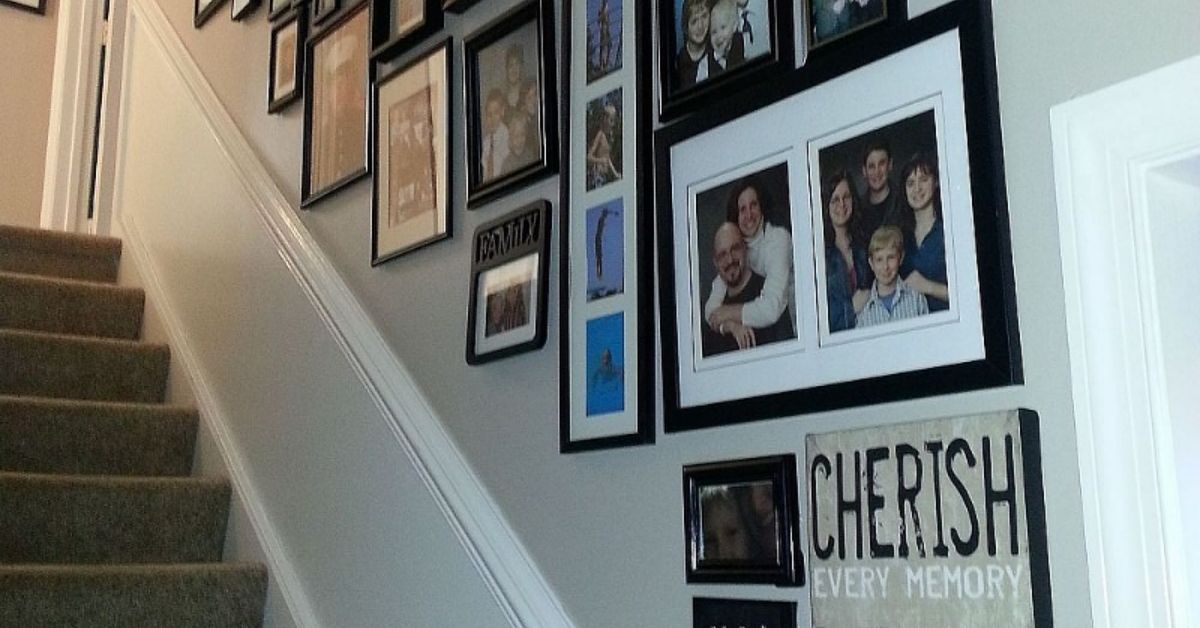
A stairway gallery wall can turn one of the most awkward spaces in a home into its most memorable feature. Instead of treating the staircase as a strictly functional route between floors, you can transform it into a visual story told through family photographs, paintings, travel prints, children’s artwork, vintage treasures, or an artful mixture of everything you love.
The beauty of decorating a staircase wall is that the architecture already provides movement. The rising handrail, angled ceiling, and repeating steps naturally guide the eye upward. Your artwork simply joins the journey. Done well, the display feels intentional and energetic. Done poorly, it can look as though a frame store sneezed on the wall.
Fortunately, creating a polished stairway gallery wall does not require an interior design degree, a laser-guided hammer, or the emotional strength to survive twenty unnecessary nail holes. With thoughtful planning, consistent spacing, appropriate hardware, and a clear visual theme, you can create a display that feels collected rather than chaotic.
Why a Stairway Gallery Wall Works So Well
Staircases often contain large stretches of unused wall space, yet they are among the most frequently traveled areas in a home. A gallery wall gives that overlooked surface a purpose while introducing color, personality, and visual interest.
Unlike artwork above a sofa or fireplace, a staircase arrangement does not need to sit inside a conventional rectangle. Frames can rise with the angle of the steps, spread into a tall landing, or continue around a corner. Designers frequently use gallery walls in stairwells and other unconventional spaces precisely because varied frame sizes can adapt to unusual architecture.
A stairway display can also connect different levels of a home. Colors from the entryway can reappear in the artwork, while frame finishes may echo the handrail, light fixtures, flooring, or nearby furniture. The result is a decorative bridge between rooms rather than a random collection of frames hovering beside the stairs.
Choose the Right Gallery Wall Style
Before buying frames or reaching for a hammer, decide what kind of visual personality you want. The best layout is not necessarily the trendiest one. It is the one that complements your home and the items you genuinely want to display.
A Clean, Coordinated Grid
A grid uses frames of the same size, color, and orientation. It is ideal for modern, transitional, minimalist, or formal interiors. Black-and-white photographs in identical black frames create a crisp, architectural look, while pale wood frames feel softer and more relaxed.
Although the frames form a structured arrangement, the entire grid can still climb with the staircase. The repetition brings order to a wall that is naturally full of angles. Uniform frames are particularly effective in tall stairwells because they can fill a large area without making it feel visually noisy.
An Eclectic, Collected Display
An eclectic stairway gallery wall combines different frame materials, sizes, shapes, and subjects. A gold portrait frame might sit beside a simple oak frame, a tiny postcard, and a circular mirror. This approach works beautifully in traditional, bohemian, cottage, farmhouse, and maximalist homes.
The secret is controlled variety. Repeat at least one element throughout the arrangement, such as black accents, warm wood tones, white mats, botanical imagery, or a limited color palette. Without repetition, eclectic can quickly become “everything from the attic within arm’s reach.”
A Family Photo Story
Family photographs are a natural choice for a staircase because the arrangement can unfold like a timeline. Start near the bottom with older generations, childhood pictures, or early family milestones. Continue upward with weddings, vacations, pets, graduations, and recent memories.
You do not have to organize the photos chronologically. A mixture often feels warmer and less museum-like. Converting photographs to black and white can unify images taken in different decades, lighting conditions, and questionable eras of fashion.
A Travel or Art Collection
Travel photographs, postcards, maps, museum prints, and small souvenirs can turn the stairway into a record of places you have explored. For an art-focused wall, combine paintings, illustrations, textiles, sculptural pieces, and framed works on paper. Professional designers often recommend mixing media because texture and dimensional objects prevent a gallery wall from feeling flat.
Plan the Stairway Gallery Wall Before Hanging
Planning is the stage that separates a satisfying weekend project from an evening spent whispering threats at a crooked frame. Measure the wall, create a layout, and confirm the visual balance before making permanent holes.
Measure the Available Area
Record the length of the staircase wall, the height above the stair treads, the position of the handrail, and any obstacles such as switches, vents, trim, doors, or light fixtures. Also observe the wall from the bottom, top, and nearby rooms. A layout that looks balanced from one step may appear strangely lopsided from the entryway.
Use the handrail or the line created by the stair treads as your visual guide. The arrangement should generally rise at approximately the same angle as the staircase rather than drifting horizontally across the wall. Painter’s tape can be placed along that slope to establish a baseline around which the frames will be organized.
Start With an Anchor Piece
Choose one substantial frame or visually strong artwork to serve as the anchor. It might be a large family portrait, an abstract painting, a vintage map, or a mirror. Place it near the middle of the overall display, then arrange smaller pieces around it.
The anchor does not need to occupy the mathematical center. In an asymmetrical arrangement, placing it slightly off-center can create energy. What matters is that the surrounding frames distribute visual weight evenly so one end of the gallery does not appear to be sliding down the stairs.
Test the Arrangement on the Floor
Re-create the approximate shape of the staircase wall on the floor with painter’s tape, then arrange the framed pieces inside it. Move the frames until the spacing and visual balance feel natural. Photograph the finished floor arrangement so you have a reference while hanging. HGTV specifically recommends mapping the stairwell’s dimensions and pitch before transferring the layout to the wall.
Make Paper Templates
Trace each frame onto kraft paper, wrapping paper, or recycled grocery bags. Cut out the shapes and label them. Tape the templates to the staircase wall and adjust them without damaging the paint.
This method reveals whether the arrangement is too high, too low, too crowded, or too timid. Mark the hanging point directly on each template. Once everything looks right, install the hardware through the paper and remove the templates before adding the frames. Paper mockups and painter’s tape are widely recommended because they allow you to test placement before committing.
How High and How Far Apart Should Frames Be?
On a normal wall, art is often positioned with its center near average eye level. A staircase is more complicated because the floor rises beneath the display. Instead of measuring every piece from the downstairs floor, judge each grouping from the nearby stair treads and follow the upward movement of the handrail.
A useful starting point for conventional artwork is to place the center around 57 inches from the floor. On stairs, imagine that reference point traveling upward along the staircase. It is a guide, not a law written by the International Gallery Wall Police.
Keep most frames approximately two to three inches apart. Consistent gaps help different frame sizes feel connected. Wider spacing can make the pieces look unrelated, while extremely narrow gaps may cause ornate frames to compete. Small variations are acceptable in an eclectic layout, but the spacing should look intentional.
Select Frames That Support the Artwork
Frames can quietly unify the collection or become decorative objects themselves. Matching frames make diverse images feel orderly. Mixed frames add history, warmth, and personality.
For a coordinated wall, limit the arrangement to one or two finishes, such as black and brass or walnut and white. For an eclectic look, use several finishes but repeat each one more than once. A single red frame surrounded by twenty neutral frames may look less like a creative decision and more like it missed the return window.
Mats provide valuable breathing room around photographs and prints. White mats create a classic gallery effect, while cream mats work well with antique art and warm interiors. Deep-colored mats can be dramatic, but they should relate to colors already present in the art, runner, wall paint, or nearby rooms.
Install Every Piece Safely
A staircase is a high-traffic zone, so frames must be secure. Choose hanging hardware according to the weight of the artwork and the wall material. Lightweight frames may require picture hooks or small nails, while heavy frames often need D-rings, properly rated anchors, or screws driven into wall studs. Masonry and plaster require different fasteners from standard drywall.
Check the back of every frame before measuring. Sawtooth hangers, picture wire, D-rings, and keyhole slots all position the nail differently. Pull picture wire upward as it will sit when hung, then measure from the wire’s highest point to the frame’s top edge.
Use two hooks for wide or heavy frames when appropriate. Two attachment points can reduce tilting and provide additional stability. Small pieces of museum putty or removable stabilizing tabs on the lower corners can help prevent frames from shifting when footsteps, doors, or enthusiastic children create vibration.
Always keep the stair treads clear while working. Use a ladder specifically designed for stairs or hire an installer when the wall is unusually high. Balancing on stacked books may look inventive for approximately three seconds, after which it becomes a cautionary tale.
Coordinate the Gallery With the Staircase
The artwork should relate to the staircase rather than behaving as though the railing, runner, and wall color do not exist. Black frames can echo black iron balusters. Warm wood frames can repeat oak treads. Gold details may connect with brass lighting or cabinet hardware in the entryway.
On a bold wall color, use frames with enough contrast to remain visible. White, brass, pale wood, or colorful frames can stand out against navy, forest green, or charcoal paint. On wallpaper, simplify the frame finishes and mat colors so the display does not compete with the pattern.
A patterned stair runner and a colorful gallery wall can coexist, but one should usually take the leading role. When the runner is loud, repeat a few of its colors in restrained artwork. When the art is highly saturated, choose a simpler runner and neutral surrounding finishes.
Lighting a Staircase Art Display
Good lighting makes the gallery visible and improves stair safety. Ceiling fixtures, wall sconces, recessed lights, or adjustable spotlights can illuminate the collection. Avoid directing intense light onto delicate photographs, textiles, or works on paper for prolonged periods.
If the stairwell receives strong daylight, consider UV-filtering glazing for valuable or irreplaceable pieces. Matte prints, nonglare glazing, and canvas artwork can reduce reflections across from windows. Battery-operated picture lights are useful where electrical work is impractical, although their scale should match the frames rather than resembling tiny interrogation lamps.
Common Stairway Gallery Wall Mistakes
Hanging Everything Too High
Artwork should feel connected to people using the stairs. When every frame floats near the ceiling, the wall loses intimacy. Test paper templates while standing on several different steps.
Using Pieces That Are All the Same Visual Weight
A wall filled only with small frames can look busy but strangely weak. Include at least one larger piece or combine several medium frames to create an anchor.
Ignoring the Staircase Angle
A horizontal arrangement can fight the architecture. Let the upper and lower boundaries of the display loosely follow the stairs, even when the internal layout is intentionally irregular.
Choosing Art Only to Fill Space
A meaningful collection almost always looks better than a rushed shopping-cart assortment. Leave some room for the wall to evolve. A staircase gallery can grow as you collect new photographs, art, and memories.
Using Incorrect Hardware
Adhesive strips can work for lightweight objects on compatible, properly prepared surfaces, but they are not universal substitutes for mechanical fasteners. Check the product’s weight rating, surface requirements, and installation instructions. Renters can also consider lightweight frames, removable hooks, or a picture rail where permitted.
A Composite Stairway Gallery Wall Experience
The following project diary is a realistic composite of common DIY experiences rather than a claim that I physically completed the installation.
The project usually begins with dangerous optimism. The wall looks empty, the frames are already in the house, and hanging them appears to be a pleasant Saturday task. Someone says, “We’ll just eyeball it,” which is how many gallery walls begin and several drywall repair tutorials acquire new viewers.
In a typical project, the first surprise is scale. Ten frames that seemed excessive while stacked on a dining table suddenly look like postage stamps against a two-story stairwell. Adding one large anchor piece immediately improves the plan. A 24-by-30-inch print, for example, can give the smaller photographs something to gather around.
The next lesson is that the floor layout matters. Rearranging framed art on the ground may feel slower than hammering nails, but it prevents most avoidable mistakes. During this stage, people often discover that their supposedly coordinated collection contains seven black frames, three wood frames, one silver frame, and one mysterious bright-blue frame purchased during a period of unexplained confidence. Repainting or relocating the outlier creates instant cohesion.
Paper templates then expose another problem: the first arrangement is usually too high. From the downstairs hallway it may look impressive, but from the actual stair treads the photographs hover above eye level. Lowering the entire composition several inches makes it feel connected to the staircase rather than displayed for unusually tall visitors.
Installation often becomes easier when the anchor piece is hung first. From there, nearby templates can be checked against the frame instead of relying only on measurements. Consistent two- or three-inch gaps create rhythm, while a few slightly wider openings prevent an eclectic arrangement from becoming a solid rectangle of frame edges.
The hardware stage provides the least glamorous but most valuable lesson. A heavy vintage frame should not be trusted to a tiny nail simply because the nail was conveniently located in a junk drawer. Weighing the piece and selecting a properly rated anchor requires a few extra minutes, but it prevents the midnight crash that causes everyone in the house to assume a burglar has entered through the art collection.
Once the final frame is installed, the wall often looks more polished than expected but also slightly too perfect. Adding a small non-photographic piece can solve that problem. A framed handwritten recipe, a child’s drawing, a vintage key, a textile sample, or a postcard introduces personality and keeps the arrangement from resembling a furniture showroom display.
The most satisfying part appears over time. Family members pause on the stairs to look at photographs they had forgotten. Guests ask about a landscape or old portrait. New memories eventually replace less meaningful pieces. The gallery wall becomes less of a decorating project and more of a living record.
Maintenance is simple but not nonexistent. Frames may tilt slightly because of footsteps and vibration. Glass collects dust. Direct sunlight may fade certain photographs. A quick seasonal check allows loose hardware to be tightened, frame corners to be stabilized, and artwork to be rotated.
The final practical lesson is to stop before every inch is filled. Negative space allows individual pieces to breathe and leaves room for future additions. The best stairway gallery wall rarely looks as though it was purchased in one afternoon. It looks assembled through years of travel, family life, artistic discoveries, and occasional encounters with an irresistible thrift-store frame.
Conclusion
A successful stairway gallery wall follows the movement of the staircase while expressing the personality of the people who use it. Begin with meaningful artwork, establish an anchor, test the layout with templates, maintain reasonably consistent spacing, and use hardware appropriate for the wall and frame weight.
Whether you choose a precise grid of black-and-white photographs or an eclectic collection of paintings, postcards, mirrors, and family treasures, the goal is not mathematical perfection. The goal is a wall that feels balanced, secure, personal, and worth slowing down to enjoyeven when you originally went upstairs because you forgot your phone.














