
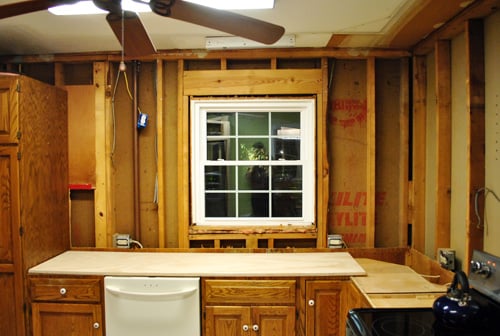
Removing an old kitchen backsplash looks wonderfully simple from a safe distance. You see a few tiles, imagine ten minutes with a hammer, and mentally fast-forward to your stylish new kitchen. Then the first tile refuses to move, the second takes half the drywall with it, and you discover a sheet of plywood installed with enough nails to survive a minor earthquake.
The good news is that backsplash demolition does not have to become a kitchen-sized archaeological dig. The key is to identify how the wall was assembled, protect everything you want to keep, and remove materials in controlled layers. Whether the tile is bonded directly to drywall, attached to plywood, or installed over a mystery sandwich of mastic and paneling, this guide explains how to demo old backsplash tile and plywood safely while leaving a practical surface for the next renovation step.
Understand What Is Behind the Backsplash
Before reaching for a hammer, determine what you are actually demolishing. Older backsplash assemblies vary considerably, even within the same kitchen. Common configurations include:
- Tile bonded directly to painted or unpainted drywall
- Tile installed over a thin plywood panel
- Plywood fastened over existing drywall
- Plywood attached directly to wall studs
- Tile embedded in a thick mortar or mud bed
- Decorative tile installed over a previous backsplash
Look at exposed edges beside cabinets, windows, appliances, or outlet boxes. The visible layers can reveal whether the plywood is merely a tile backer or part of a larger wall assembly. Fine Homebuilding recommends beginning at an edge tile or trim piece because it can provide access behind the remaining field tile. This is usually more controlled than attacking the middle of the wall like a contestant on a demolition game show.
If the tile is firmly bonded to a plywood panel, removing the tile and plywood together may be faster than separating every tile individually. If the plywood is glued to drywall, however, you should expect some drywall damage and may ultimately save time by cutting out and replacing that entire wall section.
Safety Checks Before Demolition
Turn Off Electrical Power
Kitchen backsplashes typically surround receptacles and switches. Turn off the appropriate circuit breaker before removing cover plates or working near electrical boxes. Verify that the circuit is de-energized with a suitable tester instead of assuming that a handwritten panel label from 1987 is telling the truth. Lowe’s specifically recommends turning off power, confirming it with a circuit tester, and removing switch plates before backsplash work begins.
The Electrical Safety Foundation International also advises shutting off the circuit at the main service panel before beginning do-it-yourself electrical work. Do not disconnect wiring, modify boxes, or work around damaged conductors unless you have the necessary training; call a licensed electrician when the electrical portion extends beyond removing a cover plate.
Consider Lead and Other Older Materials
If the home was built before 1978, painted surfaces around or behind the backsplash may contain lead-based paint. Renovation can turn that paint into hazardous dust. The U.S. Environmental Protection Agency recommends lead-safe work practices and suggests using a lead-safe certified contractor for projects that may disturb lead-based paint in pre-1978 homes.
Very old, unidentified adhesives, panels, or surrounding building materials may also warrant professional testing before they are sanded, ground, or aggressively broken apart. Asbestos cannot be identified reliably by appearance alone. When suspicious material is present, stop the demolition and obtain qualified advice rather than creating a sample with your power tools and lungs.
Control Dust and Flying Debris
Wear safety glasses, sturdy gloves, long sleeves, hearing protection when using power tools, and suitable respiratory protection. Tile fragments are surprisingly talented at locating the one square inch of skin you forgot to cover. Ceramic products, mortar, grout, and cement-based materials can also create fine dust when cut or ground. NIOSH notes that cutting, drilling, grinding, and polishing materials containing crystalline silica can release respirable particles that travel deep into the lungs.
Avoid dry grinding whenever a lower-dust method will work. Use hand tools, controlled breakage, local dust extraction, and a properly equipped HEPA-rated vacuum. Seal nearby doorways, close HVAC registers in the work zone, and keep children and pets out until cleanup is complete.
Tools and Materials You May Need
- Safety glasses, work gloves, and respiratory protection
- Non-contact voltage detector and circuit tester
- Utility knife with replacement blades
- Stiff putty knife or painter’s multi-tool
- Cold chisel or masonry chisel
- Small hammer or masonry hammer
- Thin pry bar and flat bar
- Oscillating multi-tool with appropriate blades
- Drill or impact driver
- Stud finder
- Wood blocks for protected leverage
- Plastic sheeting, painter’s tape, and drop cloths
- Rigid countertop protection such as hardboard or thin plywood
- Heavy-duty trash containers or contractor bags
- HEPA-rated vacuum and damp cleaning cloths
Use the smallest tool that will do the job. A putty knife and light hammer often provide more control than a demolition hammer. The Home Depot recommends a masonry hammer and chisel for beginning tile removal and emphasizes wearing eye protection during ceramic tile demolition.
How To Demo Old Backsplash Tile and Plywood
Step 1: Clear and Protect the Kitchen
Remove countertop appliances, cookware, decorations, and anything else that attracts dust merely by existing. Pull freestanding appliances away from the wall when possible. Cover countertops first with a soft layer, such as a folded drop cloth, and then with rigid hardboard or thin plywood. The soft layer helps prevent scratches, while the rigid layer protects against falling tile.
Tape plastic over lower cabinet openings and protect cabinet faces. Cover the floor along the work area. If you are keeping the countertop, place extra protection along its back edge because that is where falling chisels and tile fragments tend to gather for their little convention.
Step 2: Remove Accessories and Cut Perimeter Seams
After confirming that electrical power is off, remove switch plates and receptacle covers. Remove backsplash trim, decorative rails, hooks, and other attached accessories.
Use a sharp utility knife to score caulk and paint along cabinets, countertops, window trim, and adjoining walls. Cut these seams several times with light passes instead of trying to reach full depth in one heroic swipe. Separating the finish layer helps prevent paint and drywall paper from tearing beyond the demolition boundary.
Remove loose grout around an accessible tile with a grout saw, utility knife, or oscillating grout-removal blade. You do not need to erase every grout joint; the goal is to create enough separation to remove the first tile without transferring excessive force to neighboring surfaces.
Step 3: Create an Access Point
Start at an exposed edge, loose tile, damaged tile, or other accessible location. When no edge is available, select a tile near the center of the fieldbut not directly beside an electrical box, plumbing penetration, or cabinet edge.
Place a cold chisel near the center of the tile and tap lightly until the surface breaks. Remove small pieces toward the center to create an opening. Once there is room behind the tile, slide a stiff putty knife or narrow pry tool behind the remaining pieces. This Old House recommends controlled scoring and careful tapping when breaking stubborn tile into manageable sections.
Keep the chisel nearly parallel to the wall. Driving it directly toward the wall is an excellent technique for creating holes, discovering hidden insulation, and learning several new vocabulary words.
Step 4: Remove the Remaining Tile
Work outward from the opening. Tap the putty knife or chisel behind each tile and apply steady pressure. Whenever possible, direct the force toward the tile rather than using the drywall as a fulcrum. Mr. Handyman similarly recommends loosening grout, gently prying tiles with a putty knife, and repairing the wall afterward as needed.
Some tiles will release whole. Others will fracture into tiny ceramic confetti. Both outcomes are normal. If large sections of drywall paper or plywood veneer begin coming away, pause and reconsider whether separating the tile is worthwhile. When the substrate is scheduled for removal anyway, taking down the assembly in sections can be faster and less destructive to the surrounding wall.
Place debris directly into a sturdy container instead of sweeping it onto the floor. Do not overload bags with tile; several moderately filled containers are safer to lift than one bag that has quietly achieved the density of a neutron star.
Step 5: Expose the Plywood Fasteners
With enough tile removed, examine the plywood. Look for screw heads, nail lines, panel seams, construction adhesive, and areas where the panel meets studs or drywall. A stud finder can help identify framing, but verify findings cautiously because pipes, metal corner bead, wiring, and fasteners can confuse electronic scanners.
Remove visible screws with a drill. Pull accessible nails with a pry bar or nail puller. When adhesive and tile debris hide the fasteners, scrape small inspection areas rather than blindly cutting across the panel.
Step 6: Decide Whether to Remove Plywood Alone or With Drywall
If the plywood is screwed to studs and separates cleanly, remove it without disturbing the wall framing. Cut the panel into manageable sections with an oscillating multi-tool, setting the blade depth no deeper than the plywood thickness. Never plunge a reciprocating saw blindly into a kitchen wall; electrical cables and plumbing lines may be directly behind the panel.
If the plywood has been heavily glued to drywall, attempting to peel it away may shred the drywall face, break the gypsum core, and consume hours. In that situation, mark the stud centers, cut through both plywood and drywall, and remove the layered assembly together. The replacement panel can then be fastened to the exposed framing. Home Depot’s backsplash project guidance describes cutting badly damaged drywall back to nearby studs and installing a new fitted section.
Before cutting, inspect all accessible openings and determine where wiring and plumbing are likely to run. Use shallow cuts, remove small sections, and look behind the wall as soon as an inspection gap becomes available.
Step 7: Pry the Plywood Carefully
Insert a thin pry bar behind the plywood at a stud location. Place a wood block between the pry bar and any surface you intend to keep. Apply gradual pressure and move along the fastener line rather than forcing one corner outward.
If the panel flexes but does not release, another fastener is probably hiding under mortar. Stop and locate it. Continuing to pull may crack adjacent drywall, distort an electrical box, or damage cabinet attachment points. Cut stubborn sections smaller and remove them piece by piece.
Step 8: Clean the Wall Cavity and Work Area
Remove protruding nails, screws, adhesive ridges, and loose fragments. Vacuum wall cavities carefully before closing them. Inspect framing for moisture damage, mold-like growth, insect activity, plumbing leaks, scorched wiring, or previous repairs that appear questionable.
Use a HEPA-rated vacuum followed by damp wiping rather than dry sweeping fine dust into the air again. Keep demolition debris contained until it can be disposed of according to local requirements.
Repairing the Wall After Backsplash Removal
When the Existing Drywall Can Be Saved
Drywall may remain usable when it is structurally firm and has only shallow adhesive residue, torn face paper, small dents, or limited gouges. Remove loose paper, seal damaged areas with a compatible problem-surface primer, patch low spots, and sand lightly after the repair material cures.
The finished substrate should be clean, dry, sound, and reasonably flat. Lowe’s recommends filling holes, repairing cracks, leveling uneven surfaces, sanding where appropriate, and removing dust and grime before tile installation.
Standard drywall can be an acceptable tile substrate in a typical dry kitchen backsplash area when it is sound and the tile-setting product permits that application. Family Handyman notes that backsplash tile can be installed directly on properly cleaned and patched drywall.
When the Wall Should Be Replaced
Replace the damaged section when the gypsum core is broken, the drywall has become soft, large areas of paper are missing, the surface is deeply uneven, or plywood adhesive has torn away most of the face. Cut the opening to stud centers or add secure backing around unsupported edges. Install a new panel flush with the surrounding wall, then tape and finish the seams according to the panel manufacturer’s instructions.
For areas subject to greater moisture exposure, heavy tile, or specialized installation requirements, use a tile backer approved for the intended assembly. Cement board provides a water-durable tile base but is not automatically waterproof; a separate approved membrane may still be required where waterproofing is specified. USG’s cement-board guidance emphasizes sound framing, correct fasteners, treated joints, and a separate barrier when the assembly requires waterproofing.
Follow the tile, mortar, membrane, and backer-board manufacturers’ instructions as one coordinated system. Schluter notes that substrates differ in stability and suitability, so the correct preparation depends on the surface and installation method rather than a universal one-product solution.
Common Backsplash Demolition Mistakes
Using Too Much Force Too Soon
Large swings may feel productive, but controlled tapping usually removes tile with less collateral damage. Start gently and increase force only when the assembly proves that it deserves stronger persuasion.
Skipping the Perimeter Cuts
Uncut caulk and paint can pull finish material from cabinets and adjoining walls. Scoring the perimeter takes minutes and can save hours of cosmetic repair.
Cutting Blindly Into the Wall
Deep reciprocating-saw cuts can strike electrical wiring, water lines, drain vents, or gas piping. Use depth-controlled tools and inspect behind the first opening before expanding it.
Trying to Preserve a Ruined Substrate
Spending an entire afternoon delicately removing mastic from crushed drywall is not always thrift; sometimes it is simply a very slow route to replacing the drywall tomorrow. Compare the repair effort with the cost and simplicity of installing a clean new panel.
Preparing Only the Visible Areas
A new backsplash needs a flat substrate across the entire installation. Small ridges and depressions can cause uneven tile faces, poor adhesive contact, and troublesome transitions around outlets. Check the wall with a long straightedge before setting tile.
Experience-Based Lessons From Real-World Backsplash Demolition
The first lesson from backsplash demo projects is that the first tile usually takes longer than the next ten. Until that opening exists, every tool is working against a sealed surface. It is worth spending extra time finding a loose edge, removing grout, and creating a controlled access point. Once the back of the tile and the substrate become visible, the entire project becomes easier to understand. You can see whether the bond is thin mastic, thick mortar, plywood, drywall, or a renovation lasagna containing several generations of questionable decisions.
The second lesson is that tile removal and wall removal should not be treated as separate missions when the substrate is already doomed. A homeowner may spend hours trying to save drywall because replacing it sounds like a major construction project. In reality, cutting out a rectangular section, adding backing, and installing a new panel can be cleaner than repairing dozens of deep gouges. The moment the drywall core begins crumbling across a large area, stop scraping and calculate the easier route. Controlled replacement often creates a flatter, stronger surface for the new backsplash.
Plywood introduces a different challenge because it can conceal fasteners remarkably well. A panel may appear ready to release while one screw remains hidden beneath a patch of mortar. Pulling harder does not make that screw disappear; it transfers the force to nearby drywall, cabinets, or framing. Experienced renovators work along the fastener pattern, loosen a little at a time, and treat unexpected resistance as information. When a panel refuses to move, investigate before adding leverage.
Another practical lesson is to protect the countertop more seriously than seems necessary. A folded towel alone will not stop the corner of a falling tile or the tip of a dropped pry bar. A soft layer topped with hardboard provides far better protection. Tape the rigid sheet so it cannot slide, particularly near a sink opening or polished countertop edge. Countertop repairs can cost far more than the backsplash demolition, which is an impressively unfair way for a “simple weekend update” to introduce itself.
Good organization also makes a messy project much easier. Keep one container for sharp tile debris, another for longer plywood scraps, and a small labeled bag for switch-plate screws and reusable hardware. Photograph outlet locations, wiring routes, plumbing, blocking, and stud positions while the wall is open. Those pictures may be invaluable when reinstalling cabinets, mounting accessories, or diagnosing a future problem. A photo taken now can prevent someone from drilling into a pipe years later, possibly including future you.
Finally, expect the kitchen to look worse before it looks better. Demolition reveals crooked framing, old patches, greasy corners, abandoned holes, and construction methods that no modern instruction manual would proudly claim. That does not mean the project has failed. The ugly middle is the point at which hidden problems become visible and repairable. Stop when something appears unsafe, upgrade damaged materials instead of covering them, and focus on creating a flat, clean, reliable substrate. The quality of the finished backsplash depends far more on that invisible preparation than on how quickly the old tile hit the trash bin.
Conclusion
Learning how to demo old backsplash tile and plywood is mostly an exercise in restraint. Protect the room, shut off electrical power, investigate the wall layers, and begin with a small controlled opening. Remove tile with shallow tool angles, locate plywood fasteners before prying, and avoid cutting farther into the wall than necessary.
Most importantly, know when to stop trying to save a damaged substrate. A clean section of new drywall or approved tile backer can be easier to installand far better for the next backsplashthan an old wall covered with craters, adhesive ridges, and emotional baggage. Thoughtful demolition gives the new installation the flat, stable foundation it needs to look professional and remain secure.
Note: This article synthesizes practical guidance from 12 reputable U.S. home-improvement, electrical-safety, occupational-health, environmental, and building-material sources. Local building rules and product requirements vary, so consult qualified electrical, environmental, or construction professionals whenever hidden hazards or unfamiliar wall systems are discovered.













