
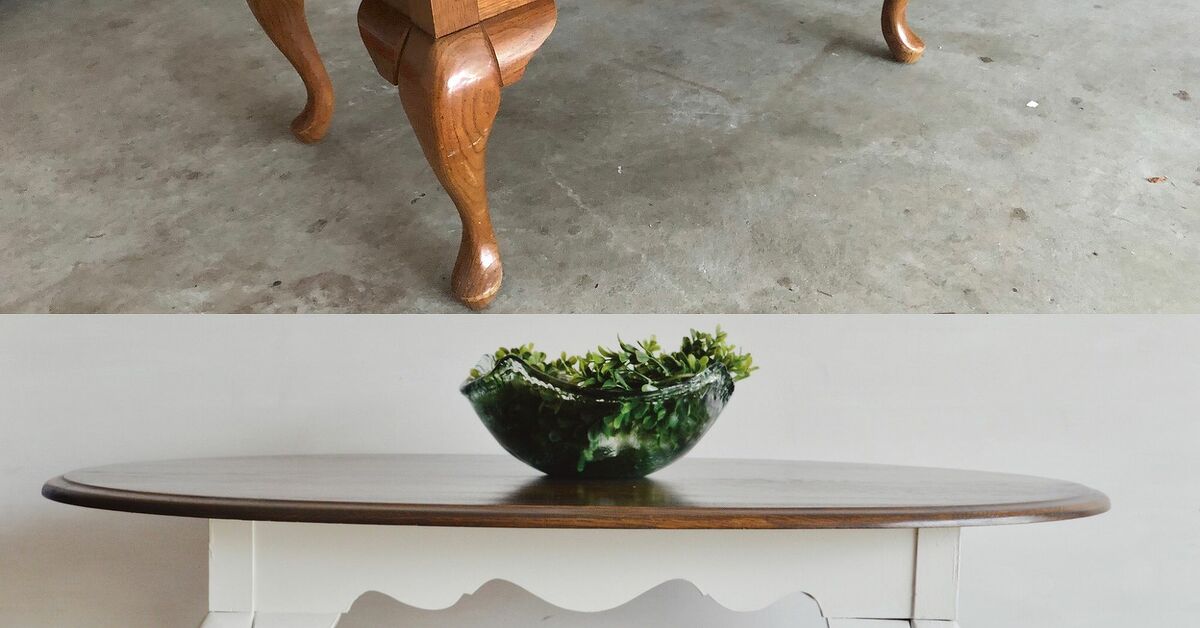
An outdated coffee table can be difficult to love. Perhaps it has a glossy orange finish, mysterious scratches, water rings from beverages nobody remembers drinking, or carved details that proudly announce, “I was fashionable in 1997.” Before sending it to the curb, however, take another look. A sturdy old table is often an excellent candidate for a farmhouse chic furniture makeover.
With careful cleaning, light sanding, the right primer, durable furniture paint, and a little strategic distressing, you can transform a tired table into a warm, character-filled centerpiece. This farmhouse coffee table DIY does not require advanced woodworking skills or a workshop full of intimidating machinery. Most of the project can be completed with basic supplies, patience, and the willingness to get paint somewhere it was never intended to go.
This step-by-step guide explains how to paint an outdated coffee table, create a believable distressed finish, protect the surface from daily use, and avoid the mistakes that make painted furniture look homemade in the less flattering sense of the word.
Why Turn an Old Coffee Table Into Farmhouse Chic Furniture?
Farmhouse chic style combines practical furniture, comfortable colors, natural textures, and finishes that look gently aged rather than factory-perfect. A painted coffee table fits this style particularly well because it can blend a clean neutral color with visible wood, softened edges, or an antiqued glaze.
Updating an existing table is also usually more affordable than buying a new solid-wood piece. Older furniture may have stronger joinery and better materials than similarly priced modern alternatives. Reusing it keeps a bulky item out of the waste stream while allowing you to customize the size, color, and finish for your living room.
The best part is that farmhouse style welcomes minor imperfections. A tiny brush mark can look handcrafted. A nick can become “character.” That crooked distressed corner? Clearly the table has a rich and complicated history.
Inspect the Coffee Table Before Painting
Before purchasing paint, determine what the table is made from and whether it is structurally sound. Tighten loose screws, inspect the legs, and press gently on the tabletop to check for wobbling. Painting will improve the appearance, but it will not persuade a loose leg to reconsider its life choices.
Solid Wood
Solid wood is usually the easiest material to repair, sand, paint, and distress. Scratches can be filled, damaged edges can be smoothed, and selected areas can be sanded back to expose natural wood.
Wood Veneer
Veneer is a thin layer of real wood attached to a less expensive core. It can be painted successfully, but aggressive sanding may cut through the veneer. Sand only enough to dull the existing finish and create adhesion.
Laminate or Engineered Wood
Laminate has a slick manufactured surface that requires thorough cleaning, light scuff sanding, and a bonding primer. Ordinary paint applied directly to glossy laminate may scratch or peel, especially on a frequently used tabletop.
If the coffee table is genuinely valuable, historically significant, or a family antique with its original finish, consult a furniture professional before painting it. Not every brown table needs to become white, despite what the internet occasionally suggests.
Tools and Materials
- Drop cloth or protective plastic
- Screwdriver and basic repair tools
- Gentle degreasing cleaner
- Clean water and lint-free cloths
- Wood filler and a putty knife
- Medium and fine-grit sandpaper or sanding sponges
- Vacuum with a brush attachment
- Tack cloth or slightly damp microfiber cloth
- Bonding or stain-blocking primer
- Quality synthetic-bristle paintbrush
- Four- to six-inch fine-finish roller
- Furniture, cabinet, mineral, milk, chalk-style, or durable interior enamel paint
- Clear water-based polyurethane, furniture wax, or compatible protective topcoat
- Safety glasses, gloves, and an appropriate dust mask or respirator
How to Paint an Outdated Coffee Table
Step 1: Remove Hardware and Prepare the Workspace
Move the table to a garage, covered patio, workshop, or well-ventilated room. Place it on a drop cloth and leave enough space to walk around every side. Remove drawers, knobs, handles, decorative brackets, and other hardware whenever possible.
Take a few photographs before disassembly. These reference images can be surprisingly useful when you are staring at four screws and wondering whether the drawer was always upside down.
Step 2: Clean the Entire Table
Cleaning is one of the most important parts of painting old furniture. Coffee tables collect skin oils, furniture polish, cooking residue, candle wax, dust, beverage spills, and possibly the remains of several movie-night snacks.
Wipe every surface with a gentle degreasing cleaner, paying special attention to the top, edges, legs, and decorative grooves. Rinse away cleaner residue with a separate damp cloth and allow the table to dry completely. Paint cannot form a reliable bond over grease, wax, or silicone-based polish.
Step 3: Complete Repairs
Tighten loose fasteners and reglue unstable joints if necessary. Fill deep scratches, dents, chipped corners, and unwanted hardware holes with paintable wood filler. Let the filler dry according to its instructions, and then sand it level with the surrounding surface.
Do not automatically fill every imperfection. Small dents and shallow marks can support the farmhouse aesthetic, provided they do not interfere with cleaning or everyday use.
Step 4: Sand for Better Adhesion
You generally do not need to strip the coffee table to bare wood unless the old finish is peeling, severely damaged, unusually thick, or incompatible with the new coating. For a stable finish, scuff-sand the entire piece until the glossy surface looks uniformly dull.
Use medium-grit sandpaper for rough areas and old peeling edges. Follow with a finer grit to smooth the surface. Sand decorative sections by hand so that you do not flatten carved details. On veneer and laminate, use light pressure and stop as soon as the shine has been removed.
Vacuum the table carefully, including joints and corners. Finish by wiping it with a tack cloth or a slightly damp lint-free cloth. Even a small amount of sanding dust can create bumps that become spectacularly visible after painting.
Step 5: Apply the Correct Primer
Primer improves adhesion, creates a consistent base, and helps prevent stains or wood tannins from bleeding through pale paint. Use a bonding primer over laminate, glossy finishes, or uncertain surfaces. Choose a stain-blocking primer when painting reddish wood, knotty wood, or furniture with persistent discoloration.
Apply primer to detailed areas with a brush and cover broad, flat sections with a fine-finish roller. Keep the coat thin and even. Watch the undersides of edges and decorative trim for drips.
Once the primer is dry, inspect the surface in strong side lighting. Lightly sand away raised grain, roller texture, or dust nibs with fine-grit sandpaper. Remove the dust before painting.
Step 6: Choose a Farmhouse Chic Color
Classic farmhouse coffee table colors include warm white, creamy ivory, soft greige, muted sage, charcoal, dusty blue, and restrained black. Warm neutrals tend to work especially well with natural wood floors, woven baskets, linen upholstery, and rustic accessories.
Test the color on the underside of the table or on a sample board. View it during the day and at night. A white that looks soft in the store may become startlingly blue under cool LED bulbs, while beige can develop unexpected peachy ambitions.
Step 7: Paint With Thin, Controlled Coats
Stir the paint thoroughly without whipping air into it. Use a quality brush for legs, corners, aprons, and carved details. Roll the tabletop and other broad surfaces with a fine-finish roller, working in manageable sections.
Apply two or more thin coats rather than one heavy coat. Thick paint dries slowly, emphasizes drips, and may remain soft underneath. Follow the manufacturer’s recommended recoat time, even when the surface feels dry. Lightly sanding between coats can create an especially smooth finish, but remove all dust before continuing.
On the final coat, avoid repeatedly brushing areas that have started to set. Overworking partially dried paint can leave ridges and drag marks. Put the brush down. Walk away. Make coffee somewhere far from the freshly painted table.
How to Create a Natural Distressed Farmhouse Finish
Distressing should suggest years of ordinary use rather than an argument with a belt sander. Let the paint dry fully before beginning, and work gradually.
Use fine or medium-grit sandpaper to soften areas that would naturally receive contact:
- Outer corners and edges
- Raised molding and carved details
- Legs near the floor
- Drawer edges and areas around handles
- Selected portions of the tabletop perimeter
Sand lightly until the primer, base color, or natural wood begins to appear. Vary the amount of wear rather than distressing every edge equally. Step back frequently and view the entire table. It is easier to remove more paint than to convince exposed wood to put the paint back on.
Optional Two-Color Distressing
For added depth, apply a darker base coat before the final light color. Charcoal beneath warm white, deep green beneath cream, or brown beneath muted gray can create an aged, layered appearance. Once the top color dries, sand selected edges until the lower color becomes visible.
Optional Antiquing Glaze
An antiquing glaze can emphasize grooves, corners, and decorative details. Work in small sections, applying a modest amount of glaze and wiping away the excess with a clean cloth. Leave slightly more product in recesses where dust and age would naturally collect.
Seal the Painted Coffee Table
A coffee table experiences more wear than a decorative shelf. Cups, remote controls, books, toys, feet, pets, and enthusiastic snack bowls all place stress on the finish. A compatible protective topcoat can improve resistance to moisture, stains, and abrasion.
Water-based polyurethane is a practical choice for many light-colored painted surfaces because it generally remains clearer than traditional oil-based products. Furniture wax creates a softer, hand-rubbed appearance but may require periodic maintenance and may offer less protection against standing water.
Apply the topcoat in thin layers using the recommended applicator. Avoid heavy brushing and allow each coat to dry properly. Two or three light coats are often preferable for a busy tabletop, depending on the selected product.
Drying Is Not the Same as Curing
A painted table may feel dry within hours, but the finish can take considerably longer to reach full hardness. Treat it gently during the curing period. Do not immediately place heavy décor, rubber-backed objects, or stacks of books on the surface.
Use coasters once the table returns to service, and wipe up spills promptly. Follow the product label for the actual cure time because paint formulations vary. Patience at this stage prevents dents, sticking objects, and the heartbreaking discovery that a decorative tray has become a permanent architectural feature.
Common Coffee Table Painting Mistakes
Skipping the Cleaning Step
Sanding does not reliably remove every trace of grease or furniture polish. Clean first, then sand, and clean again afterward.
Using the Wrong Primer
A basic primer may not bond well to laminate or block tannin stains. Match the primer to the surface and the problem you are trying to solve.
Applying Paint Too Thickly
Heavy coats are more likely to sag, wrinkle, remain soft, and show brush marks. Thin coats require more patience but produce a stronger, cleaner result.
Distressing Every Surface
Random sanding can look artificial. Concentrate wear on edges, corners, handles, and raised details that hands or objects would naturally touch.
Returning the Table to Service Too Soon
Dry paint may still be vulnerable to pressure, water, and abrasion. Respect the cure time before holding a celebratory pizza night on the new finish.
Styling Your Farmhouse Chic Coffee Table
Once the finish has cured, keep the styling relaxed and functional. A woven tray can organize remote controls and coasters. Add a small ceramic vase, a stack of books, a candle, or a simple bowl. Natural materials such as linen, jute, stoneware, aged metal, and unfinished wood reinforce the farmhouse feeling.
Avoid covering every inch. The painted and distressed finish is part of the decoration, so allow some of the tabletop to remain visible. Farmhouse chic should feel comfortable and collected, not like a country-themed gift shop experienced a minor explosion.
Conclusion
Transforming an outdated coffee table into farmhouse chic furniture is a manageable DIY project with a surprisingly dramatic payoff. The secret is not a particular paint brand or an aggressively distressed finish. It is careful preparation.
Clean the table thoroughly, repair structural problems, dull the old finish, apply the appropriate primer, and build the color with thin coats. Distress only where natural wear makes sense, and protect the finished surface with a compatible sealer. When those fundamentals are handled correctly, even an unfashionable thrift-store table can become a durable, customized centerpiece.
The finished coffee table will not merely look newer. It will look intentional, personal, and comfortably imperfectthe qualities that make farmhouse chic style so welcoming in the first place.
A Composite DIY Experience: Lessons From the Makeover
A typical coffee table makeover begins with unreasonable optimism. The table looks small, the paint can looks large, and the entire project appears perfectly capable of being completed before lunch. Then the cleaning cloth turns brown, three loose screws appear from nowhere, and a suspiciously shiny patch refuses to accept primer. This is the moment the project stops being a quick paint job and becomes a proper furniture rescue.
One of the most common lessons is that cleaning takes longer than expected. An old table may look clean while still carrying layers of furniture polish and oily residue. During a representative makeover, the first cleaning pass might remove visible dirt, while the second reveals a waxy film around the tabletop edges. Taking time to remove that residue can make the difference between a coating that bonds and one that scratches off with a fingernail.
Sanding also tends to produce an early temptation to overdo things. Once fresh wood begins appearing beneath a dated finish, it is easy to keep sanding simply because progress feels satisfying. On veneer, however, enthusiasm can become a bald patch remarkably quickly. The better approach is to scuff the finish until it becomes dull, then stop. The goal is adhesion, not archaeological excavation.
Primer often creates the least attractive stage of the project. It can look patchy, streaky, and generally alarming. A first-time furniture painter may wonder whether the table has somehow become worse. That uneven appearance is normal. Primer is creating a functional base, not competing in a beauty contest. A light sanding followed by the first coat of color usually restores confidence.
The greatest improvement often comes from switching to thinner paint coats. A heavy first coat feels efficient, but it tends to collect around corners and leave ridges on the tabletop. A thin coat may look disappointingly transparent, yet it dries more evenly. After two or three controlled coats, the finish usually looks smoother and more professional than a single thick application.
Distressing is another stage where restraint matters. The first sanded corner may look wonderfully authentic, encouraging immediate sanding of every available edge. Ten minutes later, the table can resemble something recovered from a barn after a tornado. Pausing after each small section helps maintain balance. Natural-looking wear is irregular, selective, and concentrated where people would actually touch the furniture.
The final lesson is that curing requires genuine patience. A table can look completely finished while the coating remains soft. Setting a decorative tray on it too soon may leave an outline, and placing a warm mug directly on the surface can create a mark before the topcoat reaches full hardness. Giving the finish enough time to cure is not exciting, but neither is repainting the tabletop.
After the waiting period, the transformation becomes clear. The once-glossy, dated table now has a soft neutral color, subtly worn edges, and a finish suited to the room. The scratches that once looked neglected appear intentional, and the sturdy construction finally receives the attention it deserves. More importantly, the project provides enough practical experience to make the next furniture makeover feel far less intimidatingand perhaps only slightly less messy.














