
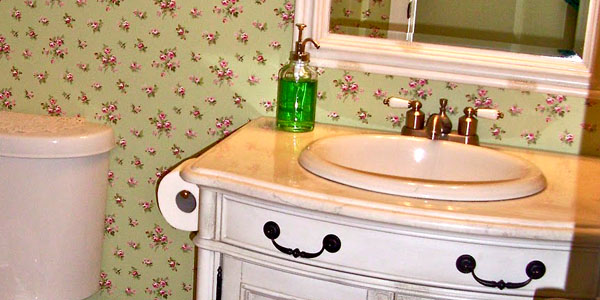
A tired bathroom does not always need demolition, a dumpster, and a contractor who begins every sentence with, “Well, once we open the wall…” Sometimes it needs a smarter edit. The best shabby chic bathroom makeovers keep the room practical while replacing its cold, builder-grade personality with soft color, vintage character, useful storage, and just enough imperfection to feel collected rather than manufactured.
This bathroom before-and-after approach is about more than painting everything white and adding a basket labeled “TOWELS.” True shabby chic bathroom design balances romance with restraint. It mixes worn finishes with clean plumbing, antique-inspired details with modern performance, and pretty accessories with surfaces that can survive steam, splashes, toothpaste, and the mysterious damp hand towel nobody admits leaving on the floor.
The Before: Why the Bathroom Felt Flat and Forgotten
The original bathroom was functional but visually exhausted. It had a bulky vanity, a plain mirror, harsh overhead lighting, generic hardware, beige walls, and very little closed storage. Nothing was dramatically broken, which made a complete renovation difficult to justify, but everything looked as though it had been chosen during one rushed trip down the same store aisle.
Before selecting paint or hunting for antique mirrors, the room needed an honest assessment. A useful bathroom renovation checklist should cover fixture condition, layout, lighting, storage, and ventilationnot merely whether the wall color inspires joy. Moisture problems, leaks, unsafe wiring, loose tile, and damaged subflooring must be addressed before cosmetic work begins. Otherwise, the makeover becomes a floral curtain hung in front of a plumbing problem.
What Was Worth Keeping
The tub, toilet, basic plumbing locations, and vanity cabinet boxes were still serviceable. Keeping them prevented unnecessary labor and allowed more of the budget to go toward finishes that people actually notice: paint, lighting, hardware, a framed mirror, textiles, and a better countertop treatment. Working with an existing floor plan can also preserve the character of a room and avoid the expense of moving water and drain lines.
What Had to Change
The old vanity finish was scratched, the mirror lacked proportion, and the single ceiling fixture made the room feel like an interrogation room with shampoo. The walls needed moisture-resistant paint, the vanity needed proper preparation and a durable coating, and the room needed layered lighting. Small decorative pieces could wait; the practical weaknesses could not.
What Shabby Chic Really Means in a Bathroom
Shabby chic style combines vintage or vintage-inspired furnishings, distressed textures, romantic details, soft colors, and a relaxed sense of elegance. In a bathroom, that might mean a painted vanity with gently worn edges, a floral or botanical print, beadboard, an ornate mirror, antique brass hardware, glass knobs, linen-look fabric, and a few objects that appear to have lived a life before arriving beside the sink.
The keyword is curated. A successful shabby chic bathroom is not a storage unit with plumbing. Too many ruffles, roses, distressed signs, wire baskets, and tiny ceramic birds can turn charm into visual static. Modern shabby chic works best when the architectural background stays calm and a limited number of vintage elements carry the personality.
The Makeover Plan: From Builder-Grade to Romantic and Useful
1. Build a Soft, Layered Color Palette
The palette began with warm white, faded sage, dusty blush, and aged brass. Warm white kept the small room bright without making it feel clinical. Sage added an English-cottage mood, while blush appeared only in towels and artwork so the room did not resemble the inside of a strawberry macaron.
For bathroom walls, choose a high-quality coating formulated for humid spaces and prepare the surface carefully. Mildew-resistant bathroom paint is designed to perform better in steamy conditions, but it is not a substitute for fixing leaks or improving ventilation. Satin, pearl, or specially formulated bathroom matte finishes can provide washability without forcing every wall to shine like a bowling ball.
2. Transform the Existing Vanity
The vanity became the visual anchor of the makeover. Instead of replacing it, the doors and drawers were removed, labeled, cleaned, lightly sanded, repaired, primed, and painted a muted sage green. Preparation mattered more than the decorative distressing. Paint applied over soap residue, polish, or a glossy factory finish tends to chip, which is not “authentic patina”; it is simply a project asking to be redone.
After the final coat cured, selected edges were rubbed very lightly to suggest age. The effect was subtle. Distressing every corner would have made the cabinet look as though it had recently escaped a raccoon. Small antique-brass knobs and cup pulls added warmth, while a simple white counter kept the composition from becoming too busy. Painting an existing vanity is widely recommended as a practical way to update a bathroom, provided that the cabinet is cleaned, prepared, primed, and coated correctly.
3. Add Cottage Character to the Walls
Beadboard or vertical paneling is one of the fastest ways to introduce cottage bathroom style. In this makeover, painted wall paneling covered the lower portion of the walls, topped with a narrow ledge. The upper walls remained a warm white, giving the room texture without shrinking it visually.
Wallpaper can also create a beautiful shabby chic bathroom, especially in a powder room or a well-ventilated bath. Choose a design with trailing flowers, faded botanicals, tiny stripes, or an old-fashioned block print. In a full bathroom, keep paper away from direct spray and follow the manufacturer’s moisture and installation guidance. A wallpapered accent wall can provide the romance while tile and paint handle the wettest zones.
4. Make the Floor Look Collected, Not Complicated
A shabby chic floor should feel timeless rather than aggressively themed. Small hexagonal tile, basket-weave patterns, marble-look porcelain, black-and-white mosaics, and lightly weathered wood-look tile can all work. Real wood adds warmth but requires careful maintenance and remains vulnerable to water; porcelain or luxury vinyl with a convincing wood pattern is often more forgiving in a busy family bathroom.
If the existing floor is sound but visually plain, a washable vintage-style runner can soften it. The rug should have a non-slip backing or pad, dry quickly, and stay clear of door swings. Beauty is important, but not so important that brushing your teeth becomes an accidental skating event.
5. Update Fixtures Without Faking History
Vintage-inspired faucets, cross handles, porcelain details, pedestal sinks, console sinks, and claw-foot tubs can reinforce the style. However, old plumbing pieces should be inspected for condition and compatibility. A safer strategy is often to pair a genuinely old mirror, cabinet, or dresser with new plumbing fixtures designed to meet modern installation requirements.
When replacement is necessary, water-efficient products can improve performance without disrupting the look. WaterSense-labeled faucets, showerheads, and toilets are independently certified to use less water while meeting performance criteria, so a bathroom can appear nostalgic without behaving like it was plumbed in 1912.
6. Replace the Plain Mirror and Harsh Lighting
The frameless wall mirror was replaced with a vintage-inspired wood frame featuring a slightly weathered finish. An actual antique mirror can be wonderful, but check for loose glass, damaged backing, unstable hanging hardware, and a frame that can tolerate humidity. A new mirror with an old-fashioned silhouette often provides the same visual effect with less drama.
Lighting made the most dramatic functional difference. The room now uses a ceiling fixture for general light and shaded sconces near the mirror for grooming. Side lighting reduces the strong shadows created by ceiling-only fixtures, while a dimmer helps the bathroom shift from weekday rush hour to evening soak. Bathroom lighting should be appropriately rated for its location, and electrical work in wet areas belongs with a qualified professional.
7. Add Storage That Looks Intentional
Shabby chic decorating is at its best when practical items become part of the design. A shallow vintage cabinet can hold medicine and grooming supplies. Open shelves can display folded towels, glass jars, and a small plant, while less photogenic necessities stay behind doors. A skirted pedestal sink can conceal plumbing and baskets, provided the fabric is washable and quick-drying.
The final arrangement used three storage layers: daily items in the vanity, backup supplies in a wall cabinet, and attractive frequently used items on one open shelf. This prevented the room from becoming cluttered while preserving the relaxed, lived-in look.
Step-by-Step Shabby Chic Bathroom Makeover
- Inspect first. Check plumbing, caulk, grout, electrical fixtures, ventilation, flooring, and signs of moisture damage.
- Measure everything. Record the vanity, mirror, wall space, door clearance, plumbing centers, and lighting locations before shopping.
- Create a limited palette. Select one main neutral, one muted color, and one metal finish, then allow a small accent color.
- Complete messy repairs. Patch walls, repair trim, replace damaged caulk, and address ventilation before decorative installation.
- Paint the ceiling and walls. Use bathroom-appropriate paint and allow proper drying time.
- Refinish the vanity. Remove hardware, clean, sand, prime, paint, and allow the finish to cure before reinstalling doors.
- Install fixed elements. Add lighting, mirror, wall paneling, shelves, hardware, and plumbing fixtures in a logical sequence.
- Style with restraint. Bring in towels, art, a rug, baskets, and one or two vintage objects rather than twenty-seven tiny treasures.
- Photograph the after. Not because the bathroom requires proof of improvement, but because surviving a renovation deserves documentation.
Common Shabby Chic Bathroom Mistakes
Ignoring Ventilation
A romantic bathroom still needs to dry between uses. An exhaust fan that vents outdoors, an operable window where appropriate, and sensible airflow help protect paint, wood, wallpaper, grout, and textiles. Decorative candles cannot negotiate with humidity.
Using Untreated Wood in Splash Zones
Old dressers and shelves can become beautiful bathroom features, but exposed wood needs suitable sealing and placement. Keep vulnerable pieces away from direct spray and standing water. Inspect the underside of converted vanities, where slow leaks may hide.
Distressing Every Surface
Patina works through contrast. One gently aged vanity looks intentional; a distressed vanity, distressed mirror, distressed shelves, distressed sign, and distressed toilet brush holder look emotionally exhausted. Pair weathered pieces with clean tile, crisp towels, and simple plumbing fixtures.
Choosing Style Over Cleaning
Deep carving, elaborate fabric, open baskets, and antique accessories collect dust and moisture. Use ornate details where they are easy to reach, and choose washable textiles. The room should look romantic after a normal cleaning routine, not require a museum conservation team.
Mixing Too Many Metal Finishes
A little variation adds authenticity, but four unrelated finishes can make the room feel accidental. Use one dominant finishsuch as aged brassand one supporting finish, perhaps black iron or polished nickel. Repeat each finish at least twice so the mix appears deliberate.
A Realistic Budget Strategy
For a low-cost refresh, concentrate on paint, hardware, a framed mirror, a shower curtain, towels, and art. A midrange makeover can add wall paneling, new lighting, a faucet, improved storage, and professionally refinished surfaces. A larger renovation may include new tile, a replacement vanity, upgraded ventilation, a freestanding tub, or layout changes.
The smartest spending order is safety and water control first, permanent finishes second, storage and lighting third, and accessories last. A $20 vintage print can wait. A leaking shutoff valve has no respect for mood boards.
The After: A Bathroom With Age, Warmth, and Better Habits
After the makeover, the bathroom feels brighter, softer, and more personal. The sage vanity provides color, the warm white walls reflect light, and the paneled lower walls add architectural depth. The framed mirror and brass-toned hardware deliver the vintage note, while modern paint, new lighting, reliable plumbing, and organized storage keep the room firmly in the present.
The most successful change is not a single product. It is the relationship between old-looking and new-performing elements. The space feels romantic without becoming fragile, rustic without becoming rough, and decorative without making the toothbrush search for a parking spot.
Experience Notes: What the Makeover Taught Me
The first lesson was that “before” photos are more honest than memory. Living with an outdated bathroom every day makes its problems fade into the background. In the photographs, the visual weight of the dark vanity, oversized mirror, and harsh light became obvious. The room was not too small; it was simply dominated by large, flat surfaces with no variation in texture or scale.
The second lesson was that paint color must be tested in the actual room. The first sage sample looked gentle in the store and strangely gray beside the bathroom tile. The second looked cheerful in daylight but slightly neon under the old bulbs. The final choice worked because it was tested on two cabinet doors and viewed in morning, afternoon, and evening light. That extra day of testing prevented several days of repainting, muttering, and pretending the wrong green was “bold.”
Preparing the vanity took longer than painting it. Removing doors, labeling hinges, cleaning residue, filling dents, sanding edges, and applying primer was not glamorous. It was also the reason the final finish looked smooth. The experience confirmed a basic DIY truth: the stage that produces no satisfying social-media photograph often determines whether the finished project lasts.
The lighting change produced the biggest improvement in daily use. The decorative mirror received most of the compliments, but the side sconces made shaving, makeup, skincare, and cleaning easier. They also made the paint colors look warmer and more dimensional. It was a reminder that a bathroom reveal should be judged at 7:00 a.m. on a workday, not only when the candles are lit and the towels are folded into suspiciously perfect thirds.
Vintage shopping required discipline. Several beautiful pieces were rejected because they were too deep, too delicate, difficult to clean, or impossible to hang safely. The winning accessories were ordinary but useful: a small framed botanical print, an old glass jar for cotton swabs, a sturdy brass hook, and a compact wooden stool sealed for occasional splashes. Each object earned its place.
The makeover also showed the value of leaving some blank space. At one point, the shelf held jars, flowers, perfume bottles, rolled towels, a clock, two candles, and a ceramic bird. Removing half of those items made the remaining pieces look more special and made cleaning faster. Shabby chic style benefits from layers, but layers need breathing room.
Most importantly, the project proved that a bathroom can feel completely different without relocating plumbing or replacing every fixture. The room gained character through proportion, color, texture, lighting, and editing. Keeping the tub and cabinet boxes was not a compromise; it was a strategy. The saved money supported better paint, safer electrical work, improved ventilation, and hardware that felt good in the hand.
Given the chance to repeat the project, I would again begin with repairs, test every finish in the room, and buy accessories last. I would also order hardware early, because discovering that one missing drawer pull is backordered can turn a triumphant reveal into three weeks of opening a drawer with a piece of painter’s tape.
Conclusion
A shabby chic bathroom before-and-after makeover succeeds when it respects both sides of the phrase. The “shabby” comes from controlled patina, vintage silhouettes, softened color, and objects with history. The “chic” comes from proportion, restraint, durable materials, reliable fixtures, good lighting, and a room that is easy to use and clean.
Start with what the bathroom needs, preserve what still works, and add character in deliberate layers. A painted vanity, warm metal hardware, cottage wall treatment, vintage-inspired mirror, layered lighting, and a few carefully chosen accessories can transform a plain bathroom into a charming retreatwithout turning the renovation into an archaeological excavation of your bank account.














