
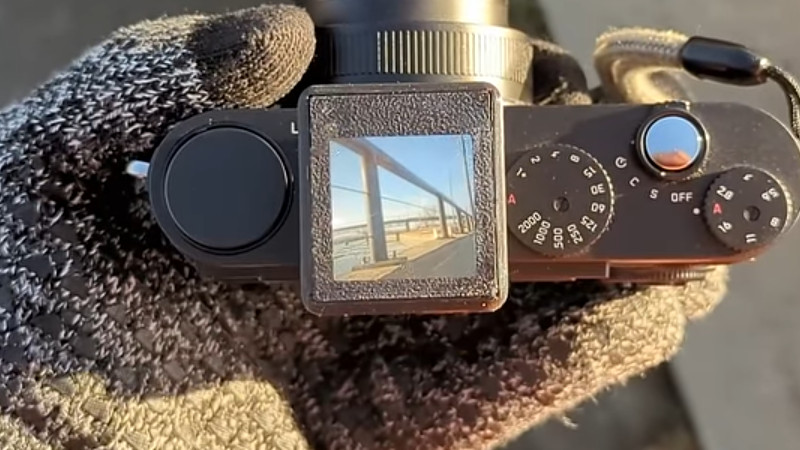
Photography has a charming habit of turning small pieces of glass, plastic, and metal into objects that cost suspiciously close to a weekend vacation. A lens hood? That will be $79, please. A cold shoe thumb grip? Somehow more than dinner. A waist level viewfinder? Historically, that could mean buying an entire medium format camera system, a collectible accessory, or a modern boutique gadget with a price tag that makes your wallet quietly walk into the sea.
But here is the good news: a waist level viewfinder does not have to be expensive, complicated, or reserved for people who say “ground glass” with the seriousness of a museum curator. Whether you shoot with a digital compact, a mirrorless camera, an old twin-lens reflex, or a hacked-together camera that looks like it was assembled by a brilliant raccoon, the waist-level shooting experience is more accessible than ever.
This article explores what a waist level viewfinder is, why photographers love it, how budget versions work, and why this humble accessory can change the way you see the world. Spoiler: it is not magic. But it does make ordinary streets, portraits, pets, plants, and coffee cups feel like tiny cinematic events.
What Is a Waist Level Viewfinder?
A waist level viewfinder is a viewing system that lets you compose a photo by looking down into the camera rather than raising the camera to your eye. In classic medium format cameras, especially twin-lens reflex cameras like Rolleiflex-style bodies, the photographer looks into a hood on top of the camera. Inside, a mirror reflects the image onto a focusing screen, often called ground glass.
The experience is wonderfully odd the first time. The image is upright, but left and right are reversed. Move the camera one way and your brain may briefly file a complaint. After a few minutes, though, it starts to feel less like a technical inconvenience and more like a creative invitation. You slow down. You notice edges. You stop stabbing the shutter button like it owes you money.
Why Photographers Still Love Waist-Level Shooting
The appeal of a waist level viewfinder is not just nostalgia, although nostalgia is definitely in the room wearing a tweed jacket. The real appeal is perspective. When the camera drops from eye level to chest, waist, or ground level, the visual relationship changes. Buildings look taller. Children and pets look more heroic. Street scenes feel less confrontational. Portrait subjects often relax because the camera is not pointed directly at their face like a tiny black interrogation device.
This is one reason waist-level shooting has remained popular among street photographers, portrait shooters, film enthusiasts, and modern digital photographers who use tilting LCD screens. It encourages a slower, more deliberate style of photography. It also makes low-angle composition easier without forcing you to kneel in suspicious sidewalk moisture.
The Classic Medium Format Look
Many photographers associate waist-level viewing with medium format film cameras. Cameras such as the Mamiya RB67, Bronica SQ, Hasselblad V-series bodies, Yashica Mat, Rolleicord, and Rolleiflex models helped define the look and rhythm of waist-level photography. These cameras often offer a large viewing screen compared with small 35mm optical finders, making composition feel immersive and tactile.
The tradeoff is that many of these cameras are now collectible, heavy, mechanically aging, or simply expensive. A working medium format system can still be a joy, but not everyone wants to carry a camera that weighs roughly the same as a serious sandwich press.
The Budget Problem: Great Idea, Expensive Tradition
Waist-level photography has always had a strange pricing problem. The concept is simple: look down, frame, focus, shoot. The gear, however, can become costly fast. Original waist-level finders for modular film cameras can be rare. Dedicated accessories for modern cameras often come with boutique pricing. And some classic cameras have climbed in value because the internet discovered that they look beautiful in mirror selfies.
That is why low-cost waist level viewfinder projects are so appealing. A simple optical design can recreate part of the experience without demanding a full vintage camera system. The basic ingredients may include a lens, a mirror, a Fresnel lens or focusing screen, and a 3D-printed housing. The result is not always perfect, but it can be surprisingly useful, especially for compact digital cameras without flip-up screens.
How a Cheap Waist Level Viewfinder Works
A budget waist level viewfinder usually works in one of two ways. The first approach is optical: it uses a small viewing lens, mirror, and screen to give the photographer a downward-looking composition aid. The second approach is screen-based: it magnifies or shades the camera’s rear LCD, making it easier to view from above, below, or in bright light.
The DIY optical approach is charming because it revives the old idea in miniature. A prime lens gathers the scene, a mirror redirects the image upward, and a Fresnel or viewing screen makes the image visible. Put those parts inside a printed case and suddenly your ordinary digital compact looks like it went to film school and came back quoting Vivian Maier.
Commercial accessories are also appearing at accessible prices. Some modern options mount to a camera’s cold shoe and provide framelines for common focal lengths such as 35mm and 50mm. Others use a hooded design to block stray light. The most practical versions are lightweight, quick to attach, and inexpensive enough that you do not need to sell a lens to try one.
What Makes a Good Low-Cost Waist Level Viewfinder?
A cheap accessory is only a bargain if it actually helps. A waist level viewfinder should make photography easier, more enjoyable, or more interesting. It does not need to be perfect, but it should solve a real problem.
1. Clear Enough Viewing
The image should be bright enough to compose with confidence. A viewfinder that turns every scene into a mysterious fog bank is not romantic; it is just annoying. Look for decent glass, a clean optical path, and a hood that blocks glare.
2. Useful Framelines
If the finder is optical and not connected to the lens, framelines matter. A 28mm viewing area with 35mm and 50mm framelines can help photographers estimate composition quickly. It will not be as precise as through-the-lens viewing, but it can be excellent for street, travel, and casual documentary work.
3. Light Weight
A waist level accessory should not make a small camera top-heavy. One reason modern compact and mirrorless shooters are interested in these finders is portability. If the accessory feels like a toaster attached to your hot shoe, the romance fades quickly.
4. A Hood That Blocks Stray Light
Bright sunlight is the ancient enemy of LCD screens and optical viewing aids. A foldable hood, magnetic hood, or simple shade can make the difference between “I can compose this shot” and “I am photographing my own reflection and possibly a tree.”
5. Realistic Expectations
A budget waist level viewfinder is not a replacement for a high-end electronic viewfinder or a precision rangefinder. It is a composition aid, a creative tool, and sometimes a delightful toy. That is not an insult. Some of the best photography tools are delightful toys that accidentally make better pictures.
DIY vs. Buy: Which Route Makes Sense?
If you enjoy tinkering, a DIY waist level viewfinder can be deeply satisfying. With a 3D-printed shell, a small lens, a mirror, and a focusing screen, you can build something functional and personal. The advantage is cost and customization. The disadvantage is that you may spend an entire Saturday learning that “close enough” is not always an optical engineering principle.
Buying a ready-made accessory is easier. A modern budget waist level finder can mount to a cold shoe, include framelines, and look stylish right out of the box. The downside is that compatibility and field of view may not perfectly match every lens or sensor format. Before buying, check whether your lens focal length makes sense with the finder’s framelines.
For photographers who already have a camera with a tilting LCD, the cheapest solution may be: use what you already own. Flip the screen up, hold the camera low, and compose from above. This gives you the waist-level experience without buying anything except perhaps a screen shade or loupe for bright days. The camera industry occasionally gives us useful features. We should encourage this behavior.
Best Uses for a Waist Level Viewfinder
Street Photography
Waist-level shooting is excellent for street photography because it feels less aggressive. People often react differently when the camera is not pressed against your face. You can compose calmly, observe the frame, and capture candid moments with a lighter touch.
Portraits
For portraits, a waist level viewfinder can soften the photographer-subject dynamic. Your subject sees your face, not just a camera. The lower angle can also add presence, though you should avoid going too low unless you want every portrait to say, “This person has conquered a small kingdom.”
Low-Angle Landscapes
Low camera positions make foreground elements more dramatic. Rocks, flowers, puddles, leaves, and textured sidewalks suddenly become compositional heroes. A waist-level viewing method lets you work low without fully committing to lying on the ground in public, which is good because ants are judgmental.
Travel Photography
When traveling, a compact waist level finder or tilting LCD can help you shoot from unusual angles quickly. Markets, train stations, cafés, and narrow streets often benefit from lower perspectives. The result feels more intimate than the standard tourist eye-level shot.
Video and Behind-the-Scenes Work
Shooting through a waist level viewfinder has also become a visual style of its own. Filming through the finder of a medium format camera creates a dreamy, framed, analog look. It is not the cleanest way to record video, but it has personalityand personality beats sterile perfection more often than camera forums admit.
Limitations You Should Know Before You Fall in Love
Waist-level viewfinders are fun, but they come with quirks. The biggest is the reversed left-right view on many traditional systems. It can make tracking movement difficult. If a subject walks left, your hands may initially move the camera as if you are piloting a shopping cart with one bad wheel.
Focusing can also be harder, especially in dim light. Many classic waist-level finders include a flip-up magnifier for critical focus. On digital cameras, focus peaking, magnified live view, and autofocus can help. If you are using a purely optical accessory with framelines, remember that it is only showing an approximate composition, not confirming focus through the taking lens.
Vertical shooting can be awkward. Traditional waist-level systems love square frames and horizontal compositions. If your camera does not have a flexible screen, portrait orientation may become a small yoga class for your wrists.
Practical Tips for Better Waist-Level Photos
Start With Static Subjects
Practice on buildings, parked bicycles, plants, books, or your cat during its three daily seconds of cooperation. Moving subjects are harder until your brain adapts to the reversed view.
Use Wider Lenses
Wide and normal lenses are easier to frame from the waist. A 28mm, 35mm, or 50mm equivalent field of view works well for street, travel, and documentary shooting. Long lenses demand more precision and may make the finder feel like a guessing machine.
Watch Your Horizon
Low angles are dramatic, but crooked horizons are dramatic in the wrong direction. Use frame lines, grid overlays, or a level if your camera provides one.
Embrace the Slower Pace
The real value of a waist level viewfinder is not speed. It is attention. Look at the corners. Study the background. Let the frame settle before pressing the shutter. The best shots often arrive when you stop chasing and start noticing.
Experience Notes: Living With a Waist Level Viewfinder on a Budget
Using a low-cost waist level viewfinder feels a little like discovering a secret door in a camera you thought you already understood. The first surprise is not the look of the photos. It is the change in body language. Instead of raising the camera to your eye and announcing to the entire street, “Hello, I am now making a photograph,” you look down. Your shoulders relax. Your elbows tuck in. You become less of a sniper and more of a person checking whether their camera has a tiny aquarium on top.
On a walk through a busy neighborhood, that difference matters. At eye level, people notice the lens immediately. At waist level, many people assume you are changing settings, reviewing a picture, or arguing silently with the menu system. This makes candid photography feel calmer. You still need to be respectful, of course. A discreet tool is not a license to be creepy. But it does help you photograph public life without turning every frame into a confrontation.
The second surprise is how much the lower angle changes ordinary scenes. A row of parked scooters becomes a graphic pattern. A dog on a leash looks like the mayor of the sidewalk. A coffee cup on a café table suddenly has foreground drama. Even boring pavement develops texture. The world does not become more interesting; you become willing to see it from a place other than your own eyeballs.
There is also a learning curve, and it is hilarious. If the finder reverses the image left to right, your first attempts may feel like playing a video game with the controller upside down. You move the camera, the image slides the wrong way, and your brain briefly considers returning to simpler hobbies like folding fitted sheets. After a while, though, the motion becomes intuitive. A useful trick is to look up at the subject first, point the camera roughly, then return to the finder for fine framing.
Focusing depends on the setup. With a digital camera and tilting LCD, autofocus and focus peaking make life easy. With an optical budget finder, you are usually estimating composition while relying on the camera’s autofocus or zone focusing. That means it works best with wider lenses and decent depth of field. Stop down a little, keep your shutter speed sensible, and do not expect surgical macro precision from a tiny finder that cost less than a pizza night.
The biggest practical benefit is creative momentum. A cheap waist level viewfinder encourages experimentation because it feels low-risk. You are not protecting a rare collector’s accessory. You are playing. That playful mindset leads to better photos than obsessing over specifications. You try low angles. You shoot reflections. You frame through railings. You put foreground objects close to the lens. You make a few terrible images, laugh, and then make one that surprises you.
That is the real charm of a waist level viewfinder for not a lot: it gives you a different way to look without demanding a different identity as a photographer. You do not have to become a film purist, a gear historian, or a person who owns three leather camera straps named after mountain ranges. You just add a simple viewing tool, lower the camera, and let the frame feel new again.
Conclusion: A Small Finder With a Big Personality
A waist level viewfinder is one of those photography tools that proves creativity does not always require more megapixels, faster autofocus, or a lens with a name longer than a legal document. Sometimes, all it takes is changing where you place your eyeor in this case, not placing your eye at the camera at all.
For budget-minded photographers, the modern waist level viewfinder revival is exciting. DIY projects show that simple optics can still be useful. Affordable accessories make the retro experience easy to try. Tilting LCD screens provide a built-in alternative for many digital cameras. None of these options are perfect, but all of them can help you slow down, compose better, and see familiar scenes from a fresh angle.
So yes, a waist level viewfinder for not a lot is absolutely worth exploring. It may not transform every photo into art. It may confuse your hands for the first afternoon. It may even make your camera look like it is wearing a tiny hat. But if it helps you see differently, shoot more thoughtfully, and enjoy the process, that little hat has earned its place in the bag.














