
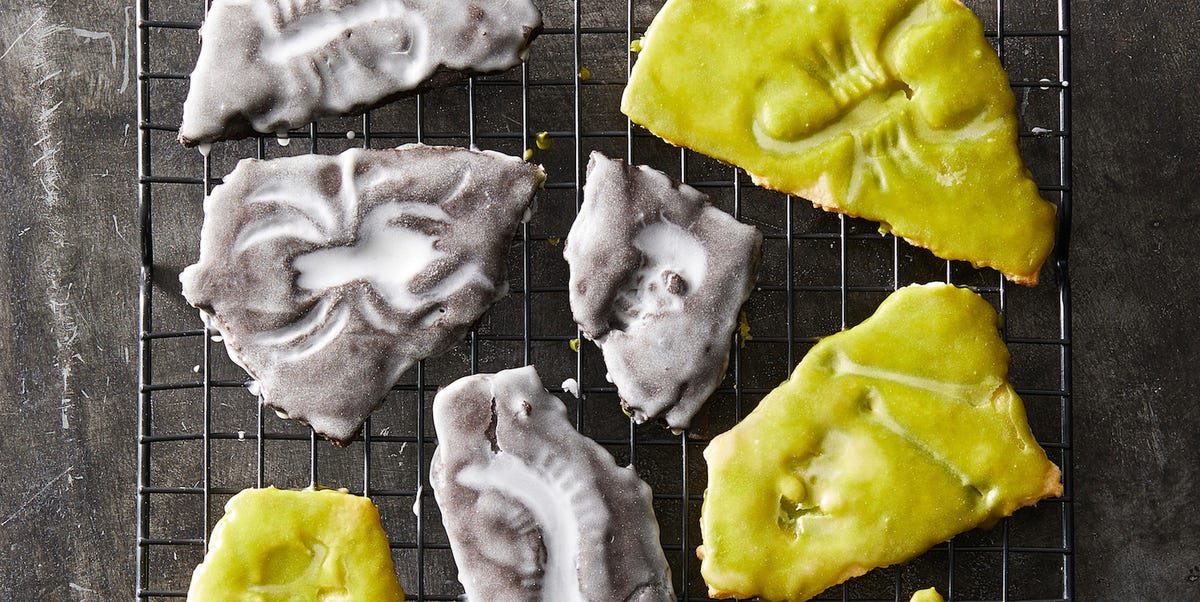
Fossil cookies are what happens when a sugar cookie walks into a natural history museum and says, “Make me educational, but still buttery.” These charming cookies look like little prehistoric relics, complete with dinosaur footprints, shell impressions, leaf marks, or “ancient” cocoa-dusted cracks. They are playful enough for a kids’ dinosaur party, polished enough for a themed dessert table, and simple enough that you do not need a pastry degree or a paleontology license.
The best fossil cookies recipe starts with a reliable roll-out sugar cookie dough. The dough needs to be soft enough to bite, firm enough to hold an imprint, and flavorful enough that adults do not quietly abandon them near the juice boxes. In this version, butter brings richness, vanilla adds warmth, a little brown sugar gives a sandy fossil-bed color, and a careful chilling step helps every dinosaur track stay visible after baking.
This guide explains how to make fossil cookies from scratch, how to stamp realistic impressions, how to prevent spreading, and how to turn a humble cookie tray into an edible dig site. Grab a clean toy dinosaur, a few seashells, or even a sprig of rosemary. The excavation begins in your mixing bowl.
What Are Fossil Cookies?
Fossil cookies are cut-out or hand-shaped cookies decorated with pressed impressions that resemble fossils. The most popular version is dinosaur fossil cookies, where a clean plastic dinosaur foot is pressed into the dough before baking. You can also use shells, leaves, small toy skeletons, fork tines, or textured fondant tools to create “fossilized” details.
Unlike highly iced cookies, fossil cookies get most of their personality from texture. That makes them easier and less messy than fully decorated sugar cookies. A little cocoa powder, cinnamon sugar, or powdered sugar can highlight the indentations, giving the cookies a weathered, stone-like appearance. They are perfect for dinosaur birthday parties, classroom treats, museum-themed snacks, Halloween dessert boards, and weekend baking projects with kids.
Why This Is the Best Fossil Cookies Recipe
A great fossil cookie has three jobs. First, it must taste good. Nobody wants a cookie that looks like a fossil and chews like one. Second, it must hold its shape. If the footprint disappears in the oven, congratulations, you have made regular cookies with mysterious dents. Third, the dough must be easy to handle, especially if children are helping.
This recipe uses a balanced sugar cookie base with enough flour for structure, enough butter for tenderness, and enough chilling time to keep the details sharp. The dough rolls easily, accepts imprints cleanly, and bakes into cookies with crisp edges and soft centers. The flavor is cozy and lightly caramel-like thanks to a small amount of brown sugar, which also helps create the earthy fossil color.
Ingredients for Fossil Cookies
For the Cookies
- 2 3/4 cups all-purpose flour, spooned and leveled
- 1 teaspoon baking powder
- 1/2 teaspoon fine salt
- 1/2 teaspoon ground cinnamon, optional
- 1 cup unsalted butter, softened but still cool
- 3/4 cup granulated sugar
- 1/4 cup light brown sugar, packed
- 1 large egg, room temperature
- 2 teaspoons pure vanilla extract
- 1 tablespoon milk, only if needed
For the Fossil Finish
- 1 tablespoon unsweetened cocoa powder
- 1 tablespoon powdered sugar
- 1/2 teaspoon cinnamon, optional
- Clean toy dinosaur feet, seashells, leaves, or fossil stamps
- Small pastry brush or clean food-safe paintbrush
Equipment You Need
You do not need fancy tools to make fossil cookies. A mixing bowl, electric mixer, rolling pin, parchment paper, baking sheets, and a round cookie cutter are enough. A 2 1/2-inch or 3-inch round cutter gives the cookies a classic “stone tablet” look. If you do not own a round cutter, use the rim of a drinking glass.
For the fossil effect, choose tools with clear texture. A dinosaur foot creates a bold track. A small seashell makes a beautiful ammonite-style impression. A clean leaf creates delicate veins. Whatever you use, wash it thoroughly with warm, soapy water, dry it completely, and keep it reserved for food contact while baking.
How to Make Fossil Cookies
Step 1: Mix the Dry Ingredients
In a medium bowl, whisk together the flour, baking powder, salt, and cinnamon if using. Whisking helps distribute the leavening evenly, which prevents random puffing. Fossil cookies should rise slightly, not inflate like tiny cookie balloons.
Step 2: Cream the Butter and Sugars
In a large bowl, beat the softened butter, granulated sugar, and brown sugar for about two minutes, just until creamy and slightly fluffy. Do not overbeat. Too much air can cause the cookies to spread and puff, which softens the fossil imprint. We want prehistoric detail, not prehistoric blur.
Step 3: Add Egg and Vanilla
Beat in the egg and vanilla extract until smooth. Scrape down the sides of the bowl so everything mixes evenly. Vanilla is important here because these cookies are not buried under frosting. The cookie itself needs to carry the flavor.
Step 4: Add the Flour Mixture
Add the dry ingredients in two additions, mixing on low speed just until the dough comes together. If the dough looks crumbly and refuses to gather, add one tablespoon of milk. The finished dough should feel soft but not sticky. If it sticks aggressively to your fingers, add one extra tablespoon of flour. Be careful, though. Too much flour can make the cookies dry.
Step 5: Roll and Chill
Divide the dough in half. Place each half between two sheets of parchment paper and roll to about 1/4 inch thick. Rolling before chilling is one of the easiest ways to avoid wrestling with a cold brick of dough later. Stack the rolled sheets on a baking pan and chill for at least one hour, or until firm.
Step 6: Cut the Cookie Shapes
Preheat the oven to 350°F. Line baking sheets with parchment paper. Remove one sheet of chilled dough from the refrigerator and peel off the top parchment. Cut circles or irregular “stone” shapes. Transfer the cookies to the prepared baking sheets, spacing them about two inches apart.
Step 7: Stamp the Fossils
Press your clean dinosaur foot, shell, leaf, or fossil stamp firmly into each cookie. The key is confident pressure without smashing the cookie flat. If the dough becomes soft, slide the whole baking sheet into the refrigerator for 10 to 15 minutes before baking. Cold dough holds detail better.
Step 8: Bake
Bake the fossil cookies for 9 to 11 minutes, or until the edges look set and the bottoms are lightly golden. Avoid deep browning because overbaked sugar cookies turn hard. Let the cookies cool on the baking sheet for five minutes, then transfer them to a wire rack to cool completely.
Step 9: Add the Ancient Dust
In a small bowl, mix cocoa powder, powdered sugar, and cinnamon. Once the cookies are fully cool, brush a tiny amount of the mixture over the surface, especially into the stamped lines. Gently wipe away the excess with a clean brush or paper towel. The darker powder settles into the grooves, making the fossil impressions pop.
Tips for Perfect Fossil Cookies
Use Cool, Softened Butter
Butter should be soft enough to dent with gentle pressure but not greasy or melted. Overly warm butter makes dough spread. If your kitchen is hot, chill the mixed dough for 15 minutes before rolling.
Roll Evenly
A 1/4-inch thickness is ideal for fossil cookies. Thinner cookies may become too crisp and fragile, while thicker cookies can puff and soften the stamped details. Rolling between parchment sheets keeps the dough smooth and reduces the need for extra flour.
Chill Before and After Stamping
Chilling is the secret handshake of successful cut-out cookies. Chill the rolled dough before cutting, then chill the stamped cookies again if they feel soft. This helps the imprints survive the oven.
Do Not Overwork the Scraps
You can reroll scraps, but each reroll adds more handling and sometimes more flour. Gather scraps gently, press them together, reroll, and chill again if needed. The second batch may be slightly less tender, but still delicious.
Choose Safe Stamping Tools
Only use clean, non-toxic objects for stamping. Wash toy dinosaurs, shells, or tools thoroughly before use. Do not let children taste raw dough, because unbaked flour and raw egg can carry harmful germs. The fun part is stamping; the tasting part comes after baking.
Flavor Variations
Chocolate Fossil Cookies
Replace 1/4 cup of the flour with unsweetened cocoa powder for a darker cookie that looks like volcanic rock. Chocolate fossil cookies pair nicely with white chocolate drizzle or a dusting of powdered sugar.
Gingerbread Fossil Cookies
Add 1 teaspoon ground ginger, 1 teaspoon cinnamon, and 1 tablespoon molasses to the dough. Reduce the milk unless the dough needs it. This version tastes warm and spicy, making it excellent for fall parties or holiday dinosaur fans. Yes, holiday dinosaur fans are real, and they deserve cookies too.
Lemon Fossil Cookies
Add 1 tablespoon lemon zest and replace the cinnamon with a pinch of cardamom. Lemon fossil cookies look especially pretty with leaf impressions and a light powdered sugar dusting.
Gluten-Free Fossil Cookies
Use a cup-for-cup gluten-free baking flour blend that contains xanthan gum. Chill the dough well, because gluten-free dough can be more delicate. Press stamps gently and transfer cookies with a thin spatula.
Fossil Cookie Decorating Ideas
The simplest fossil cookies need only cocoa dust, but you can take them further. For a party tray, mix several “specimens”: dinosaur footprints, shell fossils, leaf fossils, and bone-shaped impressions. Place them on crushed chocolate sandwich cookies to create edible dirt. Add a few candy rocks or chocolate pebbles for a full dig-site effect.
You can also serve the cookies with small paintbrushes and let kids “excavate” them from cookie crumbs. For classroom events, pack each cookie in a clear bag with a label that says “Dino Fossil Found.” It is low-effort, high-impact, and children will absolutely act like they personally discovered a new species.
How to Store Fossil Cookies
Store cooled fossil cookies in an airtight container at room temperature for up to five days. Place parchment between layers to protect the impressions. If you dust them with cocoa sugar, store them after the dusting has settled so the finish does not smear too much.
You can freeze the baked cookies for up to two months. Freeze them in a single layer first, then move them to a freezer-safe container. Thaw at room temperature. For the freshest look, add the cocoa dust after thawing.
Can You Make Fossil Cookie Dough Ahead?
Yes. The dough can be made up to two days ahead and stored in the refrigerator. For best results, roll it between parchment before chilling. You can also freeze the rolled dough sheets for up to two months. When ready to bake, thaw in the refrigerator until flexible, then cut, stamp, and bake.
Common Mistakes and How to Fix Them
The Imprints Disappeared
The dough was likely too warm, too puffy, or stamped too lightly. Chill the stamped cookies before baking and press the design a little deeper next time. Also, avoid adding too much baking powder.
The Cookies Spread Too Much
Warm butter, under-chilled dough, or a hot baking sheet can cause spreading. Use cool baking sheets for each batch and chill the cookies before they go into the oven.
The Dough Is Too Sticky
Sticky dough usually needs chilling, not a mountain of flour. Chill it for 20 minutes first. If it is still tacky, add flour one tablespoon at a time.
The Cookies Are Too Hard
They may have baked too long or received too much flour during rolling. Pull them from the oven when the edges are set but not deeply browned. They will firm as they cool.
Serving Ideas for Dinosaur Parties
Fossil cookies are natural party stars. Serve them on a tray labeled “Fresh From the Dig Site.” Scatter chocolate cookie crumbs around the platter for edible dirt. Add toy shovels, mini magnifying glasses, or paper cards naming each fossil type. For a birthday party, pair them with cupcakes topped with green frosting “grass” and small dinosaur toppers.
For a hands-on activity, bake the cookies before the party and let guests brush cocoa powder into the grooves. This keeps the raw dough stage safely in the kitchen while still giving kids a fun decorating moment. It is less chaotic than handing six-year-olds piping bags full of icing and hoping for civilization to survive.
Experience Notes: What Making Fossil Cookies Taught Me
The first time I made fossil cookies, I underestimated how dramatic a simple footprint could be. I had prepared sprinkles, icing, and a backup plan involving chocolate chips because I assumed the cookies might look plain. Then I pressed a tiny dinosaur foot into the dough, lifted it, and suddenly there it was: a perfect little track, like a T. rex had tiptoed through dessert. It was ridiculous and wonderful.
The biggest lesson is that fossil cookies reward patience. The dough may seem ready after mixing, but chilling transforms it. Warm dough acts like soft clay left in the sun. It stretches, sticks, and loses detail. Cold dough behaves like a well-trained baking assistant. It cuts cleanly, stamps beautifully, and moves from counter to baking sheet without throwing a tantrum.
I also learned that the best-looking fossil cookies are not always perfectly round. Slightly uneven circles and hand-cut oval shapes often look more natural, like stones pulled from a dig site. If a cookie edge cracks a little, do not panic. That crack may become part of the ancient artifact charm. Fossils are not famous for looking freshly polished.
For kids, the stamping step is pure magic. They do not need advanced decorating skills, and they do not have to wait for icing colors or tiny piping tips. They press, lift, gasp, and immediately want to do another one. The activity feels part baking project, part science lesson, and part treasure hunt. It also gives adults a rare chance to say, “Please stop making the dinosaur stomp in the flour,” which is not a sentence most people expect to use before lunch.
One practical trick is to create a sample cookie before letting everyone loose. Show how hard to press, how to lift the toy straight up, and how to leave enough space around the imprint. Children tend to press with either butterfly softness or asteroid impact. A quick demo saves several cookies from becoming abstract prehistoric pancakes.
Another experience-based tip: keep the cocoa dust light. The first time I brushed on too much, the cookies looked less like fossils and more like they had survived a chimney incident. A tiny amount is enough. Brush it into the grooves, then gently remove the excess. The goal is shadow, not mudslide.
Fossil cookies also make great conversation starters. Adults ask how the imprints were made. Kids invent stories about which dinosaur walked across which cookie. Someone will inevitably choose the biggest cookie and announce that it belongs in a museum. They are easy, memorable, and surprisingly flexible. You can make them silly for children, rustic for a fall dessert board, or elegant with shell impressions and a delicate cinnamon-sugar finish.
Most importantly, fossil cookies remind us that baking does not always need to be perfect to be delightful. A little unevenness makes them better. A smudged footprint still looks ancient. A cracked edge still tastes buttery. And when a cookie can make people laugh before they even take a bite, that cookie has already done its job.
Conclusion
The best fossil cookies recipe is simple, sturdy, and full of personality. Start with a buttery roll-out sugar cookie dough, chill it well, stamp it with clean dinosaur feet or natural textures, and finish with a light dusting of cocoa sugar. The result is a tray of cookies that looks playful, tastes homemade, and brings a little prehistoric drama to the dessert table.
Whether you are planning a dinosaur birthday party, a school activity, a museum-themed snack, or just a weekend baking adventure, these fossil cookies are easy to love. They are proof that a cookie does not need neon frosting or complicated decorations to be exciting. Sometimes all it takes is butter, imagination, and one very clean toy dinosaur.














