
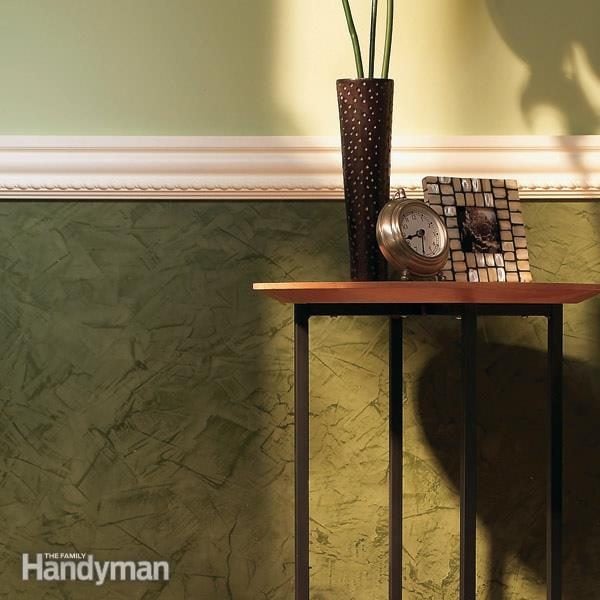
Chair rail molding is one of those small architectural details that can make a room look as if it finally remembered to put on a belt. Without it, walls can feel plain, stretched, or oddly unfinished. With it, a dining room becomes more polished, a hallway gains structure, and a bedroom wall suddenly looks like it has opinions about designin the best possible way.
Traditionally, chair rail molding was installed to protect walls from the backs of chairs. Imagine a dining room before washable paint, touch-up markers, and “just move the furniture carefully” optimism. Chairs scraped plaster, wallpaper got dinged, and homeowners needed a horizontal trim line to take the hit. Today, chair rail molding still serves that practical purpose, but it has also become a powerful decorative tool used to divide wall colors, cap wainscoting, frame wallpaper, and create classic or modern interior style.
Whether you are planning a full wall trim project or simply wondering why your dining room wall looks like it needs a little architectural caffeine, this guide explains what chair rail molding is, where to install it, how high it should go, what materials to choose, and which design ideas can make it feel fresh rather than fussy.
What Is Chair Rail Molding?
Chair rail molding is a horizontal strip of trim installed along a wall, usually somewhere between the lower third and middle portion of the wall. It can be simple and narrow, wide and decorative, painted to match the trim, stained for a natural wood look, or used as a dividing line between two wall treatments.
In traditional rooms, chair rail molding often appears in dining rooms, breakfast nooks, hallways, foyers, stairways, and formal living rooms. In modern homes, it can also work beautifully in bedrooms, powder rooms, home offices, nurseries, and even mudrooms. The key is not the room itselfit is how the molding relates to the wall height, furniture, color palette, and overall style.
Chair Rail vs. Wainscoting vs. Picture Rail
These terms are sometimes tossed around like decorative confetti, so let’s clean them up. Chair rail is the horizontal trim piece. Wainscoting is the paneling or trim treatment installed on the lower portion of a wall. Picture rail is typically placed much higher, often near the upper wall, and was historically used to hang artwork without damaging plaster.
Chair rail molding can stand alone, but it is often used as the top cap for wainscoting, beadboard, board and batten, or picture-frame molding. Think of chair rail as the line that says, “This lower wall treatment ends here, thank you very much.”
Why Chair Rail Molding Still Works
Some design features age like milk. Chair rail molding, when done thoughtfully, ages more like a good wooden dining table. It remains popular because it blends function, proportion, and style in a way few small trim pieces can.
It Protects Walls
The original purpose still matters. In dining rooms, breakfast areas, classrooms, hallways, and tight spaces, chair backs, bags, shoes, and daily traffic can leave marks on walls. A chair rail can absorb bumps and reduce scuffs, especially when painted with a durable semi-gloss or satin finish.
It Adds Architectural Character
Plain drywall can look clean, but sometimes it also looks like a blank spreadsheet. Chair rail molding adds shadow lines, depth, and a custom-built appearance. Even a modest trim profile can make a builder-basic room feel more intentional.
It Helps Divide Color and Texture
Chair rail molding is perfect when you want two wall finishes in one room. You can paint the lower wall a darker color and keep the upper wall light, install wallpaper above the rail, use beadboard below it, or create a tonal look with the same color in different finishes.
It Improves Room Proportion
A well-placed chair rail can visually lower a ceiling that feels too tall, stretch a narrow hallway, or give structure to a room with large empty walls. Interior design is partly about guiding the eye, and chair rail molding is basically a polite traffic officer for your walls.
How High Should Chair Rail Molding Be?
The most common chair rail height is roughly 30 to 36 inches from the floor, but there is no universal law carved into a sacred piece of oak. The best height depends on ceiling height, furniture, wall proportions, and the visual effect you want.
A reliable design rule is to place chair rail molding around one-third of the way up the wall. For an 8-foot ceiling, that usually puts the rail near 32 inches. In rooms with taller ceilings, you may raise it slightly, but be careful. A chair rail installed too high can make a room look chopped in half, like the wall is wearing pants pulled up to its armpits.
Practical Height Guidelines
For traditional dining rooms, 32 to 36 inches often works well. For hallways, 30 to 34 inches may look balanced and still protect the wall. For wainscoting, the total heightincluding the chair rail capshould usually stay close to the lower third of the wall unless you are intentionally creating a dramatic, tall-panel look.
Before installing, test the height with painter’s tape. Run a strip around the room and live with it for a day. Look at it while standing, sitting, and walking through the room. If it feels awkward now, it will not magically become graceful after you nail it to the wall.
Best Materials for Chair Rail Molding
Chair rail molding comes in several materials, each with its own strengths. The right choice depends on budget, room conditions, desired finish, and how much patience you have for sanding tiny grooves while questioning your life choices.
Solid Wood
Solid wood is classic, durable, and ideal if you want a stained finish. Oak, poplar, pine, and maple are common options. Wood can be shaped beautifully and repaired easily, but it may expand and contract with humidity changes. It also typically costs more than MDF.
MDF
Medium-density fiberboard, or MDF, is a popular choice for painted chair rail molding. It is smooth, budget-friendly, and easy to work with. It does not have natural grain, which is fine if you plan to paint it. However, MDF is not the best choice for wet areas unless it is specifically moisture-resistant.
PVC or Polyurethane
PVC and polyurethane trim are useful in bathrooms, laundry rooms, basements, and other moisture-prone spaces. These materials resist rot and moisture better than wood or standard MDF. They are lightweight and often come pre-primed, but some profiles may look less authentic than real wood in historic homes.
Flexible Molding
For curved walls, bay windows, or unusual architectural features, flexible molding can be a problem-solver. It costs more, but it prevents the comedy routine of trying to force rigid trim around a curve while muttering at your toolbox.
Chair Rail Molding Installation Basics
Installing chair rail molding is a manageable DIY project for confident beginners, especially in a simple rectangular room. The key is careful measuring, level layout lines, clean cuts, and patient finishing.
Tools and Supplies You May Need
Common tools include a tape measure, pencil, level or laser level, miter saw, stud finder, nail gun or finish nails, construction adhesive, caulk, wood filler, sandpaper, primer, and paint. For stain-grade wood, you will also need stain and a clear protective finish.
Step 1: Plan the Height
Measure up from the floor and mark the desired height around the room. Use a level to connect the marks. Do not rely on the floor alone, because older homes often have floors with enough personality to qualify for their own reality show.
Step 2: Find the Studs
Use a stud finder to locate wall studs and mark them lightly above or below the installation line. Nailing into studs gives the molding a stronger hold. Adhesive can help, but nails into framing provide better long-term security.
Step 3: Measure and Cut
Measure each wall section carefully. Cut molding with a miter saw, using 45-degree cuts for outside corners. Inside corners can be mitered, but many carpenters prefer coping for a cleaner fit, especially when walls are not perfectly square.
Step 4: Dry Fit Before Nailing
Hold each piece in place before attaching it permanently. Check corners, seams, and alignment. Dry fitting is the boring step that saves you from the dramatic step, which usually involves removing nailed trim and saying words not found in polite design magazines.
Step 5: Attach the Molding
Apply a small bead of construction adhesive to the back of the molding if desired, then fasten it with finish nails. Keep the top edge aligned with your level line. Work slowly around the room, checking as you go.
Step 6: Fill, Caulk, Sand, and Paint
Fill nail holes with wood filler, caulk small gaps along the top and bottom edges, and sand smooth after everything dries. Prime raw material, then paint. Semi-gloss and satin finishes are practical choices because they are easier to wipe clean than flat paint.
Chair Rail Molding Ideas for Every Room
Chair rail molding can look formal, casual, modern, farmhouse, coastal, or traditional depending on how you use it. Here are design ideas that work in real homesnot just in rooms where nobody appears to own a charging cable.
1. Classic Dining Room with Wainscoting
The most timeless chair rail idea is to pair it with wainscoting in a dining room. Paint the lower section white, cream, charcoal, navy, or deep green, then use a lighter wall color or wallpaper above. This creates elegance without making the room feel like it is auditioning for a museum tour.
2. Two-Tone Painted Walls
Use chair rail molding as a dividing line between two paint colors. A darker shade below grounds the room, while a lighter shade above keeps the space open. Try warm greige below with soft white above, sage green below with ivory above, or navy below with pale blue above.
3. Wallpaper Above the Chair Rail
Wallpaper can be expensive and visually bold, so using it above chair rail molding is a smart compromise. The lower wall can stay painted and durable, while the upper wall carries pattern, color, and personality. This works especially well in powder rooms, dining rooms, and entryways.
4. Beadboard Below the Rail
Beadboard below a chair rail creates a cottage, farmhouse, or coastal look. It is especially charming in bathrooms, mudrooms, breakfast nooks, and children’s rooms. In moisture-prone spaces, choose a water-resistant material and use proper caulking and paint.
5. Modern Monochrome Treatment
For a fresh look, paint the chair rail, lower trim, and wall all the same color. This keeps the texture and shadow of the molding while avoiding a busy contrast. A monochrome treatment works beautifully with soft taupe, creamy white, olive, charcoal, or muted blue.
6. Picture-Frame Molding Below
Add rectangular panel molding below the chair rail to create a refined, traditional wall treatment. Keep the spacing consistent and align panels with windows, doors, or furniture when possible. This approach can make a living room or dining room feel custom without requiring full wood paneling.
7. Chair Rail in a Hallway
Hallways take a beating from backpacks, laundry baskets, pet traffic, and the mysterious wall marks nobody in the house admits to making. Chair rail molding protects the wall and adds rhythm to a long corridor. Use a slightly simple profile so the hallway does not feel cramped.
8. Bold Color Below, Neutral Above
If you love dramatic paint colors but fear turning your room into a cave, apply the bold color below the chair rail. Deep green, wine red, slate blue, chocolate brown, or black can look sophisticated when balanced with a lighter upper wall.
9. Natural Wood Chair Rail
A stained wood chair rail adds warmth and works well in craftsman, traditional, rustic, or transitional homes. Pair it with matching baseboards, door trim, or wood furniture so it feels connected rather than random.
10. Chair Rail as a Small Display Ledge
A wider chair rail or cap molding can act as a narrow ledge for small framed art, seasonal decor, or tiny plants. Keep it minimal; this is not the place to display every souvenir duck you have ever met.
Common Chair Rail Mistakes to Avoid
Installing It Too High
The most common mistake is placing chair rail molding too high. This can make the room feel shorter and visually awkward. When in doubt, start near one-third of the wall height and adjust slightly based on furniture and room proportions.
Choosing a Profile That Fights the House
An ornate colonial chair rail may look strange in a sleek modern loft. A thin square-edge rail may look underwhelming in a formal historic dining room. Match the profile to the home’s architecture and existing trim.
Ignoring Existing Trim
Chair rail should relate to baseboards, window casing, door trim, and crown molding. It does not need to match exactly, but it should feel like part of the same design family. Random trim is how walls start gossiping.
Skipping Wall Prep
Trim highlights uneven walls, bad paint edges, and sloppy caulk lines. Before installation, clean the wall, patch holes, sand rough spots, and remove old adhesive or bumps. Good prep is invisible when done rightand painfully visible when skipped.
Is Chair Rail Molding Still in Style?
Yes, chair rail molding is still in style when it is used intentionally. The dated look usually comes from overly glossy two-tone walls, awkward heights, or trim that feels disconnected from the room. Modern chair rail design is cleaner, better proportioned, and often paired with sophisticated color palettes, wallpaper, or panel molding.
Instead of thinking of chair rail as an old-fashioned dining room strip, think of it as a flexible design line. It can be subtle, bold, classic, or contemporary. The best version is the one that supports your room’s architecture rather than shouting, “I was installed during a weekend of questionable confidence.”
Extra Experience: Real-World Lessons From Chair Rail Molding Projects
One of the biggest lessons from chair rail molding projects is that the wall is rarely as straight as it looks. A room can seem perfectly normal until you hold a long piece of trim against the wall and discover waves, dips, and corners that apparently studied geometry in a very relaxed school system. This is why caulk, careful nailing, and flexible expectations matter. A small gap can often be corrected with paintable caulk, but forcing a stiff piece of molding against a crooked wall may create bigger problems.
Another practical experience is that paint color changes everything. A chair rail painted bright white against a dark wall creates a crisp, formal contrast. The same molding painted the same color as the wall becomes quiet and architectural. In smaller rooms, a low-contrast look often feels calmer. In dining rooms or entryways, contrast can be beautiful because those spaces can handle a little drama. The goal is to choose the level of contrast based on how much attention you want the molding to receive.
It is also wise to think about furniture before choosing chair rail height. If the project is for a dining room, pull out a chair and see where the back naturally touches the wall. If the molding is supposed to protect the wall, it should meet the real-life contact point. But do not let one chair completely control the room if it creates an ugly proportion. Function matters, but so does the final look. The sweet spot is where protection and proportion shake hands like civilized adults.
For DIY installation, inside corners are where many beginners struggle. Walls are often not exactly 90 degrees, so two 45-degree miter cuts may not meet perfectly. Coping one piece into the profile of another can produce a cleaner inside corner, although it takes practice. If you are painting the trim, small imperfections are more forgiving because caulk and paint can hide minor gaps. If you are staining wood, accuracy becomes much more important because filler and caulk are harder to disguise.
Another experience worth remembering is that chair rail molding looks best when it has a relationship with the rest of the room. If the baseboards are very slim, an oversized chair rail can feel top-heavy. If the crown molding is ornate, a tiny chair rail may look timid. Before buying trim, compare samples against your existing baseboards, casing, and wall height. Many home centers allow you to hold profiles together, and this simple step can prevent a design mismatch.
Finally, do not underestimate finishing time. Cutting and nailing the molding may feel like the main event, but filling holes, sanding, caulking, priming, and painting often take longer than expected. This is the part that separates a professional-looking chair rail from a “we got tired near the end” chair rail. Clean paint lines, smooth nail holes, and tight caulk joints make the molding look built-in rather than glued-on. In trim work, the final 20 percent is where the magic lives.
Conclusion
Chair rail molding is a small detail with a surprisingly large design impact. It can protect walls, improve proportions, divide color schemes, cap wainscoting, and give plain rooms the architectural character they have been quietly begging for. The best chair rail projects begin with thoughtful planning: choose the right height, select a profile that matches your home, prepare the wall properly, and finish the trim with care.
Whether you prefer a classic dining room with wainscoting, a bold two-tone hallway, a wallpapered powder room, or a modern monochrome wall treatment, chair rail molding offers plenty of creative possibilities. Done well, it does not feel dated. It feels intentional, polished, and practicalthe home improvement version of wearing good shoes.













