
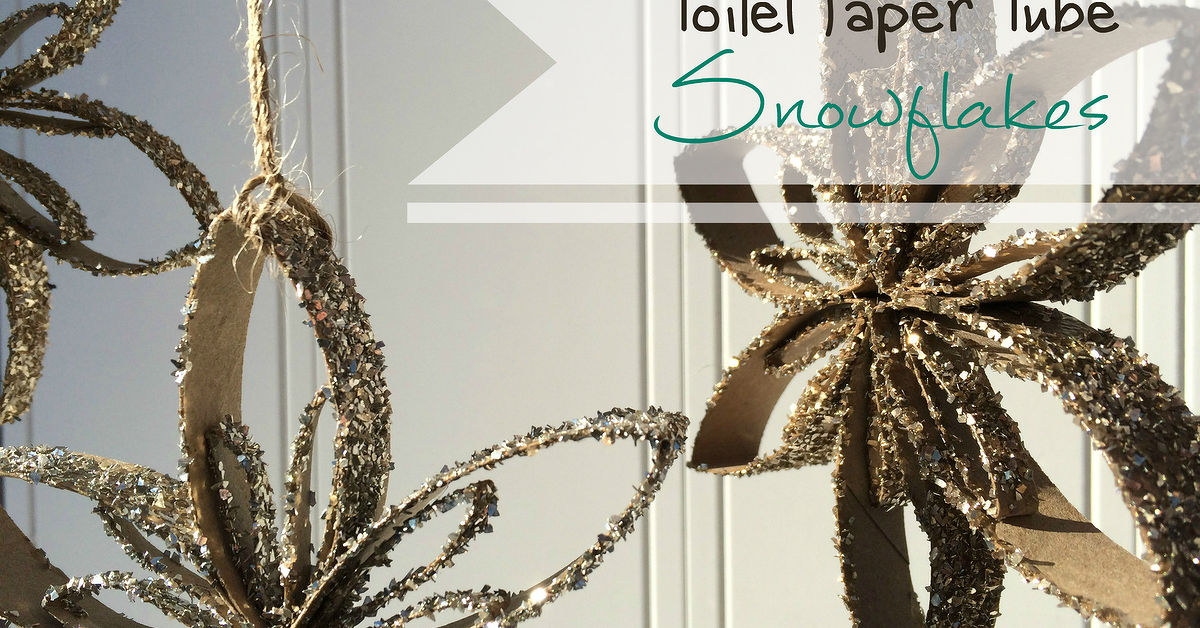
Some holiday decorations arrive in velvet boxes. Others arrive disguised as the empty toilet paper tube nobody wanted to throw away. If that sounds less glamorous than “heirloom mercury glass ornament,” give it five minutes, a pair of scissors, and a little glue. Suddenly, that humble cardboard cylinder becomes a delicate snowflake ornament that looks surprisingly boutique. Yes, the same tube that once lived in the bathroom can now hang proudly on your Christmas tree. That is what we call a seasonal redemption arc.
Upcycled toilet paper tube snowflake ornaments are inexpensive, customizable, lightweight, and wonderfully satisfying to make. They are also a smart way to reuse paperboard before it heads to the recycling bin. This craft works for adults, kids with supervision, classroom projects, family craft nights, handmade gift toppers, winter window displays, and anyone who believes holiday decorating should not require a second mortgage.
In this guide, you will learn how to make beautiful paper tube snowflakes, what supplies work best, how to get clean cuts, how to decorate them, and how to avoid the tiny disasters that turn “charming handmade” into “why is there glitter in the dog’s eyebrow?”
Why Toilet Paper Tube Snowflakes Are the Perfect Upcycled Holiday Craft
The beauty of toilet paper roll snowflake ornaments is that they sit right at the intersection of easy, cheap, eco-friendly, and impressive. Most families already have the main material at home, and the rest of the supplies are basic craft drawer regulars: scissors, glue, paint, string, and maybe glitter if you are feeling brave or emotionally prepared for sparkle migration.
Unlike flat paper snowflakes, cardboard tube snowflakes have structure. When you flatten and slice the tube into rings, each ring becomes a petal-like oval. Glue those ovals together, and the ornament instantly gets dimension. Add smaller folded pieces between the larger rings, and the design starts to look intricate, almost like laser-cut décor. The secret is simple geometry, not wizardry.
This craft is also wonderfully forgiving. If one ring is slightly crooked, it usually disappears into the final design. If the snowflake is not perfectly symmetrical, congratulations: real snowflakes are unique too. Nature has been doing “close enough but gorgeous” for a very long time.
Materials Needed for Upcycled Toilet Paper Tube Snowflake Ornaments
You do not need a craft store shopping spree to make these ornaments. Start with what you already have, then upgrade finishes only if you want a more polished look.
Basic Supplies
- Empty toilet paper tubes or paper towel tubes
- Sharp scissors
- Ruler
- Pencil
- Hot glue gun or strong craft glue
- White acrylic paint, spray paint, or craft paint
- Twine, ribbon, fishing line, or ornament hooks
Optional Decorating Supplies
- Glitter, metallic flakes, or mica powder
- Mod Podge or white school glue
- Washi tape
- Sequins, beads, rhinestones, or tiny pom-poms
- Gold, silver, or pearl paint pens
- Clear sealant spray
For a cleaner, more elegant look, stick with white paint and a touch of shimmer. For a kid-friendly Christmas craft, bring out the color: icy blue, peppermint red, evergreen, rose gold, or even rainbow snowflakes. Snow does not have to file a complaint if your ornament is purple.
Before You Start: Choosing and Preparing the Tubes
Use clean, dry cardboard tubes. If the idea of bathroom-sourced crafting bothers you, use paper towel tubes, wrapping paper tubes, or cardboard mailing tubes instead. Paper towel tubes are especially useful because they are longer and can produce several ornaments from one tube.
Flatten each tube gently with your hands. Press along the edges to create two crisp folds. The flatter the tube, the easier it is to measure and cut even strips. If the cardboard springs back, place it under a heavy book for ten minutes. This is also a great moment to pretend the book is doing important craft engineering.
Decide how wide you want your strips. A good beginner width is about 1/2 inch. For delicate ornaments, cut strips around 3/8 inch. Thicker strips create bold farmhouse-style snowflakes, while thinner strips make lace-like designs. If you want consistency, mark the tube with a ruler before cutting. If you prefer a relaxed handmade look, eyeballing works too.
How to Make Upcycled Toilet Paper Tube Snowflake Ornaments
This basic design creates a classic six-point snowflake. Once you learn it, you can adjust the size, layers, color, and details endlessly.
Step 1: Flatten and Cut the Tube
Flatten one toilet paper tube and use a ruler to mark equal sections across the length. Cut along the marks to create oval cardboard rings. Most standard toilet paper tubes will give you about six to eight usable rings, depending on your strip width.
Try to keep your cuts straight, but do not panic over tiny differences. Once the snowflake is glued and painted, the overall shape matters more than microscopic perfection. This is a craft, not a NASA docking maneuver.
Step 2: Build the Center Flower Shape
Take six oval rings and arrange them in a circle with the pointed ends meeting in the middle. The shape should look like a simple flower or starburst. Add a small dot of hot glue where each ring touches at the center, then glue the sides of neighboring rings together.
If you are working with children, use tacky craft glue or glue dots instead of hot glue. Hot glue works fast and holds firmly, but it should be handled by adults or older kids with supervision. Nobody wants a Christmas craft that requires an ice pack intermission.
Step 3: Add Smaller Folded Pieces
To create a more detailed snowflake, cut additional rings and fold them in half to make small V-shaped pieces. Glue one folded piece inside each large oval petal. This adds depth and gives the snowflake a more ornate, frosty look.
You can also glue folded pieces between the outer edges of the large petals. This creates sharp points around the snowflake and makes it look fuller. For a dramatic ornament, add both inside and outside folded pieces. The more layers you add, the more it starts to look like something from a fancy holiday market rather than your recycling pile.
Step 4: Reinforce the Shape
Once the snowflake is assembled, check every joint. Add tiny dots of glue wherever the cardboard pieces meet. Let the ornament dry completely before painting. If you move it too soon, it may shift, wobble, or collapse into a sad cardboard spider. Patience is part of the sparkle.
Step 5: Paint the Ornament
White paint is the classic choice because it instantly says “snowflake.” Acrylic craft paint works well, especially if you use a small brush to reach the inner edges. Spray paint gives faster coverage and a smoother finish, but it should be used outdoors or in a well-ventilated area.
For a rustic look, leave the cardboard natural and add only white dry brushing along the edges. For glam Christmas décor, paint the snowflake gold, silver, champagne, or black with metallic highlights. A black snowflake with gold glitter can look surprisingly elegant, like winter went to a cocktail party.
Step 6: Add Glitter or Texture
If you want sparkle, brush a thin layer of white glue or decoupage medium over the painted snowflake and sprinkle glitter while it is wet. Place the ornament over a tray or paper plate to catch excess glitter. Tap gently, then let it dry.
Fine glitter creates a frosty shimmer. Chunky glitter creates a bolder, icy effect. Mica powder gives a subtle glow without the full “craft explosion” experience. If you are glitter-avoidant, use pearl paint, metallic paint pens, or white puffy paint dots instead.
Step 7: Add a Hanger
Thread twine, ribbon, clear fishing line, or thin metallic cord through one point of the snowflake. Tie a knot and trim the ends. For Christmas trees, ribbon gives a cozy handmade look. For windows, fishing line makes the snowflakes appear to float. For gift wrap, baker’s twine feels charming and casual.
Creative Design Variations
Once you master the basic toilet paper tube snowflake ornament, you can create an entire flurry of designs without making the same ornament twice.
Minimalist White Snowflakes
Paint the snowflakes matte white and skip the glitter. Hang them on a green tree, in a window, or against a dark wall. The clean contrast looks modern and calm, like your holiday décor drinks herbal tea and has excellent boundaries.
Rustic Farmhouse Snowflakes
Leave some cardboard showing and lightly brush the edges with white paint. Add jute twine for hanging. These ornaments pair beautifully with pinecones, dried orange slices, wood beads, burlap ribbon, and neutral Christmas decorations.
Glam Metallic Snowflakes
Paint the tubes gold, silver, copper, or champagne before assembling. Add rhinestones or pearl beads at the center. These look lovely on a white tree, a mantel garland, or a New Year’s Eve display.
Kid-Made Colorful Snowflakes
Let kids paint each piece before assembly. Use washable paint, glitter glue, stickers, and sequins. The finished ornaments may not match your curated holiday palette, but they will have personality. Sometimes personality looks like six colors and one googly eye. Embrace it.
Large Statement Snowflakes
Use paper towel tubes or wrapping paper tubes to make larger rings. Build a large snowflake for a front door wreath, wall display, classroom bulletin board, or holiday photo backdrop. Larger snowflakes are easier to see from across the room and can be decorated with heavier embellishments.
Where to Display Toilet Paper Tube Snowflake Ornaments
These DIY snowflake ornaments are lightweight, which makes them easy to hang almost anywhere. Use them as Christmas tree ornaments, window decorations, mantel garland pieces, gift toppers, place cards, classroom décor, or winter party decorations.
For a beautiful window display, hang several snowflakes at different heights using clear fishing line. Add fairy lights nearby, and the snowflakes will cast soft shadows in the evening. For a mantel, string them along twine with small clothespins. For a tree, mix them with glass ornaments, pinecones, ribbon, and warm white lights.
You can also attach a small name tag to each ornament and use them as handmade place cards for a holiday dinner. Guests can take them home afterward, which is much nicer than sending everyone away with leftover fruitcake and emotional confusion.
Helpful Tips for a Cleaner, Stronger Ornament
Cutting even rings makes the final snowflake easier to assemble. A ruler helps, but a paper cutter can work if the tube is flattened very firmly. Sharp scissors are important because dull scissors crush the cardboard instead of slicing it.
Use small amounts of glue. Too much glue can create bulky blobs that show after painting. If using hot glue, apply a tiny dot and press the pieces together for a few seconds. If using craft glue, hold the joints with clothespins or paper clips while they dry.
Paint before adding glitter if you want full coverage. Paint after assembly if you want a unified color. Paint before assembly if you want easier access to the inside edges. There is no single correct order; it depends on the finish you want and how much patience you have left after finding the glue sticks.
If you plan to store the ornaments for next year, spray them lightly with clear sealant once everything is dry. Store them flat in a shallow box with tissue paper between layers. Do not crush them under heavy decorations unless you enjoy opening a box of festive cardboard pancakes.
Common Mistakes to Avoid
The first common mistake is cutting strips too narrow for the cardboard quality. Thin strips look pretty, but flimsy tubes may bend or wrinkle. If your tube is soft, cut wider rings for better structure.
The second mistake is rushing the drying time. Paint, glue, and glitter all need time to set. If you hang the ornament while the glue is still soft, gravity may redesign it without asking permission.
The third mistake is overdecorating. A little sparkle can make the snowflake magical. Too many beads, sequins, stickers, and ribbons can overwhelm the delicate shape. Choose one main finish and one accent. For example, white paint plus silver glitter. Natural cardboard plus jute twine. Gold paint plus one pearl bead. Simple choices often look more expensive.
Why This Craft Is Great for Families and Classrooms
Upcycled toilet paper tube snowflake ornaments are excellent for group crafting because the materials are affordable and easy to collect. Teachers can ask families to save clean paper tubes for a few weeks. Parents can pre-cut rings for younger children. Older kids can handle measuring, arranging, painting, and decorating.
The project also introduces useful lessons about reuse, symmetry, pattern-making, and creative problem-solving. Children can compare six-point designs, experiment with different shapes, and see how ordinary materials can become something beautiful. That is a powerful little lesson wrapped in glue and glitter.
For family craft night, set up stations: cutting, gluing, painting, and decorating. Keep wipes nearby, cover the table, and prepare a drying area. Add cocoa, holiday music, and the firm understanding that glitter is not allowed near snacks. Sparkly cookies sound festive until you remember glitter is not a food group.
Personal Experience: What Making These Snowflakes Taught Me
The first time I made upcycled toilet paper tube snowflake ornaments, I expected them to look like a “nice try” craft. You know the kind: sweet from a distance, questionable up close, and best displayed where lighting is forgiving. Instead, I was genuinely surprised by how elegant they looked once painted. The cardboard edges formed crisp shadows, the repeated oval shapes created symmetry, and the white paint hid every humble clue about the material’s former career.
My biggest lesson was that consistency matters more than complexity. The snowflakes that looked best were not the ones with the most pieces. They were the ones with evenly cut rings and a clear pattern. Six large petals with six smaller folded inserts looked better than a crowded design with random bits glued everywhere. In crafting, as in holiday buffet strategy, more is not always better.
I also learned that painting the tubes before assembly can save frustration. When I painted after gluing, it was harder to reach the inside curves. A small brush helped, but I still found tiny brown cardboard shadows hiding in the corners. When I painted the flattened tube first, let it dry, and then cut the strips, the process felt cleaner. The downside is that cut edges may still show cardboard, so I touched them up at the end. That little extra step made the ornaments look much more finished.
Hot glue was the fastest adhesive, but it required a light hand. My first snowflake had glue lumps that looked like tiny frozen marshmallows. After that, I used smaller dots and pressed the joints gently. The result was stronger and neater. For kids, I would still choose tacky glue or glue dots, even if drying takes longer. Safety beats speed, especially when small hands are excited.
The most satisfying version was a set of white snowflakes with fine iridescent glitter. I hung them in a window with clear thread, and they looked far more expensive than they had any right to look. In daylight, they were soft and papery. At night, near string lights, they shimmered just enough. Not disco-ball enough to frighten guests, but enough to say, “Yes, I am handmade and fabulous.”
I also tried using them as gift toppers, and that may be my favorite practical use. A plain kraft paper package with twine and a small white cardboard snowflake looked thoughtful, simple, and charming. It turned a basic wrapped gift into something personal without spending extra money. The recipient can remove the snowflake and hang it on a tree, which makes the wrapping feel less disposable.
If I were making a big batch again, I would collect tubes early, cut everything at once, and assemble in stages. One evening for cutting, one for gluing, one for painting and decorating. Trying to do everything in one sitting is possible, but it can turn peaceful crafting into a production line run by a person slowly losing patience with wet paint. Spacing it out keeps the project fun.
Most of all, this craft reminded me that holiday decorating does not have to be expensive to feel special. A handmade ornament carries a story. It shows time, care, and a little imagination. And when someone says, “That snowflake is beautifulwhere did you buy it?” you get the rare joy of answering, “I made it from a toilet paper tube,” then watching their face do a full holiday reboot.
Conclusion
Upcycled toilet paper tube snowflake ornaments prove that beautiful Christmas décor can come from the simplest materials. With a few clean cardboard tubes, careful cuts, glue, paint, and a bit of sparkle, you can create lightweight ornaments that look delicate, festive, and surprisingly refined. They are budget-friendly, family-friendly, customizable, and perfect for trees, windows, mantels, gifts, classrooms, and winter displays.
This project is also a lovely reminder that creativity often starts with noticing potential in ordinary things. Before tossing that empty tube, imagine it painted white, dusted with shimmer, and hanging in a window like a tiny handmade snowstorm. That is the magic of upcycling: it turns “trash” into tradition, one snowflake at a time.
Note: Adults should handle hot glue, spray paint, craft knives, and sharp scissors when making these ornaments with children. Use clean, dry cardboard tubes and allow paint, glue, and glitter finishes to dry fully before hanging or storing.













