
Learning how to tie a fishing knot is one of those small skills that can make a very large fish-sized difference. You can buy the shiny rod, the smooth reel, the premium line, and the lure that looks like it came from a tiny underwater fashion showbut if your knot slips, all that gear becomes a sad story you tell at dinner.
The good news? You do not need to memorize every knot ever invented by anglers, sailors, and people with suspiciously patient fingers. Most fishing situations can be handled with a handful of strong, easy fishing knots. Whether you are tying line to a hook, connecting braid to fluorocarbon, adding a lure, building a leader, or spooling a reel, the right knot keeps your setup secure and your confidence high.
This guide breaks down 10 easy methods for tighter lines, explains when to use each fishing knot, and gives practical tying tips that actually help on the waternot just in a diagram where the line behaves like a polite noodle.
Why Fishing Knots Matter More Than Beginners Think
A fishing knot is the weakest point in your setup if it is tied poorly. That does not mean knots are bad; it means they deserve attention. A clean, properly seated knot helps maintain line strength, improves lure action, and reduces the chance of losing fish at the worst possible moment.
Different fishing lines behave differently. Monofilament is forgiving and stretchy. Fluorocarbon is tougher and less visible underwater, but it can be stiff. Braided line is thin and powerful, but slick. Because of that, one knot may shine with mono and act like a drama queen with braid.
Before You Tie: Three Rules for Stronger Fishing Knots
First, always wet the knot before tightening. A little water or saliva reduces friction and heat, which can weaken line. Second, tighten slowly and evenly. Do not yank the knot like you are starting a lawn mower. Third, trim the tag end, but leave a tiny bit of extra line for security. A knot with no tag end is a knot looking for an excuse to quit.
1. Improved Clinch Knot
The improved clinch knot is one of the most popular fishing knots for tying line to hooks, lures, snaps, and swivels. It is simple, quick, and reliable when tied correctly, especially with monofilament or fluorocarbon line.
Best For
Use the improved clinch knot when attaching a hook, small lure, spinner, or swivel to mono or fluorocarbon line.
How to Tie It
- Pass the line through the eye of the hook.
- Wrap the tag end around the standing line 5 to 7 times.
- Pass the tag end through the small loop near the hook eye.
- Pass it back through the larger loop you just created.
- Wet the knot, pull slowly, and tighten.
- Trim the tag end.
This knot is a classic for a reason. It is fast enough to tie while standing in a breeze, but strong enough for everyday fishing. The biggest mistake is failing to pull the wraps neatly together. If the coils overlap badly, cut it off and try again. Your future fish deserves better.
2. Palomar Knot
The Palomar knot is famous because it is strong, easy to learn, and excellent with braided line. It creates a double-line connection through the eye of the hook, which helps distribute pressure.
Best For
Use the Palomar knot for hooks, jigs, swivels, and many lures, especially when fishing with braid.
How to Tie It
- Double about 6 inches of line and pass the loop through the hook eye.
- Tie a loose overhand knot with the doubled line.
- Pass the hook, lure, or swivel through the loop.
- Wet the knot.
- Pull both the standing line and tag end to tighten evenly.
- Trim the tag end.
The Palomar knot is wonderfully simple, but there is one catch: the lure has to pass through the loop. That is easy with a hook or small jig, less fun with a giant crankbait that looks like it came with its own zip code.
3. Uni Knot
The uni knot is a versatile fishing knot that can be used for tying line to hooks, attaching lures, and even connecting lines when used in a double-uni setup. If fishing knots had a Swiss Army knife, this would be wearing the tiny red outfit.
Best For
Use the uni knot for terminal tackle, lures, and situations where you want a dependable knot that works with several line types.
How to Tie It
- Run the line through the hook eye and bring the tag end alongside the standing line.
- Form a loop by turning the tag end back toward the hook.
- Wrap the tag end around both lines inside the loop 5 to 7 times.
- Wet the knot.
- Pull the tag end to snug the wraps, then pull the standing line to slide the knot down.
- Trim the tag end.
The uni knot is forgiving, compact, and strong. With braided line, many anglers add extra wraps to help the slick line grip better.
4. Double Uni Knot
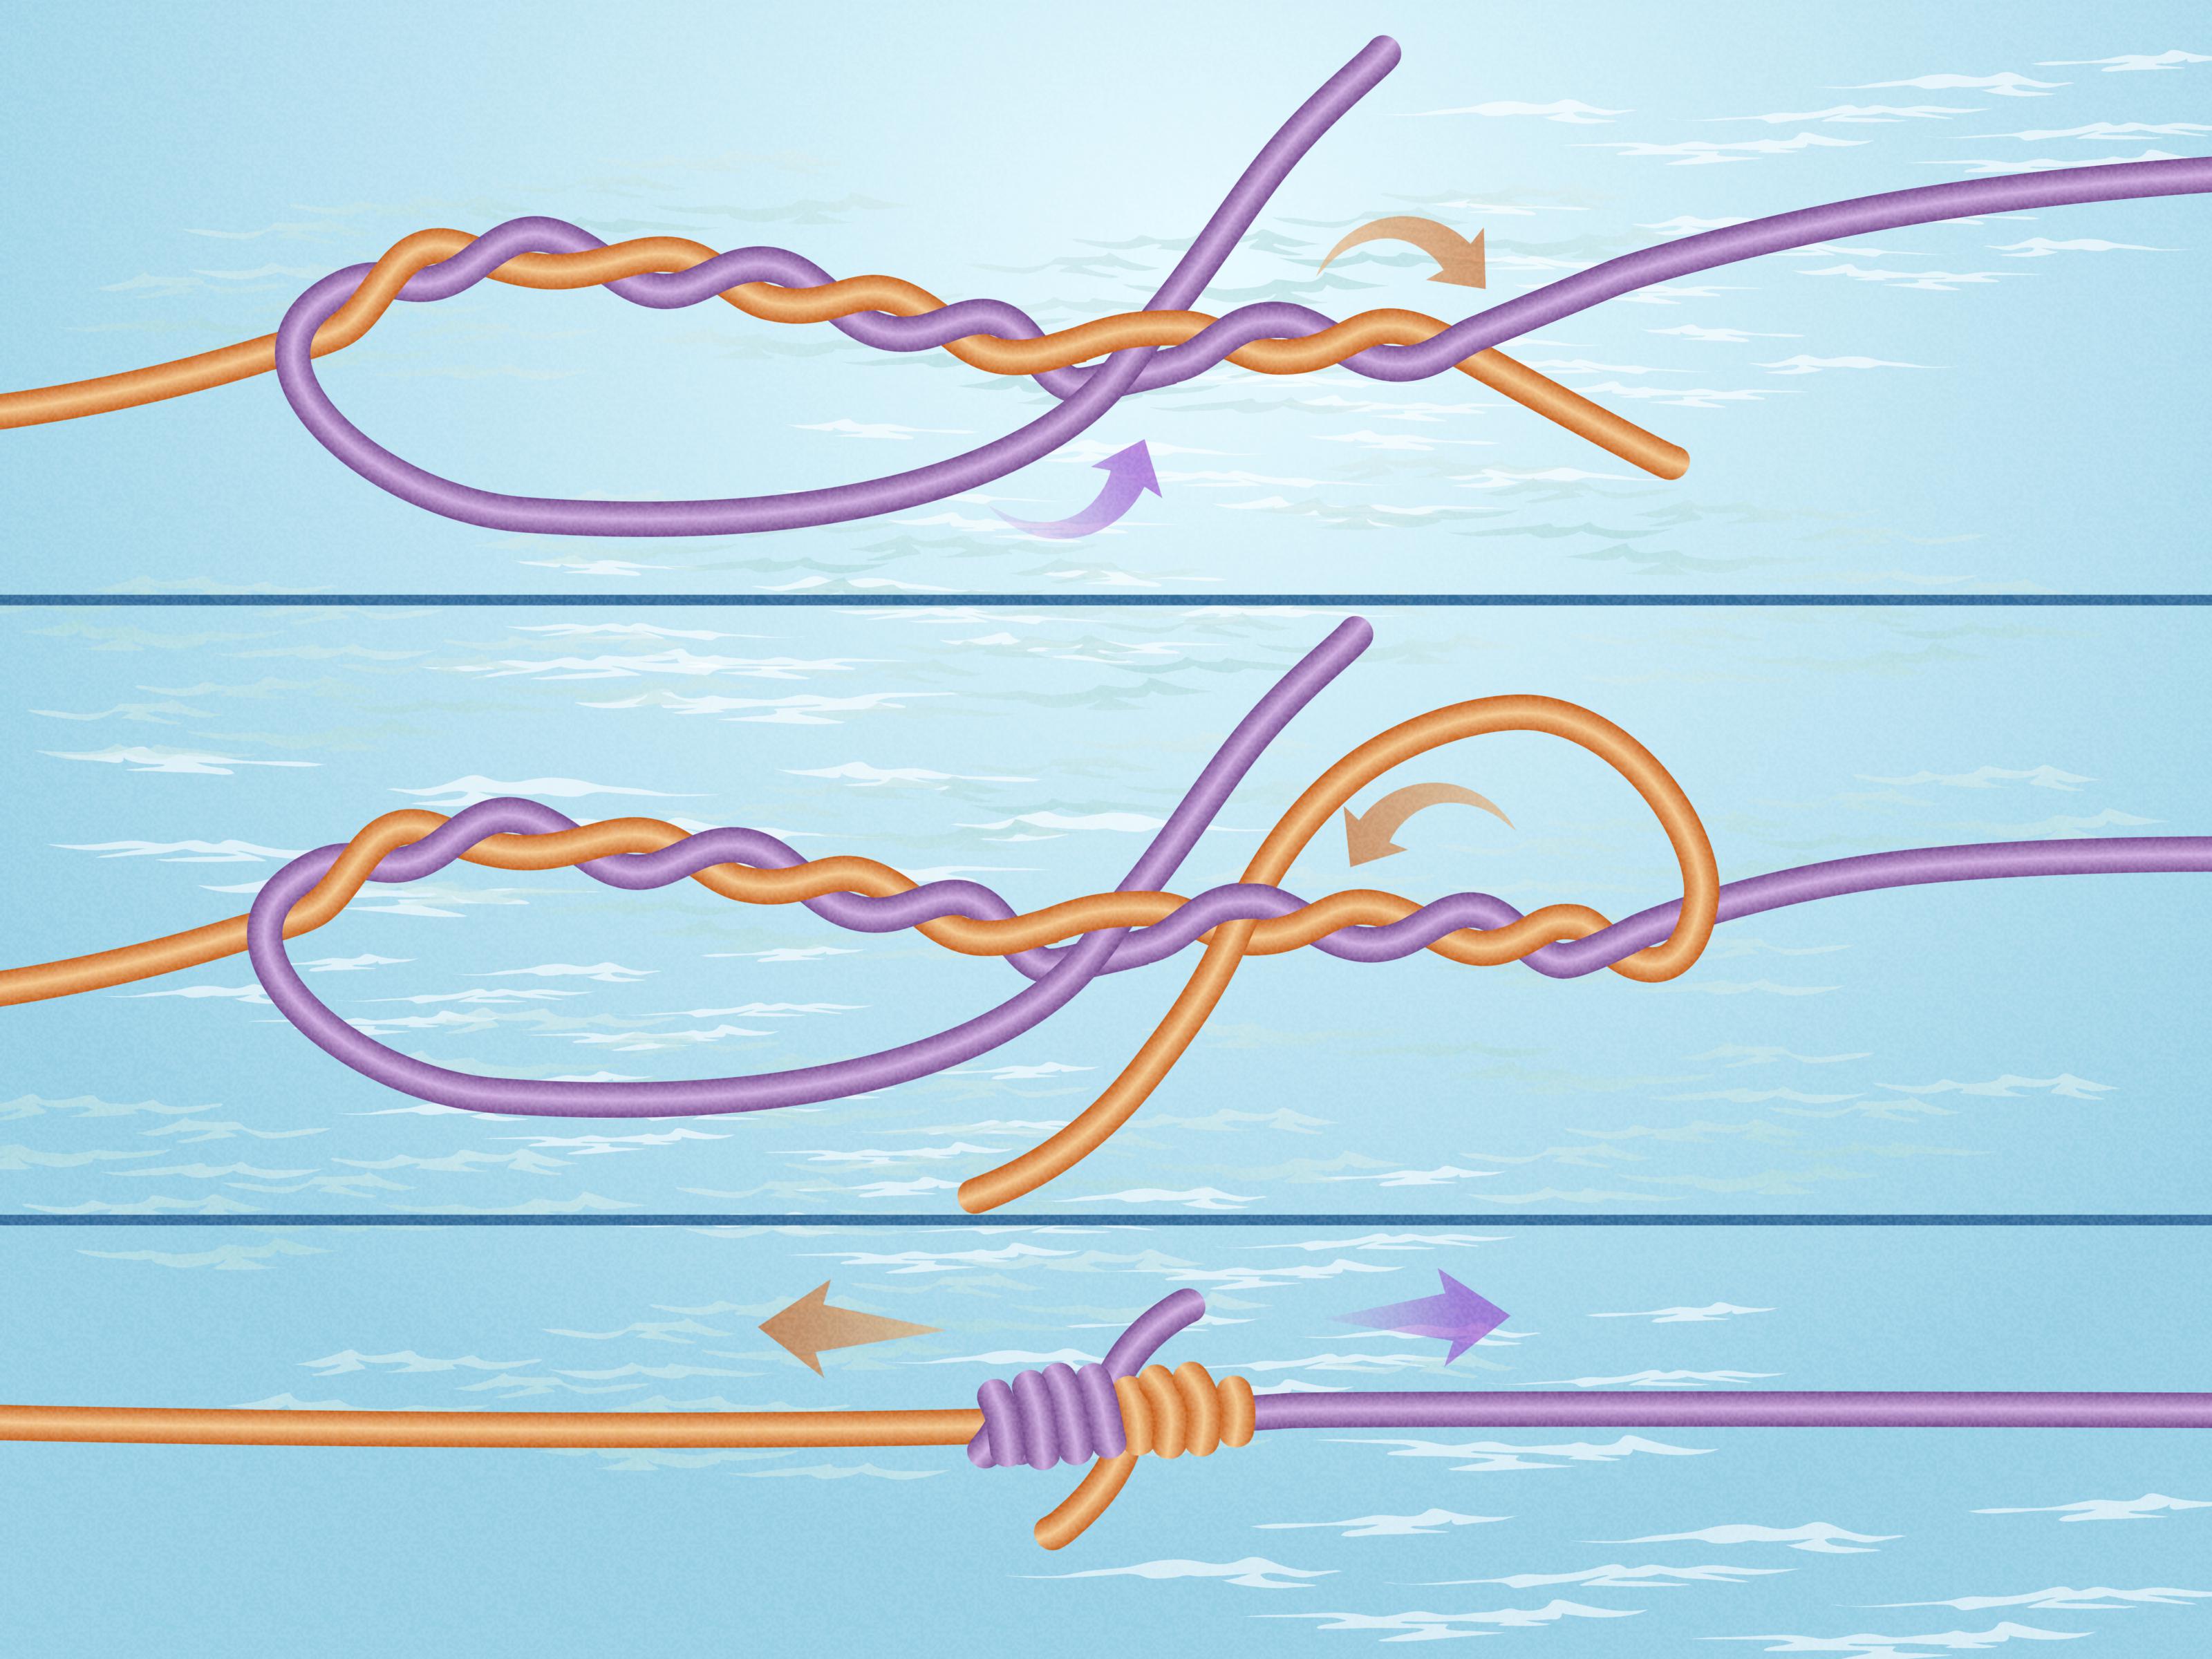
The double uni knot connects two fishing lines together. It is often used when tying braided main line to a fluorocarbon or monofilament leader. It is easier to learn than some slimmer leader knots, which makes it a favorite for beginners and weekend anglers.
Best For
Use the double uni knot for connecting braid to fluorocarbon, mono to mono, or lines of similar to moderately different diameters.
How to Tie It
- Overlap the two lines by several inches.
- With the first tag end, form a loop over both lines.
- Wrap the tag end inside the loop 5 to 7 times.
- Pull to snug the first uni knot.
- Repeat the same steps with the second line.
- Wet both knots and pull the standing lines until the knots slide together.
- Trim both tag ends.
This knot is not the thinnest connection in the fishing universe, but it is reliable and easy to inspect. If it looks like two tidy barrels kissing in the middle, you are doing well.
5. Arbor Knot
The arbor knot is used to attach fishing line to a reel spool. It is not a knot for tying on hooks or lures. Think of it as the quiet backstage worker who helps the whole show begin.
Best For
Use the arbor knot when spooling a spinning reel, baitcaster, or conventional reel with fresh line.
How to Tie It
- Wrap the line around the reel spool.
- Tie an overhand knot around the standing line.
- Tie a second overhand knot in the tag end as a stopper.
- Pull the standing line until the first knot slides down to the spool.
- Trim excess tag line.
The arbor knot keeps line anchored to the spool while you load it. With braided line, many anglers use backing or tape because braid can slip on a bare spool.
6. Blood Knot
The blood knot is a clean, strong line-to-line knot used often in fly fishing and leader building. It works best when connecting lines of similar diameter.
Best For
Use the blood knot for joining sections of monofilament or fluorocarbon leader material.
How to Tie It
- Overlap the ends of two lines.
- Wrap one tag end around the other line 5 to 7 times.
- Bring that tag end back through the center gap.
- Repeat with the other tag end, passing it through the center gap in the opposite direction.
- Wet the knot and pull both standing lines slowly.
- Trim both tag ends.
The blood knot looks elegant when tied correctly and like a tiny bird nest when rushed. Take your time. This knot rewards neat wraps.
7. Surgeon’s Knot
The surgeon’s knot is one of the easiest knots for joining two lines. It is bulkier than a blood knot, but much simpler, especially when your hands are cold or the fish are actively mocking your speed.
Best For
Use the surgeon’s knot to connect leader to tippet or join two similar lines quickly.
How to Tie It
- Overlap the two lines.
- Create a loop with both lines together.
- Pass both tag ends through the loop twice for a double surgeon’s knot.
- Wet the knot.
- Pull all four line ends evenly to tighten.
- Trim the tag ends.
This knot is especially useful when speed matters. It is not the sleekest knot for tiny guides, but it is dependable and beginner-friendly.
8. Non-Slip Loop Knot
The non-slip loop knot creates a fixed loop that lets a lure, streamer, or bait move more freely. More movement can make artificial baits look more natural in the water.
Best For
Use the non-slip loop knot for topwater plugs, jerkbaits, streamers, and lures that benefit from extra action.
How to Tie It
- Tie a loose overhand knot in the line.
- Pass the tag end through the hook or lure eye.
- Run the tag end back through the overhand knot.
- Wrap the tag end around the standing line 4 to 5 times.
- Pass the tag end back through the overhand knot.
- Wet and tighten carefully, leaving a small fixed loop.
Do not make the loop enormous. You want freedom, not a jump rope. A small loop usually gives the lure enough movement without making the connection sloppy.
9. Snell Knot
The snell knot ties the line directly around the hook shank instead of only to the eye. It is especially useful for certain bait hooks and rigs where a straight pull improves hook-setting power.
Best For
Use the snell knot for bait fishing, circle hooks, live bait rigs, and some flipping or pitching setups.
How to Tie It
- Pass the line through the hook eye toward the hook point.
- Lay the tag end along the hook shank.
- Create a loop and wrap the tag end around the shank and line 5 to 7 times.
- Hold the wraps in place and pull the standing line slowly.
- Wet and tighten the knot neatly against the hook eye.
- Trim the tag end.
A good snell knot aligns the line with the hook shank. That alignment can help the hook rotate properly when a fish bites.
10. Albright Knot
The Albright knot is used to join lines of different diameters or materials. It is a common choice for connecting a heavier leader to lighter main line, especially in saltwater situations.
Best For
Use the Albright knot for joining mono or fluorocarbon leader to braid, wire, or heavier line.
How to Tie It
- Make a loop in the heavier line.
- Pass the lighter line through the loop.
- Wrap the lighter line around both strands of the heavier loop 8 to 12 times.
- Pass the tag end back through the loop the same way it entered.
- Wet the knot and tighten slowly.
- Trim the tag ends closely.
The Albright knot is a little more advanced than the improved clinch or Palomar, but it is worth learning if you fish leaders often. Tight, even wraps are everything.
How to Choose the Right Fishing Knot
Choosing the right fishing knot depends on what you are connecting. For tying a hook or lure to monofilament, the improved clinch knot is a dependable choice. For braid, the Palomar knot or uni knot often performs better. For connecting two lines, start with the double uni knot or surgeon’s knot. For leader building, learn the blood knot. For lure action, use the non-slip loop knot.
Beginners do not need to learn all 10 knots in one day. Start with three: Palomar, improved clinch, and double uni. Those will cover many freshwater and light saltwater situations. Then add the arbor knot for spooling reels and the non-slip loop knot when you want more lure movement.
Common Fishing Knot Mistakes
Not Wetting the Knot
Dry knots create friction. Friction creates heat. Heat weakens line. Wet the knot before tightening, and you will avoid one of the easiest mistakes in fishing.
Using Too Few Wraps
Thin or slick lines often need more wraps. Braided line may require extra turns because it does not bite into itself the same way mono does.
Pulling the Knot Too Fast
A knot should seat smoothly. If you jerk it tight, the wraps can cross, burn, or bunch unevenly.
Ignoring the Tag End
Trim the tag end, but do not cut it flush against the knot. Leaving a tiny bit of line gives the knot room to settle under pressure.
Fishing Knot Strength Tips for Tighter Lines
Practice at home with thick line or cord before trying tiny fluorocarbon at sunrise. Your fingers will learn the motion faster when they can actually see what is happening. Once you understand the pattern, switch to the line you fish most often.
After tying any knot, test it. Wrap the line around your hands carefully or use a safe pulling tool, then apply steady pressure. If the knot slips, breaks, or looks ugly enough to scare the bait, retie it. A few extra seconds at the dock can save a fish later.
Also, match your knot to your line. A Palomar knot is wonderfully strong with braid, but not always convenient for large lures. A blood knot is beautiful for similar leader materials, but a double uni may be easier when conditions are rough. The best fishing knot is not always the strongest in a laboratoryit is the strongest knot you can tie correctly when your hands are wet and your buddy is already catching fish.
Real-World Experience: What Fishing Knots Teach You on the Water
Experience has a funny way of turning fishing knots from “small detail” into “the whole reason I am now staring silently at the lake.” Many anglers remember the first fish they lost to a bad knot more clearly than the first fish they caught with a good one. That is because knot failure feels personal. The rod bends, the drag sings, hope risesand then the line goes slack. Somewhere underwater, a fish is wearing your lure like jewelry.
One practical lesson is that confidence matters. When you know your knot is clean, wet, seated, and tested, you fish differently. You cast closer to structure. You work a lure with more patience. You set the hook with commitment instead of performing a nervous half-sweep that says, “I would like to catch you, but only if it is not too much trouble.” A strong fishing knot gives you permission to trust your gear.
Another lesson is that speed comes after accuracy. Beginners often want to tie knots quickly, especially when fish are biting. But a fast bad knot is not efficient; it is just a delayed problem. The better habit is to tie slowly at first. Make every wrap neat. Watch how the knot tightens. Feel how the line behaves. After enough repetition, your hands get faster without your brain yelling instructions like a confused GPS.
Different fishing situations also teach different preferences. On a calm pond with small hooks and monofilament, the improved clinch knot may feel perfect. On a bass lake with braid and jigs, the Palomar knot might become your best friend. When fishing clear water with a fluorocarbon leader, the double uni knot earns its place. In fly fishing, the blood knot and surgeon’s knot become part of everyday rigging. In saltwater, where fish pull harder and leaders are heavier, knots like the Albright become much more valuable.
Weather changes everything, too. A knot that seems easy at the kitchen table can feel like advanced engineering when your hands are cold, the wind is pushing line into your face, and your tackle bag zipper has chosen violence. That is why practice matters. The goal is not to know a knot only when conditions are perfect. The goal is to know it when the boat rocks, the light fades, and someone says, “They’re biting right now.”
There is also a quiet satisfaction in tying a good knot. It is a tiny craft inside the bigger sport of fishing. The wraps line up. The knot seats smoothly. The tag end trims clean. You give it a pull, and it holds. No fireworks, no applause, just a small moment of competencewhich, honestly, is sometimes better than applause because competence does not ask you to give a speech.
Over time, most anglers build a personal knot system. Maybe you use the Palomar for braid, the improved clinch for small lures, the double uni for leaders, and the arbor knot for spooling. That system becomes automatic. You stop wondering what to tie and start focusing on where fish are holding, how the water looks, what bait is moving, and whether your sandwich survived the cooler.
The final experience-based tip is simple: retie more often than you think. After catching fish, pulling through weeds, scraping rocks, or freeing a snag, check the knot and the first few feet of line. If anything feels rough, flattened, cloudy, or suspicious, cut it off and retie. Fishing rewards patience, and knots are one of the easiest places to spend that patience wisely.
Conclusion
Learning how to tie a fishing knot is not just a beginner skillit is an angler skill. The improved clinch, Palomar, uni, double uni, arbor, blood, surgeon’s, non-slip loop, snell, and Albright knots each solve a different problem. You do not need to master them all at once, but the more knots you understand, the more prepared you are for changing lines, lures, leaders, hooks, and fishing conditions.
Start simple. Practice often. Wet every knot. Tighten slowly. Test before you cast. A better knot will not guarantee a trophy fish, but it will make sure that when your chance comes, your line is ready for the argument.














