
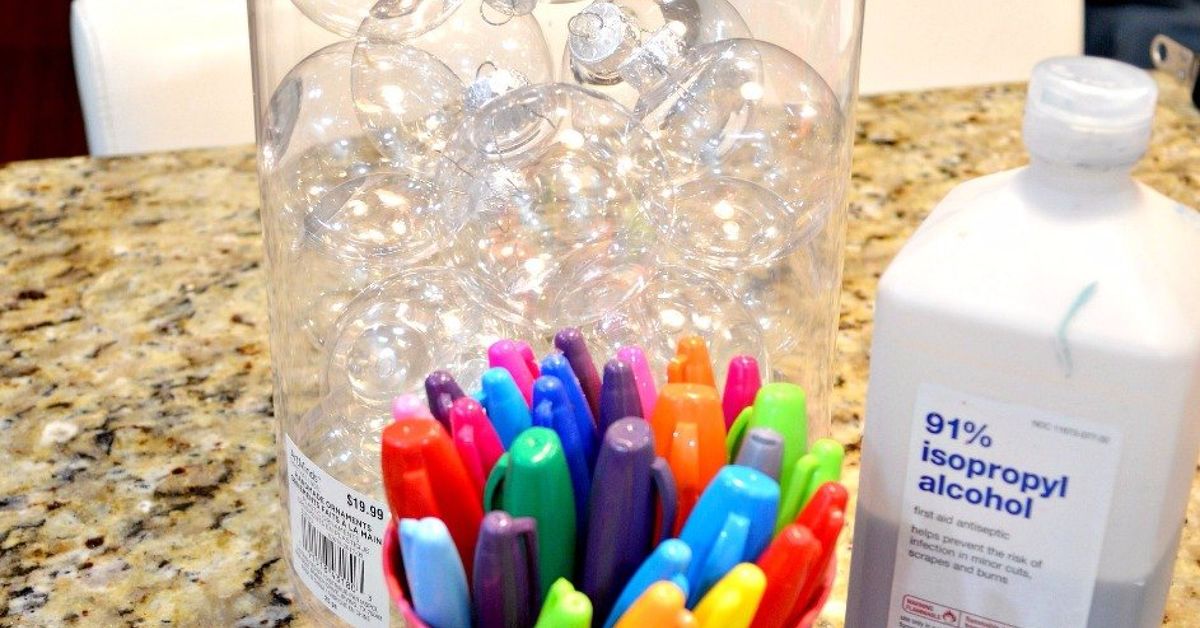
If your holiday decorating style lives somewhere between “classic Christmas charm” and “I would like my tree to look expensive without becoming financially unstable,” DIY Sharpie marbled ornaments deserve a spot on your craft table. They’re colorful, glossy, surprisingly easy to make, and just unpredictable enough to feel like art instead of homework. In other words, this is the holiday project for people who want handmade ornaments without needing the patience of a Renaissance painter.
At their core, Sharpie marbled ornaments use a simple trick: permanent marker plus rubbing alcohol equals soft, swirly color movement that looks far fancier than the supply list suggests. The effect can range from dreamy watercolor veining to bold, high-contrast streaks, depending on how much color you apply and how aggressively you let the alcohol do its dramatic little dance. The result is a set of handmade Christmas ornaments that look custom, creative, and just a touch magical.
Even better, this ornament craft works for a wide range of decorating styles. Want jewel tones for a rich, elegant tree? Done. Prefer icy blues and silvers for a winter look? Easy. Into pink, gold, and colors that whisper, “Yes, my ornaments have a skincare routine”? Also possible. With a few Sharpies, clear ornaments, and a little trial and error, you can make DIY Christmas ornaments that feel personal, giftable, and genuinely fun to create.
Why DIY Sharpie marbled ornaments are worth making
There are approximately one million ornament crafts out there, and at least half of them involve glitter finding its way into your coffee. Sharpie marbled ornaments are different. They’re low-mess compared with many holiday crafts, they dry relatively quickly, and they create a polished finish that looks much more complicated than it really is.
This project also hits a sweet spot between beginner-friendly and creatively satisfying. You do not need a cutting machine, advanced painting skills, or the steady hand of a surgeon. What you need is a willingness to experiment. Every ornament turns out a little differently, which is part of the charm. If one swirl goes rogue, congratulations: you now own a one-of-a-kind designer ornament.
For SEO purposes and real-life purposes, this is also one of those ideal homemade holiday projects because it combines several popular ideas in one: DIY ornaments, Sharpie crafts, marbling techniques, and handmade Christmas decor. It appeals to casual crafters, parents looking for older-kid projects, holiday gift makers, and anyone who has ever wandered the ornament aisle and thought, “Pretty, but why is this tiny glass ball priced like a steak dinner?”
What you need for Sharpie marbled ornaments
- Clear glass or clear plastic ornaments
- Sharpie permanent markers in 2 to 4 colors
- Rubbing alcohol
- Cotton swabs, a small dropper, or a spoon
- Paper towels
- Disposable gloves
- A protected work surface
- Optional: ribbon, ornament hooks, acrylic sealer
Clear round ornaments are usually the easiest choice because the surface is smooth and the shape gives the marbling room to flow naturally. Glass ornaments often deliver the cleanest, slickest look, but plastic ornaments can work beautifully too, especially if you want something a little less nerve-racking to handle. If you have pets, kids, or a talent for dropping things at the exact wrong moment, plastic may be your emotional support material.
As for markers, classic Sharpie permanent markers are the star here. Fine point and ultra-fine point markers give you the most control. You can scribble tiny areas for delicate marbling or lay down bolder patches if you want more dramatic veining. Choose colors that sit near each other for softer blending, or use a dark accent shade to create a more defined stone-like look.
How to make DIY Sharpie marbled ornaments
1. Prep the ornament like you mean it
Before you add any color, wipe the ornament clean and let it dry. This step is not glamorous, and therefore many people skip it. Those people are then rewarded with fingerprints, patchy color, and mild annoyance. Removing oils and dust helps the marker go on more evenly and keeps the marbling effect from fighting invisible smudges.
Set up your workspace with paper towels or scrap paper underneath. Put on gloves if you don’t want your hands to look like you wrestled a rainbow. Work in a ventilated area, especially since rubbing alcohol evaporates quickly and has a strong smell. Also, keep it away from heat, sparks, or open flame. This is a holiday craft, not a surprise science experiment.
2. Add your Sharpie color
Use your Sharpies to draw random squiggles, dots, short lines, or loose patches of color on the outside of the ornament. Don’t overthink this. In fact, the more controlled and perfectionist you get at this stage, the more likely the final ornament will look stiff. The magic happens when the alcohol softens those marks and lets them move.
A good rule is to start light. You can always add more marker, but if you cover the entire ornament in heavy dark ink right away, the colors can turn muddy fast. Think scattered patches rather than full coverage. Leave some open space so the marbling has room to bloom.
If you want a classic marble effect, try two main colors and one darker accent. For example, turquoise, teal, and black create a bold stone-inspired look. Pink, coral, and gold-toned accents can feel playful and modern. Blue, silver, and a little purple make the ornament look like winter showed up in formalwear.
3. Introduce the rubbing alcohol
This is where the ornament goes from “cute marker doodles” to “wait, why does this look store-bought?” Apply a few drops of rubbing alcohol onto the colored areas using a cotton swab, dropper, or spoon. The alcohol will react with the marker and cause the ink to spread, feather, and blend into swirls.
Rotate the ornament gently as the color begins to move. You can dab with a cotton swab to soften harsh lines or encourage the color in a certain direction. The goal is not to soak the ornament. Too much alcohol at once can wash everything into one sad, muddy blur. A little goes a long way.
Watch how the colors behave before adding more liquid. Some shades bloom quickly, while others stay a bit more defined. That variation is what gives the ornament depth. It’s the visual equivalent of saying, “Yes, I crafted this myself,” while secretly knowing it took far less effort than it appears.
4. Build the marble effect slowly
Once the first pass dries slightly, step back and evaluate. Does the ornament need more contrast? Add a little extra marker in sparse areas. Want more movement? Use another drop or two of alcohol and turn the ornament again. Need sharper veining? Add a darker color in small touches and let it partially feather instead of flooding it.
The best marbled ornaments usually develop in layers. One round gives you the base pattern. The second round adds depth. The third round, if needed, adds detail and polish. Trying to force the full effect in one go often leads to overworked color, and overworked color is the holiday crafting equivalent of over-mixing pancake batter.
5. Let the ornament dry fully
Set the ornament aside and allow it to dry completely before handling it too much, adding embellishments, or deciding it needs a rescue mission. Wet-looking areas may still shift, and touching them too soon can smear the design. Patience is not always fun, but in this case it’s worth it.
Once dry, you can stop there for a more organic finish or optionally apply a clear acrylic sealer if you want to help preserve the design. If you choose to seal it, test one ornament first. Sealers can slightly affect the finish depending on the marker, the ornament surface, and the product formula. Translation: do a practice ornament before committing your masterpiece to chemistry.
Best color combinations for marbled ornaments
Color is where this project becomes personal. Here are a few reliable combinations that work beautifully:
- Classic winter: blue, navy, silver-gray
- Modern glam: blush, burgundy, plum
- Earthy holiday: olive, forest green, brown
- Icy elegance: pale blue, lavender, charcoal
- Bold jewel tones: teal, emerald, black
- Soft candy palette: pink, peach, light purple
If you want a cleaner marble look, stick to colors in the same family. If you want drama, add one darker contrast color sparingly. Too many unrelated hues can create a brownish result that says less “marbled ornament” and more “the craft table fought back.”
Common mistakes and how to fix them
The colors turned muddy
This usually happens when there’s too much ink, too much alcohol, or too many unrelated colors. Next time, use fewer shades and apply the alcohol in smaller amounts.
The marker looks streaky
That is normal at first. The alcohol stage softens most of the streaking. If the finish still looks too sharp, add another tiny drop and rotate the ornament again.
The design disappeared
You probably used too much alcohol. Let the ornament dry, then add fresh marker in selected spots and build the pattern back gradually.
The ornament looks flat
Add depth with a second layer, preferably including a darker accent. Marbling usually looks richer when it has both soft blooms and a few stronger lines.
Glass vs. plastic ornaments
Both can work for DIY Sharpie marbled ornaments, but they behave a little differently. Glass ornaments often give a smoother, more polished finish because the surface is slick and the shape is usually uniform. They also tend to look a bit more luminous under tree lights.
Plastic ornaments are more practical for households with kids, pets, or a history of gravity-related drama. They’re easier to handle and less breakable, though some plastic surfaces may accept color differently. Round plastic ornaments with standard openings tend to be the most reliable. Odd shapes can be trickier, especially if the marker or any internal moisture dries unevenly.
If you’re making a large batch for gifting, plastic is convenient. If you’re creating a smaller set for a more elevated look, glass may be worth the extra caution. Basically, choose based on your decorating style and your relationship with dropping things.
How to style and gift marbled ornaments
These ornaments look beautiful on a tree, but don’t stop there. Tie them onto wrapped gifts as oversized gift toppers. Hang a few from cabinet knobs, garlands, or a window branch display. Fill a decorative bowl with them for a holiday centerpiece. String them on velvet ribbon for a simple mantel accent.
They also make excellent handmade gifts because they feel personal without being overly precious. A set of three in coordinating colors can look boutique-level special. Add ribbon, a small gift tag, and a note about the date or holiday season, and suddenly you’re not just giving an ornament. You’re giving a memory with better packaging.
Experience: what making DIY Sharpie marbled ornaments is actually like
The first time you make DIY Sharpie marbled ornaments, there’s a good chance you’ll go into it thinking, “Cute. This should take ten minutes.” Technically, yes. Emotionally, no. Because what really happens is that you make one ornament, watch the color bloom under the alcohol, and immediately decide you are now some kind of holiday marble artist with a destiny.
One of the most memorable parts of this craft is how surprisingly relaxing it feels. Unlike projects that demand exact measurements or painfully symmetrical results, marbled ornaments reward experimentation. You draw a few lines, add a little rubbing alcohol, twist the ornament, and then just watch. The color spreads in a way that feels half science, half luck, and all delight. It’s one of those rare crafts where the process itself is entertaining enough that even the “mistakes” are interesting.
There’s also a genuinely satisfying moment when an ornament goes from messy-looking marker scribbles to something polished and beautiful. At first, it can look like a fifth grader borrowed your supplies and got ambitious. Then the alcohol hits, the colors soften, and suddenly the ornament looks like frosted stone, blown glass, or watercolor in motion. It is deeply satisfying in a way that is difficult to explain to people who do not spend December willingly surrounded by ribbon scraps.
In a group setting, this craft gets even better. Everyone starts with the same basic materials, and yet no two ornaments come out alike. One person makes moody jewel tones. Someone else goes candy pink. Another discovers that adding a tiny bit of dark marker makes the whole thing look dramatically elegant and will not stop talking about it. The table gets louder, the creativity gets bolder, and the ornaments become little personality tests with ribbon hangers.
There is, of course, a learning curve. The first ornament may get too much alcohol. Another may turn muddy because you got carried away and added every color that looked festive. A third may become the unexpected favorite because the “mistake” made it look more natural and marbled than the one you tried to control. That’s part of the experience too. This is not a craft that demands perfection. It rewards curiosity, restraint, and the occasional willingness to say, “Interesting. Let’s pretend I planned that.”
Over time, most crafters figure out their own rhythm. Some prefer fewer colors and more negative space. Others like building layers until the ornament looks rich and dramatic. Some love glass because the finish feels extra crisp. Others swear by plastic because it is far less terrifying to handle during a busy holiday weekend. Either way, the best part is that the project keeps feeling fresh. Even if you make a dozen ornaments, each one still reveals itself a little differently.
That may be why Sharpie marbled ornaments tend to become repeat projects instead of one-time experiments. They’re affordable, creative, easy to personalize, and fun enough to make again next year. They look good on the tree, but the bigger win is the experience of making them. You end up with holiday decor, yes, but also with a small, colorful moment of play in the middle of a season that can otherwise become a competitive sport in logistics.
Final thoughts
DIY Sharpie marbled ornaments are proof that simple craft supplies can create striking holiday decor when you let texture, movement, and color do the heavy lifting. With clear ornaments, permanent markers, and rubbing alcohol, you can make handmade Christmas ornaments that feel personal, stylish, and refreshingly doable.
The secret is to keep the process light: prep the surface, start with a little color, use small amounts of alcohol, and build the pattern slowly. Let the ornament surprise you. Some of the prettiest results come from not forcing it too much. And honestly, that might be the most holiday-appropriate lesson of all.














