
Note: This article is written from synthesized real-world information about PCB milling, maker jewelry, wearable electronics, desktop CNC tools, FR-1 copper-clad boards, and practical workshop safety. It is prepared in clean HTML for web publishing.
At first glance, the phrase “PCB Mill Turns Out Stylish Necklace” sounds like a typo from a machine shop with a side hustle on Etsy. Printed circuit boards usually live hidden inside gadgets, quietly connecting power, signals, LEDs, sensors, and tiny chips while getting none of the red-carpet treatment. But give a maker a desktop PCB mill, a piece of copper-clad board, a few LEDs, and the dangerous confidence that comes from saying “this should only take an afternoon,” and suddenly a circuit board becomes jewelry.
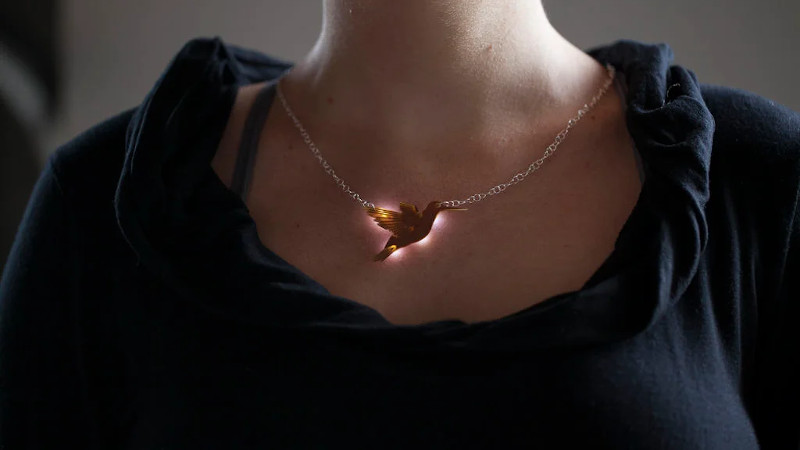
That is the charm of a milled PCB necklace. It is not just a pendant shaped like technology; it is technology. The copper traces are not decorative lines pretending to be useful. They can actually carry current. The LEDs are not glued-on sparkle. They can light up. The board is not just a flat plastic charm. It is a miniature engineered object designed with the same logic used for prototypes, badges, sensors, and small electronic devices. The result is a wearable circuit that feels part fashion accessory, part engineering flex, and part “please ask me about my necklace so I can explain it for twenty minutes.”
What Is a PCB Milled Necklace?
A PCB necklace is a pendant made from printed circuit board material. Instead of using silver, acrylic, resin, wood, or cast metal, the maker starts with a copper-clad board, usually FR-1 for desktop milling. A PCB mill then removes selected copper areas, carves isolation paths between traces, drills holes, and cuts the final outline of the pendant.
In a traditional PCB, traces are designed to connect electronic components. In a PCB jewelry project, those traces do double duty: they function as electrical pathways and visual design elements. This is where the magic happens. The same copper that carries power to a tiny LED can also create a geometric pattern, a circuit-inspired border, or a glowing art motif. A necklace can be shaped like a diamond, a teardrop, a badge, a crescent, a game token, or a futuristic relic that looks like it fell off a friendly robot.
Why a PCB Mill Is Perfect for Wearable Circuit Jewelry
Desktop PCB milling is especially suited for projects like a stylish necklace because it allows fast, local fabrication. Instead of sending Gerber files to a board house and waiting for manufacturing and shipping, a maker can design, mill, test, revise, and mill again in a small workshop or makerspace.
A PCB mill works by mechanically removing copper from the board. For electronics prototypes, it creates electrical isolation between traces. For jewelry, it can also cut delicate outlines and decorative openings. A milled pendant may have one side dedicated to visual beauty and the other side reserved for the “business department”: battery holder, switch, resistors, microcontroller, LED pads, and solder joints.
That split personality is what makes the project so satisfying. The front can look minimal, elegant, and mysterious. The back can look like a tiny city map designed by someone who drinks coffee near oscilloscopes. Both sides matter.
The Basic Build: From Copper-Clad Board to Necklace
1. Start With a Wearable Shape
Every good PCB necklace begins with the outline. A regular rectangular board might be practical, but jewelry needs personality. A pendant must hang nicely, sit comfortably, and look intentional. Makers often choose shapes such as diamonds, shields, hearts, moons, flames, circuit flowers, or abstract polygons. The shape is usually created in PCB design software or imported from a vector file.
Good wearable design also considers where the chain or cord will pass through. A simple drilled hole near the top is common, but it should be large enough for a jump ring and far enough from the edge that the pendant does not crack or wear out quickly.
2. Design the Circuit as Art
Most PCBs are designed to be efficient. A PCB necklace must be efficient and attractive. Traces should connect the components correctly, but they should also look balanced. Corners, curves, symmetry, negative space, and copper pours all affect the final appearance.
This is where tools like KiCad, vector drawing software, and PCB art workflows become useful. Some makers create the circuit first and then polish the outline. Others begin with artwork and route the circuit around it. The best results usually come from treating copper, exposed substrate, solder mask, silkscreen, and light as a single design palette.
3. Choose Components That Fit the Scale
A necklace is small, so components need to be compact. Common choices include surface-mount LEDs, coin cell batteries, tiny slide switches, resistors, MOSFETs, and microcontrollers such as ATtiny chips. A simple necklace might only need a battery, a switch, a resistor, and one or two LEDs. A more ambitious pendant could include animation, capacitive touch, sensors, or programmable light patterns.
The trick is restraint. A necklace does not need to become a wearable Times Square billboard unless that is the plan. Often, a few carefully placed LEDs look more stylish than a board overloaded with parts. In jewelry, negative space is not wasted space; it is breathing room.
4. Mill the Board
Once the design is ready, the board is secured to the mill bed, usually with strong double-sided tape. The machine probes the material, checks tool position, and begins cutting. An engraving bit removes copper between traces. A small end mill may drill holes and cut the outer profile. The process can be hypnotic: a spinning tool slowly turns a plain copper rectangle into a pendant with circuitry, texture, and shape.
FR-1 copper-clad board is commonly preferred for desktop PCB milling because it avoids the fiberglass dust associated with FR-4. Even then, dust control matters. Debris should be vacuumed, not blown around like celebratory confetti from the world’s least festive parade.
5. Solder, Test, and Finish
After milling, the board needs cleanup. Burrs may be removed, edges can be lightly sanded, and exposed copper may be polished. Components are then soldered in place. If the pendant includes LEDs, this is the dramatic moment: flip the switch, and the jewelry either glows beautifully or teaches you humility.
Testing should happen before the necklace touches anyone’s outfit. Check for shorts, sharp edges, loose parts, unstable battery contacts, and heat. Wearable electronics should be comfortable, secure, and sensible. A necklace that looks great but scratches skin or eats batteries like popcorn is not finished.
Why PCB Jewelry Looks So Good
PCB jewelry works because circuit boards already have a strong visual language. Copper traces look like futuristic roads. Pads look like tiny planets. Vias resemble stars. Silkscreen labels add a technical, almost secret-code aesthetic. Even people who do not know what a resistor does can recognize that a circuit board looks purposeful.
A milled PCB necklace leans into that purpose. It is not pretending to be handmade in the traditional sense, yet it is deeply handcrafted. The hand is in the design choices, tool setup, component placement, and finishing work. The machine cuts the board, but the maker decides whether the final piece looks like a lab sample, a boutique accessory, or a badge from a sci-fi guild.
PCB Milling vs. Ordering a Custom PCB Necklace
There are two main ways to make PCB jewelry: mill it yourself or order it from a PCB manufacturer. Both methods have advantages.
Milling It Yourself
Desktop milling is ideal for experimentation. You can make one pendant, test the size, adjust the LED placement, change the chain hole, revise the copper art, and try again. It is fast, tactile, and rewarding. It also gives the pendant a raw prototype character that many makers love.
The tradeoff is that milled boards usually do not have the polished solder mask and silkscreen finish of professionally manufactured boards. The copper may oxidize unless protected. Fine details depend on tool diameter, calibration, board flatness, and patience. Patience, unfortunately, is not sold in most electronics kits.
Ordering a Fabricated PCB
Professional PCB services offer finishes that can look spectacular for jewelry. Purple solder mask with gold finish, black substrate with clear mask, white silkscreen graphics, and custom board outlines can make a pendant feel like a finished product. Board houses also handle plated holes, solder mask registration, and repeatable production.
The downside is waiting and iteration cost. If the hole for the necklace chain is awkwardly placed, you may discover the problem only after the boards arrive. Milling gives you immediate feedback. Fabrication gives you polish. Many makers prototype with a mill and later order a refined batch.
Design Tips for a Stylish PCB Necklace
Think About the Front and Back
The front of the necklace should be visually clean. The back can hold more functional details, but it still needs to be wearable. If the solder joints face the skin, they should be smooth and protected. If the battery is exposed, it should be secure. If there is a switch, it should be accessible without requiring fingernails of steel.
Use Light Like a Designer, Not a Lighthouse Operator
LEDs are tempting. Add one, and the necklace becomes interesting. Add twenty-four, and suddenly you have a pendant that may attract aircraft. More lights are not always better. Consider diffusion, direction, brightness, and battery life. Small cutouts or translucent materials can make LEDs feel softer and more elegant.
Respect the Limits of the Mill
Tool diameter affects everything. If traces, pads, or decorative cuts are too close together, the mill cannot physically remove material cleanly. Very small bits allow finer detail but take longer and break more easily. A good PCB necklace design respects clearance, trace width, board thickness, and mechanical strength.
Make the Chain Hole Strong
The chain hole is a mechanical feature, not decoration. Reinforce it with enough surrounding material. Avoid placing it in a thin, fragile point. A gorgeous pendant that snaps off the chain during lunch is technically still wearable jewelry, but only for the floor.
Finish the Edges
Milled PCB edges can be sharp. A few minutes of sanding can make the pendant feel far more professional. Rounded corners, polished copper, sealed surfaces, and smooth edges turn a clever prototype into something people may actually want to wear outside a makerspace.
Safety Matters When Circuit Boards Become Jewelry
PCB jewelry should be fun, but it should also be safe. Use lead-free solder for wearables whenever possible. Wash hands after soldering. Work with ventilation or a fume extractor because flux fumes can irritate the eyes and lungs. Keep batteries secure and avoid designs that could short the coin cell against metal chains, clothing accessories, or loose conductive parts.
For milling, material choice matters. FR-1 is commonly used for desktop PCB milling because it is easier and safer to machine than fiberglass-based FR-4, but dust still belongs in a vacuum, not in your lungs. Wear eye protection, keep the machine cover closed, and clean the workspace carefully.
For skin contact, consider sealing exposed copper or keeping the component side away from the body. Copper naturally oxidizes and may discolor over time. Some people are sensitive to certain metals, finishes, or residues. A clear protective coating can help preserve the look and improve comfort.
What This Project Says About Modern Making
The beauty of a milled PCB necklace is not just the final object. It is the collision of disciplines. The project combines electronics, CNC machining, jewelry design, graphic layout, soldering, material science, and a little bit of fashion nerve. It proves that making is no longer neatly divided into “technical” and “creative” boxes.
A circuit board can be a tool, a prototype, a badge, a sculpture, or a necklace. A mill can be a manufacturing device and an artistic instrument. A pendant can be both pretty and programmable. That flexibility is why maker culture keeps producing delightful surprises. Someone sees a machine designed for prototyping electronics and asks, “Could this make jewelry?” The answer, apparently, is yesand it can look surprisingly good.
Specific Project Ideas Inspired by a PCB Mill Necklace
The Minimal Glow Pendant
This design uses one coin cell, one switch, one resistor, and one warm-white LED. The board outline might be a small moon or teardrop. The copper traces form a simple symmetrical pattern. It is beginner-friendly and elegant.
The Diamond-Shaped LED Necklace
A diamond-shaped PCB pendant can use multiple LEDs arranged around the edges. A small microcontroller can create blinking patterns or soft animations. This style looks more technical and playful, especially when the traces are arranged like facets.
The Secret Message Circuit
A necklace can hide words or symbols in the silkscreen, copper pours, or LED cutouts. The message might only appear when the LEDs turn on. This is the kind of project that makes people say, “Wait, that is a circuit board?” which is exactly the correct response.
The Recycled Circuit Pendant
For a non-functional version, old circuit boards can be cut, shaped, and sealed into pendants. This approach focuses on upcycling and aesthetics rather than live electronics. It is not the same as milling a new PCB, but it shares the same appreciation for circuit-board beauty.
Common Mistakes to Avoid
The first mistake is designing only for the screen. A PCB layout may look perfect in software but feel too large, too sharp, or too heavy when worn. Print the outline on paper first and hold it against a necklace chain. It sounds low-tech because it is, and it works.
The second mistake is ignoring battery access. If replacing the coin cell requires tweezers, courage, and a small prayer, redesign the holder placement. Wearable electronics should be easy to use.
The third mistake is making traces too thin for the milling setup. A trace that survives in a professional fab may not survive a desktop mill, especially if the board is not perfectly flat. Give the design room to breathe.
The fourth mistake is skipping finishing. Raw copper and rough edges can make an otherwise excellent pendant feel unfinished. Clean, sand, inspect, and seal where appropriate.
Why People Love Projects Like This
People love PCB jewelry because it tells a story. It says the wearer enjoys technology, but not in a boring “I read component datasheets for fun” wayeven if they absolutely do. It turns engineering into conversation. It makes electronics visible, personal, and playful.
A stylish PCB necklace also challenges assumptions. Circuit boards are usually hidden inside cases because they are considered too technical or too ugly for public view. But when designed intentionally, they can be striking. Copper, black substrate, gold finish, LEDs, and clean geometry can look as fashionable as many conventional materials.
Experiences Related to “PCB Mill Turns Out Stylish Necklace”
Making or even watching a PCB mill turn out a stylish necklace is one of those experiences that changes how you see everyday electronics. Before the project, a printed circuit board may seem like a flat green rectangle full of mysterious parts. Afterward, it starts to look like a design medium. You begin noticing the shape of traces, the balance of component placement, the contrast between copper and substrate, and the way small LEDs can transform a simple board into something expressive.
The first memorable part of the experience is the design stage. It feels simple at the beginning: make a pendant, add lights, cut it out. Then reality walks in wearing safety glasses. Where does the battery go? Will the switch be reachable? Are the LEDs facing the right direction? Is the chain hole strong enough? Can the mill actually cut the decorative gaps? Suddenly, the necklace is not just jewelry. It is a tiny mechanical and electrical system that has to survive gravity, movement, skin contact, battery changes, and curious friends poking it.
The second memorable part is watching the mill work. Unlike sending a design away for fabrication, milling gives immediate drama. The blank board is taped down, the tool lowers, and the copper begins to disappear in precise little paths. It is slow enough to build suspense and fast enough to feel productive. There is also a special kind of nervousness when the outline cut begins. At that point, the pendant is almost born, and everyone silently hopes the tape holds.
The third experience is troubleshooting, because every maker project includes at least one tiny gremlin. Maybe an LED is reversed. Maybe the copper was not fully cleared between two traces. Maybe the battery clip is slightly too loose. Maybe the pendant works perfectly on the bench but flickers when moved. These problems are annoying in the moment, but they are also the best teachers. A necklace is small enough that mistakes are visible, understandable, and fixable. It becomes a compact lesson in design for manufacturing.
The most satisfying moment comes when the pendant lights up for the first time. The object stops being a milled board and becomes wearable electronics. That little glow feels wildly disproportionate to the size of the project. It is just a few volts and a tiny LED, but emotionally it lands like a successful rocket launch for people who own too many jumper wires.
Wearing the finished necklace creates a different kind of reward. It invites questions. Someone notices the copper pattern, then the LED, then the fact that it is a real circuit. The pendant becomes a portable explanation of making, prototyping, electronics, and design. It is a reminder that technology does not have to be hidden behind plastic shells. Sometimes it can hang from a chain, catch the light, and look fantastic doing it.
In the end, the experience proves that a PCB mill is more than a prototyping tool. It is a bridge between engineering and personal expression. A stylish PCB necklace may not solve a major technical problem, but it does something equally valuable: it makes people curious. And curiosity is often where the best projects begin.
Conclusion
A PCB mill turns out a stylish necklace by transforming ordinary copper-clad board into a wearable piece of functional art. The project works because it combines the precision of desktop CNC milling with the creativity of jewelry design and the charm of tiny electronics. It is practical enough to teach PCB layout, soldering, component placement, and material safety, yet playful enough to feel like a fashion experiment from a very well-equipped garage.
Whether milled at home, refined through PCB design software, or later manufactured with polished finishes, a circuit board necklace shows how modern making can turn technical tools into expressive objects. It glows, it hangs, it starts conversations, and it proves that even a printed circuit board deserves a night out.













