
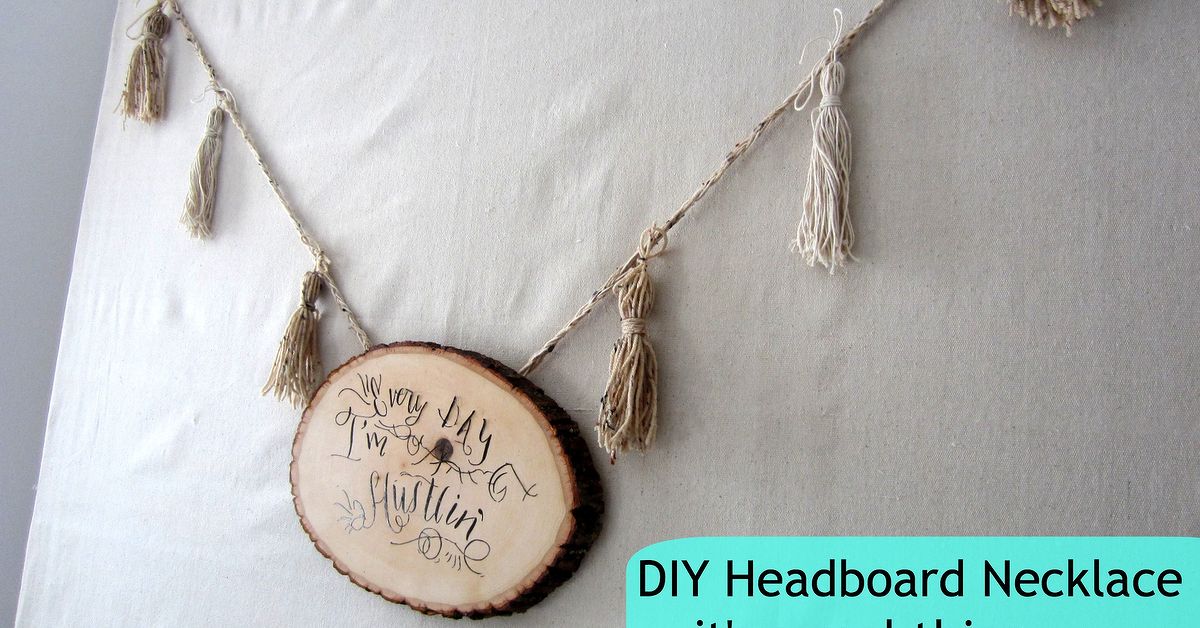
A bedroom should feel like a place where your brain can finally take off its work shoes. Unfortunately, many bedrooms are designed by accident: a bed pushed against a blank wall, a few pillows doing emotional support duty, and maybe one lonely lamp wondering why it was invited. That is where the DIY headboard necklace comes ina simple, stylish, budget-friendly home hack that dresses up your bed the way a necklace dresses up a plain T-shirt.
Despite the playful name, a headboard necklace is not jewelry for your furniture in the tiny, literal sense. Think of it as a decorative garland, draped rope, bead strand, textile swag, tassel chain, or lightweight hanging accent styled across or above a headboard. It creates a focal point without requiring a full renovation, a custom upholstered bed, or a dramatic conversation with your bank account. This #HomeHack works especially well for renters, small bedrooms, dorm-style spaces, guest rooms, and anyone who wants a fresh look without building a whole new headboard from scratch.
The best part? You can personalize it endlessly. A wooden bead garland adds warm boho texture. A braided cord feels coastal and relaxed. A velvet ribbon with tassels can lean romantic. A macramé strand gives the room handmade charm. A row of small hooks can even turn the “necklace” idea into smart necklace storage, keeping your favorite accessories visible, untangled, and ready to wear. It is decor, organization, and personality all hanging out together like friends who actually remembered to bring snacks.
What Is a DIY Headboard Necklace?
A DIY headboard necklace is a decorative strand or hanging accent placed on, across, or slightly above the headboard area. It usually follows the width of the bed and creates a soft frame around the sleep zone. The look can be minimal or dramatic depending on your materials, color palette, and how much “main character energy” your bedroom can handle before breakfast.
Traditional headboards provide structure and visual weight. A headboard necklace adds the finishing detail. Imagine a simple wood or upholstered headboard with a soft garland draped from corner to corner. Suddenly, the bed looks styled instead of simply assembled. It is similar to adding trim to curtains, a runner to a table, or a scarf to a blazer. The object may be small, but the effect is surprisingly big.
Why This Home Hack Works So Well
It Creates a Focal Point
The bed is usually the largest piece of furniture in a bedroom, so the wall behind it naturally becomes the visual anchor. A headboard necklace draws attention to that area without needing oversized artwork, expensive wallpaper, or a heavy custom panel. It gives the eye somewhere to land, which makes the room feel more intentional.
It Adds Texture Without Clutter
Good bedroom design is not only about color. Texture matters. Wood, cotton, linen, jute, velvet, wool, rattan, and metal all change how a room feels. A bead or rope headboard necklace adds dimension to flat walls and plain bedding. Because it hangs vertically or horizontally in one controlled zone, it brings interest without spreading clutter across nightstands and dressers.
It Is Budget-Friendly
A store-bought statement headboard can cost hundreds of dollars. A DIY headboard necklace can often be made from craft-store beads, thrifted belts, curtain tiebacks, leftover ribbon, cotton rope, wooden rings, tassels, old scarves, or a strand of decorative trim. The project is ideal for anyone who wants a high-impact bedroom makeover on a low-impact budget.
It Is Easy to Change
Paint is a commitment. Wallpaper is a relationship. A headboard necklace is a weekend flirtation. You can swap it seasonally, change the color when you buy new bedding, or remove it when you want a cleaner look. That flexibility makes it especially helpful for renters or design lovers who change their minds with the confidence of a weather forecast.
Best Materials for a DIY Headboard Necklace
The right material depends on the look you want and the type of headboard you already have. Here are several reliable options.
Wooden Beads
Wooden beads are perfect for boho, Scandinavian, farmhouse, and organic modern bedrooms. Choose unfinished beads for a natural look, stained beads for warmth, or painted beads for a playful accent. Large beads make the strand feel sculptural, while smaller beads create a softer, more delicate line.
Cotton Rope or Macramé Cord
Cotton rope gives the project a relaxed handmade feel. You can braid it, knot it, add tassels, or combine it with beads. It works beautifully with white bedding, woven baskets, rattan lamps, and light wood furniture.
Velvet Ribbon
Velvet ribbon creates a softer and more elegant result. Deep green, navy, rust, blush, cream, or charcoal velvet can make even a basic headboard feel boutique-hotel fancy. Add small tassels at the ends for extra drama.
Fabric Strips
Fabric scraps are excellent for a casual, cottage-style headboard necklace. Use linen, cotton, muslin, or even leftover curtain fabric. Tie strips onto a cord for a rag-garland effect, or sew simple fabric tubes if you want a cleaner finish.
Lightweight Chain or Brass Rings
For a modern or glam bedroom, consider lightweight brass-colored chain, metal hoops, or decorative curtain rings. Keep the design simple and avoid anything too heavy, especially if the piece will hang above your pillows.
Tools and Supplies
You do not need a garage full of power tools. In most cases, this DIY headboard decor project requires only basic supplies:
- Cotton cord, jute rope, ribbon, or lightweight chain
- Wooden beads, tassels, fabric strips, charms, or decorative rings
- Scissors
- Measuring tape
- Pencil
- Small hooks, removable wall hooks, cup hooks, or adhesive clips
- Needle or tape-wrapped cord end for threading beads
- Optional: paint, wood stain, fabric dye, hot glue, or clear craft sealant
Before buying anything, measure the width of your bed or headboard. A queen bed is usually about 60 inches wide, while a king bed is usually about 76 inches wide. Your headboard necklace can match the bed width, extend slightly beyond it, or dip in a relaxed curve across the center.
How to Make a DIY Headboard Necklace
Step 1: Choose Your Style
Start with the mood of the room. Is your bedroom calm and neutral? Try natural wood beads and cream cotton cord. Is it bold and colorful? Use painted beads or patterned fabric strips. Is your space romantic? Choose velvet ribbon and tassels. The goal is not to copy a trend exactly, but to make the headboard area feel like it belongs to you.
Step 2: Measure the Headboard Area
Measure the width of the headboard or the wall area behind the bed. Add extra length if you want the strand to drape. For a gentle curve, add about 10 to 16 inches beyond the measured width. For a deeper swag, add 20 inches or more. When in doubt, cut a little longer. Rope can be trimmed; regret cannot.
Step 3: Create a Simple Pattern
Lay the cord on the floor or bed and arrange your beads, tassels, rings, or fabric pieces before attaching anything. Try repeating patterns such as large bead, small bead, small bead, tassel. Another easy design is a cluster in the center with simpler ends. Symmetry gives a polished look, while an irregular pattern feels more handmade and artsy.
Step 4: Thread or Tie the Details
Thread beads onto the cord, knotting between sections if you want them to stay in place. For fabric strips, fold each strip over the cord and tie it with a simple knot. For tassels, attach them with small jump rings or tie them directly onto the rope. Keep the back side neat enough that it will not snag bedding or scratch the wall.
Step 5: Hang It Securely
If your headboard is wood, small cup hooks can be installed on the back or sides where they will not show. If you are renting or avoiding holes, use removable wall hooks rated for the weight of your project. For heavier materials, mount into studs or use proper wall anchors. Avoid hanging anything heavy directly over sleeping areas unless it is securely installed. A headboard necklace should look charming, not like it is auditioning for a late-night gravity experiment.
Step 6: Style the Bed Around It
Once the piece is hanging, adjust your bedding and pillows. A simple headboard necklace looks best when the rest of the bed has some softness: layered pillows, a textured throw, a linen duvet, or a quilt folded at the foot. Repeat one color from the necklace somewhere else in the room to make the design feel connected.
Design Ideas for Different Bedroom Styles
Boho Headboard Necklace
Use large natural wood beads, cotton rope, and long tassels. Pair it with woven baskets, a jute rug, white bedding, and a few plants. Keep the color palette earthy: cream, tan, camel, clay, olive, and warm brown.
Coastal Headboard Necklace
Choose white cotton rope, driftwood beads, pale blue fabric strips, or shell-inspired accents. Avoid using real shells if they are sharp or heavy. Keep the look breezy with striped bedding, light wood furniture, and woven shades.
Modern Minimalist Headboard Necklace
Go simple: a single black cord, a few matte beads, or one clean brass ring in the center. Hang it straight instead of draped. This works well with platform beds, neutral bedding, and uncluttered nightstands.
Cottagecore Headboard Necklace
Use floral fabric strips, lace ribbon, soft cotton cord, and tiny bows. Pair the look with vintage-style lamps, quilts, botanical prints, or a painted nightstand. The result should feel sweet but not overly fussy.
Glam Headboard Necklace
Try velvet ribbon, gold-toned rings, pearl-style beads, or silky tassels. This version works especially well on an upholstered headboard. Keep the strand lightweight and refined so the design feels elegant rather than costume-party enthusiastic.
Smart Ways to Make It Functional
A DIY headboard necklace does not have to be purely decorative. If your bedroom is small, you can turn the concept into useful vertical storage.
Use It as Necklace Storage
Install a slim wooden rail above or beside the headboard and add small hooks for jewelry. Hang necklaces individually so they do not tangle. This is a clever option for people who forget what they own when everything is trapped in a drawer. When jewelry is visible, it becomes both storage and wall art.
Add Clip-On Reading Notes
Use small wooden clips to attach postcards, affirmations, tiny photos, or a bedtime reading list. Keep it minimal so the area does not become visually noisy. This idea works best for guest rooms, teen bedrooms, and creative spaces.
Include Soft Lighting Carefully
A lightweight battery-operated fairy light strand can be woven into a headboard necklace, but keep safety first. Use only lights designed for indoor decorative use, avoid overheating, and do not sleep with questionable cords tangled near bedding. Cozy is good. Electrical mystery is not.
Common Mistakes to Avoid
Making It Too Heavy
The headboard area is not the place for heavy hardware, thick metal chain, oversized ceramic pieces, or anything that could fall and cause injury. Choose lightweight materials and secure them correctly.
Ignoring Scale
A tiny strand can disappear above a king-size bed. A giant garland can overwhelm a twin bed. Match the size of your headboard necklace to the bed, wall height, and furniture. If your room is small, a thinner strand with subtle texture usually works better.
Using Too Many Colors
Colorful can be wonderful, but too many competing shades may make the bed area look messy. Pick two or three main colors and repeat them intentionally. For example, cream cord, walnut beads, and rust tassels create a warm and cohesive look.
Skipping the Test Hang
Before final installation, use painter’s tape to test the placement. Step back, look from the doorway, and check whether the strand sits too high, too low, or awkwardly off-center. A five-minute test can save you from installing hooks in the wrong spot and then pretending you meant to do that.
Renter-Friendly Tips
If you live in a rental, avoid permanent changes unless your lease allows them. Removable hooks, adhesive clips, over-the-headboard loops, and tension-style solutions can work well for lightweight designs. You can also attach the necklace to the headboard itself instead of the wall. For fabric headboards, use ribbon loops tied around the back legs or frame. For wood headboards, removable clear hooks placed on the back may hold a light strand without visible hardware.
Another renter-friendly approach is to create a faux headboard necklace wall using a dowel and cord. Hang a lightweight dowel with removable hooks, then drape the decorative strand from the dowel. This creates the look of a styled headboard even if your bed has no headboard at all.
How to Keep It Looking Fresh
Dust the strand occasionally with a microfiber cloth or a soft brush. If you use fabric strips, remove and wash them when needed. Wooden beads can be wiped gently with a dry cloth. Avoid spraying fragrance, room mist, or harsh cleaners directly on the materials, especially if you use unfinished wood, velvet, or dyed fabric.
Seasonal updates are easy. In spring, use light linen strips or pale wood beads. In summer, try cotton rope and coastal colors. In fall, add rust, mustard, or warm brown accents. In winter, use velvet ribbon, deeper tones, and soft metallic details. You do not need to redecorate the whole room; sometimes the smallest change is enough to make the space feel new.
DIY Headboard Necklace Experience: What I Learned From Trying This Home Hack
The first time I tried a DIY headboard necklace, I underestimated two things: the importance of measuring and the powerful ability of wooden beads to roll under furniture like they are fleeing the country. I started with a simple idea: natural beads, cream cord, two tassels, and a gentle drape across a plain upholstered headboard. It sounded easy enough. In fairness, it was easybut only after I stopped eyeballing everything like a person who had never met a tape measure.
My first version was too short. It stretched across the headboard in a tight line that looked less like relaxed bedroom decor and more like the bed was wearing a seatbelt. The second version was too long and dipped so low it nearly touched the pillows. That looked romantic in theory, but in real life it kept brushing against the pillowcases. The sweet spot was adding about 14 inches beyond the headboard width, which gave the strand a soft curve without making it interfere with sleep.
I also learned that texture matters more than quantity. At first, I wanted beads, tassels, fabric knots, little rings, and maybe a few charms. Basically, I tried to invite the entire craft aisle to one small project. Once everything was together, it looked busy. The final version was much better after I removed half the pieces and kept a simple rhythm: three small beads, one large bead, repeat, with tassels only at the ends. Suddenly, the headboard looked intentional instead of attacked by a hobby drawer.
Placement made a huge difference. Hanging the necklace directly across the front of the headboard was cute, but it moved whenever pillows shifted. Mounting the hooks slightly behind the headboard kept the strand stable and made the drape look cleaner. For a bed without a headboard, placing removable hooks on the wall about six inches above the pillows created a similar effect. The key is making sure the piece is high enough to be decorative, not so low that it becomes part of your sleep routine.
The biggest surprise was how much the room changed. The project took less than an afternoon, but it made the bed feel styled. It added warmth to a blank wall, connected the bedding to the wood tones in the nightstand, and gave the room a handmade detail that did not feel overly crafty. Guests noticed it immediately, which is always satisfying when the total cost is less than a dinner delivery order.
If I were doing the project again, I would start by laying everything out on the bed before tying a single knot. I would take a photo of the pattern, adjust it, and only then commit. I would also choose removable hooks with a higher weight rating than necessary, because peace of mind is part of good design. Most importantly, I would keep the materials lightweight, soft, and easy to clean. A bedroom should feel restful, and the best DIY projects support that feeling instead of demanding constant maintenance.
My honest verdict: the DIY headboard necklace is one of those rare home hacks that is beginner-friendly, affordable, and genuinely stylish when edited well. It is not trying to replace a beautiful headboard, but it can make a basic one feel finished. It can also help a no-headboard bed look more anchored. Whether you use beads, rope, ribbon, or fabric, the secret is balance. Keep it simple, hang it safely, repeat colors already in the room, and let the bed enjoy its little accessory moment.
Conclusion
A DIY headboard necklace is proof that a bedroom makeover does not need to involve power tools, designer furniture, or a budget that causes dramatic staring into the distance. With a few lightweight materials and a clear style direction, you can turn a plain headboard into a charming focal point. The project is affordable, customizable, renter-friendly, and easy to update whenever your taste changes.
Whether you prefer boho beads, coastal rope, glam velvet, cottage fabric, or a functional jewelry-hanging version, this #HomeHack gives your bed personality without overwhelming the room. Measure carefully, choose safe hanging hardware, keep the design balanced, and let your headboard wear its new necklace proudly.













