
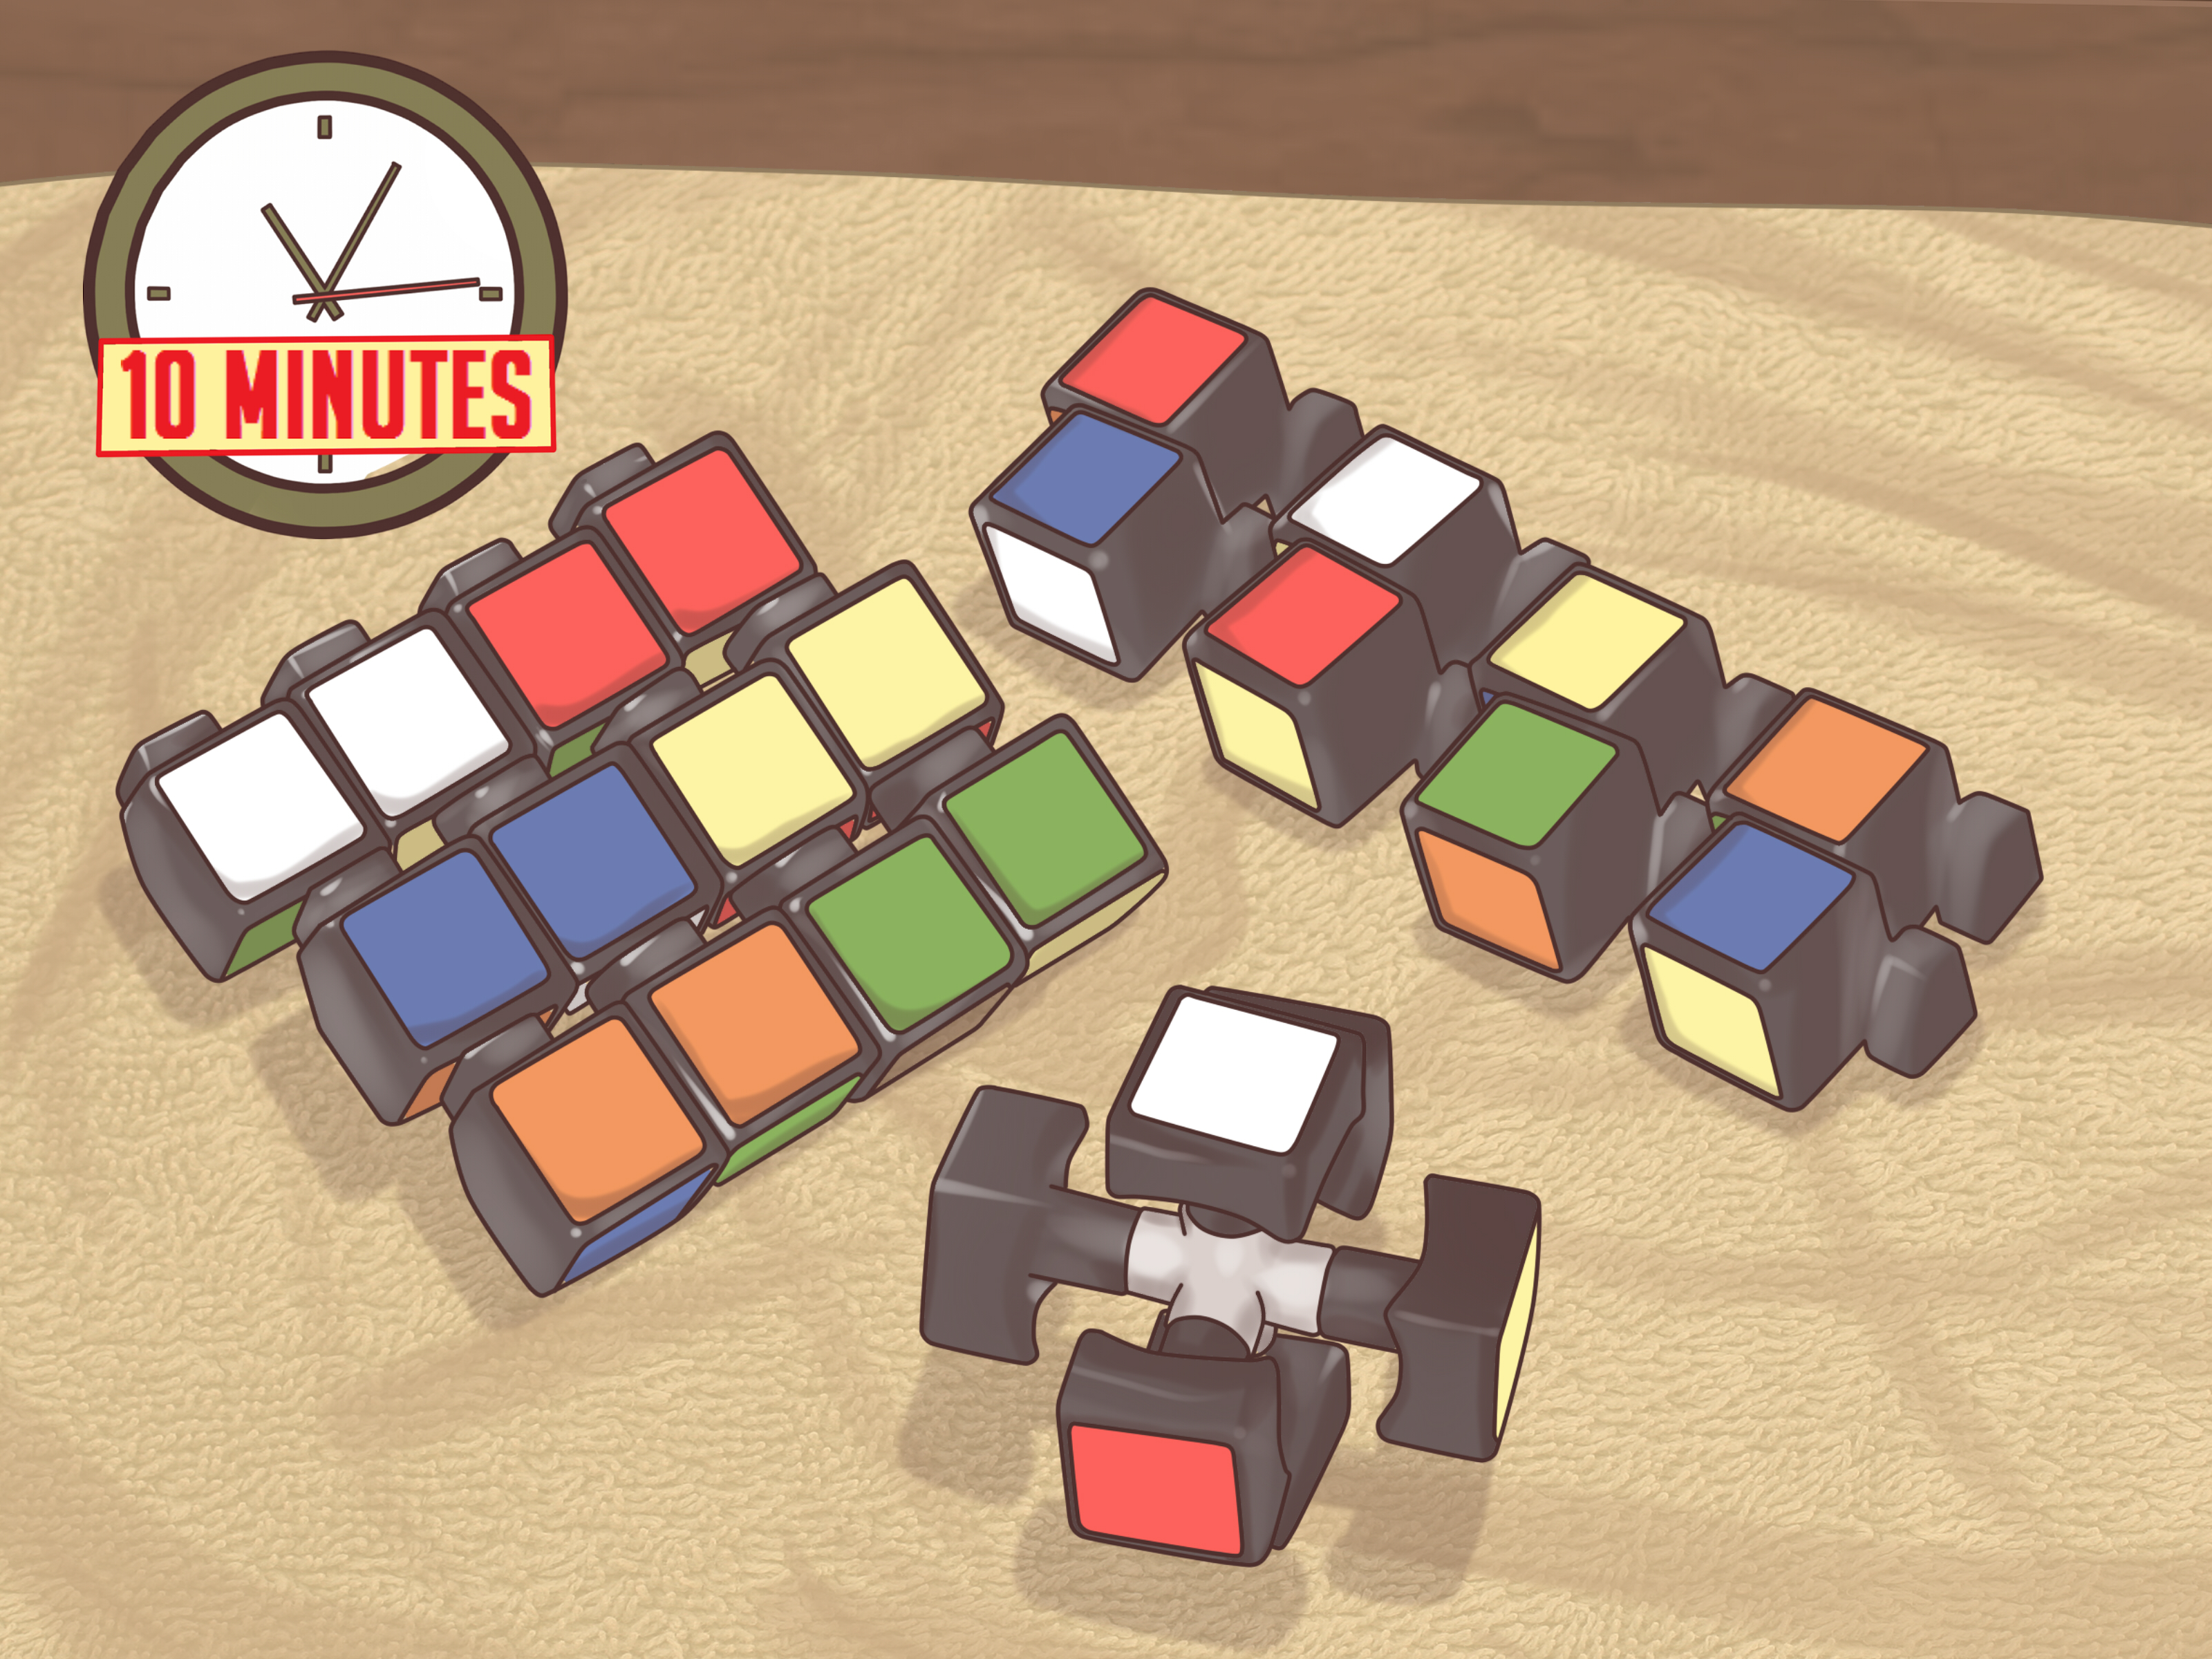
Taking apart a Rubik’s Cube sounds slightly dramatic, like opening a tiny plastic safe full of secrets. Fortunately, a standard 3×3 cube is not a forbidden artifact. It is a clever mechanical puzzle made of center pieces, edge pieces, corner pieces, a core, and just enough tension to make your first disassembly feel like a magic trick with mild panic.
Whether your cube feels sandy, sticky, slow, noisy, over-lubed, under-loved, or simply mysterious, learning how to disassemble a Rubik’s Cube is useful. You can clean old dust, remove hair or grit, inspect broken parts, adjust tension, apply lubricant, or reassemble a scrambled cube back into a solved state. The key is patience. The goal is not to wrestle the cube into submission like a tiny plastic bear. The goal is to release one piece carefully, then let the rest come apart naturally.
This guide focuses on a standard 3×3 Rubik’s Cube or modern 3×3 speed cube. Some cubes are built with screws under the center caps. Others use rivets, clips, magnets, or sealed mechanisms that are not meant for full core disassembly. Before you begin, remember this golden rule: if a piece feels like it is about to crack, stop. Plastic is brave, but it is not immortal.
Before You Start: Understand the Cube’s Anatomy
A 3×3 cube has three main visible piece types. The center pieces have one color and usually stay attached to the internal core. The edge pieces have two colors. The corner pieces have three colors. When solved, the centers define the color of each face, which is why you should pay attention to their positions before reassembly.
Most full-size 3×3 cubes contain 6 center pieces, 12 edge pieces, and 8 corner pieces. A speed cube may also include center caps, screws, springs, washers, magnets, or tensioning systems. A classic store-bought cube may be tighter and less willing to open than a modern speed cube. That is normal. It is not judging you. It just has trust issues.
Tools and Materials You May Need
You can disassemble many cubes with only your hands. Still, the right setup prevents lost screws, scratched plastic, and the classic “where did that tiny washer go?” moment.
- A clean table or tray
- A soft cloth or paper towel
- A small flathead screwdriver or plastic pry tool
- A small Phillips screwdriver for adjustable cubes
- A container for screws, springs, washers, and center caps
- Cotton swabs for cleaning tight areas
- Water-dampened cloth for plastic pieces
- Cube-safe silicone lubricant, if you plan to lube the cube
Avoid cooking oil, petroleum jelly, alcohol-heavy cleaners, harsh solvents, and mystery liquids from the garage. Your cube wants maintenance, not a chemical adventure.
How to Disassemble a Rubik’s Cube in 11 Steps
Step 1: Start With a Clean, Flat Workspace
Place the cube on a table with plenty of light. Use a tray, towel, or shallow box lid so small parts do not roll away. This is especially helpful if your cube has screws, springs, washers, or magnetic parts. A white towel makes dark screws easier to spot, while a dark towel makes white center caps easier to see.
If you are disassembling the cube for cleaning, take a quick photo of the solved cube first. You may not need it, but it gives you a handy reference for color placement during reassembly.
Step 2: Check Whether Your Cube Is Adjustable
Look at the center pieces. On many speed cubes, the colored center cap can be lifted off, revealing a screw or tensioning system underneath. On some official or beginner cubes, the center may not be designed to open easily. Do not force a sealed center cap with metal tools unless you are comfortable risking cosmetic damage.
If the cube has visible screws under the center caps, you can loosen the tension slightly before removing pieces. Do not unscrew everything yet. A quarter-turn or half-turn on one or more screws may create enough flexibility to remove the first edge piece safely.
Step 3: Turn the Top Layer 45 Degrees
Hold the cube in both hands and rotate the top layer halfway between a normal position and a full quarter turn. In other words, turn it about 45 degrees. This creates a small gap between the top layer and the middle layer, exposing an edge piece that can be removed more easily.
This step is the secret handshake of cube disassembly. If you try to remove a piece while every layer is perfectly aligned, the cube will resist. Turn the top layer 45 degrees, and suddenly the cube becomes much more cooperative.
Step 4: Remove One Edge Piece First
Choose a top-layer edge piece, not a corner. Grip the edge with your thumb and finger, then gently lift and wiggle it upward. If it does not move, do not yank. Try turning the top layer a little more or loosening the tension slightly if your cube allows it.
A plastic pry tool or small flathead screwdriver can help, but be careful. Insert it under the edge piece and apply gentle upward pressure. Protect the plastic by moving slowly. The first edge is the hardest part. Once it comes out, the cube usually relaxes like it has accepted its fate.
Step 5: Remove the Adjacent Corner Pieces
After the first edge comes out, the two nearby corner pieces should have more room to move. Slide or lift them out one at a time. Corners are easier to remove after an edge is gone because the surrounding structure is no longer locked tightly around them.
Do not twist corners aggressively. Corner twisting can damage some cube designs, especially smaller or tighter puzzles. If a corner feels stuck, remove another nearby edge first or gently rotate the layer to create more space.
Step 6: Continue Removing Edges and Corners
Once one edge and a few corners are removed, the remaining pieces should come out with minimal effort. Continue removing edge pieces and corner pieces around the cube. Keep the center pieces attached unless you specifically need to clean or inspect the core.
Sort the pieces into groups: edges in one area, corners in another, center caps and hardware in a small container. Sorting now saves time later. It also prevents you from staring at a pile of plastic pieces wondering whether you have accidentally invented a 2.7×3 cube.
Step 7: Decide Whether to Disassemble the Core
For basic cleaning, you usually do not need to take apart the core. Wiping the visible center pieces and inner tracks is often enough. However, if the cube is gritty, squeaky, uneven, or full of old lubricant, you may want to remove the center caps and inspect the screws, springs, washers, or tensioning system.
If you unscrew the center pieces, remove one side at a time and keep each set together. Screws and washers are small and easy to lose. Springs can bounce. Center caps enjoy hiding under rugs. Work slowly and keep everything organized.
Step 8: Clean the Pieces Carefully
Wipe each edge and corner piece with a soft cloth. If the cube has sticky grime, use a slightly damp cloth, then dry every piece completely. Cotton swabs are useful for cleaning grooves, tracks, and the inner feet of pieces. The goal is to remove dust, old lube, crumbs, pocket lint, and whatever mysterious substance appears after a cube has lived in a backpack for six months.
Do not soak the cube pieces. Do not wash screws or springs with water unless you know how to dry them thoroughly and prevent corrosion. For metal hardware, a dry cloth is usually safest. If your cube has magnets, avoid aggressive moisture and harsh cleaners.
Step 9: Reassemble the Cube in a Solved Layout
Reassembly is easiest when you build the cube in a solved color scheme. Start with the core and center pieces. Since center positions define each face, make sure the opposite colors are correct for your cube. On many standard cubes, white is opposite yellow, blue is opposite green, and red is opposite orange, but color schemes can vary.
Insert pieces layer by layer. Place four bottom-layer edges and corners around one center, then build upward. Slide edge pieces into their slots and add corners where three matching center colors meet. Keep checking that each edge has a valid two-color combination and each corner has a valid three-color combination.
Step 10: Insert the Final Edge Piece
The last piece is usually the trickiest. Leave one edge out until the end. Turn the top layer about 45 degrees again, gently spread the surrounding pieces, and press the final edge into place. It may take firm pressure, but it should not require violence. If it feels impossible, loosen the tension slightly or remove one neighboring piece and try again.
Once the final edge snaps in, align the layers and turn each face slowly. If the cube locks immediately, a piece may be inserted incorrectly, the tension may be too tight, or the cube may not be reassembled in a possible solved state.
Step 11: Test, Tension, and Lubricate Lightly
After reassembly, turn every face several times. Listen for scraping, clicking, or uneven resistance. If the cube has screws, adjust each side evenly. Small changes matter. A quarter-turn can make the cube feel completely different.
If you use lubricant, add only a small amount of cube-safe silicone lube. Too much lubricant can make the cube gummy and slow. Add a little, turn the cube for a minute, then decide whether it needs more. Cube maintenance is like seasoning soup: you can always add more, but removing too much is annoying.
Common Mistakes to Avoid
Starting With a Corner
Many beginners try to pry out a corner first because it looks easy to grab. Unfortunately, corners are trapped by surrounding edges. Start with an edge piece after turning the top layer 45 degrees. Your cube will complain less.
Using Too Much Force
If you feel plastic bending sharply, stop. A tight cube may need slight tension loosening, a different angle, or more patience. Brute force can snap internal feet or damage caps.
Losing the Hardware
Center screws, washers, springs, and caps are small enough to vanish instantly. Use a dish, cup, or magnetic parts tray. Future you will send a thank-you card.
Over-Lubricating
A little lube can make a cube smoother. Too much can make it feel like it is turning through peanut butter. Use lubricant sparingly and break it in with repeated turns.
Reassembling an Impossible Cube
A 3×3 cube has rules. If you randomly insert pieces without matching the color scheme, you may create a cube that cannot be solved by normal turning. Reassemble it in a solved state to avoid this problem.
When Should You Disassemble a Rubik’s Cube?
You do not need to take apart a cube every week. Disassembly is useful when the cube feels dirty, sandy, sticky, or unusually slow. It also helps after a cube has been dropped outside, exposed to crumbs, or attacked by the ancient enemy of all mechanical puzzles: carpet fuzz.
Speed cubers may disassemble cubes more often for setup changes, tension adjustments, and lubrication experiments. Casual solvers may only need to do it once in a while. If the cube turns smoothly and feels good, leave it alone. A happy cube does not need surgery.
Safety Tips for Kids and Beginners
Children can learn a lot from taking apart a cube, but adult supervision is smart. Small screws, springs, magnets, and caps can be choking hazards. Also, some pieces may pop out suddenly. Work over a table, not the floor, and keep pets away unless your dog has advanced mechanical training.
Beginners should avoid full core disassembly on expensive magnetic speed cubes unless they have watched model-specific setup instructions or understand the tensioning system. Some modern cubes have adjustment systems that differ from traditional screw-and-spring designs.
Experience Notes: What It Feels Like the First Time
The first time someone disassembles a Rubik’s Cube, there is usually a moment of hesitation right before the first edge comes out. The cube has spent its whole life pretending to be one solid object, so pulling out a piece feels suspiciously wrong. Then the edge pops free, the two corners loosen, and suddenly the entire cube seems much less mysterious. That moment is oddly satisfying. It is like discovering that a locked door was actually just stuck.
One common experience is realizing how much dust can hide inside a puzzle that looks clean on the outside. A cube carried in a backpack may collect lint, crumbs, hair, and old lubricant along the inner tracks. After cleaning, the difference can be obvious. Turns feel lighter, layers glide more evenly, and the cube stops making that gritty sound that says, “I have seen things.”
Another memorable lesson is that organization matters more than confidence. Many first-timers remove all the pieces into one heroic pile, then discover that reassembly requires attention to color pairs and corner combinations. Sorting edges and corners before rebuilding makes the process calmer. It also helps to reassemble the cube in a solved state instead of trying to guess random positions. A cube can look complete and still be impossible to solve if pieces are inserted incorrectly.
People also learn quickly that lubricant is powerful in tiny amounts. A dry cube may feel scratchy, but an over-lubed cube can feel sluggish. The best experience comes from adding a small drop, turning the cube for a while, and testing before adding more. Patience wins. Dumping lube into the cube like salad dressing usually creates a slow, slippery mess.
The final edge piece is often the funniest part. Everything is rebuilt, the cube looks nearly whole, and one stubborn edge refuses to go home. This is where the 45-degree top-layer trick returns like a loyal sidekick. Angle the layer, create a gap, press gently but firmly, and the final piece usually clicks into place. When the cube turns smoothly afterward, the whole process feels less like repair and more like understanding. You no longer own a mysterious cube-shaped object. You understand the tiny machine inside it.
Conclusion
Learning how to disassemble a Rubik’s Cube is simple once you know the correct order: prepare your workspace, turn the top layer 45 degrees, remove an edge first, then take out the corners and remaining pieces carefully. From there, you can clean the plastic parts, inspect the core, apply light lubricant, and reassemble the puzzle in a solved layout.
The biggest secret is not strength. It is patience. A cube that feels impossible to open usually needs a better angle, slightly looser tension, or a gentler touch. Treat the pieces carefully, keep small hardware organized, and avoid harsh cleaners. Done right, disassembly can make an old cube feel fresh againand it gives you a much better appreciation for the clever little mechanism hiding under those colorful stickers or tiles.














