
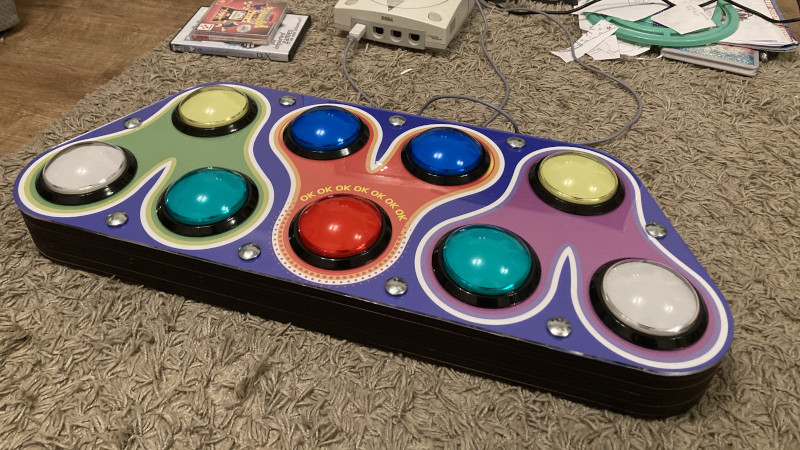
Some retro gaming projects whisper, “I fixed a loose cable.” Others kick open the arcade door wearing platform shoes and announce, “I built an entire rhythm game controller from scratch for the Sega Dreamcast.” This project belongs proudly in the second group. A custom Dreamcast rhythm game controller is not just a box with buttons; it is a love letter to arcade rhythm games, old-school Sega hardware, and the beautiful madness of making modern microcontrollers speak fluent 1999.
The build that inspired this discussion centers on a handmade controller for Pop’n Music, Konami’s colorful rhythm game series known for oversized buttons, fast patterns, and the unique ability to make your hands feel like they joined a marching band without asking permission. Instead of relying on the standard Dreamcast controller, maker Charlie Cole built a dedicated Pop’n Music-style controller using a Raspberry Pi Pico, arcade buttons, laser-cut materials, LED effects, and custom firmware that communicates with the Dreamcast through its Maple bus.
That sentence may sound simple, but under the hood it is a tiny engineering circus. The Sega Dreamcast is charming, stubborn, and technologically quirky. Its controller system is not a generic USB plug-and-play situation. To make a scratch-built controller work, the builder had to recreate the behavior of a real Dreamcast peripheral, including button states and memory card-style storage. In other words, the controller could not merely look retro. It had to convince the console it belonged there.
Why Build a Dreamcast Rhythm Game Controller at All?
The standard Dreamcast controller is iconic, but nobody would confuse it for an arcade rhythm controller. It has a distinctive shape, analog triggers, a VMU slot, and a design that looks like a spaceship steering wheel had a very serious meeting with a fishing reel. It works well for many games, but rhythm games like Pop’n Music ask for a different kind of physical interaction.
Pop’n Music is built around large, colorful buttons arranged in a wide layout. The arcade experience is tactile and dramatic. You do not simply press buttons; you slap, tap, roll, and occasionally panic-tap while pretending you meant to do that. Playing the Dreamcast version with a normal controller can technically work, but it loses much of the charm. A dedicated controller restores the scale, timing, and joyful chaos that define the game.
That is the real appeal of this retro Dreamcast rhythm game controller built from scratch: it bridges the gap between home console convenience and arcade authenticity. It is not nostalgia for nostalgia’s sake. It solves a real gameplay problem with craftsmanship, electronics, and just enough stubbornness to make the finished product feel heroic.
The Core Idea: Arcade Feel Meets Dreamcast Compatibility
The controller’s physical design follows the spirit of the arcade cabinet. Large arcade buttons sit across the top surface, giving players a layout closer to the original Pop’n Music experience. The enclosure uses stacked laser-cut MDF layers, an acrylic top, and a cork bottom. That combination is practical and stylish. MDF gives the case structure, acrylic protects the artwork and provides a clean finish, and cork helps the controller stay put on a table instead of skating around like it has somewhere better to be.
The handmade enclosure also shows why custom controllers remain popular in retro gaming communities. Factory accessories are limited by what companies produced decades ago. Scratch-built hardware is limited mostly by patience, tools, and whether the maker has accepted that cable management is a lifestyle, not a task.
For rhythm games, the size and spacing of buttons matter. A small button can register a press, but it does not provide the same muscle-memory-friendly target as a large arcade button. When a song speeds up and the note chart becomes an enthusiastic confetti cannon, bigger controls help players react with confidence. This is especially important for a game like Pop’n Music, where the controller is part of the performance.
The Raspberry Pi Pico: Small Board, Big Responsibility
At the heart of the controller is the Raspberry Pi Pico, a microcontroller board based on Raspberry Pi silicon. Unlike a full Raspberry Pi computer, the Pico does not run a desktop operating system. It is designed for embedded projects where fast, predictable input and output matter. That makes it a strong fit for custom controllers.
The important feature here is Programmable I/O, usually shortened to PIO. PIO lets the RP2040 microcontroller handle timing-sensitive communication through small dedicated state machines instead of forcing the main processor cores to do every pin change manually. For a strange and speedy console communication bus like the Dreamcast’s Maple bus, that matters a lot.
Think of PIO as hiring a tiny, extremely punctual assistant who only does signal timing and never gets distracted by snacks. The main code can track buttons and manage behavior, while the PIO hardware handles the precise electrical conversation. That division of labor is one reason the Pico became such a good match for the project.
Understanding the Dreamcast Maple Bus
The Dreamcast uses the Maple bus to communicate with controllers, memory cards, rumble packs, keyboards, mice, and other peripherals. It is not the same as USB, and it has its own packet structure and timing requirements. To the console, a controller must respond in a way that matches what a real Dreamcast device would do.
This is where the build becomes more than a fancy button box. The custom controller must emulate a Dreamcast controller at the protocol level. When the console asks what is connected, the device needs to answer properly. When the game checks button states, the controller must report them accurately. When memory card behavior is expected, the firmware needs to provide storage-like functionality.
That last part is especially clever. The project uses the Pico’s flash storage to emulate a memory card. For Dreamcast fans, this is a delightful detail because the Dreamcast’s Visual Memory Unit, or VMU, is one of the console’s most memorable accessories. The VMU was more than a save card; it had a screen, buttons, and mini-game potential. By integrating memory-card-style behavior, the scratch-built controller becomes more useful and more authentic.
Why This Build Feels So Retro and So Modern
The magic of the project comes from the clash of eras. On one side, there is the Sega Dreamcast, a late-1990s console famous for online features, arcade-quality games, a distinctive controller, and a fanbase that refuses to let it retire quietly. On the other side, there is the Raspberry Pi Pico, a modern low-cost microcontroller with features that make complex hardware projects more approachable.
This combination captures the best kind of retro modding. The goal is not to erase the old hardware’s personality. The goal is to support it, extend it, and make it easier to enjoy in the present. A modern board does the behind-the-scenes work, but the final experience still feels like sitting down with a Dreamcast and playing a rhythm game the way it deserves to be played.
It also highlights why the Dreamcast community remains unusually energetic. The console had a short commercial life, but it left behind hardware that still invites experimentation. From optical drive emulators to VMU upgrades, new homebrew games, controller adapters, and custom peripherals, Dreamcast fans keep finding ways to make the orange swirl spin again.
Design Details That Make the Controller Work
Large Arcade Buttons
The big arcade buttons are the stars of the show. Rhythm games rely on timing, feel, and confidence. Large buttons give the player a satisfying physical target and make the controller feel closer to an arcade panel. They also make the project visually obvious. Nobody looks at a row of huge rhythm buttons and asks, “Is this for spreadsheets?”
Layered MDF Construction
Using laser-cut MDF layers is a smart fabrication choice. It allows the maker to build a sturdy enclosure without expensive injection molding or complex woodworking. Each layer contributes to the final shape, and the internal cavities can be planned for wiring, the Pico board, and button hardware. It is the DIY equivalent of making a sandwich, except the filling is electronics and the bread should not be eaten.
Acrylic Top Layer
The acrylic top protects the printed artwork and gives the controller a polished look. For custom arcade-style builds, acrylic is popular because it provides a smooth surface while allowing graphics underneath to show through. This helps the project feel finished rather than “prototype that escaped the garage.”
Cork Bottom
The cork bottom is a small but important touch. Rhythm games can get physical, and a controller that slides across the table mid-song is not a controller; it is a betrayal. Cork adds grip and helps soften contact with the surface underneath.
LED Feedback
The build includes LEDs controlled with pulse-width modulation, creating fade effects after button presses. LED feedback is not strictly required for gameplay, but it adds personality. A rhythm controller should feel alive. When the buttons glow and fade, the hardware looks like it is enjoying the music too.
The Software Challenge: More Than Button Mapping
A simple USB controller project often maps button inputs to keyboard keys or gamepad events. This Dreamcast build is more demanding because it targets original hardware. The firmware has to manage physical inputs, drive LEDs, emulate controller responses, and communicate through Maple bus timing. It is a software project wearing a hardware costume.
The Pico continuously monitors button presses and releases. At the right moments, it sends data packets back to the Dreamcast that represent the controller state. The timing must be reliable because rhythm games punish lag, missed inputs, and inconsistent response. A rhythm controller with bad timing is like a drummer who keeps checking email during the chorus.
The project’s use of PIO is the technical key. The Maple bus communication pattern is unusual, and handling it purely through normal software loops would be difficult on many low-end microcontrollers. By using hardware-assisted timing, the Pico can deal with the bus more cleanly while still leaving room for the rest of the controller logic.
What Makes This Project Important for Retro Gaming?
This controller matters because it shows how retro hardware can be preserved through creativity rather than sealed behind glass. A Dreamcast in a display case is nice, but a Dreamcast running a rhythm game with a custom controller is alive. Projects like this keep old systems useful, playful, and accessible.
It also demonstrates a broader lesson for retro gaming accessories: original peripherals are not always available, affordable, or comfortable. Some were released only in certain regions. Some are rare. Some are expensive enough to make your wallet whisper, “Please, no.” Custom builds can fill those gaps while respecting the original experience.
For Pop’n Music fans, a scratch-built controller can be the difference between casually testing the game and truly playing it. For hardware makers, it is a case study in protocol emulation, enclosure design, timing-sensitive firmware, and user-focused controls. For everyone else, it is simply cool. Not everything needs a grand academic justification. Sometimes a glowing rhythm controller for a 1990s Sega console is cool, and that is enough.
Lessons for Anyone Planning a Similar Build
The first lesson is to design around the game, not just the electronics. A rhythm controller succeeds when it feels right under the hands. Button size, spacing, angle, height, and enclosure stability all affect playability. The electronics can be perfect, but if the panel feels awkward, the player will notice immediately.
The second lesson is to respect the console’s communication protocol. Original hardware often has quirks that emulators and modern adapters hide from view. When building for real Dreamcast hardware, the controller must speak the console’s language. Maple bus support is not a decorative feature; it is the handshake that makes the entire project possible.
The third lesson is that aesthetics matter. The acrylic top, artwork, LED fades, and clean enclosure turn a working prototype into something people want to use. A handmade controller does not need to look factory-made, but it should look intentional. There is a big difference between “custom-built” and “lost a fight with a toolbox.”
The fourth lesson is to plan for maintenance. Arcade buttons are mechanical parts. Wires can loosen. Firmware may need updates. A good custom controller should be serviceable without requiring a heroic excavation. Builders should think about access panels, labeled wiring, secure mounting, and sensible internal layout.
Specific Example: Why Pop’n Music Benefits From Custom Hardware
Imagine playing a song where notes arrive quickly across multiple lanes. On a standard controller, your thumbs must translate the on-screen pattern into small button presses that were never designed for this type of rhythm layout. It is playable, but it feels like reading sheet music through a keyhole.
Now imagine the same song on a wide arcade-style controller. Your hands move across large buttons. The physical layout mirrors the game’s visual language. Fast passages become more intuitive because your body understands the spacing. The controller becomes part of the rhythm, not a tiny plastic obstacle between you and the music.
That is why specialized rhythm controllers exist. The best ones do not merely send inputs; they shape how players experience timing, flow, and difficulty. This Dreamcast build succeeds because it treats the controller as an instrument. It is closer to a small arcade panel than a traditional gamepad, and that is exactly the point.
The Charm of Building Instead of Buying
Buying a rare original controller can be satisfying, but building one creates a different kind of connection. Every design choice tells a story. The enclosure material, the button selection, the wiring layout, the firmware decisions, and the artwork all become part of the finished object. It is not just a controller; it is a playable diary of problem-solving.
There is also a practical advantage. Custom builds can be repaired, modified, and improved. If a button wears out, it can be replaced. If the firmware gains features, it can be updated. If the player wants different artwork, the top panel can be redesigned. Original hardware is history. Custom hardware is history with a screwdriver nearby.
Hands-On Experience: Living With a Scratch-Built Dreamcast Rhythm Controller
Using a retro Dreamcast rhythm game controller built from scratch feels different before the console even turns on. There is a little ceremony to it. You set the controller on the table, feel the weight of the enclosure, notice the arcade buttons, and suddenly the Dreamcast does not feel like a living-room console anymore. It feels like someone shrank a corner of an arcade and gave it a power cable.
The first thing you notice is the confidence of the controls. Large rhythm buttons invite full-hand movement rather than cramped thumb presses. That changes the mood immediately. On a normal controller, difficult rhythm patterns can feel like a puzzle being solved through finger gymnastics. On a dedicated controller, the same patterns feel more musical. Your hands travel across the panel, your timing becomes more physical, and even mistakes feel dramatic. Not better, necessarily, but definitely more theatrical. If you are going to miss a note, you might as well miss it with stage presence.
The second experience is appreciation for stability. A rhythm controller needs to stay exactly where it is placed. The cork bottom and broad body help make the controller feel planted. That matters once the songs get faster. When a controller shifts during play, your brain spends precious attention correcting position instead of following the chart. A stable enclosure lets you focus on rhythm, not furniture management.
The LED feedback adds another layer of enjoyment. It is not required, but it makes each press feel responsive and alive. The fade effect gives the controller a visual rhythm that matches the audio rhythm. In a dim room, the glowing buttons can make a Dreamcast session feel surprisingly premium. This is where the project escapes pure utility and becomes a piece of interactive retro art.
There is also a quiet satisfaction in knowing that the controller is communicating with original Dreamcast hardware. Modern adapters are convenient, but a custom device that speaks Maple bus properly feels like a clever translator at a very niche international conference. The console asks a question, the Pico answers, and the game continues as if this handmade arcade slab had always been part of the Dreamcast family.
For players, the biggest takeaway is that good hardware can renew an old game. A title you might have tested once with a standard controller suddenly becomes worth learning. Songs feel more approachable. The layout makes more sense. The game’s personality comes forward. For makers, the experience is even richer because every successful input is proof that the design, wiring, code, and fabrication are working together.
Of course, scratch-built controllers are not magic. They require patience, testing, and occasional troubleshooting. A button may need adjustment. A wire may need checking. Firmware may need refinement. But that is part of the charm. The controller is not a sealed consumer product pretending it was born perfect. It is a handmade tool, and handmade tools have character. Sometimes that character says, “I am a masterpiece.” Sometimes it says, “Please tighten my panel screws.” Both are valid forms of communication.
In the end, the experience is memorable because it restores the physical joy of arcade rhythm gaming while keeping the Dreamcast at the center. It proves that retro gaming is not only about collecting old boxes. It is about building new ways to enjoy them. And when a custom controller makes a decades-old console feel fresh again, that is not just nostalgia. That is engineering with a beat.
Conclusion
A retro Dreamcast rhythm game controller built from scratch is more than a clever mod. It is a complete meeting of design, electronics, firmware, and arcade nostalgia. By combining a Raspberry Pi Pico with arcade buttons, laser-cut construction, LED feedback, Maple bus communication, and memory-card-style functionality, the project shows what modern makers can do for classic consoles.
The best part is that the build respects the Dreamcast rather than replacing it. It does not turn the console into something else. It helps the console deliver a better version of an experience it already supported. For Pop’n Music, that means bigger buttons, better feel, and a more authentic rhythm game setup. For the wider retro community, it is a reminder that old hardware still has new stories to tell.
Note: This article is written as original web content based on publicly available information about Dreamcast hardware, Pop’n Music controllers, Raspberry Pi Pico microcontrollers, Maple bus communication, and documented custom controller builds.










