
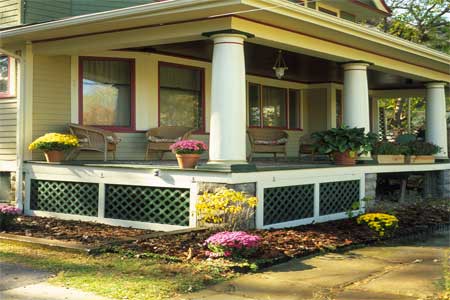
Installing lattice under a deck is one of those home improvement projects that delivers a suspiciously satisfying before-and-after. One day, the underside of your deck looks like a secret meeting place for weeds, forgotten soccer balls, and possibly a raccoon with strong opinions. The next day, it looks polished, intentional, and wonderfully finished.
Deck lattice, also called deck skirting, hides the open space beneath a raised deck while still allowing airflow. That matters because the area under a deck needs ventilation to help reduce trapped moisture, mildew, musty smells, and wood damage. Lattice also keeps larger animals out, makes storage look less chaotic, and gives your outdoor space a cleaner, more complete appearance.
The good news: learning how to install lattice under a deck is absolutely DIY-friendly. You do not need a contractor’s truck, a tool belt that weighs more than your dog, or mysterious “pro-only” knowledge. You do need accurate measurements, the right fasteners, a simple frame, and patience with cutting. Lattice is forgiving, but it is not magic. Measure twice, cut once, and keep snacks nearby.
What Is Deck Lattice and Why Install It?
Lattice is a panel made with a crisscross, square, or decorative pattern. It is commonly sold in 4-by-8-foot sheets and made from vinyl, plastic, composite, pressure-treated wood, or cedar. When installed under a deck, lattice works as skirting: it covers the open area between the bottom of the deck and the ground.
Homeowners install lattice under decks for several reasons. First, it improves curb appeal. A raised deck without skirting can look unfinished, like a nice table wearing no pants. Second, lattice helps discourage animals from nesting underneath. Third, it allows airflow better than many solid skirting options. Fourth, it can create a hidden storage area for garden tools, hoses, outdoor cushions, or anything else you do not want sitting in plain view.
Before You Start: Planning the Project
Before buying lattice panels, take a slow walk around the deck. Look at the post spacing, the ground slope, the deck height, and any obstacles such as stairs, downspouts, utilities, vents, pipes, or sprinkler lines. This is where many DIY mistakes happen. The panel installation itself is simple; the planning is what keeps it looking professional.
Check Local Rules and Access Needs
Many lattice projects do not require permits, but local building departments can have rules about deck modifications, especially if your project affects stairs, structural posts, drainage, or enclosed storage. If the deck has utilities, gas lines, electrical lines, plumbing cleanouts, or HVAC equipment underneath, plan for easy access. A removable lattice panel or small hinged door can save you from future frustration.
Choose the Right Lattice Material
Vinyl lattice is popular because it resists rot, insects, and peeling paint. It is low-maintenance and comes in common colors such as white, black, brown, and gray. Wood lattice has a classic look and can be painted or stained to match the deck, but it requires more maintenance. Composite or PVC lattice can offer a more upscale finish and better durability, though it often costs more.
If your deck is exposed to lots of moisture, vinyl or PVC lattice is usually easier to live with. If your deck is part of a traditional wood porch and you enjoy painting or staining, wood lattice can look warm and custom. For a modern deck, square-pattern lattice or horizontal skirting boards may feel cleaner than traditional diamond lattice.
Tools and Materials You Will Need
Gather your materials before you begin. Nothing ruins DIY momentum faster than discovering you need one more box of screws after you are already covered in sawdust.
Basic Tools
- Tape measure
- Pencil or marker
- Level
- Chalk line or straightedge
- Circular saw, jigsaw, or fine-tooth saw
- Drill and drill bits
- Driver bit
- Clamps
- Safety glasses
- Work gloves
- Sawhorses or a stable cutting surface
Materials
- Lattice panels
- Pressure-treated 2x4s, 1x4s, or exterior-grade framing boards
- Exterior screws or stainless steel screws
- Lattice cap molding
- Lattice divider molding, if joining panels
- Exterior hinges and latch, if adding an access panel
- Exterior paint or stain, if using wood
- Gravel or landscape fabric, optional for ground preparation
Step 1: Clean and Prepare the Area Under the Deck
Start by clearing out everything under the deck. Remove leaves, branches, weeds, old lumber, toys, planters, and mystery objects that have achieved archaeological status. Trim back plants that touch the deck framing or future lattice panels.
If the ground beneath the deck is muddy or uneven, consider adding landscape fabric and a thin layer of gravel. This helps reduce weeds and improves drainage. Lattice should not be buried into the soil. Direct contact with soil can trap moisture, encourage rot in wood lattice, and cause vinyl panels to bow or get damaged during freeze-thaw cycles.
Step 2: Measure the Deck Openings
Measure each section between deck posts separately. Do not assume every opening is the same size, even if the deck looks symmetrical. Decks settle, posts shift slightly, and ground slopes like it has its own creative agenda.
Measure the width between posts at the top and bottom. Then measure the height from the underside of the deck framing to the ground in several places. If the ground slopes, use the shortest height as your starting point and decide whether you want the bottom of the lattice to follow the slope or remain level.
For the cleanest look, leave a small gap between the bottom of the lattice and the ground. A gap of about 1 to 2 inches helps prevent moisture damage and allows seasonal ground movement. If you are using vinyl lattice, also plan small expansion gaps around the panel edges, commonly about 1/4 inch, so the material can expand and contract with temperature changes.
Step 3: Decide Between Fixed Panels and Removable Panels
Before building the frame, decide how the lattice should function. Fixed panels are simple and sturdy. They work well for deck sections where you rarely need access. Removable panels are better if you store items under the deck or need to reach utilities. A hinged lattice door is ideal near a storage zone.
A smart layout might include mostly fixed lattice panels with one access door placed near the least visible side of the deck. That gives you a tidy look without trapping your rake, hose reel, or future self underneath.
Step 4: Build a Support Frame
Lattice needs a frame or support structure. Do not simply screw a floppy panel to random deck posts and hope it behaves. It will sag, wave, and generally look like it regrets being involved.
Use pressure-treated lumber or exterior-grade boards to create a rectangular frame for each lattice section. A simple frame can be made from 2x4s or 1x4s. Attach vertical frame pieces to the deck posts and horizontal frame pieces along the top and bottom. Make sure the frame is square and level before attaching lattice.
If your deck posts are far apart, add vertical supports every 24 to 48 inches. This keeps the lattice from flexing and helps the installation look crisp. For vinyl lattice, support spacing is especially important because plastic panels can expand, contract, or bow if fastened too tightly or unsupported.
Step 5: Cut the Lattice Panels to Size
Place the lattice panel on sawhorses or another stable cutting surface. Mark your cut lines carefully with a pencil and straightedge. For vinyl lattice, use a fine-tooth blade to reduce chipping. A circular saw works well for straight cuts, while a jigsaw is helpful around posts, pipes, or uneven shapes.
Cut slowly and support both sides of the panel. If the lattice vibrates while cutting, clamp it down or place a scrap board underneath. For wood lattice, seal or paint cut edges before installation if you want better weather resistance.
When cutting panels, remember to allow for expansion gaps. Do not cut vinyl lattice so tightly that it has no room to move. A panel squeezed into place like a suitcase before vacation will eventually buckle.
Step 6: Add Cap and Divider Moldings
Lattice molding gives the project a finished edge. Cap molding fits around outside panel edges, while divider molding connects two lattice panels where they meet. These trim pieces make the installation look cleaner and help hide slightly imperfect cuts.
Install molding according to the product instructions. In many vinyl lattice systems, the panel slides into the molding, and the molding is fastened to the frame. Do not force pieces together too tightly. Leave small gaps for movement, especially in hot climates where vinyl expands.
Step 7: Position and Fasten the Lattice
Hold the panel against the frame and clamp it in place. Step back and check alignment. Look at the top line, bottom gap, and pattern direction. Traditional diamond lattice looks best when the pattern remains consistent around the deck.
Predrill oversized holes through vinyl lattice before fastening. This is important because vinyl expands and contracts. Center the screws in the holes and avoid over-tightening. The screw head should hold the panel without pinching it. If you crank down hard on every screw, the lattice may buckle when the temperature changes.
Use exterior-rated or stainless steel screws. Place fasteners about every 18 to 24 inches along the frame, depending on the panel type and manufacturer instructions. If you are using wood lattice, predrilling still helps prevent splitting, especially near edges.
Step 8: Install an Access Door or Removable Panel
If you want under-deck storage, build at least one access panel. A basic lattice door can be made by attaching lattice to a rectangular wood frame, then mounting the frame with exterior hinges. Add a simple latch to keep it closed.
Make the access opening large enough to be useful. A tiny door may look cute, but it will not be cute when you are trying to pull out a storage bin, lawn chair, or leaf blower. For large decks, consider two access points on different sides.
Removable panels are another option. Instead of hinges, attach panels with screws that can be removed later. This gives a seamless look while still allowing maintenance access when needed.
Step 9: Handle Sloped Ground
Sloped ground is common under decks. You have two main choices: keep the top of each lattice panel level and cut the bottom to follow the grade, or step the panels down from section to section. Cutting the bottom to match the slope usually looks more custom, but it takes more careful measuring.
To mark a slope, hold the panel in place, level the top, and use a compass, scrap block, or scribing method to transfer the ground line onto the lattice. Cut along the marked line, leaving a small gap above the soil. If the slope is steep, stepping the panels may look cleaner and reduce awkward triangular cuts.
Step 10: Paint, Stain, or Finish the Trim
If you are using wood framing or wood lattice, paint or stain it before final installation whenever possible. It is much easier to coat boards on sawhorses than while crouching under a deck performing what can only be described as advanced outdoor yoga.
Choose exterior paint or stain designed for decks, fences, or outdoor trim. Match the lattice to the deck color for a seamless look, or use a darker color to make the skirting recede into the shadows. White lattice creates a bright cottage look, while black or dark brown lattice often feels more modern and understated.
Common Mistakes to Avoid
Over-Tightening Screws
This is one of the biggest mistakes when installing vinyl lattice. Tight screws prevent expansion and contraction, which can cause buckling or warping. Snug is good. Crushing the panel is not.
Skipping Ventilation
Lattice naturally provides airflow, but do not block every opening behind it with plastic, solid boards, or stored items pressed against the panel. Air movement helps protect the underside of the deck from moisture problems.
Forgetting Access
Never permanently seal off an area that contains utilities, drainage lines, or useful storage. Add a door, removable panel, or access hatch. Future you deserves kindness.
Letting Lattice Touch the Ground
Ground contact can cause wood lattice to rot and vinyl lattice to distort. Leave a small bottom gap. If you dislike seeing the gap, hide it with gravel, low plants, or a clean border.
Maintenance Tips for Deck Lattice
Once installed, lattice does not require much attention. Vinyl lattice can usually be cleaned with a garden hose, mild soap, and a soft brush. Avoid harsh abrasive cleaners that can scratch the surface. Wood lattice should be inspected annually for peeling paint, loose fasteners, rot, or insect damage.
After storms, check that leaves and debris are not piled against the panels. Keep plants trimmed so they do not trap moisture. If a panel bows, loosen the screws slightly and check whether enough expansion space was left around the edges.
Cost Considerations
The cost to install lattice under a deck depends on the deck size, lattice material, trim, framing lumber, fasteners, and whether you build access doors. Vinyl lattice usually costs more than basic wood lattice upfront but requires less maintenance. Wood lattice may be cheaper initially, but painting, staining, and future repairs can add to the long-term cost.
For a small deck, this can be a weekend project with a modest material budget. For a large raised deck with multiple sides, stairs, sloped ground, and custom access doors, the project can take several weekends. The key is to break the job into sections instead of trying to conquer the entire deck in one heroic Saturday.
Design Ideas for Better Curb Appeal
Traditional white diamond lattice is not your only option. Square lattice gives a cleaner, more contemporary appearance. Dark lattice can disappear visually and make landscaping stand out. Framed lattice panels look more finished than panels screwed directly to posts. Matching the trim color to the deck fascia can make the whole structure feel intentional.
You can also pair lattice with landscaping. Low shrubs, ornamental grasses, mulch beds, or stone borders can soften the bottom edge. Just keep plants far enough away to preserve airflow and maintenance access.
of Practical Experience: What Installing Deck Lattice Really Feels Like
The first thing most homeowners learn when installing lattice under a deck is that the deck is not as square as it looked from the patio chair. From a distance, everything seems straight. Up close, one post is slightly out of line, the ground slopes more than expected, and the “same size” openings between posts are apparently cousins, not twins. This is normal. The secret is to measure every opening individually and label each panel before cutting. Write “left side,” “front middle,” or “stair side” on painter’s tape and stick it to the panel. It feels overly careful until you avoid installing the wrong piece in the wrong place.
Another real-world lesson: cutting lattice is easier when the panel is supported well. If a vinyl lattice sheet hangs off the sawhorse and vibrates, the cut can chatter and look rough. Place scrap plywood or boards under the panel, clamp it, and use a fine-tooth blade. For wood lattice, move slowly near the edges because thin strips can split. If the cut edge will be visible, plan to cover it with cap molding. Trim is the DIY equivalent of a good haircut; it hides a lot.
Working with vinyl lattice also teaches patience with screws. Many beginners want to tighten fasteners until the panel feels locked forever. That instinct makes sense, but vinyl needs room to move. Predrill oversized holes, center the screw, and stop before the head pinches the lattice. If the panel can expand and contract, it will stay flatter over time. If it cannot move, summer heat may turn it into a wavy plastic potato chip.
Access doors are worth the extra time. Even if you do not plan to store anything under the deck, life has a way of sending you under there. A hose bib may need repair. A pet may chase a tennis ball into the forbidden zone. A contractor may need to inspect something. Build one lattice panel as a hinged door or make a section removable. Use exterior hinges and a latch, and make the frame sturdy enough that it does not sag.
One of the best finishing tricks is to paint or stain the support frame before attaching the lattice. Raw pressure-treated boards can stand out behind the panel, especially with white lattice. A dark frame behind dark lattice nearly disappears. For wood lattice, prefinishing all sides gives better protection than trying to brush paint into every little diamond after installation. That job is possible, but it is also how a simple weekend project turns into a personal endurance event.
Finally, do not ignore the ground below the lattice. A clean gravel strip or mulch bed makes the whole installation look sharper. It also prevents weeds from growing directly into the panels. Leave a small gap at the bottom, then visually soften it with landscaping. The result is a deck that looks finished, breathes properly, and no longer advertises every storage bin, garden tool, and wandering leaf underneath.
Conclusion
Installing lattice under a deck is a practical upgrade that improves curb appeal, hides clutter, discourages pests, and keeps the underside of your deck ventilated. The job is manageable for most DIY homeowners when approached step by step: clean the area, measure carefully, build a solid frame, cut panels accurately, allow for expansion, fasten without over-tightening, and include access where needed.
The best deck lattice installations look simple because the planning was thoughtful. Choose the right material for your climate and maintenance style, leave room for airflow, and finish the edges with trim. Whether your deck is small and cozy or large enough to host the neighborhood barbecue committee, lattice skirting can make it look polished without requiring a full deck rebuild.














