
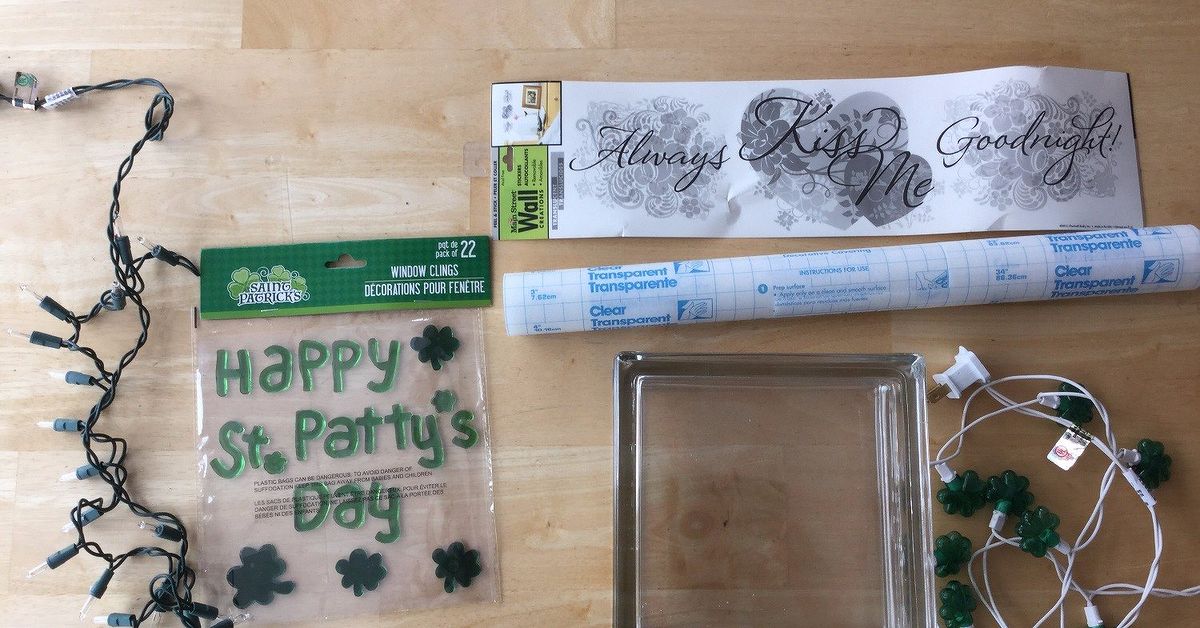
A plain glass block is basically the craft-store version of a quiet introvert: simple, square, and waiting for someone with ribbon, lights, and too much enthusiasm to turn it into the life of the party. For St. Patrick’s Day, that transformation is wonderfully easy. With a few budget-friendly supplies, you can turn an ordinary glass craft block into glowing holiday decor that looks charming on a mantel, entry table, bookshelf, bathroom counter, or snack station where the green cupcakes are mysteriously disappearing.
This project is especially friendly for beginners because it does not require a cutting machine, advanced painting skills, or the emotional resilience needed to untangle a box of ancient holiday lights. The two options below use simple materials: battery-operated LED lights, shamrock accents, removable decals, contact paper, window clings, ribbon, and a craft glass block with an opening. One version is fast and playful; the other has a softer, frosted glow that looks a little more polished. Both are reusable, customizable, and easy to update for other holidays once the leprechauns have clocked out.
Why Glass Block Decor Works So Well for St. Patrick’s Day
Glass blocks are popular in DIY decor because they naturally diffuse light. The textured surface softens the brightness of string lights, creating a cozy glow instead of a harsh flashlight-in-the-face situation. That makes them perfect for seasonal displays, especially St. Patrick’s Day decor, where green, gold, shamrocks, rainbows, and warm white lights all play nicely together.
Another advantage is flexibility. A glass block can look whimsical with a tiny leprechaun hat, elegant with gold ribbon, farmhouse-inspired with burlap, or modern with clean vinyl lettering. You can make it cute enough for kids, subtle enough for adults, or sparkly enough to suggest that a craft store exploded in the best possible way.
Before You Begin: Choose the Right Glass Block
For this project, use a decorative craft glass block that already has an opening or removable plug. Do not try to drill into a standard building glass block unless you have the proper tools, experience, and safety equipment. Better yet, skip the drama entirely and buy the craft version. Many craft blocks are designed specifically for lights, fillers, and seasonal decorations, which makes the project safer and much easier.
A common size is about 7.5 to 8 inches square, but smaller blocks also work well for tabletop displays. Clear blocks give the brightest effect, while wave-pattern or ice-pattern blocks help hide the wires and create a prettier glow. If you want a softer look, you can add frosted contact paper or use frosted glass spray on the outside, but contact paper is less permanent and easier to remove when Easter, spring, or “I forgot this was still out in June” season arrives.
Materials You Can Use
Basic Supplies
- One craft glass block with an opening or removable plug
- Battery-operated LED fairy lights or shamrock-shaped lights
- Rubbing alcohol and a lint-free cloth
- Green, gold, white, or rainbow ribbon
- Scissors
- Removable St. Patrick’s Day decals, window clings, or stickers
- Clear or frosted contact paper
- Optional: small leprechaun hat, faux clover, gold coins, or mini bow
Why LED Lights Are the Smart Choice
LED lights are ideal for glass block crafts because they stay cooler, use less energy, and last longer than older incandescent light strings. Battery-operated LEDs also keep the project portable, so you can place your glowing shamrock block wherever it looks best without hunting for an outlet like a decorating detective.
Always inspect your lights before placing them inside the block. Avoid damaged wires, cracked battery cases, or lights that feel unusually hot. Turn the lights off when you leave the house or go to bed. Holiday glow is delightful; mystery electrical smells are not part of the aesthetic.
Option 1: The Quick Shamrock Glow Block
This first option is the easiest and fastest. It uses a clean glass block, a strand of green or shamrock lights, and peel-and-stick decals. It is perfect if you want a cheerful St. Patrick’s Day decoration without setting up a full crafting command center.
Step 1: Clean the Glass
Wipe the front of the glass block with rubbing alcohol and let it dry completely. This removes dust, fingerprints, and any invisible “I touched this while eating chips” residue that can prevent stickers or decals from sticking smoothly.
Step 2: Add the Lights
Feed your LED lights into the opening of the glass block. Spread them out gently with your fingers or the blunt end of a wooden spoon. Do not pack the lights too tightly. The goal is a soft, even glow, not a tiny electrical spaghetti casserole.
Step 3: Apply the Decal
Choose a St. Patrick’s Day decal, shamrock sticker, or “Lucky” message and place it on the front of the glass block. Start from the center and smooth outward to reduce bubbles. If you are using transfer tape with vinyl, burnish the design firmly, then peel the tape back slowly at a low angle.
Step 4: Dress Up the Top
Tie a ribbon around the block or add a bow to the top. Green gingham, gold satin, burlap, or rainbow ribbon all work beautifully. For a playful finish, place a mini leprechaun hat on top. If the hat is too floppy, add a small rubber band or a dab of removable adhesive to shape it.
Step 5: Turn It On
Switch on the lights and adjust the placement until the glow looks balanced. This version works well as a St. Patrick’s Day night light, party centerpiece, shelf accent, or cheerful bathroom counter decoration. Yes, even the bathroom deserves luck.
Option 2: The Frosted Window Cling Lantern
The second option has a softer, more layered look. Instead of placing decals directly on the glass, you apply contact paper first, then decorate with window clings. This creates a frosted lantern effect and makes the design easy to remove or replace.
Step 1: Cut the Contact Paper
Measure the front face of your glass block and cut a piece of clear or frosted contact paper slightly smaller than the glass surface. Leaving a tiny border around the edge helps the finished design look clean and intentional.
Step 2: Apply the Contact Paper
Peel back a small section of the backing and position the contact paper on the glass. Smooth it slowly from top to bottom, peeling more backing as you go. Use a credit card, scraper, or your fingers to push out bubbles. If a bubble refuses to leave, gently lift that section and smooth it again. We are crafting, not negotiating with air pockets.
Step 3: Add Window Clings
Place shamrock, rainbow, leprechaun, or pot-of-gold window clings on top of the contact paper. This is where the project becomes especially fun for kids, because the pieces can be moved around until the design looks right. Try placing one large shamrock in the center, smaller clovers near the corners, and a rainbow near the bottom for a layered scene.
Step 4: Fill with Warm White or Green LEDs
Insert LED fairy lights into the block. Warm white lights create a cozy glow behind the green decorations, while green lights make the whole block feel more festive. If your lights have multiple settings, choose steady-on for a calm look or gentle twinkle for a party table.
Step 5: Finish with Ribbon and Gold Accents
Add a ribbon around the edge of the block to hide seams and make it feel finished. Gold coins, faux clover, or a small bow can be placed at the base. The result looks like a little glowing St. Patrick’s Day lantern, minus the need to catch an actual leprechaun for technical support.
Design Ideas for Different Styles
Classic Lucky Green
Use green shamrock lights, a “Lucky” decal, and a bright green bow. This is the most traditional look and works well for family rooms, classroom displays, and party tables.
Elegant Green and Gold
Choose warm white lights, frosted contact paper, gold ribbon, and one simple clover design. This version feels more grown-up and blends better with neutral home decor.
Rainbow Party Block
Add rainbow window clings, colorful ribbon, and a few gold coins around the base. This style is cheerful, kid-friendly, and great for dessert tables or school events.
Farmhouse St. Patrick’s Day
Use burlap ribbon, muted green clover accents, and warm white fairy lights. Add a small wooden tag that says “Lucky” or “Welcome.” This option feels seasonal without looking like the decoration aisle challenged your living room to a duel.
Where to Display Your Glowing Glass Block
A glowing St. Patrick’s Day glass block is small enough to move around but bright enough to anchor a simple holiday vignette. Place it on a mantel with faux greenery, set it near a bowl of chocolate coins, or use it as a centerpiece for a casual dinner. It also looks charming in an entryway, where guests get a little flash of green before they even take off their shoes.
For a party, use the block near snacks or drinks to create a festive focal point. If you are decorating a classroom or office, battery-operated lights are usually the easiest option because they reduce cord clutter. For covered porch use, make sure every material is rated for the environment and protected from moisture. Most indoor craft lights, clings, ribbons, and contact paper are happiest inside where rain cannot ruin their lucky little lives.
Helpful Tips for a Better Finished Look
First, avoid overfilling the block. A few lights spread evenly will look better than a dense clump. Second, keep the battery pack accessible. You can hide it behind the block or tuck it under ribbon, but do not seal it inside permanently. Batteries eventually need changing, usually at the exact moment guests arrive.
Third, test your layout before sticking anything down. Arrange decals, clings, and ribbon on the table first. If the block has a wave pattern, simple bold designs show up better than tiny detailed graphics. Finally, photograph the finished project with the lights on and off. This helps you see whether the design is readable in daylight and magical at night.
How to Store and Reuse It
One of the best parts of this DIY St. Patrick’s Day decor is that it can be reused. Remove window clings and store them flat between sheets of wax paper or in a plastic sleeve. Take out the lights before packing the block away, especially if they use batteries. Store ribbon separately so it does not flatten or wrinkle.
If you used removable decals, peel them off carefully. If you used permanent vinyl, keep the St. Patrick’s Day design and simply store the block with your seasonal decorations. You can also rotate the same glass block through the year: shamrocks in March, bunnies in spring, stars in July, leaves in fall, and snowflakes in winter. One block, many personalities. Honestly, it is doing more seasonal wardrobe changes than most humans.
Common Mistakes to Avoid
Do not use hot lights inside a sealed block. Choose LED lights and leave the opening accessible. Do not run cords under rugs or through tight door gaps. Do not place the block near open flames, heaters, or wet surfaces. And do not assume every sticker will remove cleanly from glass after weeks in the sun. If removability matters, test a small corner first or use contact paper as a protective layer.
Also, avoid using too many competing decorations on the front. A glass block already has texture, lights, and depth. One strong focal point usually looks better than twelve tiny shamrocks fighting for attention like they all paid rent.
Experience Notes: What This Project Feels Like in Real Life
The best thing about making a glowing St. Patrick’s Day glass block is that it gives a big result without a big mess. In real life, this is the kind of project that can be finished on a weeknight after dinner, even if the table still has homework, mail, and one mysterious pen cap on it. The supplies are easy to gather, the steps are forgiving, and the final piece looks like you spent more effort than you did. That is the sweet spot of holiday crafting.
Option 1 is the one to choose when you want instant satisfaction. The direct decal method feels quick and bold. You clean the glass, add the lights, stick on the design, tie a bow, and suddenly you have a glowing block that says, “Yes, I decorate for March, and yes, I am emotionally supported by seasonal ribbon.” It is also the better option for a last-minute party because there is less drying, measuring, and smoothing involved.
Option 2 takes a little more patience, but the frosted effect is worth it. Contact paper can be mildly dramatic at first. It loves to trap bubbles and curl at the edges, as if it has its own artistic opinions. The trick is to peel the backing slowly and smooth as you go. Once the contact paper is flat, the window clings become easy to arrange. This option is especially good if kids are helping because they can move the clings around without ruining the whole project.
Lighting choice changes the mood more than expected. Green lights make the block festive and bold, but warm white lights often look more expensive. Shamrock lights are adorable, though they can look busy if the front design is already detailed. For the most balanced look, pair decorative shamrock lights with a simple front decal, or pair plain fairy lights with colorful clings.
Ribbon also matters. A thin ribbon can disappear against the glass, while a wide ribbon frames the block and makes it feel finished. Wired ribbon is easier to shape into a full bow, especially if you want that cheerful boutique-style look. If the bow starts leaning to one side, do not panic. That is not failure; that is personality. Adjust the loops, trim the tails, and pretend it was intentional.
From a practical standpoint, the most important lesson is to keep everything removable when possible. St. Patrick’s Day decor has a short seasonal window, so removable clings and contact paper make the project more useful long-term. After March 17, you can take off the shamrocks and turn the same block into spring decor with flowers, butterflies, or pastel lights. That makes the glass block a smart craft investment instead of a one-holiday wonder.
This project is also a great reminder that holiday decorating does not have to be expensive or complicated. A plain glass block, a strand of LEDs, and a few green accents can create a warm, happy glow that makes a room feel festive. It is simple, cheerful, and just a little magical, which is exactly what St. Patrick’s Day decor should be.
Final Thoughts
Turning a plain glass block into glowing St. Patrick’s Day decor is an easy DIY project with plenty of room for creativity. Choose the quick decal version if you want something fast, bright, and playful. Choose the frosted window cling version if you prefer a softer lantern effect that can be changed from year to year. Either way, you get a festive decoration that glows beautifully, stores easily, and brings a little lucky charm into your home.
Note: For the safest and cleanest result, use a craft glass block with a built-in opening, battery-operated LED lights, and removable decorations whenever possible. Keep the battery pack accessible, turn the lights off when unattended, and store the pieces carefully so your lucky little block can return next March without looking like it spent the year in a junk drawer.














