
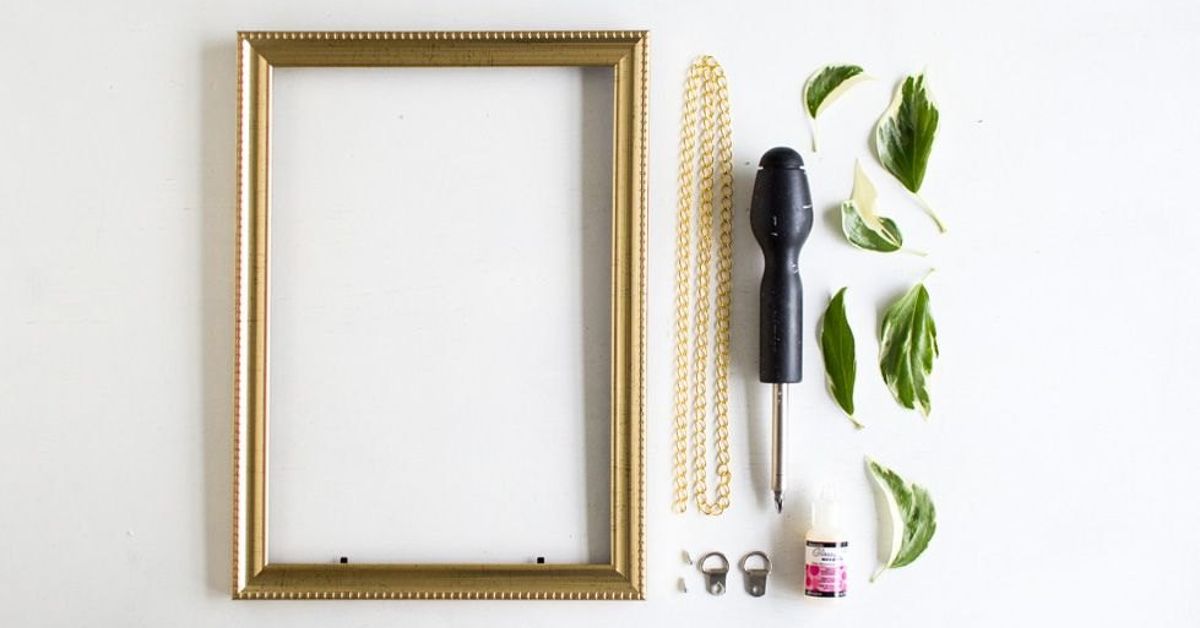
There are two kinds of wall art: the kind that costs as much as a weekend getaway, and the kind that makes people say, “Wait, you made that?” DIY hanging gold frame leaf art happily belongs to the second group. It looks elegant, warm, botanical, and a little expensivein the best “I definitely know what I’m doing” wayeven if your craft table currently looks like a leaf tornado met a glue stick.
This project combines pressed leaves, a gold frame, simple hanging hardware, and a clean floating-art look. The result is a lightweight piece of natural wall decor that works in bedrooms, entryways, apartments, dorm rooms, reading corners, gallery walls, and any sad blank wall that has been silently begging for personality.
The best part? You do not need advanced art skills. You need patience, a good eye for leaf shape, and the ability to resist touching wet paint “just to check.” That last one is harder than it sounds.
What Is DIY Hanging Gold Frame Leaf Art?
DIY hanging gold frame leaf art is a handmade wall decor project that displays real or faux leaves inside, on, or across a gold frame. The leaves are usually pressed flat, dried, sealed, or arranged between glass or acrylic panels. The gold frame adds polish, while the leaves bring texture and nature-inspired charm.
Think of it as a modern botanical specimen, but less “science lab drawer” and more “stylish home magazine spread.” It can be minimalist with one dramatic leaf, rustic with several autumn leaves, romantic with fern stems, or contemporary with a symmetrical floating-frame layout.
Why Gold Frames and Leaves Work So Well Together
Gold and greenery are a classic combination because they balance each other. Gold adds warmth, shine, and structure. Leaves add softness, organic lines, and color variation. Together, they create art that feels designed, not overdecorated.
A gold picture frame also works with many interior styles. In a modern room, it creates contrast. In a farmhouse room, it feels warm and collected. In a boho space, it plays nicely with baskets, plants, linen, and wood. In a traditional home, it adds a refined botanical touch without looking too trendy.
Materials You’ll Need
Before you begin, gather your supplies. Nothing ruins a peaceful craft session faster than discovering you own five pairs of scissors and somehow none of them can cut ribbon.
Basic Supplies
- Gold picture frame, floating frame, or empty decorative frame
- Pressed leaves, dried leaves, faux leaves, or fern stems
- Glass, acrylic sheet, or backing board depending on your frame style
- Acid-free paper, cardstock, or linen-textured backing
- Clear craft glue, double-sided tape, or glue dots
- Ribbon, twine, thin chain, or picture wire for hanging
- Small hooks, sawtooth hanger, D-rings, or wall-safe adhesive hooks
- Scissors, ruler, pencil, and tweezers
- Optional: gold paint, metallic wax, sealant spray, or Mod Podge-style sealer
Best Leaves for Framed Leaf Art
Not all leaves behave the same after drying. Some stay graceful. Others curl into tiny botanical tacos. Choose leaves that are naturally flat, flexible, and visually interesting.
- Maple leaves: Great for autumn color and bold shape.
- Fern fronds: Perfect for airy, delicate wall art.
- Eucalyptus leaves: Soft green tones and modern style.
- Oak leaves: Strong silhouette and rustic personality.
- Ginkgo leaves: Fan-shaped and elegant.
- Magnolia leaves: Beautiful but thicker, so they may need extra drying time.
How to Prepare Leaves for DIY Hanging Gold Frame Leaf Art
The secret to beautiful leaf art is preparation. A leaf that looks pretty outside may become brittle, wrinkled, or moldy indoors if it is not dried properly. Moisture is the sneaky villain of this project. It hides inside stems, thick veins, and glossy leaves, then shows up later like an uninvited guest.
Step 1: Collect Leaves Responsibly
Choose leaves from your yard, garden, neighborhood sidewalk, or craft store. Avoid collecting from protected parks, nature preserves, or private property without permission. For an eco-friendly approach, pick fallen leaves instead of pulling healthy ones from plants. Nature already did the trimming; you are just accepting the delivery.
Look for leaves without mold, heavy insect damage, or wet spots. A few natural marks can add character, but avoid anything that looks mushy or overly fragile.
Step 2: Clean and Dry the Leaves
Gently wipe leaves with a soft cloth. If they are dusty, use a barely damp paper towel, then let them air dry fully. Do not press wet leaves. They may stain the paper, wrinkle, or develop mildew. In the world of pressed leaf art, dry is delightful.
Step 3: Press the Leaves
The classic book method works well. Place leaves between sheets of parchment paper, printer paper, or absorbent paper. Put them inside a heavy book, then stack more books on top. Leave them for one to two weeks, depending on thickness.
For faster results, use a flower press or a microwave flower press made for craft use. Thin leaves may flatten quickly, while thick leaves need more time. Check every few days and replace damp paper if needed.
Step 4: Seal the Leaves
Sealing is optional, but it helps protect delicate leaves from cracking. Use a light coat of clear acrylic spray, matte sealer, or a thin brush-on craft sealant. Spray outdoors or in a well-ventilated area, and follow the product directions. Let the leaves dry completely before framing.
Choosing the Right Gold Frame
The frame is not just the border. It sets the whole mood. A thin gold floating frame looks modern and clean. An ornate gold frame feels vintage and dramatic. A simple thrifted frame painted gold gives the project charm on a budget.
Floating Frame
A floating frame is one of the best choices for DIY pressed leaf wall art. It sandwiches the leaf between two transparent panels, creating the illusion that the leaf is suspended in midair. It is elegant, simple, and surprisingly forgiving.
Empty Frame with Hanging Leaves
If you want a more playful look, use an empty gold frame and suspend leaves from ribbon, twine, or small clips across the opening. This style works especially well for seasonal decor, autumn displays, or a mantel arrangement.
Traditional Frame with Backing
A traditional frame with white, cream, black, or linen-textured backing creates a polished botanical print effect. This is the best option if you want the art to feel permanent and gallery-ready.
Step-by-Step Guide: DIY Hanging Gold Frame Leaf Art
Now for the fun part: turning leaves into art that looks like you bought it from a boutique where everything smells faintly of cedarwood and costs $84.
Step 1: Plan Your Design
Lay your frame on a flat surface and arrange the leaves before attaching anything. Try one large leaf in the center for a minimalist look, three leaves in a vertical row for balance, or several small leaves scattered like a natural pattern.
Use the rule of odd numbers. Groups of three, five, or seven often look more natural than even-numbered arrangements. Leave some empty space so the design can breathe. Crowding every inch makes the frame look less like art and more like a leaf traffic jam.
Step 2: Prepare the Background
If using a traditional frame, cut your backing paper to fit. White paper gives a clean museum look. Cream paper feels warm. Black backing creates high contrast and drama. Linen-textured paper adds subtle depth.
For a floating frame, clean both glass or acrylic panels carefully. Dust becomes very noticeable once the frame is assembled, because dust is apparently a professional photo bomber.
Step 3: Attach the Leaves
Use tiny glue dots, a small amount of clear craft glue, or double-sided archival tape. Apply adhesive only to the thickest parts of the leaf, such as the stem or central vein. Too much glue may show through or cause wrinkling.
If your design is inside a floating frame, you may not need glue at all. The pressure of the two panels can hold the leaf in place. For fragile leaves, use tweezers so you do not accidentally snap a stem.
Step 4: Assemble the Frame
Place the backing or second glass panel into the frame. Secure the frame clips or tabs. Check the front for dust, fingerprints, or leaf movement. If something shifted, fix it now before you hang it and pretend not to notice for six months.
Step 5: Add Hanging Hardware
For lightweight frames, a sawtooth hanger, D-ring, or picture wire works well. If using ribbon or chain, attach it securely to the top corners of the frame. Make sure the hanging material matches the weight of the finished piece.
For renters, adhesive wall hooks can be useful, but always check the weight rating and wall surface instructions. For heavier frames, use proper wall anchors or picture-hanging hardware.
Step 6: Hang and Style
Hang your gold frame leaf art at eye level, usually around the center of the wall or above furniture. It looks beautiful above a console table, desk, nightstand, or reading chair. Add a small plant nearby if you want the wall to whisper, “I have my life together,” even if your laundry disagrees.
Design Ideas for DIY Hanging Gold Frame Leaf Art
Minimalist Single Leaf
Choose one perfect leaf and place it in the center of a floating gold frame. This style is simple, modern, and excellent for small spaces. A ginkgo, fern, or maple leaf works especially well.
Autumn Color Collection
Use red, orange, yellow, and brown leaves in a balanced arrangement. This design brings seasonal warmth to an entryway or dining room. Keep the frame gold for a cozy harvest look that does not scream “pumpkin spice took over the house.”
Botanical Gallery Wall
Create three to six matching gold frames with different leaves. Hang them in a grid for a clean gallery wall. This approach works beautifully in hallways, bedrooms, home offices, and staircases.
Boho Hanging Frame
Use an empty gold frame and hang pressed leaves from thin twine, small clips, or delicate chain. Add wooden beads or soft ribbon for a handmade bohemian touch.
Gold-on-Gold Leaf Accent
For a glamorous version, lightly brush the edge of a pressed leaf with metallic gold paint. Do not cover the entire leaf unless you want a bold statement. A little shimmer goes a long way, just like glitter, opinions, and hot sauce.
Common Mistakes to Avoid
Using Leaves That Are Too Fresh
Fresh leaves may look beautiful, but they contain moisture. If framed too soon, they can wrinkle, darken, or mold. Always press and dry them first.
Adding Too Much Glue
Heavy glue can make leaves ripple or turn shiny in odd spots. Use the smallest amount possible. The goal is invisible support, not a glue puddle with botanical ambitions.
Ignoring Frame Weight
A frame with glass can be heavier than expected. Use hardware designed for the weight of the finished project. If the frame falls, it will not land gracefully. Frames are not gymnasts.
Hanging in Direct Sunlight
Direct sunlight can fade leaves over time. Hang your artwork away from intense sun exposure, especially if you want the colors to last. Bright indirect light is better.
Skipping the Test Layout
Always arrange the design before attaching anything. Once glue is involved, confidence suddenly becomes very expensive.
How to Make the Project Look More Expensive
Small details can make this DIY project look high-end. Use a clean frame with a slim profile. Choose a limited color palette. Leave generous negative space around the leaves. Match the hanging ribbon or chain to the frame finish. Use real pressed leaves with interesting shapes rather than overcrowding the frame with too many pieces.
You can also upgrade the backing. Instead of plain paper, try handmade paper, watercolor paper, linen fabric, or a neutral mat board. These textures add depth without stealing attention from the leaves.
Budget-Friendly Tips
This project can be very affordable. Thrift stores often have frames that only need a coat of gold spray paint. Fallen leaves are free. Old books can work as pressing tools. Leftover ribbon, twine, or chain from other crafts can become hanging material.
If you already have a frame at home, remove the old print and reuse it. This is a great way to refresh outdated decor without buying something new. Your old “Live Laugh Love” frame may finally get a second chance at dignity.
Care and Maintenance
Dust the frame gently with a microfiber cloth. Avoid spraying cleaner directly onto the frame or glass, especially if the frame has openings where moisture could seep inside. If cleaning glass, spray the cloth first, then wipe.
Keep the artwork away from bathrooms, steamy kitchens, and damp basements. Pressed leaves prefer dry conditions. If the leaf shifts inside a floating frame, open the frame and reposition it carefully.
Where to Display DIY Hanging Gold Frame Leaf Art
This project works in many rooms because it is natural, lightweight, and visually calm. In an entryway, it makes a welcoming first impression. In a bedroom, it adds softness. In a home office, it brings a little outdoor energy to the workday. In a living room, it pairs well with plants, wood furniture, neutral textiles, and warm lighting.
For a seasonal display, hang it near pumpkins in fall, pine branches in winter, fresh flowers in spring, or woven baskets in summer. The gold frame keeps it stylish all year, while the leaf choice can change with the season.
Experience Notes: What I Learned Making DIY Hanging Gold Frame Leaf Art
The first thing you learn while making DIY hanging gold frame leaf art is that leaves have personalities. Some are cooperative little angels. They flatten beautifully, keep their color, and sit inside the frame like they were born for interior design. Others curl at the edges, crack at the stem, or dramatically fall apart the moment you pick them up. It is basically a tiny nature-themed reality show.
One of the most useful experiences is learning to collect more leaves than you think you need. If you want three finished leaves, press ten. If you want ten, press twenty. This is not pessimism; it is crafting wisdom wearing sensible shoes. Some leaves will fade, some will tear, and some will simply not look as good once flattened. Having options makes the design process much easier.
Another lesson is that simple designs often look best. At first, it is tempting to use every pretty leaf. You arrange one maple leaf, then add a fern, then a tiny oak leaf, then another because balance, then suddenly the frame looks like a forest had a yard sale. The most elegant versions usually have breathing room. One strong leaf in a floating gold frame can look more expensive than a crowded arrangement with twelve competing shapes.
Frame choice also matters more than expected. A bright shiny gold frame gives a glamorous look, while a brushed or antique gold frame feels softer and more vintage. If your room already has warm wood tones, brass lamps, or cream textiles, antique gold usually blends beautifully. If your space is modern with black, white, or marble details, a sleek gold frame can create a sharp designer-style contrast.
Hanging the piece is another practical moment. Lightweight frames are easy, but glass frames can surprise you. Always check the back hardware and use the correct wall hook. A frame that is slightly crooked will bother you forever, so use a ruler or level. You may think you can eyeball it. You may even be confident. The wall will humble you.
The best part of this project is how personal it feels. A leaf from your backyard, a walk with your family, a favorite park path, or a memorable season can become art. It is not just decoration; it is a small preserved moment. That is why handmade botanical wall decor has such lasting appeal. It brings the outside in, but politely, without bugs, mud, or surprise squirrels.
My favorite tip is to make more than one frame at the same time. A trio of small gold leaf frames can look stunning above a desk or nightstand. You can use matching leaves for a clean look or different leaves for a collected botanical style. It also makes gift-giving easier. Handmade gold frame leaf art feels thoughtful, beautiful, and personalwithout requiring you to knit a sweater or learn pottery under pressure.
In the end, this is a beginner-friendly DIY project with a high reward. It teaches patience, composition, and the beauty of small details. It also proves that home decor does not have to be complicated to feel special. Sometimes all you need is a good leaf, a gold frame, and enough self-control not to touch the glue before it dries.
Conclusion
DIY hanging gold frame leaf art is a simple, affordable, and beautiful way to create custom botanical wall decor. With pressed leaves, a gold frame, and thoughtful arrangement, you can make art that feels personal and polished. Whether you prefer minimalist floating frames, cozy autumn leaves, or a full botanical gallery wall, this project offers endless creative possibilities.
The key is preparation: choose good leaves, press them fully, keep the design balanced, and use secure hanging hardware. Once finished, your handmade leaf art can bring warmth, texture, and natural charm to almost any room. It is proof that great decor does not always come from a store. Sometimes it falls from a tree and waits patiently for you to frame it.













