
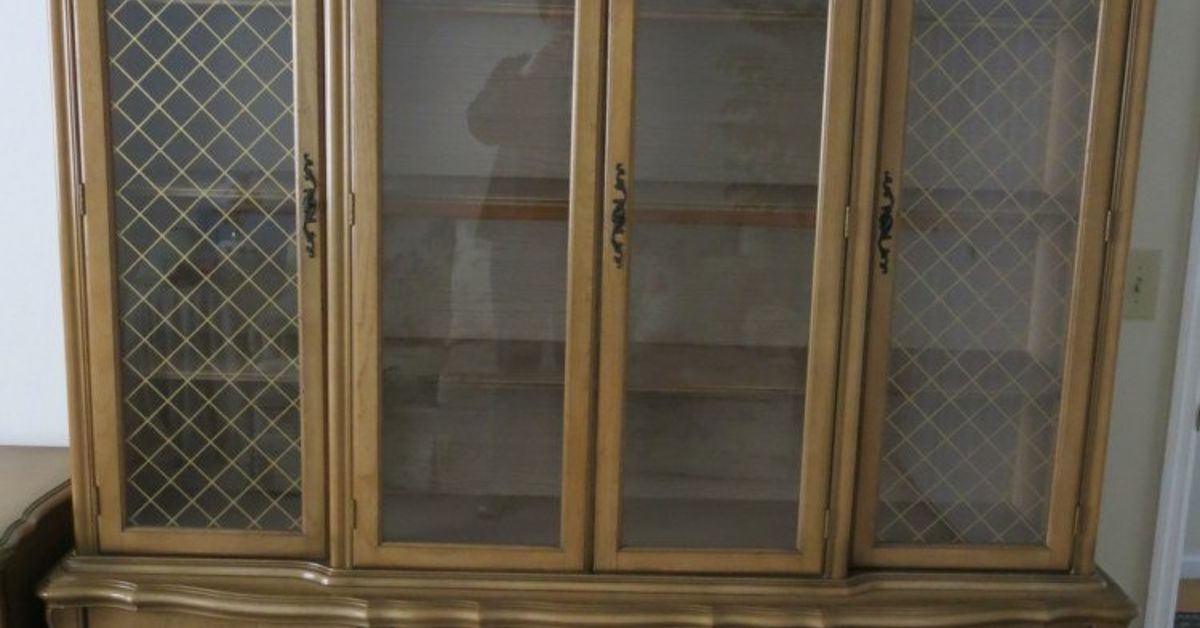
A French Provincial hutch has a very specific personality. It is graceful, curvy, a little dramatic, and often built like it plans to outlive everyone in the room. The problem? Many of these beauties are still wearing dark orange-brown stain, shiny brass hardware, or a finish that whispers, “I once held crystal goblets in 1987.” A French Provincial hutch makeover is the perfect way to turn that dated dining room giant into a charming, functional statement piece.
The good news is that you do not need a design degree, a professional spray booth, or a mysterious uncle who restores antiques in a barn. You need a plan, patience, the right paint products, and the emotional strength to sand for longer than seems spiritually fair. Whether you want a soft cottage-style cabinet, a romantic antique white hutch, a moody charcoal showpiece, or a two-tone buffet with natural wood shelves, the makeover process follows the same basic rhythm: clean, repair, prep, paint, protect, and style.
This guide walks through the complete process, from choosing colors to avoiding common mistakes. The goal is not just to make your hutch pretty for photos. The goal is to create a finish that survives plates, vases, hands, humidity, and that one relative who insists on touching freshly painted furniture “just to see if it’s dry.”
What Makes French Provincial Furniture Special?
French Provincial furniture is known for elegant curves, carved details, cabriole legs, scalloped aprons, arched cabinet doors, and ornate hardware. It was inspired by the refined style of French country homes, but it usually feels warmer and less formal than palace-style furniture. Think graceful countryside charm rather than “please do not sit on the museum chair.”
A hutch in this style often has a buffet base with drawers or cabinet doors and an upper display cabinet with shelves, glass doors, or open storage. These pieces are practical, which is part of their charm. They can hold dishes in a dining room, books in a living room, towels in a bathroom, or craft supplies in a home office. A makeover works so well because the carved details naturally catch paint, glaze, wax, and highlights.
The trick is to modernize the piece without erasing its personality. A flat, heavy paint job can make the hutch look like a refrigerator wearing mascara. A thoughtful makeover, however, lets the curves and trim do the talking.
Before You Start: Decide the Look You Want
Before buying supplies, decide what mood the finished hutch should bring into the room. French Provincial furniture can lean in several directions:
Classic Antique White
Antique white, warm ivory, and creamy beige are timeless choices for a French Provincial hutch makeover. These colors brighten the piece while keeping the vintage romance intact. Add light distressing on raised edges and a soft brown glaze in the carvings for an aged, collected look.
Soft Cottage Blue or Sage Green
Muted blue, dusty green, and pale gray-green work beautifully if you want a cottage or farmhouse-inspired hutch. These colors feel fresh but not loud. They also pair well with white dishes, woven baskets, brass hardware, and natural wood accents.
Moody Charcoal or Deep Navy
A dark color can make a French Provincial hutch look surprisingly modern. Charcoal, navy, deep olive, and black create a dramatic backdrop for glassware, books, or ceramics. The curves keep the dark finish from feeling too severe.
Two-Tone Painted and Wood Finish
One popular approach is painting the exterior while leaving the shelves, top, or interior in a stained wood finish. This gives the piece depth and keeps it from looking too flat. It is especially effective if the original wood has attractive grain under that old glossy finish.
Supplies for a French Provincial Hutch Makeover
A successful makeover starts with the right supplies. You do not need every tool in the home improvement aisle, but you do need materials that help the finish adhere and last.
- Degreasing cleaner or mild furniture cleaner
- Lint-free rags and tack cloth
- Screwdriver or drill for removing hardware
- Painter’s tape
- Wood filler for dents, scratches, or old hardware holes
- Sandpaper or sanding sponges in medium and fine grits
- Bonding primer or stain-blocking primer
- Furniture paint, chalk-style paint, mineral paint, or cabinet enamel
- Quality angled brush and small foam or microfiber roller
- Clear topcoat, furniture wax, or polyurethane sealer
- Optional glaze, dark wax, metallic wax, or decorative transfers
- New knobs, pulls, or cleaned original hardware
If your hutch has glass doors, remove the glass if possible. If not, tape carefully. Painting around glass without tape is possible, but it is also how many DIYers discover new vocabulary words.
Step 1: Inspect the Hutch Like a Detective
Before sanding or painting, inspect the hutch from top to bottom. Check whether the frame is sturdy, whether drawers slide correctly, whether shelves sag, and whether the back panel is loose. A makeover should not hide structural issues. Paint can disguise many sins, but it cannot make a wobbly cabinet suddenly responsible.
Look for veneer damage, missing trim, chipped corners, water rings, musty smells, and loose hardware. If the hutch smells old, clean the inside thoroughly and let it air out. For stubborn odors, place bowls of baking soda, charcoal odor absorbers, or coffee grounds inside for a few days before painting.
Step 2: Remove Hardware and Clean Everything
Remove knobs, pulls, hinges, shelf pegs, and any removable doors or drawers. Label parts as you go. French Provincial hardware can look identical until you try to put it back and suddenly one hinge behaves like it belongs to a submarine.
Cleaning is one of the most important steps in furniture painting. Old hutches collect furniture polish, cooking grease, dust, hand oils, and mystery residue. Paint does not bond well to grime. Wipe the whole piece with a degreasing cleaner, then follow with clean water if the product requires rinsing. Let everything dry completely.
Pay special attention to carved trim and corners. A toothbrush or small detail brush can help remove buildup from grooves. If the hutch has a glossy factory finish, cleaning alone is not enough. You will still need to dull the surface so primer can grip.
Step 3: Repair Dents, Scratches, and Hardware Holes
Use wood filler to repair scratches, dents, chips, or old hardware holes. This is also the moment to change the hardware layout. If you want modern cup pulls or new knobs with a different screw spacing, fill the old holes now.
Let the filler dry according to the product directions, then sand it smooth. Run your hand across the repaired area. If you can feel a bump, ridge, or crater, it will probably show after paint. Paint is wonderful, but it is not a fairy godmother with a putty knife.
Step 4: Sand or Degloss the Surface
Most hutches do not need to be sanded down to raw wood unless the finish is failing, peeling, or badly damaged. For a painted makeover, the goal is usually to scuff the surface so primer can adhere. Use medium-grit sandpaper for glossy areas, then follow with a fine-grit sanding sponge to smooth everything out.
For carved details, liquid deglosser can be helpful because it gets into nooks and curves that sandpaper struggles to reach. If you use a deglosser, work in a well-ventilated area, wear gloves, and test it in a hidden spot first. For very old painted furniture, test for lead before sanding. Safety is not the glamorous part of a makeover, but neither is coughing dust into your coffee.
After sanding, remove all dust with a vacuum, tack cloth, or damp lint-free rag. Dust left behind can create a gritty finish, and nobody wants a hutch that feels like it vacationed at the beach.
Step 5: Prime for Long-Lasting Results
Primer is the difference between a makeover that lasts and one that starts chipping when someone looks at it too firmly. A bonding primer helps paint stick to slick surfaces. A stain-blocking primer helps prevent wood tannins, old stain, or mysterious orange bleed-through from ruining your fresh color.
For a French Provincial hutch with dark stain, reddish wood, or unknown history, a stain-blocking primer is a smart choice. Apply one thin, even coat. Let it dry fully, then lightly sand with fine-grit paper to smooth raised grain or brush texture. Wipe away dust before painting.
Do not panic if the primed hutch looks patchy. Primer is not supposed to win a beauty contest. It is the undergarment of the paint world: important, supportive, and ideally not the final look.
Step 6: Choose the Best Paint for Your Hutch
There are several good paint options for a French Provincial hutch makeover. The best choice depends on the finish you want and how much use the piece will get.
Chalk-Style Paint
Chalk-style paint gives a matte, velvety finish that suits vintage furniture beautifully. It is popular for distressed, antique, and cottage-style pieces. It usually sticks well to clean surfaces, but prep still matters if you want durability. Chalk-style paint should be sealed with wax, lacquer, or a clear topcoat.
Mineral Paint
Mineral paint is another favorite for furniture makeovers. It often has excellent adhesion, rich color, and a smooth finish. Some mineral paints include built-in topcoats, but high-touch furniture still benefits from extra protection.
Cabinet and Trim Enamel
For a hutch that will be used heavily, cabinet enamel or trim enamel is a durable option. These paints are designed for surfaces that need to resist handling and cleaning. They usually require more careful prep but can create a sleek, professional result.
Whatever paint you choose, apply thin coats. Thick paint causes drips, brush marks, long drying times, and regret. Two or three thin coats almost always look better than one heroic glob.
Step 7: Paint the Hutch in the Right Order
Start with the interior, shelves, and detailed trim. Then move to larger flat surfaces. Use a quality angled brush for corners, carved areas, and molding. Use a small roller for broad panels and sides. Brush in the direction of the grain when possible, and keep a wet edge to avoid lap marks.
If your hutch has glass doors, paint the frames carefully and remove tape before the paint fully cures, unless the tape instructions say otherwise. This helps prevent peeling. For drawers and doors, paint one side at a time and allow plenty of dry time before flipping.
Between coats, lightly sand with fine-grit paper if the surface feels rough. Wipe away dust before applying the next coat. This small step makes the final finish feel smoother and more expensive, which is excellent because “expensive” is a delightful illusion when you are wearing paint-splattered sweatpants.
Step 8: Add Character with Distressing, Glaze, or Wax
French Provincial furniture loves a little dimension. Once the paint is dry, you can enhance the details with one of several techniques.
Light Distressing
Use fine sandpaper to gently rub raised edges, corners, and carved details. Focus on areas that would naturally wear over time. Avoid distressing every edge equally, or the piece may look less “antique treasure” and more “attacked by a tiny raccoon.”
Antiquing Glaze
Glaze settles into carvings and trim, making details stand out. Apply it with a brush or rag, then wipe back the excess. Brown glaze gives warmth, gray glaze cools down bright whites, and black glaze adds drama.
Dark or White Wax
Wax can soften the finish and add depth. Clear wax protects without changing the color much. Dark wax adds age and shadow. White wax can create a washed, coastal, or European look on darker paint.
Always test decorative finishes in a hidden area or on a sample board. Glaze and wax can change the color more than expected, and surprise is better for birthday parties than furniture finishes.
Step 9: Seal the Finish
A hutch is a working piece of furniture, so the finish needs protection. If you used chalk-style paint, sealing is especially important. Wax gives a soft, traditional feel but may need maintenance over time. A water-based clear topcoat gives stronger protection and is usually better for shelves, tabletops, and high-touch areas.
Apply topcoat in thin layers. Watch for drips along trim and lower edges. Let each coat dry completely before adding another. For light-colored paint, choose a non-yellowing water-based topcoat. Oil-based finishes can warm or yellow the color, which may be lovely on wood but less lovely on a crisp white hutch.
Step 10: Update or Restore the Hardware
Original French Provincial hardware is often worth saving. Those curvy brass pulls and ornate backplates are part of the style. If they are dull or dirty, clean them with a metal-safe cleaner. If they look too shiny, dark wax or antiquing finish can tone them down. If they are damaged or missing, replace them with vintage-inspired knobs, aged brass pulls, ceramic knobs, or matte black hardware for contrast.
Hardware is jewelry for furniture. Choose it carefully. The wrong hardware can make a beautiful hutch look confused, like it dressed for a garden party but wore hiking boots.
Styling Your Finished French Provincial Hutch
Once the paint has dried and cured enough for gentle use, it is time for the fun part: styling. Start with function. What does the hutch need to hold? Everyday dishes, serving pieces, books, linens, collectibles, or craft supplies?
For a dining room, stack white plates, add glassware, and mix in a few bowls or pitchers. For a living room, combine books, framed art, baskets, and ceramics. For a kitchen, use the hutch for mugs, cookbooks, cake stands, and pretty storage jars. Leave some breathing room between objects. A styled hutch should look collected, not like the shelves are hosting a yard sale during an earthquake.
If the interior is dark, consider painting it a contrasting color or adding peel-and-stick wallpaper to the back panel. A soft floral print, ticking stripe, grasscloth texture, or subtle toile pattern can give the hutch a custom look without major commitment.
Common French Provincial Hutch Makeover Mistakes
Skipping Cleaning
Paint over dust and grease, and you are basically making a sandwich of failure. Clean first, always.
Using Paint Too Thickly
Heavy coats create brush marks, drips, and slow drying. Thin coats build a smoother finish.
Ignoring Cure Time
Dry paint is not the same as cured paint. A piece may feel dry in hours but remain vulnerable for days or weeks. Be gentle before loading shelves or closing painted doors tightly.
Over-Distressing
A little wear looks charming. Too much can make the hutch look like it got dragged behind a tractor for historical accuracy.
Choosing the Wrong White
Bright white can sometimes look harsh on vintage furniture. Warm whites, creams, and soft neutrals usually flatter French Provincial lines better.
Budget-Friendly Makeover Ideas
A French Provincial hutch makeover does not have to be expensive. Many beautiful transformations happen with leftover paint, cleaned original hardware, and a little creativity. If your budget is tight, spend money on primer, paint, and topcoat before decorative extras. A strong finish matters more than fancy embellishments.
Try painting only the exterior and leaving the interior wood. Replace missing knobs with mismatched vintage pieces for a collected look. Add battery-powered puck lights inside the top cabinet. Use removable wallpaper on the back panel. Style the shelves with thrifted white dishes, old books, baskets, and glass jars. The secret is not buying more stuff; it is making the hutch look intentional.
Experience Notes: What a French Provincial Hutch Makeover Teaches You
The first thing you learn during a French Provincial hutch makeover is that furniture has opinions. The hutch may look sweet in the listing photo, but once you bring it home, it reveals every sticky drawer, chipped corner, loose hinge, and dusty groove it has been hiding since the Reagan administration. That is not a reason to panic. It is simply the piece introducing itself.
One of the biggest lessons is that prep work feels slow because it is doing the heavy lifting. Cleaning, sanding, filling, taping, and priming do not provide the instant satisfaction of paint. There is no dramatic “before and after” moment when you are wiping brown residue from carved trim with a rag. But that boring work is what makes the final result durable. Every extra minute spent smoothing filler or removing sanding dust pays off later when the finish looks clean instead of lumpy.
Another practical experience is that color changes throughout the project. A paint sample that looks perfect on a card can look too blue, too yellow, or too gray once it covers a six-foot hutch. Large furniture reflects more light and casts more shadow than small samples. For that reason, it is smart to paint a test patch inside a cabinet door or on a scrap board before committing. Let it dry, view it in morning and evening light, and then decide. Paint has a personality shift after sunset. Respect the drama.
Hardware also changes the mood more than expected. Original brass pulls may look outdated before painting, then suddenly become gorgeous against a soft ivory or charcoal finish. Before replacing hardware, clean it and hold it against the new color. Many French Provincial pieces have hardware that was designed for their curves, and keeping it can preserve the character of the hutch.
The most humbling part is waiting. After the final coat, you will want to style the hutch immediately. You will want to stack plates, arrange books, photograph it, and casually invite people over so they can admire your obvious genius. But curing time matters. Heavy dishes, sticky door edges, and aggressive decorating can damage paint that has not hardened. Give the finish time to strengthen. Your future self will be smugly grateful.
The best part of the process is watching an overlooked piece become useful again. A French Provincial hutch makeover is not only about paint. It is about rescuing craftsmanship, reducing waste, and creating furniture that feels personal. New furniture can be beautiful, but an old hutch with a fresh finish has a story. It has survived moves, meals, holidays, dust, and design trends involving far too much orange varnish. With the right makeover, it gets another chapter.
Conclusion
A French Provincial hutch makeover is one of the most satisfying furniture projects because the piece already has great bones. The curves, carvings, doors, shelves, and hardware give you a strong foundation. Your job is to clean it, repair it, choose a finish that suits your home, and protect the result so it lasts.
Whether you choose antique white, sage green, navy, charcoal, or a two-tone finish, the best makeover is the one that balances beauty with durability. Do not rush the prep. Use thin coats. Seal the finish. Let the paint cure. Then style the hutch in a way that feels useful and lived-in.
In the end, the old hutch does not need to pretend to be brand new. Its charm comes from looking refreshed, loved, and ready for another decade of holding dishes, books, linens, or whatever else your home needs. That is the magic of a good furniture makeover: it does not erase the past; it gives it better lighting.














