
A trestle table has several things going for it: a sturdy stance, generous legroom, timeless good looks, and just enough medieval-banquet energy to make Tuesday-night tacos feel important. Its biggest practical advantage, however, is that the base and top can be built as separate components.
That advantage disappears when the tabletop is permanently glued or randomly peppered with screws. A better solution is to create a strong mechanical connection that can be taken apart for moving, storage, refinishing, or repairs. For most solid-wood projects, the best method uses threaded inserts in the underside of the tabletop and machine bolts passing through slotted holes in the trestle base. The hardware is reusable, hidden, and capable of accommodating seasonal wood movement.
This guide explains how to attach a table top to a trestle base without trapping the wood, splitting the top, or accidentally sending a screw through the dining surface like a tiny steel periscope.
The Best Easy-Disassembly Method at a Glance
For a solid-wood tabletop, install threaded inserts in the underside of the top. Machine bolts then pass upward through holes in the upper trestle rails, mounting plates, or cross supports and thread into those inserts.
The important detail is that most of the holes in the base should be elongated into slots. The slots allow the tabletop to expand and contract across its grain while remaining securely attached.
- Use one centered round hole, or one centered pair of round holes, to keep the tabletop aligned.
- Make the remaining holes into slots that run in the direction the tabletop needs to move.
- Use flat washers large enough to bridge the slots.
- Tighten the bolts until snug, not until the washer attempts to become part of the wood.
- Remove the bolts whenever the table must be disassembled.
If the tabletop grain runs along the length of the table, as it normally does, seasonal movement occurs mainly across the table’s width. The mounting slots should therefore run across the width, perpendicular to the tabletop grain.
Why Wood Movement Determines the Attachment Method
Solid wood continually exchanges moisture with the surrounding air. During humid weather, it tends to swell. During dry weather, it tends to shrink. Finishing the wood slows this exchange, but it does not eliminate it.
Most dimensional movement happens across a board’s grain rather than along its length. That means a 72-inch-long tabletop may change very little from end to end while its 36-inch width changes noticeably between dry and humid seasons.
If a wide solid-wood top is glued rigidly to cross-grain supports, or attached through tight round holes at every location, the base prevents that movement. Something must eventually give. Possible results include cracks, cupping, distorted rails, loose screws, or joints that begin making mysterious noises when the humidity changes.
Solid Wood Versus Engineered Panels
A solid oak, walnut, maple, pine, or cherry tabletop needs room for cross-grain movement. The wider the top and the larger the seasonal humidity swing, the more important this becomes.
Plywood, medium-density fiberboard, and similar engineered panels are dimensionally more stable. They can often be attached through ordinary round holes. However, slots remain useful when an engineered top is attached to a solid-wood base that may move independently.
Tools and Materials
Recommended Hardware
- Threaded inserts suitable for the tabletop material
- Matching machine bolts, commonly 1/4-20 or a comparable metric size
- Flat washers or fender washers
- Optional removable thread-locking compound for vibration-prone installations
Recommended Tools
- Drill or drill press
- Brad-point drill bits
- Manufacturer-specified bit for the threaded inserts
- Drill-depth stop or masking-tape depth marker
- Router, jigsaw, rotary tool, or file for creating slots
- Forstner bit for recessed washers and bolt heads
- Combination square and tape measure
- Awl, center punch, or transfer punch
- Clamps
- Hex key, socket, or wrench matching the bolts
- Padded blankets or foam to protect the tabletop
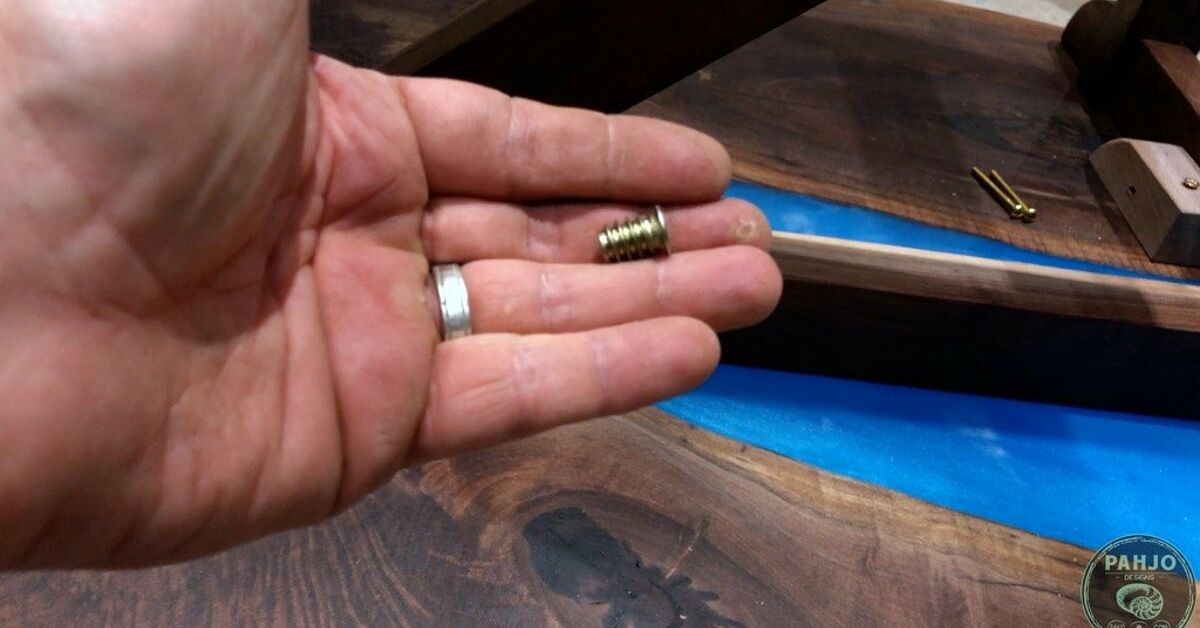
Choose inserts designed for the material you are using. Knife-thread inserts generally work well in hardwoods, while broad external threads are commonly used for pine, plywood, and other softer materials. Always use the pilot-hole diameter specified by the insert manufacturer rather than trusting a hole that merely “looks about right.” Woodworking has enough surprises already.
Plan the Attachment Points Before Drilling
Check the Trestle Base
A typical trestle base has two end assemblies connected by a long stretcher. Each end assembly may include a broad upper rail, sometimes called a bearer, that supports the tabletop. These upper rails are the most convenient places for attachment holes.
Before adding hardware, confirm that both upper rails sit in the same plane. Place a straightedge across them and check for rocking or gaps. Bolts cannot flatten a twisted base without pulling stress into the tabletop.
Choose the Number of Fasteners
The correct number depends on the table’s size, weight, base design, and intended use. A typical 72-by-36-inch dining table might use six attachment points, with three along each upper trestle rail. A particularly heavy slab or broad support rail may benefit from eight.
More fasteners are not automatically better. Twelve rigid screws through twelve tight holes simply create twelve opportunities to restrict movement. The goal is even hold-down pressure with enough freedom for the top to move.
Establish a Fixed Center Point
The tabletop needs one reference point that prevents it from slowly wandering sideways. Place a round mounting hole close to the centerline of each upper rail. All other mounting points should be slotted outward from that center.
This arrangement encourages expansion and contraction to occur from the middle toward both edges. The tabletop remains centered over the base even as its width changes.
How to Attach the Table Top to the Trestle Base
Step 1: Acclimate and Finish the Components
Let the tabletop acclimate in the room or a similar indoor environment before final installation. Avoid moving a freshly built top directly from a damp garage into a heated dining room and immediately locking it to the base.
Sand and finish the underside as well as the visible surface. The underside does not require the same cosmetic perfection, but applying a finish to both faces helps moderate moisture exchange. Keep finish out of threaded inserts and bolt holes.
Step 2: Position the Tabletop Upside Down
Lay the tabletop upside down on a clean, padded surface. Blankets, rigid foam, or carpet scraps work well as long as no trapped screw, wood chip, or hardened glue droplet is waiting underneath.
Turn the assembled trestle base upside down and place it on the tabletop. Measure the overhang at both ends and along both sides. Adjust the base until it is centered and square to the top.
Trace light reference marks around the upper rails or apply strips of painter’s tape beside them. Add orientation marks such as “head,” “foot,” “left,” and “right.” Those labels become surprisingly valuable after the base has been rotated three times and everyone involved has developed a different theory about which direction is correct.
Step 3: Mark the Mounting Locations
Mark one center mounting position on each upper rail. Add one or more additional positions toward both ends of each rail. Keep holes a safe distance from rail ends, knots, cracks, mortises, and other joinery.
The center hole may remain round. The outer locations will become slots running across the tabletop grain. On a conventional table with lengthwise grain, the slots should follow the length of the upper trestle rails from one side of the table toward the other.
Step 4: Drill the Round Holes and Cut the Slots
Drill the centered round holes slightly larger than the bolt shank. At each outer location, drill two overlapping holes and connect them with a jigsaw or file, or use a router with an edge guide to create clean slots.
A slot approximately 3/4 inch long often provides practical travel for a moderately wide indoor dining table, but required movement varies with tabletop width, species, grain orientation, and climate. Very wide tops or major humidity swings may require longer slots.
Round over or smooth the slot walls so the bolt shank cannot snag. The slot should permit side-to-side travel without excessive front-to-back play.
Step 5: Counterbore for the Washers
Use a Forstner bit to create shallow recesses around the holes and slots on the underside of the base rails. Each recess should be wide enough for the washer and long enough for the washer to travel with the bolt.
Do not counterbore so deeply that the rail becomes weak. The goal is merely to keep the washer and bolt head below the surrounding surface while leaving substantial wood beneath them.
A large flat washer spreads pressure over the rail and bridges the slot. Make sure the washer remains supported at both ends of its travel.
Step 6: Transfer the Hole Centers to the Tabletop
Return the base to its carefully measured position. Clamp it lightly so it cannot shift. Use a transfer punch, brad-point bit, or awl through each mounting hole to mark the exact center on the underside of the tabletop.
Do not estimate these positions with a tape measure unless you enjoy enlarging perfectly good holes later. Direct transfer is faster and more accurate.
Step 7: Drill Pilot Holes for the Threaded Inserts
Remove the base. Mark the required drilling depth on the bit with a stop collar or highly visible tape. Subtract a generous safety margin from the tabletop thickness so the bit cannot reach the show face.
Drill each hole perpendicular to the surface. A drill press is ideal, but a simple guide block with a square hole can keep a handheld drill upright. Clear chips frequently, especially in deep hardwood holes.
A slightly crooked insert can make bolt alignment difficult. Six slightly crooked inserts can turn table assembly into an advanced puzzle that nobody ordered.
Step 8: Install the Threaded Inserts
Lightly chamfer the mouth of each pilot hole to reduce surface splintering. Drive the insert with its specified installation tool, hex key, or bolt-and-jam-nut setup. Keep the insert square as it enters the wood.
Stop when the insert is flush with or slightly below the underside of the tabletop. Do not keep tightening after it bottoms out. Overdriving may strip the surrounding wood or split the top.
Test each insert with a bolt before reinstalling the base. The bolt should enter smoothly by hand for several turns. Resistance at the first thread usually indicates misalignment, debris, or cross-threading.
Step 9: Bolt the Base to the Top
Place the trestle base back inside the reference marks. Insert a bolt and washer through each rail and start every bolt by hand before tightening any of them.
Tighten the center bolts first. Then snug the bolts in the outer slots. The washers should hold the base firmly against the tabletop, but they should not be crushed into the rail. Moderate pressure allows seasonal movement to overcome friction and slide the bolts within their slots.
Verify that each outer bolt sits near the center of its slot during installation. A bolt already touching one end has no room to accommodate movement in that direction.
Step 10: Test the Table and Practice Disassembly
Turn the table upright with assistance. Check for rocking, racking, or movement between the top and base. Apply gentle upward pressure at the tabletop edges to confirm that the fasteners hold securely.
Then perform one practice disassembly. Remove the bolts, separate the base and top, and put them together again. This confirms that the hardware is accessible and properly aligned before the table is wedged into a dining room with only two inches of wrench clearance.
Alternative Ways to Attach a Removable Tabletop
Slotted Holes With Wood Screws
Instead of threaded inserts, washer-head wood screws can pass through slotted holes in the trestle rails and enter the tabletop. This method is inexpensive and allows occasional disassembly.
Its disadvantage is wear. Repeated removal eventually weakens ordinary screw holes in wood. Threaded inserts are therefore preferable for tables that will be moved or stored regularly.
Figure-Eight Fasteners
Figure-eight fasteners pivot in shallow recesses and allow a tabletop to move. They are inexpensive, compact, and can often be installed after the base is assembled. They work especially well when the table includes aprons or rails near the perimeter.
Z-Clips and Tabletop Fasteners
Z-shaped clips screw to the tabletop and engage grooves cut into the table rails. They are fast to install and naturally accommodate movement. Removing several small screws is less convenient than releasing a few machine bolts, but the system remains serviceable.
Traditional Wooden Buttons
Wooden buttons have tongues that fit loosely into grooves or mortises in the base. Screws secure the buttons to the tabletop while the tongues slide as the top moves. This method is traditional, strong, and attractive, although it takes longer to make than installing metal hardware.
Mistakes to Avoid
- Gluing the solid top to the base: A long cross-grain glue joint prevents seasonal movement.
- Using only tight round holes: Outer fasteners need room to travel across the grain.
- Running slots in the wrong direction: Slots should follow the direction of cross-grain movement.
- Overtightening bolts: Extreme clamping pressure can prevent sliding and damage the rail.
- Using bolts that are too long: Measure the rail, washer, insert depth, and tabletop thickness before selecting bolt length.
- Drilling insert holes freehand at an angle: Misaligned inserts make every future assembly more difficult.
- Putting inserts near an edge: Leave enough surrounding material to prevent splitting or breakout.
- Expecting bolts to correct a twisted base: Flatten and stabilize the base before attaching the top.
- Rigidly attaching breadboard ends: Breadboard construction has its own movement requirements and does not eliminate seasonal expansion.
Practical Experience Notes From Real-World Builds
The following lessons reflect recurring experiences reported by furniture builders, installers, and people who have had to repair tables after less forgiving attachment methods were used.
Dry-Fitting Saves More Time Than It Costs
The most reliable builds include at least one complete dry-fit before the finish is applied. Builders frequently discover that a trestle rail is slightly bowed, a washer recess is too narrow, or a wrench cannot reach a bolt beside the stretcher. These are easy corrections while the table is still in the workshop.
Dry-fitting also reveals whether the tabletop balances naturally on the base. If it rocks before the bolts are tightened, investigate the rails rather than using hardware to force the pieces together.
A Drill Guide Is Worth Making
Threaded inserts work beautifully when installed straight and become remarkably stubborn when installed crooked. A small hardwood guide block drilled square on a drill press can be clamped over every insert location. The block keeps a handheld bit vertical and costs almost nothing to make.
Many insert problems begin when the bit wanders through figured grain or when the drill tilts during the last half-inch. The guide block prevents both problems and gives the finished attachment a factory-made feel.
Transfer Punches Beat Repeated Measuring
It is tempting to measure the location of every base hole and reproduce those dimensions on the tabletop. In practice, minor differences accumulate. A rail might be one-sixteenth inch off center, or a slot may not be perfectly symmetrical.
Positioning the actual base and transferring the centers directly produces a much better fit. This is particularly helpful when adding a removable base to an existing tabletop rather than building both components together.
Large Washers Make Assembly Friendlier
A washer that barely covers a slot may tip into the opening or catch at one end. Builders often obtain better results with wide flat washers or fender washers that remain fully supported throughout the slot’s travel.
The washer recess must be large enough to accommodate that travel. A round counterbore around a long slot may look tidy, but it can trap the washer before the bolt reaches the end of the slot. An elongated recess solves the problem.
Snug Is Better Than Heroically Tight
One of the most common assembly mistakes is overtightening. A trestle table does not become twice as strong because the hex key leaves an imprint in your palm. Excessive torque can embed the washer, strip an insert, distort the rail, or restrict wood movement.
Tighten until the base and top meet firmly and no gap remains. Stop when the bolt is secure. Inspect the hardware after the table has been used for several weeks and tighten only if something has actually loosened.
Label Every Removable Part
Even a symmetrical-looking trestle base may fit slightly better in one orientation. Add discreet pencil marks, stamped letters, or small labels beneath the tabletop. Match “A” on the base to “A” on the top and repeat at the opposite end.
Store the bolts, washers, and correct hex key in a labeled bag whenever the table is moved. Taping the sealed bag to the stretcher is considerably better than placing it in a mysterious “safe location” that no human can identify six months later.
Transport the Top and Base Separately
A knock-down connection is useful only when it is actually used. Moving a fully assembled trestle table puts enormous leverage on the attachment points when the top is lifted through a doorway or tilted down a staircase.
Removing the tabletop reduces weight, protects the base from racking, and makes both pieces easier to wrap. Carry the top vertically with padded edges, but support it carefully and avoid resting a finished edge directly on concrete.
Inspect the Table After Its First Seasonal Cycle
A table built during a humid summer may be narrower by winter. A table built during a dry heating season may expand when summer arrives. After the first major seasonal change, look beneath the table and confirm that the outer bolts have shifted freely within their slots.
If a bolt is pressed against a slot end, enlarge the slot before the movement is restricted. Also check for washer impressions, loose inserts, or bolts that were overtightened. A five-minute inspection can prevent a crack that requires days of repair.
The Simplest Connection Is Usually the Most Useful
Complex hidden joinery can be beautiful, but a removable table benefits from hardware that is easy to understand. Threaded inserts, accessible bolts, wide washers, and correctly oriented slots create a system that future owners can service without possessing specialized woodworking knowledge.
The best result is a table that feels permanently solid during dinner yet separates into manageable parts when moving day arrives. That is the pleasant contradiction at the heart of good knock-down furniture: it stays together because it was designed to come apart.
Conclusion
The easiest reliable way to attach a table top to a trestle base is to combine threaded inserts, machine bolts, washers, and slotted holes. The inserts provide reusable metal threads, while the slots allow a solid-wood top to expand and contract across its grain.
Keep the top centered with one fixed mounting position, slot the remaining holes in the direction of wood movement, drill the inserts square, and tighten the bolts only until snug. The completed table will remain sturdy during everyday use but can be disassembled with a hex key when it must be transported, stored, repaired, or refinished.
Note: This method is intended for typical indoor residential tables. Unusually heavy stone-and-wood assemblies, exceptionally large slabs, commercial furniture, or bases with limited bearing surfaces may require hardware sizing and structural review specific to the project.














