
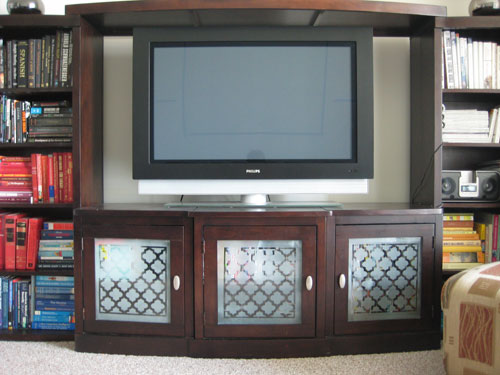
Glass-front media cabinets are stylish right up until they reveal the entire backstage production: tangled charging cables, blinking router lights, game controllers, instruction manuals, and one mysterious cord that apparently belongs to nothing. Frosting the glass doors of a media cabinet offers a simple solution. It softens the view, hides visual clutter, and gives ordinary furniture a cleaner, more customized appearance without requiring replacement doors.
This project can be completed with frosted glass spray, removable privacy film, or permanent glass-etching products. For most homeowners, spray coating or static-cling film provides the best balance of affordability, appearance, and reversibility. The key is choosing the right method, preparing the glass carefully, and remembering that a media cabinet is not merely decorative furniture. It also houses electronics that need ventilation, access, and reliable remote-control operation.
Why Frost the Glass Doors of a Media Cabinet?
Clear glass makes a cabinet feel lighter and less bulky, but it also puts everything inside on display. Unless your entertainment equipment has been arranged by a professional stylist with a personal grudge against visible wires, the result can look busy.
Frosted glass diffuses the view without turning the doors into solid panels. Shapes and lights may remain faintly visible, but small objects, labels, cables, and uneven stacks become much less noticeable. The cabinet retains the polished character of glass while gaining some of the visual calm of a closed-door console.
A Cleaner, More Modern Appearance
Semi-opaque glass is frequently associated with modern cabinetry because it adds depth without exposing every item behind the door. A soft matte finish can also coordinate with painted wood, natural oak, black metal, brushed nickel, and other common media-console materials.
Frosting is especially useful when an older cabinet is structurally sound but visually dated. Instead of replacing the furniture, you can update the glass, swap the hardware, organize the interior, and create a surprisingly convincing makeover.
Less Visible Electronic Clutter
Streaming devices, routers, sound equipment, game consoles, and cable boxes rarely share the same shape, color, or design language. Put them together behind clear glass and they may resemble a tiny electronics yard sale. Frosting allows the equipment to remain accessible while reducing the visual contrast between black boxes, silver components, colored lights, and assorted accessories.
Reduced Distraction From Indicator Lights
Bright status lights can become distracting in a dark living room or bedroom. A frosted finish may diffuse those lights so they appear softer rather than sharply defined. It will not necessarily eliminate the glow, particularly from strong LEDs, but it can make the cabinet less likely to resemble an airport runway at midnight.
Choosing the Best Frosting Method
There are three common ways to create a frosted-glass effect. Each method offers a different combination of durability, cost, finish quality, and reversibility.
Frosted Glass Spray
Frosted glass spray creates a translucent coating that imitates the appearance of etched glass. It works well on smooth interior glass and is usually applied in several thin coats. The final opacity can be adjusted by adding or reducing coats.
This method is affordable and produces a seamless appearance without visible film edges. It is a good choice for cabinet doors with unusual shapes, beveled corners, or narrow glass inserts that would be awkward to cover with sheet film.
The disadvantages are overspray, fumes, and the need for careful masking. The finish can also scratch if cleaned aggressively. Although many frost-effect coatings can be removed with an appropriate solvent, removal is messier than peeling off static-cling film.
Removable Frosted Window Film
Privacy film is the most forgiving option for renters, frequent decorators, and anyone who experiences commitment anxiety around home projects. Static-cling varieties attach to smooth glass with water rather than permanent adhesive. They can generally be removed without altering the glass.
Film is available in plain frosted, rice-paper, geometric, reeded, patterned, and decorative finishes. It creates a consistent level of opacity and does not release paint fumes during installation. It is also easy to replace when the room’s style changes.
On the other hand, film must be measured and trimmed accurately. Dust, pet hair, trapped water, and air bubbles can remain visible if the glass is not spotless. Poorly trimmed edges may lift or collect debris over time.
Glass-Etching Cream
Etching cream chemically changes the surface of compatible glass, producing a permanent frosted effect. It is often used with stencils for decorative designs and can look more authentic than a coating.
However, permanent etching is rarely the best first choice for a media cabinet. Mistakes cannot simply be peeled away, and some specialty or treated glass may respond unpredictably. Etching products also require strict compliance with the manufacturer’s handling, surface-compatibility, and safety instructions.
Which Option Should You Choose?
Choose removable film when you want a low-risk project, live in a rental, or expect to change the cabinet later. Choose frosted glass spray when you want a smooth, borderless look and are comfortable with masking and spray-paint preparation. Reserve permanent etching for glass you own, have tested, and are completely certain you want to alter.
Materials and Tools
Gathering everything before removing the cabinet doors prevents the classic DIY problem of discovering halfway through the project that the one tool you need is currently living in somebody else’s garage.
For Frosted Glass Spray
- Frosted glass spray intended for indoor glass
- Glass cleaner or mild soap solution
- Lint-free microfiber cloths
- Painter’s tape
- Masking paper, plastic sheeting, or newspaper
- Screwdriver for removing doors and hardware
- Protective gloves and eye protection
- Appropriate respiratory protection as directed by the product label
- Drop cloth or disposable work-surface covering
For Frosted Window Film
- Frosted or decorative privacy film
- Measuring tape
- Sharp utility knife
- Cutting mat and straightedge
- Spray bottle
- Water with a small amount of mild liquid soap
- Film squeegee or a plastic card with a soft edge
- Lint-free towels
Preparation: The Step That Determines the Finish
Most disappointing frosting projects do not fail because the product is bad. They fail because the glass contains invisible grease, polishing residue, dust, or fingerprints. Frosting tends to make surface defects more noticeable rather than politely pretending they are not there.
Remove the Doors When Possible
Take a photo of the hinges before disassembly, especially if they are adjustable European-style hinges. Label the doors and hardware so everything returns to its original position. Place each door on a padded, level work surface.
Removing the doors makes cleaning, masking, spraying, and trimming easier. It also keeps paint mist and installation water away from amplifiers, consoles, speakers, power strips, and other electronics.
Determine Which Side to Frost
Applying the finish to the interior side of the glass usually provides the cleanest result. The smooth exterior remains easier to wipe, while the coating or film receives some protection from fingerprints and accidental contact.
Before proceeding, examine the glass closely. Film requires a smooth, flat surface. Textured, heavily beveled, cracked, or loose glass may need another solution. Frosted spray should also be tested on an inconspicuous area when the material or existing surface treatment is uncertain.
Clean the Glass Thoroughly
Remove dust with a clean cloth, then wash both sides of the glass. Pay special attention to the corners where grease and furniture polish accumulate. Rinse or wipe away cleaner residue and dry the glass with a lint-free cloth.
Avoid touching the cleaned area with bare fingers. Skin oils can create spots or affect adhesion. Hold the door by its frame or wear clean gloves during the final preparation.
How to Frost Media Cabinet Doors With Spray
Step 1: Select a Safe Work Area
Read the entire product label before starting. Aerosol coatings should be applied only under the ventilation and safety conditions specified by the manufacturer. Keep the project away from flames, pilot lights, sparks, children, pets, and operating electronics.
A protected outdoor location is often more practical than spraying inside a living space, provided weather conditions fall within the product’s recommended temperature and humidity range. Avoid strong wind, airborne dust, direct hot sun, and damp conditions.
Step 2: Mask the Door Frame
Run painter’s tape neatly around the inner edge of the frame. Press the edge firmly to reduce seepage. Cover the rest of the wood, metal, hardware, and surrounding work surface with masking paper or plastic.
Do not assume that a careful wrist can replace masking. Overspray has an impressive ability to land precisely where confidence told you it would not.
Step 3: Shake and Test the Spray
Shake the can for the time stated on the label. Test the spray on scrap glass or another disposable smooth surface. This reveals the spray pattern and helps you judge the speed and distance needed for an even coat.
Step 4: Apply Light, Overlapping Coats
Hold the can at the recommended distance and begin spraying slightly beyond one edge of the glass. Move across the surface in a steady pass and release the nozzle only after crossing the opposite edge. Overlap each pass slightly.
Several light coats generally create a smoother result than one heavy coat. Excess product can sag, run, or produce cloudy patches. Allow the specified drying time between coats, and rotate the door if that helps maintain a comfortable spraying angle.
Step 5: Inspect the Opacity
Once the coating becomes touch-dry, hold the door upright in representative room lighting. Place a dark object or cable behind it and check whether the level of concealment is sufficient. Add another thin coat when needed rather than trying to achieve complete opacity in one pass.
Step 6: Remove Masking and Allow Full Curing
Follow the product instructions regarding when to remove tape. Pull it back slowly at an angle to create a clean border. Allow the coating to cure fully before reinstalling the door or cleaning the glass. Dry-to-touch and fully cured are not the same thing, despite their suspiciously similar appearance.
How to Apply Frosted Film to Cabinet Glass
Step 1: Measure the Visible Glass
Measure the width and height of each pane in several places. Cabinet frames are not always perfectly square. Cut the film slightly larger than the opening if the product instructions recommend trimming after placement, or prepare an accurately sized piece when the glass cannot be trimmed safely in place.
Step 2: Cut on a Protected Surface
Use a sharp blade, cutting mat, and metal straightedge. Do not cut directly on the cabinet glass, as the blade can scratch the surface or damage the frame. Keep patterned film aligned consistently across multiple doors.
Step 3: Wet the Glass
Spray the clean glass generously with the installation solution recommended by the film manufacturer. The liquid allows the film to slide, which makes alignment easier and reduces the chance of immediate adhesion in the wrong position.
Step 4: Position the Film
Remove the backing when applicable and place the film against the wet glass. Adjust it until the edges and pattern are aligned. Keep the exposed film and your hands moist enough to avoid fingerprints and sticking.
Step 5: Squeegee From the Center Outward
Wet the front surface so the squeegee glides without scratching. Begin near the center and push water and air toward the edges with overlapping strokes. Use moderate, even pressure rather than attacking each bubble as though it has personally insulted the cabinet.
Step 6: Trim and Dry the Edges
Trim excess film according to the manufacturer’s directions. Wipe the edges with a lint-free cloth and inspect the surface under angled light. Tiny moisture pockets may become less noticeable as the film dries, but large bubbles and trapped debris should be corrected immediately.
Media Cabinet Considerations That Ordinary Window Guides Miss
Test the Remote Control
Before treating every panel, create a small test area or temporarily hold a sample of the selected film over the glass. Then test each infrared remote from normal seating positions. Some remote signals may work through certain frosted materials, while denser coatings, reflective films, framing, or equipment placement can reduce reliability.
When a remote stops working consistently, possible solutions include leaving a narrow clear section, relocating the component, using an infrared repeater, or controlling compatible equipment through radio-frequency, Bluetooth, Wi-Fi, or an app.
Do Not Block Ventilation
Frosting the glass does not solve heat buildup. Confirm that the cabinet has adequate openings for cool air to enter and warm air to escape. Avoid pushing equipment tightly against the back or stacking heat-producing components without clearance.
After reinstalling the doors, operate the system for a normal viewing or gaming session and check the cabinet temperature. Excessive heat can shorten component life and cause shutdowns. A beautifully frosted cabinet is less impressive when the game console inside is quietly roasting.
Plan for Cable and Equipment Changes
Film is particularly convenient when components are upgraded frequently because it can be removed or replaced. A spray finish is more durable-looking but requires extra effort to repair if a shelf, cable, or controller scratches the interior-facing surface.
Common Frosting Mistakes and How to Avoid Them
Applying Too Much Spray at Once
A heavy first coat can create drips, blotches, and uneven translucency. Use light passes and build opacity gradually.
Ignoring the Corners During Cleaning
Dust trapped near the frame becomes obvious under film and can cause lifted edges. Clean corners with extra care and make the final wipe immediately before installation.
Using Film on Textured Glass
Static-cling film needs smooth contact. Raised patterns trap air and prevent consistent adhesion. Spray coating may be more suitable, but it should still be tested first.
Reinstalling the Doors Too Soon
Handling a coating before full cure can leave fingerprints, pressure marks, or scratches. Respect the cure time on the label even when the finish looks dry.
Frosting Before Testing Electronics
Check remote performance, ventilation, shelf spacing, and cable access before completing every panel. A ten-minute test can prevent an afternoon of removal and creative vocabulary.
Cleaning and Maintaining Frosted Cabinet Doors
Clean the smooth, untreated side of the glass whenever possible. Use a soft microfiber cloth and a mild cleaner compatible with the selected coating or film. Avoid abrasive pads, scraping tools, stiff brushes, and aggressive rubbing.
For film, pay attention to the edges. Do not flood them with cleaner or catch them with a cloth. For spray coatings, avoid strong solvents unless you are intentionally removing the finish and the manufacturer identifies the solvent as suitable.
If a sprayed panel becomes scratched, mask the frame and apply a very light repair coat after cleaning and testing. If film is badly creased or damaged, replacing the individual panel generally produces a better result than attempting a patch.
Design Ideas Beyond a Plain Frosted Finish
A fully frosted panel is not the only option. Painter’s tape or a removable stencil can create stripes, borders, geometric blocks, monograms, or clear windows for infrared receivers. Decorative film can imitate reeded, rice-paper, etched, or patterned glass.
For a balanced look, repeat the same design on all doors and align patterns across adjacent panes. A clear border around the perimeter can make the treatment appear intentional, while a frosted center hides clutter. Another option is a graduated layout with heavier coverage near shelves containing cables and lighter coverage near decorative objects.
Experience-Based Lessons From Frosting Media Cabinet Doors
A typical first attempt at this project teaches an important lesson almost immediately: the actual frosting is the fast part. Removing doors, labeling hinges, cleaning glass, masking frames, and setting up a safe work area usually require more time than applying the finish. That preparation may feel excessive while the cabinet is scattered across the room, but it is what separates a polished result from a suspiciously cloudy rectangle.
The first practical decision is usually whether to use film or spray. Film feels safer because it is removable, but it exposes every speck of dust. A pane that looks perfectly clean from across the room can suddenly reveal lint, fingerprints, and one determined pet hair as soon as the film is applied. Keeping a clean cloth nearby and inspecting the glass from several angles saves considerable frustration.
Using plenty of application solution also makes film easier to position. Beginners sometimes use too little because soaking a furniture door feels wrong. On smooth, removable glass, however, adequate moisture allows the sheet to slide into alignment. The excess is then pushed toward the edges with a squeegee and wiped away. The process becomes much easier when there is no rush to position a nearly dry sheet perfectly on the first try.
Spray frosting creates a different learning curve. The first coat may look alarmingly faint or uneven. That is normal. The appearance usually improves as multiple thin coats overlap. Trying to force full coverage with one slow, heavy pass is where runs and dense patches appear. Smooth motion matters more than dramatic coverage.
Testing the finish against the actual equipment is another valuable step. Frosting that looks subtle on an empty door can provide plenty of concealment once the cabinet is placed in its normal lighting. Conversely, bright blue and green indicator lights may remain surprisingly visible. Temporarily placing the door upright with the equipment operating gives a far more useful preview than examining it flat on a workbench.
Remote performance can also produce surprises. A remote may work perfectly from three feet away during testing but respond inconsistently from the couch. Checking every device at the usual distance and angle is worth the effort. Leaving a small clear area near an infrared sensor is much easier during the original design than after the entire pane has been coated.
Reassembly often reveals another lesson: hinge alignment matters. Returning each labeled door to its original location reduces adjustment, but doors may still need minor corrections. Taking a photograph before removal helps restore hinge positions and door spacing. This tiny bit of documentation is far more reliable than the optimistic belief that every screw location will remain obvious several hours later.
Finally, the greatest improvement often comes from combining frosting with basic interior organization. Dark cable sleeves, adhesive cable clips, labeled cords, and properly spaced components make the softened view look deliberate. Frosted doors can disguise clutter, but they work best when they are not expected to perform supernatural acts. A little organization behind the glass creates a cabinet that looks calmer when closed and remains usable when opened.
The finished project should feel understated rather than flashy. The cabinet still looks like itself, only neater, more modern, and less interested in sharing the private lives of its cables with everyone in the room. That quiet transformation is exactly why frosting glass cabinet doors is such a satisfying weekend upgrade.
Conclusion
Frosting the glass doors of a media cabinet is an affordable way to hide electronic clutter, soften indicator lights, and modernize existing furniture. Removable film offers flexibility and easy reversal, while frosted glass spray creates a smooth, custom-looking finish. Permanent etching is available but requires greater certainty and caution.
Whichever method you choose, careful cleaning, accurate masking, light application, and full curing will determine the quality of the final result. Test remote controls before completing every door, preserve airflow around electronic components, and follow all product-specific safety instructions. With patient preparation, an ordinary glass-front cabinet can become a polished focal point instead of a transparent confession about your cable-management habits.














