
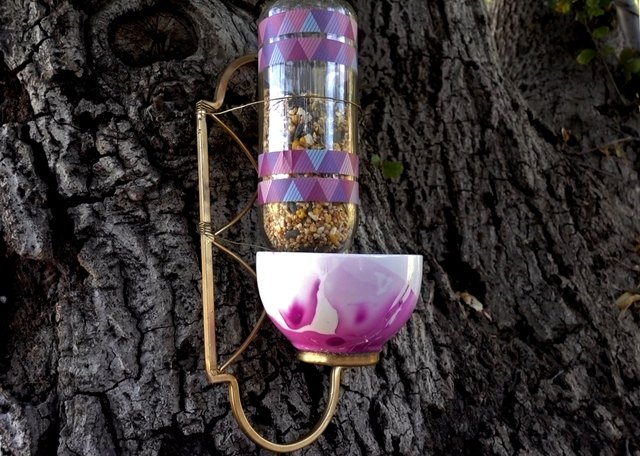
Some home projects begin with a grand design board, a perfectly sharpened pencil, and the confidence of a cable TV renovation host. Others begin with you holding an old wall sconce and asking, “Is this trash, or is this about to become a five-star restaurant for chickadees?” Good news: that forgotten wall light can absolutely become a creative bird feeder, and it may even look more charming outdoors than it ever did glowing awkwardly in a hallway.
Upcycling a wall sconce into a bird feeder is the kind of DIY project that checks all the best boxes. It is affordable, eco-friendly, decorative, beginner-friendly, and just quirky enough to make guests pause in the garden and say, “Wait, is that a light fixture?” Yes. Yes, it is. And now it serves sunflower seeds.
This guide walks you through how to turn an old wall sconce into a safe, practical, and attractive backyard bird feeder. You will learn how to choose the right sconce, clean and weatherproof it, add drainage, mount it securely, pick bird-friendly food, and maintain it without turning your patio into a seed-covered crime scene.
Why Turn a Wall Sconce Into a Bird Feeder?
A wall sconce already has several bird-feeder-friendly features. It is usually designed to mount vertically, often has a cup, shade, dish, or bracket shape, and is made to be seen. That means it can become a feeder that looks intentional instead of like you panic-crafted something five minutes before trash pickup.
Repurposing a sconce also keeps useful materials out of the landfill. Metal, glass, ceramic, and sturdy plastic sconces can all be given a second life with a little cleaning and a few smart modifications. The result is a feeder with character: vintage cottage, farmhouse, industrial, romantic garden, modern minimalist, or “grandma’s hallway but for finches.”
Unlike many store-bought feeders, a sconce feeder can blend with your home’s exterior. Mount it on a fence post, shed wall, porch column, garden arbor, or freestanding board. Instead of adding one more plastic object to the yard, you create a small piece of outdoor decor that happens to attract birds.
Choose the Right Wall Sconce
Not every wall sconce is a good bird feeder candidate. The best option is sturdy, easy to clean, weather-resistant, and shaped in a way that can hold seed without trapping water. A shallow bowl-style sconce, lantern-style sconce, candle sconce, or fixture with a glass cup can work beautifully.
Best Sconce Materials
Metal sconces are often the strongest choice, especially if they are brass, aluminum, galvanized steel, or iron that can be sealed against rust. Ceramic sconces can look gorgeous, but they are heavier and more fragile. Glass sconces can work if the glass is thick, secure, and not cracked. Avoid anything with sharp edges, peeling mystery paint, exposed wiring, or brittle plastic that crumbles when you look at it sternly.
If the sconce is very old, be cautious with flaking paint. Older painted items may contain lead-based finishes. When in doubt, do not sand it indoors, do not use it near food or wildlife, and choose another fixture. Backyard birds deserve better than a toxic buffet.
Shapes That Work Well
A cup-shaped sconce can hold seed directly if it has drainage holes. A lantern-style sconce can be modified with a small tray inside. A candle wall sconce can become a platform feeder by replacing the candle cup with a saucer. A sconce with a decorative arm can support a hanging mini feeder, suet cage, or small dish.
The most important design rule is simple: birds need access, seed needs to stay dry, and you need to be able to clean the feeder easily. If the sconce has tiny crevices that will trap soggy seed, skip it or use it as decoration rather than a functional feeder.
Supplies You Will Need
You do not need a professional workshop for this project. Most of the work involves cleaning, drilling, sealing, and mounting. Gather the basics before you begin so you do not end up holding a drill in one hand and Googling “where did I put the screws” with the other.
- Old wall sconce
- Screwdriver
- Drill with metal, ceramic, or glass bit as needed
- Outdoor-safe screws
- Small metal, terracotta, or glass dish if needed
- Sandpaper or wire brush for rust removal
- Non-toxic outdoor paint or sealant
- Weatherproof adhesive or epoxy suitable for outdoor use
- Gloves and eye protection
- Mild dish soap
- Bleach solution or other bird-safe cleaning method
- Black oil sunflower seed, safflower seed, or another suitable bird food
If the sconce still has electrical parts, remove them completely. This project is about feeding birds, not offering them a suspiciously dramatic chandelier experience.
Step-by-Step: How to Upcycle a Wall Sconce Into a Bird Feeder
Step 1: Remove Electrical Parts
Start by taking out all wiring, sockets, bulbs, switches, and electrical hardware. If you are not comfortable handling an old wired fixture, ask an experienced adult, electrician, or handy friend for help. Once the electrical pieces are gone, you should be left with the decorative shell or bracket.
Check for sharp wire ends, loose screws, cracked glass, and unstable parts. Birds are tiny visitors, not safety inspectors. It is your job to make sure the feeder is smooth, stable, and free of hazards.
Step 2: Clean the Sconce Thoroughly
Wash the sconce with warm water and mild dish soap. Remove dust, grease, spiderwebs, old candle wax, and whatever mysterious garage fuzz has been living on it since 2009. Rinse well and let it dry completely.
If the sconce was stored outdoors or in a damp area, inspect it for rust or mildew. Light rust can often be brushed away and sealed. Heavy rust, crumbling metal, or moldy porous material is a sign to choose a different fixture.
Step 3: Plan the Feeding Area
Decide where the seed will sit. Some sconces already have a cup or bowl that can act as a seed tray. Others need a small dish added. A shallow dish is usually better than a deep one because it allows birds to perch and feed without sinking into a seed canyon like tiny explorers.
The dish should be removable if possible. Removable parts make cleaning much easier. If you glue the dish permanently in place, make sure you can still scrub every surface where seed and droppings might collect.
Step 4: Add Drainage Holes
Drainage is not optional. Wet seed can spoil quickly, grow mold, and create unhealthy feeding conditions. Drill several small holes in the lowest part of the seed tray or dish so rainwater can escape.
Use the correct drill bit for the material. A metal bit works for metal. A ceramic or glass bit is needed for ceramic or glass, and it should be used slowly and carefully. Wear eye protection. If drilling glass feels risky, use a different dish that already has drainage or choose a metal tray instead.
Step 5: Smooth Rough Edges
After drilling, check the holes for sharp edges. Sand or file them smooth. Also inspect the perch area, bracket, and any decorative curls or cutouts. Birds may land on unexpected parts of the feeder, because birds do not read your design plan.
A safe feeder should have no jagged metal, splintering wood, cracked ceramic, or loose pieces that could pinch feet or wings. This is where function matters more than cuteness. Fortunately, you can have both.
Step 6: Paint or Seal the Sconce
If you want to repaint the sconce, choose an outdoor-safe, non-toxic paint and allow it to cure fully before adding birdseed. Avoid painting surfaces that will have direct contact with seed unless the finish is clearly safe after curing. A better approach is to paint the outside and leave the feeding dish natural, stainless, glass, or food-safe ceramic.
For metal sconces, a rust-resistant outdoor sealant can help extend the life of the feeder. For wood mounting boards, use exterior-grade paint or stain and let it dry completely. Do not rush curing time. Birds may be impatient, but paint chemistry is not.
Step 7: Add a Perch If Needed
Some birds are happy feeding from a tray edge, while others appreciate a small perch. You can add a short wooden dowel, natural twig, or smooth metal rod beneath the seed tray. Keep it modest. A giant perch can invite larger birds or squirrels to treat your feeder like an all-you-can-eat diner.
Make sure the perch is stable and easy to clean around. Natural twigs look charming, but they may need replacing as they weather. That is fine. Rustic does not mean permanent.
Step 8: Mount the Feeder Securely
Because wall sconces are made to mount on vertical surfaces, installation is usually straightforward. Attach the sconce to a fence post, shed wall, deck post, or sturdy wooden board. Use outdoor-rated screws and anchors appropriate for the surface.
The feeder should not wobble when a bird lands on it. It should also be high enough to discourage casual interference from pets and low enough for you to refill and clean safely. A feeder that requires a heroic ladder climb every Tuesday will soon become a very fancy empty sculpture.
Where to Place Your Wall Sconce Bird Feeder
Placement matters as much as design. A feeder should be visible enough for you to enjoy, safe enough for birds, and practical enough for maintenance. Choose a quiet area with some nearby cover, such as shrubs or trees, but avoid placing it where predators can easily hide and pounce.
Window safety is especially important. To reduce collision risk, place feeders either very close to windows or far enough away that birds are less likely to hit glass at high speed. Also consider adding window decals, screens, or other visual markers if birds frequently fly near reflective glass.
A sheltered location can help keep seed dry. Under a porch overhang, on a covered fence section, or beside a shed with partial protection can work well. Just avoid tight corners where droppings and seed hulls pile up unnoticed.
Best Foods for a DIY Sconce Bird Feeder
Black oil sunflower seed is one of the best all-around choices for many backyard birds. It attracts species such as chickadees, cardinals, finches, nuthatches, and titmice. Safflower seed can also be useful, especially where squirrels or some less-welcome feeder visitors are an issue.
Avoid cheap seed mixes full of fillers that birds toss aside. Those fillers can create waste below the feeder, attract pests, and make your yard look like a cereal factory had a small accident. Better seed means less mess and happier birds.
Do not offer salty snacks, bread, cookies, or processed human foods. Birds may investigate them, but that does not make those foods good for them. A bird eating a cracker is not a nutrition endorsement. It is just a bird making a questionable life choice.
How to Keep the Feeder Clean and Safe
A beautiful feeder is only helpful if it stays clean. Bird feeders can collect droppings, damp seed, hulls, and bacteria. Plan to clean your sconce feeder regularly, especially during rainy or warm weather.
Empty old seed before it becomes wet or clumpy. Scrub the dish and perch with hot, soapy water. Rinse thoroughly. Periodically disinfect using a diluted bleach solution, then rinse again and let everything dry completely before refilling. Drying matters because fresh seed in a damp feeder is basically an invitation for mold to throw a party.
Clean the ground below the feeder as well. Seed hulls and spilled food can attract rodents or create unsanitary buildup. If the area gets messy, move the feeder occasionally or add a tray that can be removed and washed.
Creative Design Ideas for a Wall Sconce Bird Feeder
Vintage Cottage Feeder
Use a white or cream-painted metal sconce with a small terracotta saucer. Add a tiny twig perch and mount it near climbing roses, herbs, or a cottage-style fence. The result looks like something a sparrow would book for a weekend retreat.
Modern Black Metal Feeder
A matte black wall sconce with a simple metal dish creates a clean, modern feeder. Pair it with a cedar mounting board or dark fence for a sleek look. This style works especially well for contemporary patios and minimalist gardens.
Glass Lantern Feeder
Remove the bulb and wiring from a lantern-style sconce, then place a shallow seed tray inside. Leave the side open enough for birds to access food. This design can look magical, especially when mounted near greenery. Just be sure the glass is secure and easy to clean.
Farmhouse Saucer Feeder
Attach a small enamelware dish or metal saucer to an old candle sconce. The farmhouse look is charming, durable, and practical. Bonus points if the sconce has a weathered finish that says “vintage market find” instead of “I forgot this in the basement.”
Common Mistakes to Avoid
The first mistake is forgetting drainage. A feeder without drainage may look fine on day one and become a soggy seed swamp by day three. Always give water a way out.
The second mistake is making the feeder too decorative to clean. Tiny glued-on embellishments, fake moss, beads, and complicated trim may look cute, but they can trap grime. Keep the feeding area simple and washable.
The third mistake is overfilling. Start with a small amount of seed until birds discover the feeder. Too much seed can sit too long, spoil, or spill. Backyard bird feeding is not a warehouse business. You do not need inventory stacked to the ceiling.
The fourth mistake is ignoring squirrels. Squirrels are talented, ambitious, and apparently enrolled in advanced feeder engineering courses. If they become a problem, mount the feeder away from jump-off points, use baffles where possible, and choose seed types they may be less excited about.
My Practical Experience With This Project
The first time I tried turning a wall sconce into a bird feeder, I underestimated two things: how much personality an old light fixture could have, and how quickly birds can identify a new snack station. The sconce was a dusty brass-colored candle holder from a thrift store. It had a curled arm, a shallow cup, and the dramatic energy of something that once lived beside a floral wallpaper border. In other words, perfect.
The cleaning stage took longer than expected. Old fixtures collect grime in decorative grooves, and those grooves have no respect for your schedule. A toothbrush became the hero tool. After washing, drying, and checking for sharp spots, I added a small metal condiment cup as the seed dish. It was removable, which turned out to be the best decision of the whole project. A fixed dish may look seamless, but a removable dish makes cleaning so much easier that your future self will want to send your past self a thank-you card.
Drainage was the next lesson. At first, I thought the shallow cup would be fine because it sat under a porch overhang. Then one windy rainstorm proved that rain does not care about my optimism. The seed became damp, and the birds politely ignored it like guests avoiding a suspicious casserole. After adding three tiny drainage holes, the feeder performed much better.
Placement also made a big difference. When the feeder was mounted too close to a busy walkway, birds visited rarely. Once I moved it to a quieter fence post near shrubs, activity increased. The shrubs gave birds a place to pause and check for danger, while the open space around the feeder made it harder for neighborhood cats to sneak close. The feeder became most popular in the morning, especially with chickadees and small finches.
I also learned not to fill the dish too much. A small amount of fresh seed attracted more activity than a big pile that sat for days. Birds seemed to prefer a clean, reliable feeder over a heaping bowl. That made maintenance easier, reduced waste, and kept the area below the feeder much tidier.
The best part was how naturally the finished feeder fit into the garden. Store-bought feeders can be attractive, but this one had a story. Visitors noticed it. Kids asked about it. One neighbor said it looked like a “bird café,” which is exactly the kind of review every upcycled wall sconce deserves. The project reminded me that outdoor decor does not have to be expensive or complicated. Sometimes it just needs imagination, a few screws, and the willingness to look at an outdated light fixture and see lunch for cardinals.
Final Thoughts
Upcycling a wall sconce into a creative bird feeder is a satisfying weekend project because it combines sustainability, backyard wildlife, and personal style. You rescue an old fixture, turn it into something useful, and create a charming feeding spot for local birds. That is a strong return on investment for something that might otherwise have ended up in a donation pile or trash bin.
The key is to keep the project safe and practical. Remove electrical parts, clean everything thoroughly, add drainage, avoid toxic finishes, mount the feeder securely, and maintain it regularly. A good bird feeder should be beautiful, yes, but it should also be dry, clean, stable, and easy to refill.
Once your sconce feeder is finished, give birds time to discover it. They may not arrive instantly, but when they do, the reward is delightful: flashes of color, quick little visits, cheerful movement, and the quiet satisfaction of knowing your old wall light has found a second career. It may no longer brighten a hallway, but it can brighten your garden every morning.
Note: This DIY bird feeder should be cleaned often, mounted securely, and filled with appropriate birdseed. Avoid sharp edges, unsafe finishes, spoiled seed, and placement that increases window-collision or predator risks.










