
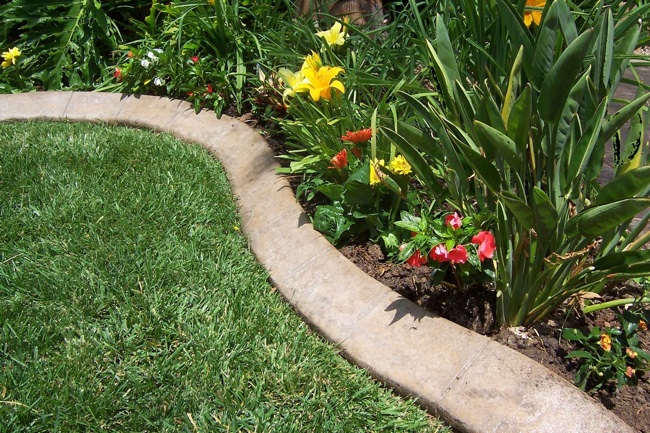
If your garden beds keep “mysteriously” expanding into the lawn (or your lawn keeps creeping into the mulch like it pays rent),
concrete garden edging is the DIY peace treaty. It’s durable, clean-looking, and flexible enough to follow curvesyet tough enough
to survive weed whackers, rainy seasons, and the occasional misjudged wheelbarrow turn.
This guide follows the classic Bob Vila-style approachlayout, dig, form, pour, finish, curethen adds practical pro-level details:
how thick to make it, how to calculate concrete bags, how to prevent wavy lines, and how to avoid the number-one concrete mistake:
“I added water until it looked like soup.”
Why Concrete Garden Edging Works So Well
Concrete edging is basically a low curb that defines space. Done right, it:
- Stops lawn creep by creating a hard boundary for roots and runners.
- Keeps mulch where it belongs (not in your grass like confetti after a parade).
- Follows curves and custom shapes better than many rigid store-bought borders.
- Lasts for years with minimal maintenance.
Plan First: Size, Style, and Placement
Pick a width and depth that won’t crack the first time you step near it
A dependable DIY edging profile is typically about 4 inches deep with at least 2 inches below grade
for stability. Many DIYers also like a minimum width around 3.5–5 inches so the edge doesn’t feel flimsy.
Wider borders look more intentional and resist chipping better.
Decide your “reveal” height
You can finish the top of the edging:
- Flush with the lawn for a subtle, modern line (also mower-friendly).
- 1–2 inches above grade to help hold mulch in place and create a stronger visual border.
Lay out the shape the easy way
Use a garden hose or rope to draw your border line. Stand back and look at it from different angles.
If it’s a curve, aim for a smooth, sweeping bend rather than a series of awkward kinksyour future self (and your mower)
will thank you.
Tools and Materials Checklist
- Shovel and hand trowel
- Hammer or mallet
- Measuring tape
- Level (short level is fine)
- Wood stakes (often 1″ x 1″ x ~12″)
- Form material: flexible hardboard for curves, thin plywood for straights
- Screws and drill/driver
- Spacer blocks (cut to your edging width)
- Mixing tub/wheelbarrow and hoe (or mixer for big runs)
- Concrete mix (bagged mix is easiest for DIY edging)
- Float (wood or magnesium) and margin trowel
- Edging tool (for a rounded top edge)
- Gloves, eye protection, and a dust mask/respirator
- Plastic sheeting or a way to mist water for curing
Step-by-Step: How to Make Concrete Garden Edging
Step 1: Mark the border line
Put your hose/rope exactly where you want the inside edge of the border. If you’re creating a bed line, consider how you’ll
edge, mow, and mulch later. The best border is the one you don’t have to fight every Saturday.
Step 2: Dig the trench
A common DIY trench size is roughly 4 inches deep and wide enough to fit your planned edging plus room for forms.
Dig along the line, then tamp the soil at the bottom so you’re not pouring onto fluffy dirt that will settle later.
If your soil is soft or you get heavy rain, adding a thin layer of compacted gravel can help drainage and stability.
Step 3: Set stakes on the outside edge
Drive stakes along the outside of the border at regular intervals so the form stays put. For curves, use more stakes so the
form doesn’t “spring” away from your intended line.
Step 4: Attach your form boards
Screw hardboard (for curves) or thin plywood (for straights) to the stakes. Keep the top of the form at your desired finished height.
Use a level and step back frequentlyconcrete is wonderfully forgiving while you’re forming and brutally honest once it cures.
Step 5: Use spacers to keep the width consistent
Cut small spacer blocks the exact width you want your edging to be. Place them at the bottom of the trench between the forms.
This prevents that “snake that swallowed a basketball” look where the edging bulges wider in some spots.
Step 6: Mix the concrete (stiff is your friend here)
For garden edging, you want a firm, workable mixnot watery. Add water gradually and mix thoroughly so there are
no dry pockets. A good target consistency is often described as “stiff but moldable,” meaning it holds shape when piled and
doesn’t immediately slump into a puddle.
Dust note: Add water carefully and avoid breathing the dry powder. Mix outdoors when possible, and keep your face
out of the dust cloud (concrete does not belong in your lungs).
Step 7: Place and consolidate the concrete
Shovel or pour the concrete into the form in sections. Use a margin trowel to push it into corners and eliminate air pockets.
Tap the outside of the form with a hammer handle to help bubbles rise.
Step 8: Strike off and float the top
Use a straight board or trowel to strike off excess concrete. Then float the surface to smooth it and bring fine
paste up for finishing. If water starts pooling on top, stop working and waitoverworking wet concrete can weaken the surface.
Step 9: Add control joints (optional, but smart)
Concrete likes to crack. Your job is to tell it where to crack. For edging, you can tool shallow score lines every couple of feet
(or at regular visual intervals) to guide cracking and make the border look intentionally “segmented” rather than randomly broken.
Step 10: Shape the edges
Run a concrete edging tool along the top edges to round them slightly. This reduces chipping and makes the border look finished,
not like a science fair volcano that’s still drying.
Step 11: Let it setthen remove forms at the right time
Timing matters. If you pull forms too early, corners slump or chip. Too late, and the form may stick and tear the edge.
A practical approach: wait until the concrete is firm enough to hold shape and resist light pressure, then remove carefully.
Step 12: Cure it like you actually want it to last
Curing is not the same as “it feels hard.” Concrete continues to hydrate and strengthen over time, and it needs moisture to do that well.
Keep the new edging slightly moist for several days (misting and/or covering with plastic). Avoid heavy impacts
during the first week.
How Much Concrete Do You Need?
Here’s the quick math:
Volume (cubic feet) = length (ft) × width (ft) × depth (ft)
Example calculation
Suppose you’re edging a 20-foot garden bed, with edging that’s 5 inches wide and 4 inches deep.
- Length = 20 ft
- Width = 5 in = 0.417 ft
- Depth = 4 in = 0.333 ft
Volume ≈ 20 × 0.417 × 0.333 = 2.78 cubic feet
Many 80-lb bags yield around 0.6 cubic feet of concrete. That means:
2.78 ÷ 0.6 = 4.63 → buy 5 bags, plus a little extra if your trench isn’t perfectly uniform.
Design Upgrades That Make It Look “Custom” (Not “I Tried”)
1) Gentle curves over sharp wiggles
Curves look professional when they’re smooth and consistent. Flexible hardboard forms help you avoid faceted “polygon” curves.
2) Color (use it like seasoning, not syrup)
You can tint concrete with liquid colorant or use colored mixes, but subtle tends to age better than loud. If you do color,
keep curing consistentuneven moisture can lead to blotchy tones.
3) Texture choices
- Float finish: clean, slightly textured, classic garden look.
- Light broom: adds grip and hides small imperfections.
- Polished/troweled: sleek but shows flawsbest for confident finishers.
Common Mistakes (and How to Avoid Them)
Making the mix too wet
Too much water makes concrete easier to pourbut often weaker and more crack-prone. Add water gradually and stop when the mix is workable,
not when it becomes a latte.
Skipping compaction
If the soil base is loose, the edging can settle and crack. Tamp the trench bottom. If drainage is an issue, add compacted gravel.
Over-finishing
Repeated troweling while water is on the surface can trap moisture and weaken the top layer. Float, wait for sheen to fade, then finish.
Not curing
The fastest way to turn “durable concrete edging” into “crumbly concrete sadness” is letting it dry out immediately. Keep it moist
and protected for several days.
Maintenance Tips for Long-Lasting Edging
- Keep soil from burying the edge: re-establish the line with a spade if mulch creeps up.
- Avoid salt/de-icers near the edge in freezing climates (they can be rough on concrete).
- Touch up chips early so small damage doesn’t become big damage.
Wrap-Up: A Border Your Garden Deserves
Concrete garden edging is one of those weekend projects that keeps paying you backsharper bed lines, less mulch migration,
easier mowing, and a landscape that looks intentionally designed. If you take your time on layout and forms, keep your mix
on the stiff side, and cure it properly, you’ll get a crisp, durable edge that looks like it came with the house (in a good way).
Experience Section: Real-World Lessons From Making Concrete Garden Edging
The first time you pour concrete garden edging, you think the “hard part” is the concrete. Spoiler: it’s the forms.
Concrete is the easy-going friend who shows up on time. Forms are the friend who says, “I’ll be there in five minutes,”
then texts you an hour later asking if you can pick them up.
My biggest takeaway: layout takes longer than you think, and it should. I once tried to “eyeball” a curve because it
looked fine from one angle. After the pour, it looked like a garden bed designed by a Roomba. Using a hose first, then walking the
line from the street, the patio, and the kitchen window made a huge difference. The best curve is the one that looks intentional
from the viewpoints you actually live in.
Second lesson: stake density is your secret weapon. On a straight run, you can get away with wider stake spacing.
On curves, though, the form material wants to straighten itself like it’s offended by your creativity. The moment you start pouring,
that pressure increases. More stakes (and snug screws) keep the form from drifting. I started thinking of stakes like seatbelts:
you don’t notice them when everything’s going well, but you’ll definitely notice when you don’t have enough.
Third: mix consistency is a personality test. If you’re impatient, you’ll be tempted to add water so it pours faster.
That’s how you get slumping edges and weak spots. A stiffer mix is more work up front, but it holds shape, especially in narrow forms.
One practical trick that helped: mix to “stiff but workable,” then wait 2–3 minutes and remix briefly. Sometimes the mix relaxes as the
water distributes, and you realize you didn’t need that extra splash.
Fourth: finishing is mostly about timing. When you float too early, the surface can get gummy and uneven. When you wait
a bituntil the sheen fadesyou get a cleaner finish with fewer drag marks. I also learned to do a quick, gentle first pass on the
edges, then come back once the concrete is a little firmer. The difference between “homemade” and “nice” is often just one well-timed
second pass.
Fifth: control joints are as much aesthetic as they are practical. For edging, I like small, regular score lines that look
like deliberate segments. They visually break up a long run and help disguise natural cracking if it happens. The trick is consistency:
same spacing, same depth, same angle. If you freehand them, they’ll look like you sneezed mid-groove. Using a guide board or a marked
trowel handle helps keep things tidy.
Finally: curing is the easiest step to doand the easiest to skip. After a long day of digging, forming, mixing, and finishing,
it’s tempting to declare victory and walk away. But keeping the edge damp (or covered) for a few days is what turns “it hardened” into
“it lasts.” I’ve had the best results by lightly misting and covering with plastic so the moisture stays in. It feels overly cautious,
until you compare it to a too-fast-dried patch that chips when you look at it funny.
If you’re on the fence about doing this project: do it. Just plan for it like a mini construction job. Set up your forms like you’re being
judged by a very picky garden gnome, keep your mix sensible, and treat curing like the final boss battle. When it’s done, the garden bed
looks sharper immediatelyand you’ll wonder why you tolerated messy edges for so long.













