
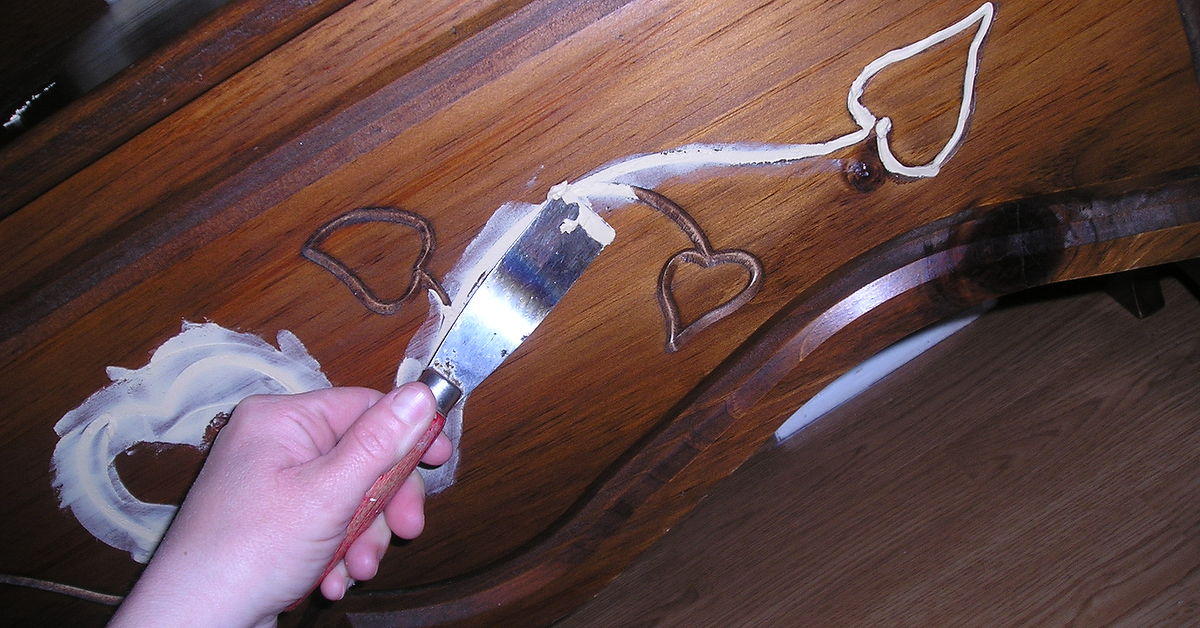
Ornate furniture can be beautife flourishes sometimes make a piece feel too formal for a modern room. Filling those recessed details can turn a busy dresser, cabinet, headboard, or table into something cleaner and more contemporary. It is a little like giving furniture a haircutexcept the hair is wood, the scissors are sandpaper, and mistakes require considerably more filler.
The process is simple in theory: clean the carving, prepare the surface, fill the recess, sand it flat, prime it, and paint it. The professional-looking result comes from choosing the correct filler, building deep repairs in layers, and resisting the urge to rush.
Decide Whether the Carving Should Be Filled
Filling decorative carving works best when the furniture will be painted. Even products labeled “stainable” may absorb stain differently from natural wood, leaving a pale or muddy patch. For a transparent or natural-wood finish, a fitted wood insert, matching veneer panel, tinted professional repair, or replacement drawer front generally blends more convincingly. rotect valuable and historic pieces
Do not permanently fill carving on an antique, signed designer piece, family heirloom, or potentially collectible item until its value is understood. Original carving can be part of the furniture’s history. A reversible fitted panel may provide the cleaner look you want without destroying the original detail.
Identify the material
Solid wood, veneer, MDF, particleboard, and molded composite behave differently. Solid wood moves with humidity, so rigid filler placed across an active joint may crack. Veneer can be sanded through quickly. Damaged MDF edges may swell when exposed to moisture. Check drawer backs, undersides, and unfinished edges before choosing a product or sanding method.
Choose the Right Filler
Water-based wood filler
Water-based filler spreads easily, cleans up with water, and sands without a fight. It is useful for shallow carving, small grooves, pinholes, and skim coats on interior furniture that will be painted. Deep areas should usually be built with several thin applications unless the product specifically allows a thick fill.
Solvent-based or wood-fiber filler
These formulas often cure harder than lightweight water-based filler. Many can be sanded, cut, drilled, stained, or painted. They suit medium-depth recesses, damaged corners, and areas needing a crisp edge, although their odor and cleanup requirements demand good ventilation.
Two-part polyester or epoxy filler
For deep carving, missing chunks, vertical surfaces, or unsupported edges, a two-part compound is often the strongest choice. It cures chemically, can handle thicker repairs, and may be shaped or drilled after hardening. Working time can be brief, so mix small batches and follow the stated ratio exactly. Adding extra hardener is not a shortcut; it is an excellent way to create an unpredictable lump. roducts that are not substitutes
Non-hardening wood putty is mainly intended for small defects in finished wood. Grain filler fills pores in open-grained species such as oak; it does not have enough body for carved recesses. Wall spackle is easy to sand but is usually too soft and moisture-sensitive for durable furniture repair.
Tools and Materials
- Furniture-safe degreaser, clean rags, nylon brushes, and a vacuum
- 80-, 120-, 150-, 180-, and 220-grit sandpaper
- Rigid sanding blocks, flexible sponges, and detail sanding tools
- Putty knives, artist’s spatulas, or plastic spreaders
- Wood filler or a two-part repair compound
- Disposable mixing board for two-part products
- Painter’s tape and plastic sheeting
- Bonding or stain-blocking primer
- Furniture paint and an optional compatible topcoat
- Gloves, eye protection, and suitable respiratory protection
A flexible spreader works well on slightly curved drawer fronts, while a small palette knife reaches narrow scrollwork. Keep disposable tools nearby. Hardened two-part filler can turn a favorite putty knife into a permanent modern sculpture.
How to Fill In Carved Wood Areas Step by Step
1. Remove hardware and position the piece
Remove knobs, pulls, hinges, doors, and drawers when practical. Label everything before setting it aside. A removable drawer front is easier to fill when laid horizontally because gravity becomes an assistant rather than an opponent.
2. Clean the surface thoroughly
Old wax, polish, cooking grease, and skin oils can prevent filler and primer from bonding. Scrub the low points of the carving with a nylon brush and a cleaner suitable for the existing finish. Rinse or neutralize as directed and let the furniture dry completely. Major filler and refinishing manufacturers consistently call for a clean, dry, contaminant-free surface. . Remove loose finish and create grip
Scrape away peeling coating, brittle previous repairs, and loose fibers. Scuff-sand inside the carving so the filler has a keyed surface. Coarse 80-grit paper may suit hard two-part repairs on bare wood, while 120 to 150 grit gives more control on furniture. Avoid aggressive power sanding on veneer.
4. Repair movement before cosmetic work
Filler is not glue. Stabilize loose appliques, open joints, split drawer fronts, and moving panels first. Otherwise, movement will transfer into the patch and produce a crack. A large open-backed recess may also need a thin wood backing so the filler is supported.
5. Press in the filler
Use a narrow spatula to force material into the deepest points and eliminate trapped air. Build deep recesses in layers, letting each layer cure according to the label. Slightly overfill the final coat so it can be leveled flush. Several controlled applications are usually easier to manage than one heroic blob. Some manufacturers specifically recommend layering deeper fills. . Shape excess before final curing
Some two-part fillers pass through a firm “green” stage when excess can be shaved with a scraper or rasp. Trimming then can save a great deal of sanding. With water-based filler, smooth the wet application efficiently and stop working it once the surface begins to skin over.
7. Sand the repair flat
Begin with a grit suited to the filler’s hardness and height, often 80 or 120 for substantial leveling. Progress through 150, 180, and 220 grit. Use a rigid block on flat areas so your fingers do not create shallow dips. Flexible sanding sponges are better reserved for genuinely curved surfaces. Common refinishing guidance uses progressions from roughly 120 through 220 grit for smoothing and finish preparation. . Inspect with side lighting
Place a lamp low and shine it across the surface. Shadows reveal ridges, pinholes, and low spots that overhead light hides. Apply a thin primer coat, inspect again, skim remaining defects with fine filler, and sand after curing. Needing a second pass is normal, not evidence that the furniture has won.
9. Prime the complete panel
Prime the entire drawer front, door, or visible panel when possible. Spot-priming only the patch can create a difference in texture or sheen. Bonding primer helps on glossy finishes, while stain-blocking primer reduces bleed-through from old dye, tannins, smoke residue, and unknown coatings. Let the primer dry, sand lightly with 220 grit, and remove all dust. 0. Paint in thin coats
Apply a durable furniture or cabinet paint that is compatible with the primer. Two or more thin coats generally level better than one heavy coat. Use a fine-finish roller or sprayer for a sleek modern surface, or brush in the direction of the surrounding grain. Allow the specified drying time between coats. Add a compatible clear topcoat only when the paint system or level of use calls for it.
Example: Updating a Carved Dresser Drawer
Suppose a veneered dresser has a shallow floral carving about 1/8 inch deep on every drawer, and the final color will be satin navy. Remove the pulls, clean the drawer fronts, and scuff the carving by hand. Press a hard-drying water-based or wood-fiber filler into the grooves with a flexible spreader, leaving the patch slightly proud.
After it cures, sand gently with a rigid block and 120- or 150-grit paper. Stop once the patch is level; do not keep sanding the surrounding veneer. Apply primer, inspect under side lighting, skim any pinholes, and finish with 220 grit. Prime the whole drawer front and apply two thin paint coats. When the hardware returns, the front should look like a smooth panel rather than a repaired carving.
Common Mistakes to Avoid
Filling over wax or gloss
The repair may detach because it never bonded. Cleaning and scuffing are less exciting than painting, but they are also less exciting than watching the patch fall out.
Applying one thick layer
Thick air-drying filler may shrink, crack, or remain soft in the center. Use layers or select a compound designed for deep repairs.
Sanding with fingertips
Fingers follow hollows and create a smooth wave, not a flat surface. A rigid block bridges the patch and cuts high spots.
Expecting an invisible stained repair
Filler and natural wood often take stain differently. Test the complete stain and finish system in a hidden area before attempting a transparent makeover.
Bridging a moving joint
Do not fill panel gaps, active splits, or expansion joints with rigid material. Repair the cause or cover the area with a separate applied panel.
Coating uncured filler
If sandpaper clogs immediately or the patch feels cool, rubbery, or darker inside, it may not be ready. Drying varies with product, depth, temperature, and humidity, so the product instructions outrank a universal timetable.
Alternatives to Permanently Filling the Carving
A thin fitted wood or MDF panel can cover ornate work and create a new architectural detail. Drawer fronts may be replaced, while separately attached appliques can sometimes be removed. Painting the piece one color with a low-contrast glaze can also reduce the visual dominance of carving without erasing it. For antiques or uncertain projects, a removable panel attached from behind offers the modern look now while preserving the original design.
Conclusion
Filling carved areas can give ornate furniture a cleaner, more modern appearance without replacing the piece. The most dependable results come from choosing a painted finish, cleaning thoroughly, stabilizing loose parts, selecting filler for the depth, building the repair in controlled layers, sanding with a block, and using primer to reveal defects.
Take your time where it matters. A few extra minutes spent removing wax, pressing filler into narrow grooves, or checking the patch under side lighting can save hours of rework. Done carefully, the furniture will not look as though its carving was buried. It will look as though the smooth design was always meant to be there.
Experience-Based Lessons From Furniture Makeovers
The following practical lessons reflect patterns repeatedly seen in furniture refinishing projects. They may not be as dramatic as a before-and-after photograph, but they often separate a durable makeover from one that looks excellent for two weeks and then begins sending distress signals.
Preparation usually takes longer than filling. Carving traps grime where a flat rag cannot reach. Nylon brushes, cotton swabs, and repeated cleaning passes may be necessary. Skipping this work because the surface looks “clean enough” is one of the easiest ways to weaken adhesion. The contamination remains invisible until the repair fails.
The first layer should be treated as a foundation. Pressing a modest amount of filler deeply into every groove reduces air pockets. Once that coat cures, later layers have something stable to sit on. Trying to level a deep carving in one pass usually creates more shrinkage, more sanding, and more colorful language.
A basic sanding block can be more useful than an expensive sander. Power tools remove material quickly, but they can dish soft filler, round crisp edges, or burn through veneer. A rigid block keeps the surface flat and provides better feedback. Fresh paper also cuts more predictably than worn paper that merely polishes the problem.
Primer is an inspection tool, not just an undercoat. Bare filler and wood have different colors, which can hide subtle defects. A thin coat of primer makes the surface visually uniform. Place a lamp low to the side, and tiny pits or ridges suddenly become obvious. A final skim coat at this stage is normal refinement.
The furniture’s use should determine the repair system. A decorative side panel on a rarely touched cabinet can tolerate a lighter filler. A drawer front handled several times a day needs harder material, excellent adhesion, durable primer, and properly cured paint. A beautiful finish is not useful if a fingernail dents it while opening the sock drawer.
Edges require special attention. When a carved area reaches a bevel or molding, careless filler can make the original profile look swollen. Protect important lines, scrape excess early, and restore the edge with a sanding block or small file. Human eyes notice inconsistent outlines faster than a tiny pinhole in the center.
Knowing when to stop prevents damage. Over-sanding can expose the carving again or wear through surrounding veneer. Once the repair is flat, smooth, and uniformly sealed with primer, additional sanding may create problems rather than perfection. The furniture does not need to pass inspection by a satellite; it needs to look even in normal light.
Test the entire coating system. Whenever possible, try the cleaner, filler, primer, paint, and optional topcoat on a hidden spot or scrap sample. Compatibility problems often appear only after several layers. A small test may feel slow, but stripping an entire dresser because the topcoat wrinkled the paint is considerably slower.
Give the finished paint time to cure. Dry-to-the-touch paint may still be soft underneath. Reinstall hardware gently, avoid stacking drawers, and postpone heavy use until the coating reaches the manufacturer’s recommended cure. Patience at this stage protects all the patient work that came before it.













