
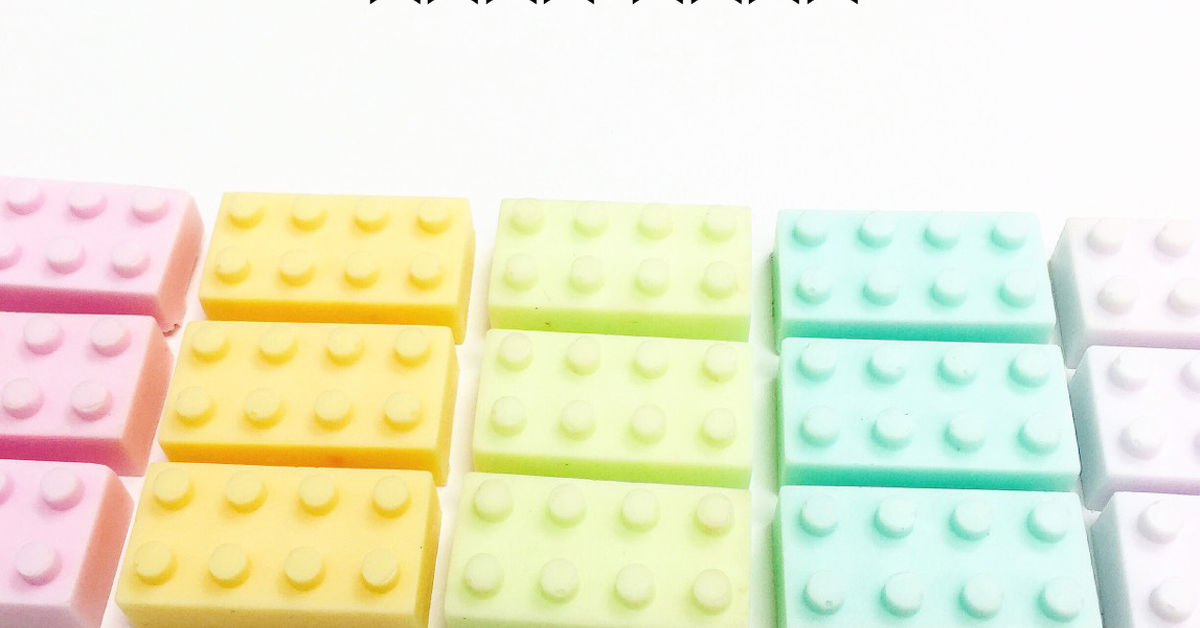
DIY Lego Soap is the kind of craft that makes adults say, “This is for the kids,” while secretly choosing the best colors for themselves. It is bright, playful, surprisingly easy, and practical enough to justify the tiny mess you will definitely make on the kitchen counter. Whether you are planning a birthday party favor, a rainy-day activity, a classroom craft, or a sneaky way to make handwashing more exciting, LEGO-inspired soap checks all the boxes: colorful, customizable, affordable, and just a little bit ridiculous in the best possible way.
The easiest way to make DIY Lego Soap is with melt-and-pour soap base. Unlike cold-process soap, melt-and-pour soap has already gone through saponification, which means you do not need to handle lye, wait weeks for curing, or explain to your family why the kitchen suddenly looks like a chemistry lab with better lighting. You simply melt the base, add color and scent, pour it into a silicone mold, and let it harden. That is it. Your reward is a batch of cheerful handmade soaps shaped like little bricks, mini figures, blocks, or colorful stacked designs.
This guide walks you through the materials, safety tips, step-by-step instructions, design ideas, troubleshooting, gift packaging, and real-life experience notes for making DIY Lego Soap that looks great and actually works as soap. The goal is not to create museum-level sculptures. The goal is to make something fun, useful, and charming enough that people will say, “Wait, you made that?” and you can casually answer, “Oh, this old thing?” while pretending you did not spend 20 minutes choosing the perfect shade of blue.
What Is DIY Lego Soap?
DIY Lego Soap is handmade soap inspired by LEGO bricks, blocks, or figures. Most versions use a clear or white melt-and-pour soap base poured into silicone molds shaped like toy bricks. Some makers embed small plastic toys inside clear soap, while others create soap-only brick shapes in different colors. For family-friendly projects, the safest and easiest approach is to use soap molds that create brick shapes rather than putting tiny loose toy pieces inside bars meant for very young children.
Because the LEGO name is a protected trademark, it is wise to describe your finished bars as “LEGO-inspired soap” if you plan to sell, promote, or publish the project online. For home use, party favors, and gifts, the phrase DIY Lego Soap is commonly used by crafters, but “building brick soap” or “block soap” is also a smart alternative. Translation: your soap can look like a tiny colorful brick, but it should not pretend to be an official product from the LEGO Group. Nobody wants a trademark lawyer at a birthday party.
Why Melt-and-Pour Soap Is Best for This Project
Melt-and-pour soap is ideal for beginners because it is fast, forgiving, and does not require complicated chemistry. The soap base comes as a solid block. You cut it into cubes, melt it gently in the microwave or a double boiler, mix in skin-safe color and fragrance, then pour it into a mold. Once the soap cools and hardens, it is ready to use.
Clear glycerin soap base is especially popular for DIY Lego Soap because it creates a glossy, toy-like look. It also works beautifully if you want to embed a small waterproof toy or create transparent layers. White soap base, on the other hand, gives colors a softer, creamier finish. If clear soap looks like candy glass, white soap looks like a pastel art project that got promoted to bathroom decor.
Materials You Need
Basic Supplies
- 1 pound melt-and-pour soap base, clear or white
- Silicone brick-shaped soap mold or building block candy mold
- Skin-safe soap colorants or mica powder approved for soap
- Skin-safe fragrance oil or essential oil suitable for wash-off products
- Microwave-safe measuring cup or glass bowl
- Knife and cutting board for cubing soap base
- Small spoon, spatula, or craft stick for stirring
- Rubbing alcohol in a spray bottle
- Digital kitchen scale, optional but helpful
- Paper towels for quick cleanup
Optional Extras
- Small waterproof toys for embed soap, only for age-appropriate gifts
- Cosmetic glitter approved for soap
- Soap-safe neon colors for bold party favors
- Small gift bags, labels, ribbon, or kraft paper boxes
- Soap cutter or crinkle cutter for trimming edges
Safety Notes Before You Start
DIY Lego Soap is simple, but simple does not mean “let everyone freestyle next to hot liquid.” Melted soap can be hot enough to burn skin, so adults should handle melting and pouring, especially when children are involved. Kids can help choose colors, arrange packaging, name the scents, and admire the molds with the seriousness of tiny product designers.
If you use plastic toys inside soap, choose waterproof toys with no sharp edges and no small detachable parts. Avoid toy embeds for children under three because small parts can become choking hazards once the soap wears down. For younger kids, stick with soap shaped like bricks instead of soap containing actual toy pieces. It is still fun, and you will not have to perform a bathroom rescue mission when a tiny wheel appears in the drain.
Use only skin-safe fragrance oils, essential oils, colorants, and glitter made for soap or cosmetics. Candle fragrance, craft glitter, food coloring, and random mystery powders from the back of a drawer are not good choices. Soap touches skin, so your ingredients should be intended for skin contact and wash-off use.
Easy DIY Lego Soap Recipe
Ingredients for About 4 to 6 Small Bars
- 1 pound clear melt-and-pour soap base
- Soap-safe colorant in red, yellow, blue, green, or your favorite shades
- About 0.25 to 0.3 ounce skin-safe fragrance oil per pound of soap base, or according to the manufacturer’s usage rate
- Rubbing alcohol for spraying bubbles
Step 1: Prepare the Mold
Place your silicone mold on a flat tray or cutting board before pouring. This makes it easier to move the mold later without sloshing liquid soap across the counter. Silicone molds are flexible, which is wonderful when unmolding soap and mildly treacherous when carrying warm soap from one side of the kitchen to the other.
Step 2: Cut the Soap Base
Cut the melt-and-pour soap base into small cubes. Smaller pieces melt more evenly and reduce the chance of overheating. Add the cubes to a microwave-safe measuring cup. If you are making multiple colors, divide the soap into smaller batches.
Step 3: Melt Gently
Microwave the soap base in short bursts of 15 to 30 seconds, stirring between each round. Stop heating when the soap is fully melted. Do not boil it. Overheated soap can become rubbery, cloudy, or full of bubbles. In soap making, patience is not just a virtue; it is the difference between smooth bricks and bubbly chaos nuggets.
Step 4: Add Color
Add a small amount of soap-safe colorant and stir slowly. Start with less than you think you need. You can always add more color, but you cannot politely ask the soap to become less electric orange once it has committed to the lifestyle.
Step 5: Add Fragrance
Add your fragrance oil or essential oil according to the supplier’s recommended usage rate. For a kid-friendly scent, try fruit punch, lemon, vanilla, bubblegum, orange cream, or cotton candy. For a cleaner bathroom scent, try lavender, eucalyptus mint, or fresh linen. Stir gently so the fragrance disperses evenly.
Step 6: Pour Into the Mold
Slowly pour the melted soap into the mold cavities. Fill each cavity to the top for bold brick shapes, or pour partial layers if you want a striped look. After pouring, lightly spray the surface with rubbing alcohol to pop bubbles and help the soap look smoother.
Step 7: Let the Soap Harden
Allow the soap to sit undisturbed until completely firm. Most small bars harden within one to three hours at room temperature. You can place the mold in the refrigerator for a short time to speed things up, but do not freeze the soap. Freezing can cause condensation when the bars return to room temperature.
Step 8: Unmold and Wrap
Once the soap is firm, gently peel the silicone mold away from the edges and push the bars out from the bottom. Wrap each bar tightly in plastic wrap or a shrink-wrap bag to help prevent sweating, especially if you used a glycerin-rich clear soap base. Add a label, ribbon, or gift tag if the soaps are party favors.
How to Make Layered Brick Soap
Layered DIY Lego Soap looks impressive but is still beginner-friendly. Pour a thin layer of one color into the mold and allow it to form a skin. Spray the surface with rubbing alcohol, then pour the next color when it is warm but not steaming hot. If the second layer is too hot, it may melt the first layer and create a swirl. Sometimes that looks artistic. Sometimes it looks like a traffic cone had an emotional breakdown.
For clean layers, keep each pour slow and controlled. Let each layer firm enough to support the next but not so long that it becomes completely dry and separate. Rubbing alcohol helps the layers adhere. This technique is great for rainbow bricks, team colors, party themes, or holiday designs.
How to Make Toy-Embedded Soap
To make a clear soap bar with a small toy inside, pour a thin layer of clear soap into the mold and let it cool slightly. Place the waterproof toy face down or centered in the mold, spray with rubbing alcohol, then pour more clear soap over it. If the toy floats, pour in stages. A partial first layer can act like glue and hold the toy in place.
For best results, use a clear soap base and avoid too much colorant. The whole point is to see the surprise inside. Also, remember the age warning: toy-embedded soap is not suitable for toddlers or children who still put objects in their mouths. A cute soap is not worth turning bath time into a safety documentary.
Best Colors for DIY Lego Soap
Classic brick colors are red, yellow, blue, green, black, white, and gray. Bright primary colors give the strongest toy-inspired look. Clear soap base makes colors look jewel-like, while white soap base creates solid, creamy shades. If you want a modern look, try teal, coral, lavender, lime, or navy. If you want party favors that photograph well, make several colors and stack them together in clear packaging.
One helpful trick is to keep each batch simple. Too many colors in one bar can turn muddy, especially if layers melt together. When in doubt, make separate single-color bricks. They look clean, cheerful, and very satisfying lined up in rows like a tiny soap army prepared to fight germs.
Best Scents for Brick-Shaped Soap
The best fragrance depends on the audience. For kids, sweet and fruity scents usually win. Think watermelon, strawberry, blueberry, lemon drop, orange soda, or birthday cake. For adults, fresh and spa-like scents may feel more practical: mint, citrus, lavender, cucumber, rain, or sandalwood. If you are making favors for a party, choose one light fragrance rather than mixing several strong scents. A dozen different smells in one gift bag can create what scientists call “craft store thunderstorm.”
Common Mistakes and How to Fix Them
The Soap Has Too Many Bubbles
Stir slowly and avoid whipping air into the melted base. After pouring, spray the surface lightly with rubbing alcohol. Bubbles are common and usually harmless, but removing them gives your soap a cleaner, more professional finish.
The Soap Looks Cloudy
Cloudiness can happen when clear soap is overheated or when incompatible fragrance oils are used. Melt gently, use soap-safe fragrance, and avoid overloading the base with additives.
The Layers Separate
If layers peel apart, you may have waited too long between pours or skipped the rubbing alcohol. Spray each layer before adding the next one, and pour the next layer while the previous layer is firm but still slightly fresh.
The Soap Sweats
Glycerin soap can attract moisture from the air, especially in humid climates. Wrap finished bars tightly once they are fully cool. Store them in a dry place away from direct sunlight and steamy bathrooms until use.
The Color Bleeds
Some liquid dyes migrate through soap over time. Use non-bleeding soap colorants or mica powders if you want crisp layers and long-lasting designs.
Creative DIY Lego Soap Ideas
Rainbow Brick Soap
Create six small batches in rainbow colors and pour them into individual brick molds. Package one of each color together for a bright party favor set.
Mini Figure Surprise Soap
Use clear soap and embed one small waterproof figure inside each bar. This works best for older children and collectors who understand that the toy appears only after the soap is used down.
Birthday Party Favor Soap
Make soaps in the birthday child’s favorite colors. Wrap each bar in clear film and add a tag that says, “Thanks for building memories with us.” Yes, it is a pun. No, we are not apologizing.
Holiday Brick Soap
Use red and green for Christmas, orange and black for Halloween, pastels for Easter, or red, white, and blue for the Fourth of July. Brick shapes work for almost every theme because apparently rectangles are festive now.
STEM Party Soap
Turn soap making into a small science activity by explaining melting, cooling, solids, liquids, color mixing, and measurement. Kids love crafts more when they are allowed to stir something and call it science.
How to Package DIY Lego Soap
Because melt-and-pour soap can sweat, wrap each bar tightly after it hardens. Clear shrink wrap, plastic wrap, or small cello bags work well. Add labels with the scent, basic ingredients, and a safety note if the soap contains a toy. If you are giving the soap as a gift, place several bars in a small box with shredded paper, a ribbon, and a playful tag.
For party favors, individual wrapping is best. It keeps the bars clean, makes them easy to distribute, and prevents different scents from blending together. A simple label can say “Handmade Building Brick Soap,” “Use Me, Then Build More Fun,” or “Soap Today, Master Builder Tomorrow.”
Can You Sell DIY Lego Soap?
You can sell handmade soap, but you need to be careful with labeling, safety, ingredients, and trademark wording. Avoid presenting your soap as an official LEGO product. Use descriptions such as “building brick soap,” “block-shaped soap,” or “LEGO-inspired handmade soap” only if your use is legally appropriate in your context. Do not use official logos or brand-style packaging.
Also, avoid making medical claims. Saying a soap cleans hands is very different from claiming it kills germs, treats skin conditions, or prevents illness. Claims can change how a product is regulated. If you sell soap, use skin-safe ingredients, label clearly, research local and federal requirements, and consider product liability insurance. A hobby can become a business, but it should not become a paperwork ambush.
DIY Lego Soap for Kids: Making Handwashing Fun
One of the best reasons to make DIY Lego Soap is that it gives kids a reason to care about handwashing. A bright soap shaped like a toy brick feels more exciting than a plain beige bar sitting sadly by the sink. For children who rush through washing, a fun soap can turn the routine into something more interactive.
You can also pair the soap with a simple habit-building game. Ask kids to choose a color for morning handwashing and another for after outdoor play. Use a soap dish where the bars are easy to see. If the soap contains a visible embed for older kids, the “prize inside” effect can encourage regular use. Just make sure the final toy is age-appropriate and supervised.
Real-Life Experience: What Making DIY Lego Soap Actually Feels Like
The first thing you learn when making DIY Lego Soap is that melt-and-pour soap looks calm until it is liquid. Then suddenly everyone in the room becomes deeply interested in your pouring technique. Children gather like tiny project managers. Adults offer opinions nobody requested. Someone asks if the soap is edible because it looks like candy. This is your cue to say, clearly and repeatedly, “Soap is not food,” even though the watermelon scent is doing absolutely nothing to support your argument.
In practice, the easiest batches are the single-color bricks. They are fast, clean, and satisfying. You melt the base, stir in color, add fragrance, pour, spray, and wait. The waiting is the hardest part for kids. They will ask if the soap is ready approximately every seven minutes, which is impressive because time becomes meaningless during craft projects. A good trick is to make the soap first, then move on to decorating labels or gift bags while the bars harden.
Layered soap is where the project starts to feel fancy. The first time you pour a clean red layer, let it set, spray alcohol, then add a yellow layer, you may feel like a professional soap artist. The second time, you may pour too hot and create an orange swirl you did not plan. This is not failure. This is “limited edition marbled brick soap.” Handmade crafts are generous that way. Almost every mistake can be rebranded if you say it confidently enough.
Toy-embedded soap is exciting, but it requires more patience. Small toys tend to float, tilt, or trap bubbles. Pouring in stages helps. Start with a thin layer, let it thicken, place the toy, then add more soap. Clear soap makes the final bar look like a treasure trapped in ice. Kids love it, but it is best for older children because the toy eventually comes free. For younger kids, brick-shaped soap without embeds is simpler and safer.
The cleanup is easier than expected. Since you are working with soap, most tools rinse clean with warm water. The bigger issue is fragrance. A little scent goes a long way, and too much can make the kitchen smell like a fruit smoothie opened a candle shop. Use a light hand. You want cheerful soap, not a mango fog machine.
Packaging is the moment the project suddenly looks polished. A simple clear wrap and a small label can make homemade soap feel boutique. Stack three colorful bricks together and you have a gift that looks intentional, not like something you panic-made at midnight before a party. These soaps work especially well for birthday favors, teacher gifts, summer crafts, and holiday stocking stuffers. They are inexpensive, creative, and useful, which is the holy trinity of DIY projects.
The biggest lesson from making DIY Lego Soap is that perfection matters less than personality. Slightly uneven edges, tiny bubbles, or unexpected color blends do not ruin the project. They make each bar unique. And unlike many crafts that end up in a drawer, these actually get used. Every time someone washes their hands with a bright little brick, the project earns its place by the sink.
Conclusion
DIY Lego Soap is a fun, beginner-friendly craft that combines creativity, color, and everyday usefulness. With melt-and-pour soap base, silicone molds, skin-safe colorants, and a little patience, you can make bright building brick soaps for parties, gifts, classroom activities, or your own bathroom counter. The process is simple enough for beginners but flexible enough for creative designs like rainbow layers, clear toy embeds, themed color sets, and personalized packaging.
The key is to keep safety and quality in mind. Use soap-safe ingredients, avoid tiny toy embeds for very young children, melt the soap gently, and wrap finished bars properly to prevent sweating. Once you understand the basics, DIY Lego Soap becomes one of those crafts you can repeat for birthdays, holidays, rainy weekends, and “I need a cute handmade gift but I also need it not to take six weeks” emergencies.
In the end, these soaps are more than colorful bathroom accessories. They are tiny, practical reminders that handmade projects do not need to be complicated to be memorable. Sometimes all it takes is a mold, a microwave, a splash of color, and the courage to tell everyone that your slightly crooked purple brick soap was absolutely part of the plan.













