
Note: This project involves small accessories, paint, adhesive, and cutting tools. Adults should handle cutting, drilling, hardware installation, and any work involving small parts around young children.
Doll hair accessories have a magical ability to multiply overnight. One tiny brush becomes three. A pair of barrettes somehow produces a full rainbow of bows. Before long, the floor looks like a glamorous tornado passed through a miniature salon.
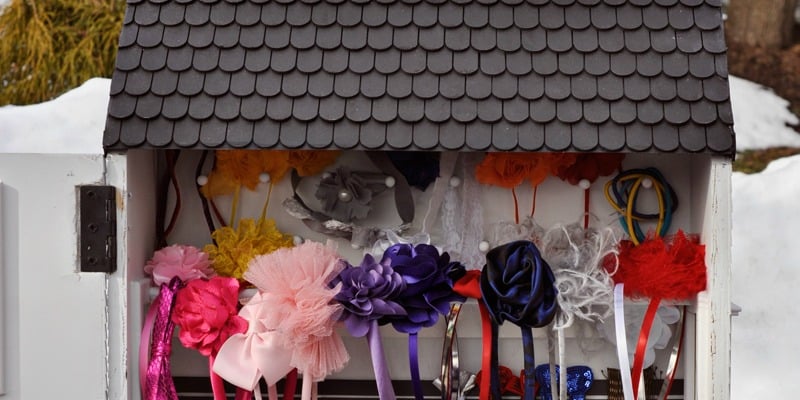
A DIY dollhouse hair accessory storage box solves that problem without banishing the fun. Instead of hiding doll brushes, clips, elastic bands, headbands, and tiny bows in a plain plastic container, you can build a charming miniature house that doubles as a display piece. It keeps accessories visible, organized, and ready for the next doll makeover emergency.
This project is designed for beginners. You do not need a workshop that looks like a television set or a tool belt with its own ZIP code. A few basic materials, careful measuring, and a little patience are enough to create a dollhouse-inspired storage box that feels special and works hard behind the scenes.
Why Build a Dollhouse Hair Accessory Storage Box?
A storage box is useful. A dollhouse storage box is useful and adorable, which is basically the gold medal of kids’ organization. The best version of this project does three jobs at once:
- It stores small doll hair accessories in separate compartments.
- It makes cleanup easier because every item has a designated home.
- It becomes part of imaginative play instead of looking like a boring container that wandered in from the garage.
The key is to build the organizer around the collection rather than forcing the collection to fit a random box. Tiny elastic bands need a lidded cup or shallow compartment. Doll brushes and combs need longer spaces. Hair bows look better when they can be clipped to ribbon, elastic, or miniature rods. Once you think like a tiny salon manager, the layout becomes much easier.
Plan the Dollhouse Storage Box Before You Build
Take Inventory of the Accessories
Start by gathering every doll hair item in one place. Sort the collection into groups: brushes, combs, headbands, bows, clips, barrettes, hair ties, wigs, and styling tools. This step may reveal that you do not own “a few accessories.” You own a miniature beauty supply warehouse.
Measure the longest item, usually a doll brush or comb. That measurement determines the minimum height of one compartment. Then count the smallest loose items, such as tiny rubber bands and decorative clips. These are the items most likely to vanish into another dimension, usually under a couch.
Choose a Practical Size
A beginner-friendly dollhouse hair accessory storage box can be about 14 inches wide, 10 inches tall, and 3 inches deep. This size fits on a shelf, desk, dresser, or playroom table without requiring a moving crew.
The box can be wider or taller if the doll collection is large. However, keep the depth modest. A shallow organizer prevents accessories from disappearing into a dark storage cave where only one lonely hair clip survives.
Decide on a Layout
A simple and effective layout includes one tall compartment for brushes, two medium shelves for bows and headbands, and several smaller cubbies for clips and elastic bands. You can also add a ribbon strip inside the door for clipping bows in a neat row.
Think of the storage box like a tiny dollhouse salon. One room is the brush station, one room is the bow boutique, and one room is where all the mysterious single barrettes wait for their missing partners.
Materials and Tools You Will Need
For a sturdy DIY dollhouse storage organizer, gather the following materials:
- One piece of 1/4-inch plywood, craft plywood, or smooth birch panel
- Thin wood strips or craft boards for dividers and decorative trim
- Wood glue
- Small finishing nails, brad nails, or short wood screws
- Two small hinges
- A small magnetic catch, latch, or decorative clasp
- Fine-grit sandpaper
- Water-based craft paint or low-odor paint suitable for wood projects
- Clear sealer, if desired
- Small cups, mini jars, or clear containers for elastic bands and clips
- Ribbon, elastic cord, or narrow fabric strips for bow storage
- Decorative items such as scrapbook paper, stickers, miniature knobs, or wood shapes
Helpful tools include a ruler, pencil, clamps, a hand saw or jigsaw, drill, small drill bit, screwdriver, paintbrushes, and a craft knife. If you prefer a no-saw version, ask a home improvement store or lumber shop to cut the main wood pieces to size.
Cut List for a Simple Dollhouse Accessory Box
Use these measurements as a starting point for a 14-inch-wide by 10-inch-tall box:
- Back panel: 14 inches wide by 10 inches tall
- Bottom panel: 14 inches wide by 3 inches deep
- Top panel: 14 inches wide by 3 inches deep
- Side panels: 9 1/2 inches tall by 3 inches deep
- Front door: 14 inches wide by 10 inches tall
- Horizontal shelves: cut to fit the inside width
- Vertical dividers: cut to fit the shelf height
For the dollhouse appearance, add a decorative peaked roof above the front door. Cut two narrow wood strips at matching angles and attach them in an upside-down V shape. You can also create shutters with craft sticks, a tiny sign above the door, or pretend window boxes with artificial flowers.
The structural box remains rectangular, which keeps the project beginner-friendly. The decorative roof gives it dollhouse personality without forcing you to perform complicated roof geometry while holding glue in one hand and questioning your life choices with the other.
Step-by-Step: How to Build the Storage Box
Step 1: Sand Every Cut Edge
Before assembling anything, sand the edges and faces of each wood piece. Focus on corners, cut edges, and any rough spots that could snag doll clothes or little fingers. Start with medium-grit sandpaper if the wood is rough, then finish with fine-grit sandpaper for a smooth surface.
Do not rush this stage. Sanding is not exciting, but neither is discovering a splinter during a doll spa day. A smooth finish makes the final project look more polished and helps paint go on evenly.
Step 2: Dry-Fit the Main Box
Place the back panel flat on your work surface. Arrange the bottom, top, and side panels around it without glue. Check that the edges meet neatly and the box looks square.
Mark the inside with a pencil where you want shelves and dividers. Test-fit a doll brush, bow, comb, or headband before attaching anything. It is much easier to move a pencil line than to remove a shelf after the glue dries.
Step 3: Assemble the Outer Frame
Apply a thin, even bead of wood glue to the bottom edge of the back panel. Press the bottom panel into place and clamp it until stable. Repeat with the side panels and top panel.
Add a few small finishing nails or short brad nails if you want extra reinforcement. Keep nails away from the front edge where the door will sit. Wipe away glue squeeze-out with a damp cloth before it dries, because dried glue has the personality of concrete.
Check the corners with a ruler or square. If the box leans slightly, adjust it before the glue sets. A dollhouse storage box should look whimsical, not like it survived an earthquake.
Step 4: Install Shelves and Dividers
Once the outer frame is secure, glue in the interior shelves. A useful setup includes one long shelf across the middle and one shorter shelf on the right side. Add a vertical divider beneath the top shelf to create smaller cubbies.
Reserve one tall compartment for brushes and combs. Create shallow compartments for clips and hair ties. For extra-small pieces, place a tiny clear container inside one cubby. Clear containers are helpful because they let children see what is inside without dumping every accessory onto the floor in a five-second confetti parade.
Step 5: Build a Bow Display Area
Choose one section of the inside door or one tall compartment for bows. Glue two short ribbon strips vertically inside the box, leaving the centers loose enough to slide clips behind them. Another option is to stretch a narrow elastic cord across a compartment and use it as a bow rail.
For a more decorative look, attach a narrow dowel or wooden skewer between two small supports. Doll barrettes and clips can hang from it like merchandise in a tiny boutique.
Step 6: Attach the Front Door
Lay the box face down and position the front door along the back edge. Mark where the hinges will go. Drill small pilot holes before adding screws, especially if you are using delicate hardware. Pilot holes help prevent thin wood from splitting and make the screws easier to control.
Attach the hinges to the box first, then to the door. Open and close the door slowly to check alignment. Add a magnetic catch or small clasp on the opposite side.
Choose a latch that is easy for older children to open but does not create a difficult locking enclosure. The box should open easily, and the door should never slam shut unexpectedly. A small soft-close support, ribbon door stop, or lightweight door design can make the organizer safer and more comfortable to use.
Step 7: Add the Dollhouse Facade
Now comes the part where the plain wooden box becomes a miniature home for tiny hair treasures. Glue two angled wood strips above the door to form a roofline. Add small square trim pieces as pretend windows. Use craft sticks to create shutters or a front porch.
You can paint the exterior in classic dollhouse colors such as pale pink, mint green, sky blue, lavender, cream, or soft yellow. For a more modern style, try white walls, black window trim, and a tiny gold “Salon” sign above the door.
Use painter’s tape for clean lines. Paint thin coats rather than one heavy coat, and allow each layer to dry fully before adding another. Thick paint often looks fine at first, then dries with drips that resemble frozen frosting.
Step 8: Finish and Decorate the Interior
Paint the inside in a lighter color so small accessories are easier to spot. Line the shelf bottoms with scrapbook paper, peel-and-stick vinyl, felt, or washable fabric. A patterned background can make the compartments look like miniature rooms.
Add labels such as “Brush Bar,” “Bow Room,” “Clip Closet,” or “Hair Tie Hotel.” Younger children may benefit from picture labels showing a brush, bow, or clip. Labels turn cleanup into a simple matching game instead of an argument that begins with, “But where does this go?”
Creative Dollhouse Storage Box Themes
Mini Beauty Salon
Paint the box in soft pink, white, and gold. Add a small paper mirror, a pretend salon sign, and a tiny reception desk made from a wood block. Store brushes in the “styling station” and bows in the “fashion display.”
Fairy Cottage Organizer
Use pastel green paint, tiny paper flowers, wood-grain scrapbook paper, and miniature mushroom decorations. This theme works especially well for dolls with fantasy outfits, woodland accessories, or colorful hair pieces.
Modern Dollhouse Closet
Choose neutral colors such as white, beige, gray, and blush. Add clean black trim around the pretend windows. Use clear mini bins and simple labels for a more organized, grown-up look that still feels playful.
Vintage Boutique Box
Paint the exterior in cream or dusty rose. Add lace trim, floral paper, tiny brass-colored knobs, and a handwritten shop sign. The finished organizer can look like a miniature accessory boutique from a charming old-fashioned main street.
Tips for Keeping Doll Hair Accessories Organized
Building the box is the fun part. Keeping it organized is the part that requires a tiny bit of strategy and a tiny bit of luck.
- Store hair ties in small labeled containers instead of loose compartments.
- Clip bows to ribbons so they remain visible and paired.
- Keep brushes upright in a tall cubby.
- Use one compartment for “mystery accessories” until you identify them.
- Return accessories after each play session instead of waiting for a giant cleanup day.
- Rotate seasonal or rarely used doll accessories into a separate container.
- Take a quick photo of the organized box so children can see where each item belongs.
The best storage systems are not the fanciest ones. They are the ones that are easy enough for a child to use without needing a map, a flashlight, or a committee meeting.
Common Mistakes to Avoid
Making Compartments Too Deep
Deep bins seem useful until tiny doll clips sink to the bottom. Keep small-item sections shallow or use removable mini containers. Visibility makes cleanup faster and prevents duplicate purchases of accessories that were hiding in plain sight.
Forgetting to Test the Layout
Always place real accessories inside the dry-fit compartments before gluing shelves in place. A compartment that looks perfect on paper may be too narrow for a doll brush or too short for a headband.
Using Heavy Hardware on Thin Wood
Choose lightweight hinges and small latches for a small storage box. Heavy hardware can pull on thin wood or make the door difficult to open. Simple and secure wins every time.
Adding Decorations Before Painting
Paint the main surfaces first. Small decorations are easier to attach after the paint has dried. Otherwise, you may spend twenty minutes trying to paint around a tiny wooden flower that suddenly has more authority than the entire project.
Practical Experience: What This Project Teaches You
Building a dollhouse hair accessory storage box is one of those projects that looks simple from across the room but teaches plenty of useful lessons once you begin. The first lesson is that small-scale storage needs more planning than large-scale storage. A big toy bin can hide a lot of chaos. A miniature organizer cannot. Every shelf, divider, ribbon strip, and tiny container has to earn its place.
In practical use, the most successful dollhouse organizers are not necessarily the ones with the most elaborate decorations. A box with fewer compartments, clear labels, and one good bow display often works better than a highly detailed miniature mansion with twelve little rooms. Children tend to use systems that are easy to understand. When a brush has one obvious place and bows have one visible ribbon rail, cleanup becomes a quick routine rather than a scavenger hunt.
Another useful experience is learning the difference between “pretty storage” and “playable storage.” A beautiful dollhouse box can become frustrating if the door is hard to open, the shelves are too narrow, or the accessories are stored behind decorations. The best approach is to build the structure first, test it with real accessories, and decorate after the practical details work. That order prevents the project from becoming a tiny museum where nobody is allowed to touch anything.
Painting also teaches patience. Light coats of water-based paint usually look cleaner than one thick layer. It can be tempting to cover the wood quickly, especially when the color is exciting and the project is almost finished. However, thin coats reduce drips, keep details crisp, and make the dollhouse facade look more polished. Waiting for paint to dry may feel like waiting for a pizza delivery during a snowstorm, but the result is worth it.
Another common lesson comes from the accessories themselves. Doll hair pieces vary wildly in size. Some bows are fluffy and wide. Some clips are tiny enough to disappear inside a sock. Some headbands are awkwardly shaped and refuse to lie flat no matter how politely you ask. Removable mini bins, shallow trays, and flexible ribbon holders make the storage box more adaptable as the collection changes.
The project can also become a meaningful activity for families. An adult can handle cutting, drilling, and hinge installation while a child chooses paint colors, names the rooms, adds labels, and helps arrange accessories. This creates more than a storage solution. It turns organization into part of the play experience. The finished box can feel personal because it reflects the child’s favorite colors, dolls, and imaginative style.
Finally, this project proves that organizing does not have to feel like a chore. A dollhouse hair accessory storage box gives tiny accessories a home, helps protect them from getting lost, and adds a playful detail to a bedroom or playroom. The goal is not perfection. The goal is to make it easier to find the purple bow before the doll’s big imaginary fashion show begins.
Conclusion
A DIY dollhouse hair accessory storage box is a practical craft project with plenty of personality. By combining shallow compartments, a hinged door, bow storage, labeled sections, and a playful dollhouse facade, you can create an organizer that makes doll accessories easier to find and more fun to put away.
Start with a simple rectangular wooden box, build the interior around the accessories you already own, and add dollhouse details after the structure is complete. Whether you create a fairy cottage, mini beauty salon, vintage boutique, or modern doll closet, the finished storage box can turn everyday doll cleanup into a small creative ritual.













