
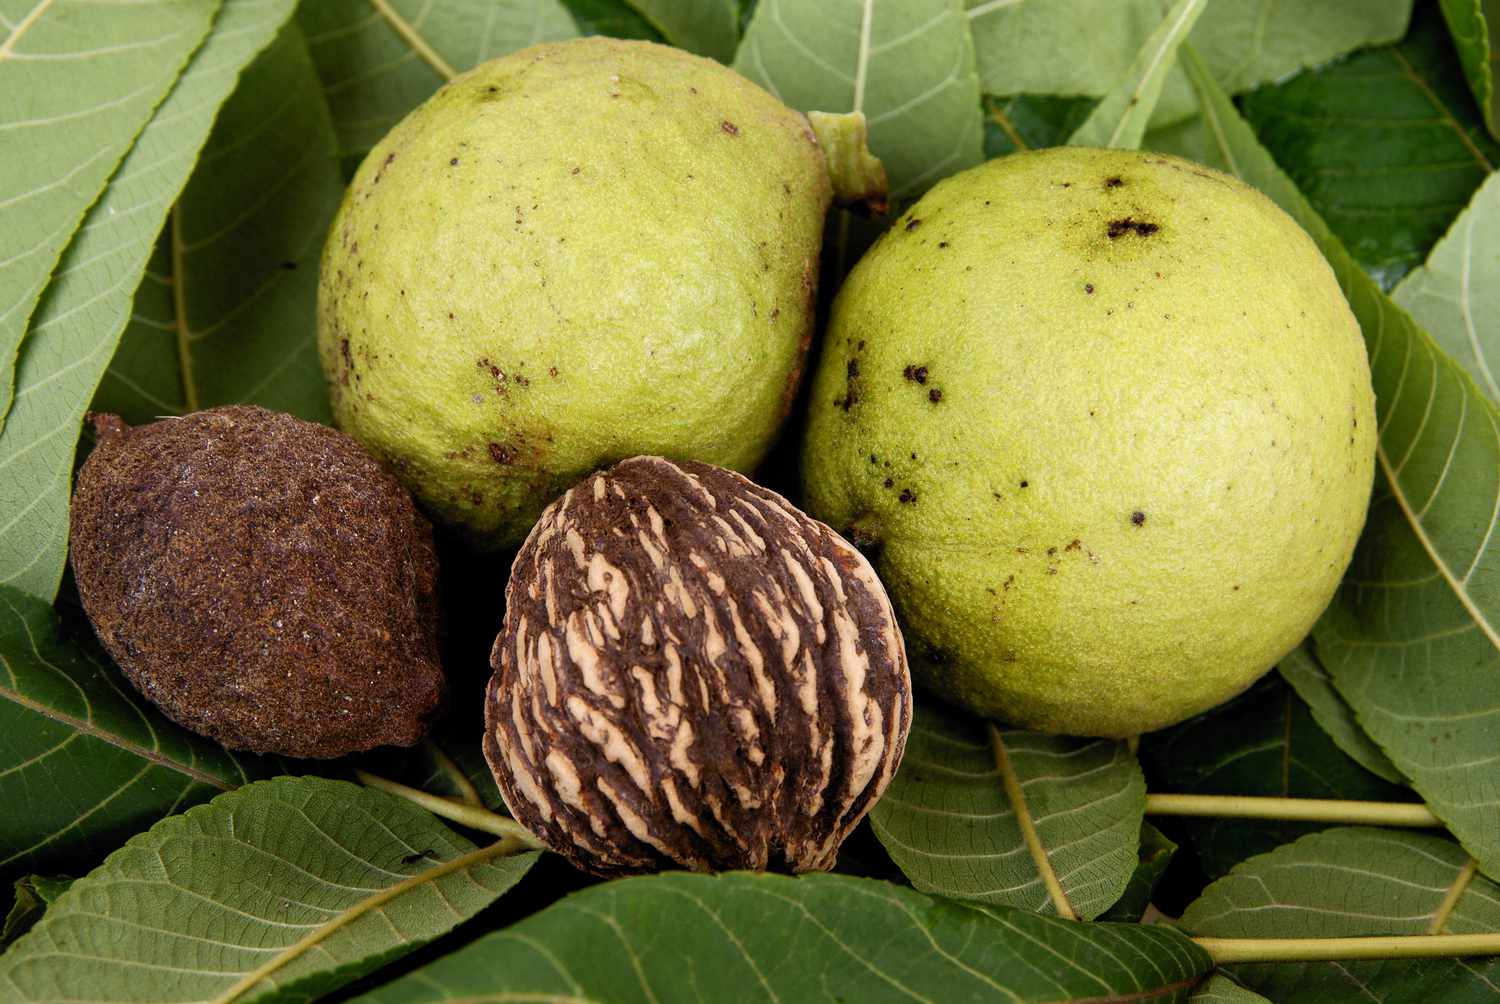
If you have ever picked up a black walnut, you already know two things: it looks innocent, and it is lying. Beneath that round, green exterior is a famously tough shell, a rich, bold-flavored nut, and enough brown staining power to make your driveway look like it lost a fight with coffee. Still, if you love foraging, home food projects, or simply turning backyard abundance into something delicious, learning how to harvest black walnuts is absolutely worth the trouble.
Black walnuts are not quite like the tidy English walnuts you find in grocery stores. They are stronger in flavor, harder to crack, messier to handle, and much more dramatic about the whole process. But that intensity is also their charm. Once you learn when to gather them, how to hull them, and how to dry and store them properly, you can turn a wild autumn nuisance into baking gold.
This guide walks through the full process of harvesting black walnuts at home, from spotting ripe nuts to curing, cracking, and storing them without wasting your time or your countertops. If you have a walnut tree in your yard or a reliable patch in the neighborhood, here is how to get the job done without losing your patience, your shirt, or your fingerprints to walnut dye.
Why Black Walnuts Are Worth Harvesting
Before we get into the step-by-step process, let’s answer the obvious question: why bother? Black walnuts are labor-intensive. They are not a grab-and-snack nut. They are a commitment. But they reward that effort with a deep, earthy, almost wine-like flavor that makes cookies, cakes, brownies, quick breads, granola, and savory dishes taste more interesting.
For many people, black walnut harvesting is also about using what is already available. A mature tree can produce a lot of nuts, and many of them simply fall and rot if nobody gathers them. That makes black walnuts a classic “free food hiding in plain sight” crop. The key is knowing how to handle them the right way so the kernels taste fresh instead of funky.
How to Know When Black Walnuts Are Ready
Timing matters. Harvest too early, and you may end up with immature kernels that are difficult to separate from the shell. Wait too long, and squirrels will beat you to the prize while the hulls turn into a soft, black mess.
In most parts of the United States, black walnuts ripen in early to mid-fall. A ripe nut usually has a hull that has softened from solid green to a more yellow-green tone, and you should be able to dent the outer hull with your thumb. Another reliable sign is the classic one: the nuts start dropping from the tree on their own.
The best-quality nuts often come from mature nuts picked right as they fall or gently shaken from the tree once ripe. In real life, though, most home harvesters collect them from the ground. That is perfectly fine as long as you gather them frequently and do not leave them sitting around in wet leaves for days.
What You Need Before You Start
- Heavy-duty gloves or waterproof gloves
- Old clothes and old shoes
- Buckets, crates, or mesh bags
- A sturdy boot, rubber mallet, or simple hulling setup
- A hose or large tub for rinsing
- Wire racks, screens, or shallow trays for drying
- Safety glasses for cracking
- A hammer, vise, or strong nutcracker
- Airtight containers or freezer bags for storage
Do not skip the gloves. Black walnut hulls contain a powerful dye that stains hands, clothing, wood, concrete, and basically anything that seems expensive. Dress like you are about to do yard work at a house you do not particularly care about. Fashion can return later.
Step 1: Gather the Nuts Quickly
Once the walnuts begin falling, collect them several times a week if possible. The longer they sit on the ground, the more likely they are to get moldy, bug-damaged, waterlogged, or stolen by wildlife. Freshly fallen nuts are easier to process and more likely to have good flavor.
As you gather, do a rough first sort. Set aside nuts that are badly cracked, obviously moldy, or so deteriorated that the hull is already turning into mush. You want firm, reasonably fresh nuts with hulls that are soft enough to work with but not fully decomposed.
If the crop is huge, do not try to process every walnut on the same day unless you are looking for a hobby that feels suspiciously like manual labor. Gather in manageable batches. Black walnuts reward steady progress much more than heroic overconfidence.
Step 2: Hull Them Promptly
This is the step where black walnuts stop pretending to be easy. The hull, which is the thick outer covering around the shell, should be removed as soon as possible after harvest. If you leave the hull on too long, the juices can stain the shell, darken the kernels, and create a stronger, harsher flavor.
There are many ways to hull black walnuts at home. Some people step on them with a heavy boot. Some push them through a board with a properly sized hole. Others use homemade tools, rollers, or small hand-operated devices. For a modest backyard harvest, a simple boot heel, mallet, or board method works fine.
The goal is to break and peel away the outer hull without crushing the nut inside. It is messy, but it is not complicated. Work outside, move slowly, and accept that this is not a clean hobby. If the hulls are stubborn, do not panic. Some nuts, especially those affected by husk fly or damp conditions, cling to the shell like they are paying rent. A little patience goes a long way.
Step 3: Rinse and Sort the Good Nuts from the Duds
After hulling, rinse the nuts to remove hull debris and staining juice. Then do a simple sink-or-float test in a bucket or tub of water. Nuts that sink are more likely to be well-filled. Nuts that float are often empty, poorly filled, or otherwise disappointing little freeloaders.
This step is not glamorous, but it saves time later. There is nothing quite like spending ten determined minutes cracking a walnut only to discover it contains the emotional equivalent of a shrug. Floaters can be discarded so you focus your effort on the better nuts.
Once the rinsed nuts are sorted, drain them well. Moisture is not your friend during storage, and this is where the process shifts from “muddy yard project” to “careful post-harvest handling.”
Step 4: Dry and Cure the Walnuts
Fresh black walnuts need time to dry and cure before you crack and eat them. Spread the clean, hulled nuts in shallow layers, ideally no more than about three nuts deep, on wire racks, screens, or trays. Put them in a cool, dry, well-ventilated area such as a garage, shed, porch, or utility room with good airflow.
Let them dry for about two to three weeks. This curing period helps improve flavor and makes the kernels easier to remove later. If you pile them too deeply or keep them in a damp space, you invite mold, stale flavor, and regret. Turn them occasionally if needed and make sure air can circulate around them.
How do you know they are dry enough? Crack one open as a test. The kernel should feel firm rather than rubbery, and the inside should not seem damp. This is one of those old-school food skills that gets easier fast: by the second batch, you will stop second-guessing yourself and start acting like the neighborhood walnut foreman.
Step 5: Crack Them the Smart Way
Black walnut shells are famously hard. Regular nutcrackers often look at them and quietly resign. You can use a hammer, a vise, or a heavy-duty cracker designed for tougher nuts. Safety glasses are a wise idea because shell fragments can fly farther than you might expect.
One common method is to place the walnut on a hard surface with the pointed end facing up, then tap it with a hammer until the shell splits into sections. The goal is not to pulverize it like a villain in an action movie. The goal is controlled force. Tap, check, rotate, and tap again.
If you are after beautiful halves, prepare yourself emotionally. Black walnuts are better known for flavorful pieces than perfect showroom kernels. That is normal. Most home cooks use them chopped in baked goods, stuffings, oatmeal, or ice cream, so pieces are still a win.
Step 6: Store Them Properly
Walnuts contain oil, and oil plus warmth plus time equals rancidity. In other words, proper storage matters. Unshelled nuts can hold for a while in a cool, dry place once fully cured, but shelled kernels should be kept in airtight containers in the refrigerator or freezer.
If you want the best long-term quality, freeze the nutmeats. That helps preserve flavor and keeps them ready for baking season, holiday treats, or random Tuesday banana bread emergencies. Refrigeration is fine for shorter-term use, but warm room-temperature storage is not ideal if you care about taste.
Always use clean, dry containers. If the nuts smell sharp, sour, or vaguely like paint thinner, they have gone rancid and should be discarded. Good black walnuts smell rich and nutty, not like they are plotting against your dessert.
Common Problems When Harvesting Black Walnuts
The Hulls Are Stuck Tight
This often happens with nuts affected by insects, excess moisture, or delayed harvest. You may be able to loosen the hulls by letting the nuts sit briefly until the covering softens further, then removing them by hand or with a simple tool. Do not leave them so long that the hull turns to sludge.
The Nuts Smell Bad
That is usually a sign of poor storage, overripe hulls left too long, or nuts that stayed wet. Good black walnuts smell earthy and rich, not sour or chemical-like.
The Kernels Are Tiny or Missing
That is exactly why the float test is your friend. Some nuts never fill well, and some years are simply better than others. Black walnuts like to keep harvesters humble.
The Shells Are Impossible
Welcome to the club. They really are tough. Use the right tools, wear eye protection, and crack only what you plan to use soon. Many people store cured nuts in the shell and crack them as needed.
Best Practices for Better Flavor
- Harvest ripe nuts, not immature green ones
- Remove hulls promptly after gathering
- Discard floaters and damaged nuts
- Dry in shallow layers with good airflow
- Store kernels cold in airtight containers
- Crack only as many as you need if you prefer maximum freshness
Those simple habits make the difference between “amazing wild ingredient” and “why do these taste like old woodshop?” Black walnuts have a naturally bold flavor, but they should still taste fresh.
What to Do with Your Harvest
Once you have a stash of black walnuts, the fun part begins. Their bold flavor works beautifully in brownies, cookies, coffee cake, pumpkin bread, pancakes, granola, muffins, brittle, and fudge. They also play well in savory recipes like wild rice, roasted vegetables, and hearty salads.
Use them where their flavor can stand out. Black walnuts are not subtle background nuts. They walk into a recipe like they own the place, which, honestly, they kind of do.
Final Thoughts on How to Harvest Black Walnuts
Harvesting black walnuts is not difficult so much as it is gloriously inconvenient. You need timing, gloves, patience, a place to dry the nuts, and a willingness to look a little ridiculous while hulling them in the yard. But once you understand the process, it becomes a satisfying seasonal routine.
If you harvest at the right time, hull promptly, sort carefully, dry thoroughly, and store the kernels cold, black walnuts can become one of the most rewarding backyard foods you gather all year. They are strong-flavored, old-fashioned, a little stubborn, and completely worth the trouble. Which, now that you think about it, is exactly what makes them memorable.
Field Notes: What Harvesting Black Walnuts Actually Feels Like
Anyone who has harvested black walnuts more than once learns the same lesson: the process is half food preservation and half seasonal ritual. On paper, it sounds simple. Pick up nuts, remove hulls, dry them, crack them, eat them. In real life, it feels more like joining a secret fall society whose membership requirements include stained gloves, sore hands, and the ability to explain to your family why there are mysterious round objects drying in the garage.
The first experience is usually a comedy of small mistakes. You start by picking up every nut in sight because free food is exciting. Then you realize black walnuts are heavier than they look. By the time your bucket is half full, your arm feels like you have been training for a lumberjack competition you never actually entered. Then comes the hulling. At that point, you discover the hulls are not merely messy. They are committed to the bit. They stain your gloves, your sleeves, the edge of the bucket, and any patch of concrete you so much as glance at. Black walnuts are the kind of harvest that make you respect old clothes in a whole new way.
Then there is the smell. Fresh black walnut hulls have a sharp, earthy scent that is hard to describe if you have never handled them. It is woodsy, green, a little spicy, and slightly wild, like autumn itself decided to get its hands dirty. For some people, that smell becomes part of the memory of the season. You catch it once the next year, and suddenly you are back outside, sorting nuts while the leaves scrape across the yard.
Drying the walnuts is where the experience becomes unexpectedly satisfying. The work slows down. The nuts are lined up on screens or trays, and the project stops looking like chaos and starts looking intentional. That is the moment many people realize they are not just cleaning up yard debris. They are preserving food the way people have done for generations. It feels practical in the best sense of the word. No trend, no gimmick, just a useful skill and a pantry reward waiting at the end of it.
Cracking black walnuts later is its own tiny ceremony. You do not usually rush through it. You sit down with a tool, a bowl for shells, and enough patience to deal with a nut that was apparently engineered by a committee of tiny medieval blacksmiths. But when a clean piece of kernel finally comes free, there is a real sense of victory. Not because the piece is huge or perfect, but because you earned it. Black walnuts have a way of making you appreciate small successes.
And maybe that is the real appeal. Harvesting black walnuts slows you down. It demands attention. It teaches you that useful food does not always come in polished packages or tidy bins. Sometimes it comes in a green-stained bucket from under a tree, and you have to work for it. The payoff is not only the flavor, though that flavor is excellent. The payoff is also the experience itself: the fall air, the repetitive work, the little lessons learned from each batch, and the quiet pleasure of turning something overlooked into something genuinely valuable.










