
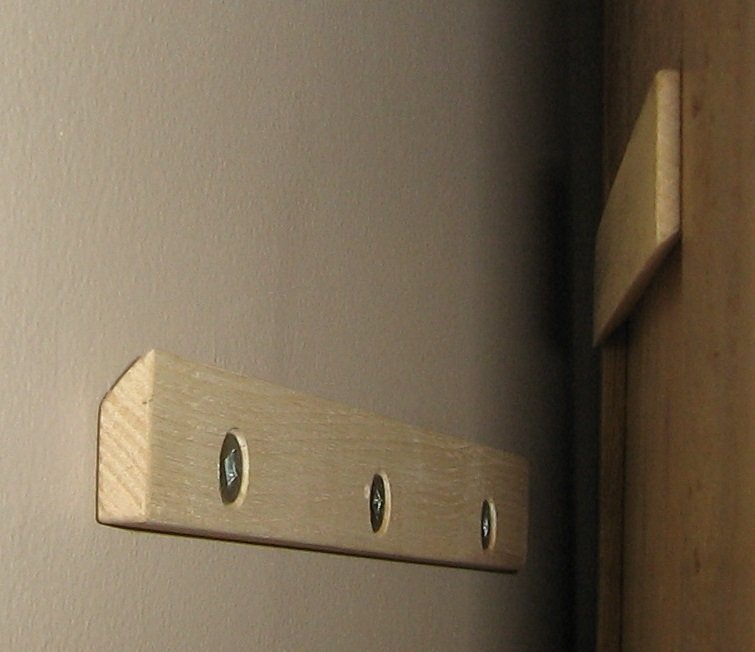
If your garage wall currently looks like a yard sale lost a fight with a hardware store, a French cleat wall may be your new best friend. This storage system is simple, clever, and satisfyingly tough: one beveled strip mounts to the wall, a matching beveled strip mounts to a holder or cabinet, and the two lock together with gravity doing the heavy lifting. The result is wall storage that is strong, clean-looking, and easy to rearrange when your tool collection suddenly “mysteriously” doubles.
That flexibility is the real magic. Pegboard is handy, sure, but French cleats are in a different league when you want to hold heavier items, create custom holders, or change your setup without patching a dozen bad decisions. Whether you are organizing clamps in a workshop, gardening gear in a shed, or bulky supplies in a mudroom, a French cleat wall can turn wasted wall space into a hardworking storage zone.
This guide breaks down five practical tips for building a strong French cleat wall, along with real-world design advice, common mistakes to avoid, and hands-on experience that can save you time, money, and one very annoying second trip to the lumberyard.
What Is a French Cleat Wall?
A French cleat wall is a system of horizontal cleats mounted across a wall. Each cleat has a beveled edge, usually cut at 45 degrees. Tool holders, shelves, bins, and cabinets get matching cleats on their backs, so they hook onto the wall-mounted strips. Instead of being locked into one layout, you can lift a holder off and move it anywhere along the wall.
That makes French cleat storage ideal for spaces that evolve over time. A woodworking shop today might become a bike-repair corner next year. A craft room may need deeper bins during holiday season and slimmer racks the rest of the year. The cleat system lets the wall adapt without turning every change into a demolition project.
Why a French Cleat Wall Works So Well
The appeal comes down to three things: strength, flexibility, and efficiency. Because the cleat spreads the load across a wider area and can be anchored into multiple studs, it handles weight far better than many small hooks or isolated fasteners. Because the holders are removable, the system stays useful as your storage needs change. And because the wall becomes vertical storage real estate, it frees up floor space for workbenches, rolling carts, or simply the radical luxury of being able to walk through the garage without sidestepping a leaf blower.
Another underrated benefit is customization. Instead of trying to make store-bought organizers fit your stuff, you build holders around the exact tools and supplies you own. Drill dock? Easy. Clamp rack? Absolutely. Charging station, spray paint shelf, tape dispenser, measuring tool rack, or awkward bin for those random accessories you swear you will organize later? All fair game.
Tip 1: Start With Better Material, Not the Cheapest Sheet You Can Find
A French cleat wall is only as trustworthy as the material used to make it. If you start with weak, knotty, splinter-prone plywood, the whole system becomes a gamble. Higher-grade plywood gives you cleaner cuts, better screw holding, and less risk of warping over time. For most garage and workshop builds, 3/4-inch plywood is the smart choice because it offers better stiffness and support for heavier tools and storage units.
That does not mean every project needs to look like it belongs in a yacht interior. You do not need luxury wood. You do need material that is stable, reasonably flat, and strong enough for the job. Sanded plywood or good-quality cabinet-grade panels usually make the process easier and the results cleaner.
How to choose thickness
For light-duty storage, such as small hand tools, craft supplies, or kitchen organizers, 1/2-inch stock can work. For serious workshop use, 3/4-inch material is usually the safer bet. If the wall will hold loaded shelves, chargers, power tools, or bins full of metal hardware, this is not the moment to get thrifty in the wrong direction.
What to avoid
Avoid plywood with large voids, delamination, or face veneers that look like they were assembled during a thunderstorm. Cheap sheets may save money upfront, but they often crack at the bevel, split near screws, or sag under repeated use. That is the kind of savings that boomerangs.
Tip 2: Cut Accurate 45-Degree Bevels and Keep Them Consistent
French cleats are simple, but they are not forgiving of sloppy bevels. The classic design uses two opposing 45-degree cuts. When those angles are clean and consistent, the pieces mate neatly and hold tight. When they are rough, crooked, or inconsistent, the storage holders can rock, bind, or hang out of level like they have given up on life.
A table saw is the easiest tool for this job because it gives a straight, repeatable bevel. A circular saw can work too, especially with a guide, but accuracy matters. If one cleat is cut slightly off, it may still hang, but it will not feel solid. Multiply that by an entire wall and you have created a storage system with trust issues.
Useful cutting habits
- Rip wider strips first, then cut the bevel down the center.
- Label wall cleats and holder cleats so you do not flip pieces the wrong way later.
- Lightly sand or ease the sharp point after cutting to reduce splintering.
- Test-fit a pair before cutting a whole batch.
Consistency is the secret. The more uniform your cleats are, the easier it is to move holders anywhere on the wall without fussing, shimming, or muttering under your breath.
Tip 3: Fasten Into Studs Like You Actually Want the Wall to Hold Stuff
This is the big one. A French cleat wall gets its strength from proper anchoring, not from hope, drywall, or a brave attitude. The wall-mounted cleats should be secured into studs with appropriate screws. That spreads the load through the framing rather than asking the wall surface to perform miracles.
Before you mount anything, find and mark the studs across the entire wall. Use a level, then double-check it. The beauty of a French cleat is that once the main rails are level and secure, anything hung from them starts off on the right foot. Or at least on the right bevel.
Smart mounting practices
Pre-drill and countersink your holes so the screw heads sit flush and do not interfere with the mating cleat. Use screws long enough to bite well into the studs. If your wall is masonry or another nonstandard surface, choose hardware designed for that material and keep load expectations realistic. A French cleat system is strong, but the wall behind it still has opinions.
It also helps to think in spans rather than isolated points. One short cleat mounted carelessly may hold a tool rack for a while. A properly installed series of cleats running across several studs creates a much more stable and useful system. That is how you move from “I hung a thing” to “I built a wall that works.”
Tip 4: Design the Wall for Modularity, Not Just for Today’s Tools
The smartest French cleat walls are not just sturdy. They are adaptable. If you build around only the tools you own right now, the system may feel outdated within months. That is why many experienced DIYers leave room for growth, add multiple rows of cleats, and make holders that can be swapped out in seconds.
Think of the wall as a framework, not a finished sculpture. Add narrow racks for chisels, deeper shelves for cans and bottles, trays for batteries and chargers, and open cubbies for oddly shaped gear. When your needs change, you build a new holder, not a new wall.
Modular ideas that age well
- Drill and driver charging station with cord management
- Clamp rack with deep hooks and side support
- Shelf modules for finishes, glue, and fasteners
- Tape and measuring station near the bench
- Mobile bins for gardening tools, paint supplies, or sports gear
Spacing matters too. Leave enough clearance between rows so bulky holders do not crash into each other. A wall packed too tightly may look efficient in theory but become annoying in daily use. In storage design, a little breathing room is not waste. It is usability.
Tip 5: Plan for Real Loads, Real Clearance, and Real-World Safety
A French cleat wall is strong, but it is not magic. Weight still matters. So do leverage, wall condition, screw quality, and how the holder itself is built. A beautifully mounted cleat cannot rescue a flimsy shelf box made from scraps that should have retired honorably months ago.
As you design each holder, think beyond static weight. Ask what happens when you yank a clamp off the rack, slide a tool in sideways, or load a shelf unevenly. Wider or heavier holders may need a larger cleat, additional backing, or a lower support strip to keep them from tipping. A cabinet that holds fine when empty may behave very differently once you fill it with router bits, hardware, or six pounds of mystery fasteners in old coffee cans.
Safety checks worth doing
- Make sure the holder sits flat and does not twist on the wall.
- Confirm screw heads do not block the mating cleat.
- Test heavy items low on the wall before mounting them high.
- Keep very heavy or dangerous tools where they are easy to lift off safely.
- Consider baseboard thickness or wall irregularities so holders hang correctly.
And yes, looks matter too. If the wall lives in a utility room, home office, laundry zone, or kitchen, keep the layout orderly and intentional. French cleat systems do not have to scream “garage energy.” With a clean finish and well-designed holders, they can look sharp and architectural.
Common French Cleat Wall Mistakes to Avoid
- Using weak plywood: Cheap material often fails at the bevel or around fasteners.
- Missing studs: Drywall alone is not a serious storage strategy.
- Making holders too deep: Extra depth increases leverage and stress on the mount.
- Ignoring clearance: Holders that collide are annoying and waste the system’s flexibility.
- Skipping test fits: Building ten holders before checking one on the wall is a classic DIY plot twist.
- Overloading one section: Spread heavy storage across multiple studs and multiple cleats.
Best Places to Use a French Cleat Wall
The garage and workshop are the obvious favorites, but they are not the only options. A French cleat wall works beautifully in a craft room, sewing space, utility room, garden shed, mudroom, pantry, or even a kitchen for pots, pans, and boards. Anywhere you want strong vertical storage with the freedom to reconfigure later is a good candidate.
In family spaces, the system can be especially useful because needs change fast. One year you need toy bins and backpack hooks. The next year it is sports gear, art supplies, or school storage. A flexible wall keeps up without requiring a full remodel every time life updates its software.
Final Thoughts
A French cleat wall succeeds because it solves two problems at once: it gives you stronger wall storage, and it lets you keep changing the setup without starting over. Build it with better material, cut the bevels accurately, anchor it into studs, and design for flexibility. Do that, and you end up with a storage system that feels less like a project and more like a permanent upgrade to how the space works.
And perhaps that is the best part. A good French cleat wall does not just hold tools. It reduces clutter, saves time, protects equipment, and makes the room feel more intentional. Which is a fancy way of saying it turns “Where did I put that thing?” into “Oh, there it is,” and honestly, that is the dream.
Hands-On Experiences and Lessons Learned
One of the most useful lessons people discover after building a French cleat wall is that the first version is rarely the final version. On paper, it is easy to imagine a perfect arrangement. In real life, the wall starts teaching you things almost immediately. Maybe the clamp rack needs to live closer to the bench. Maybe the drill station looked smart near the door until you realized the charging cords now cross your path like tiny tripwire spaghetti. Maybe the shelf you thought would hold sanding supplies becomes the place where every random tape measure in the house goes to retire.
That is exactly why this system is so satisfying. It rewards adjustment. Instead of punishing you for changing your mind, it practically expects it. Many DIYers start with a few simple holders, then gradually build more specialized pieces as they learn how they actually use the room. A basic shelf becomes a battery charging center. A shallow tray becomes a dedicated glue station. An empty corner becomes a vertical rack for clamps, levels, or garden tools. The system grows with your habits.
Another real-world takeaway is that neat walls change behavior. When tools have obvious homes, people are far more likely to put them back. That sounds almost suspiciously wholesome, but it is true. A labeled holder for a square, chisel set, or cordless drill removes friction. You stop tossing items on the nearest flat surface because the correct spot is visible, convenient, and easy to reach. In many shops and garages, the French cleat wall becomes less of a storage hack and more of a daily workflow upgrade.
There is also a confidence factor that comes with building one. The first cleat can feel intimidating because it is structural, visible, and important. But once the first row is level and anchored, the rest of the project becomes more creative than stressful. You move from worrying about the wall to designing solutions for your stuff. That is a fun shift. It turns the project into a series of small wins instead of one giant, nerve-rattling installation.
People also learn quickly that strong storage is not only about holding weight. It is about holding weight in a way that feels stable, safe, and convenient over time. A holder that technically works but wobbles every time you remove a tool is not really finished. A shelf that blocks the one below it is not efficient. A cabinet that hangs securely but needs two hands and a yoga pose to access is not as useful as it looked in the sketch. Experience improves the design.
In the end, the best French cleat walls tend to look a little more thoughtful and a little less crowded than their owners first imagined. They leave space for change. They favor practical holder designs over fussy ones. And they make the room feel more capable. That may be why so many builders swear by them after trying one: once you have a wall that works this hard, ordinary hooks and random shelves start feeling like they are not even trying.
Note: This article is for general DIY information. Always match the cleat thickness, fasteners, wall type, and holder design to the actual load you plan to hang.














