
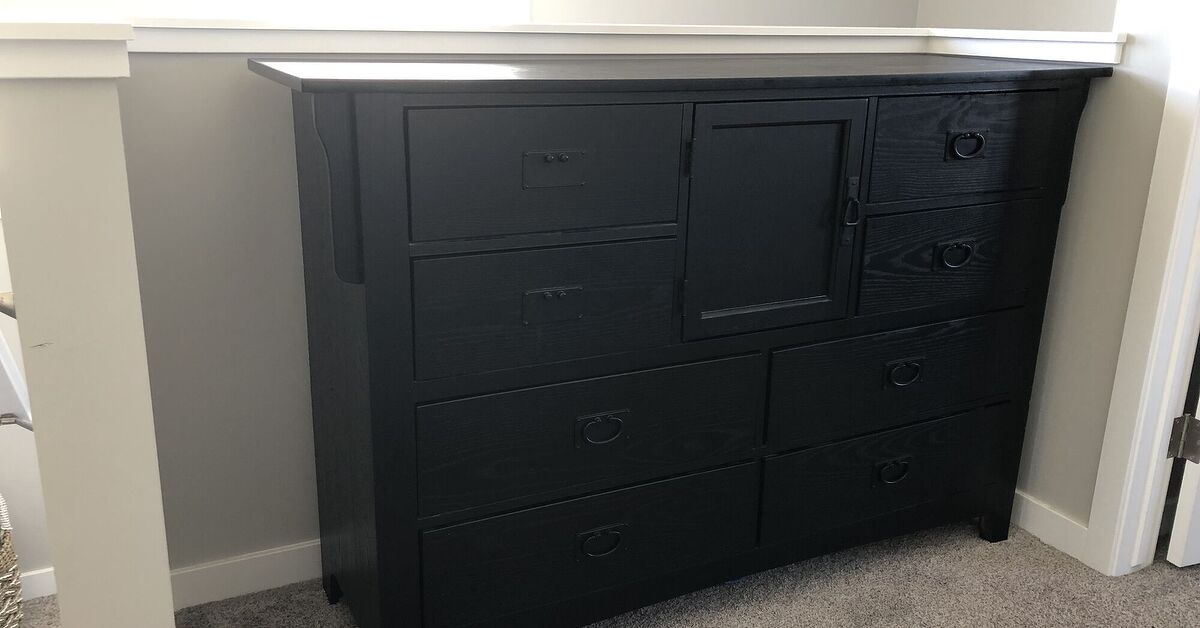
An old dresser may look like it is one wobbly drawer away from retirement, but do not schedule the curbside pickup just yet. With thoughtful repairs, a durable finish, and a smarter storage plan, that forgotten bedroom relic can become a hardworking laundry station with drawers, shelving, and a generous folding surface.
This project is especially useful in laundry rooms where builder-grade storage is scarce, custom cabinetry is expensive, and detergent bottles have somehow formed their own disorganized neighborhood. Instead of buying another piece of disposable furniture, you can repurpose an old dresser into a practical command center for washing, drying, folding, sorting, stain treatment, and missing-sock investigations.
Why an Old Dresser Makes a Great Laundry Station
A dresser already contains most of what a functional laundry room needs: a flat work surface, enclosed storage, multiple organizational zones, and enough visual weight to make the space feel intentional. The drawers can hold towels, cleaning cloths, ironing supplies, garment bags, extra hangers, and seasonal linens. The top becomes a folding counter or a place for laundry baskets.
Repurposed furniture is also flexible. You can keep every drawer, remove several drawers to create open shelves, add baskets, install dividers, or combine closed and open storage. Unlike fixed cabinetry, the design can be adapted to the way your household actually handles laundry.
There is an environmental benefit, too. Furniture upcycling keeps a usable piece out of the waste stream while reducing the demand for a newly manufactured replacement. Better still, older solid-wood dressers are often sturdier than inexpensive modern storage units. Some are built like small barns, which is excellent news unless you need to carry one upstairs.
Evaluate the Dresser Before Starting
Check the Frame and Drawer Structure
Begin with an honest inspection. Push gently on the corners to determine whether the dresser rocks or twists. Examine the joints, drawer runners, back panel, feet, and underside. Loose joints can often be repaired with wood glue, clamps, screws, or replacement corner blocks. A dresser with extensive rot, active mold, severe insect damage, or a collapsing frame is not a charming restoration opportunity. It is firewood with hardware.
Solid wood is usually the easiest material to repair and refinish. Wood veneer can also work well, but aggressive sanding may cut through the thin decorative layer. Laminate and medium-density fiberboard require careful cleaning, light scuffing, and a bonding primer designed for slick surfaces.
Measure the Dresser and the Laundry Room
Measure the dresser’s width, depth, and height, including any decorative top overhang. Then measure the intended location, nearby doors, appliance clearances, utility connections, dryer vents, and walking paths. Confirm that the drawers can open fully without striking a washer, door, wall, or laundry basket.
Also consider working height. A dresser that is approximately counter height can make a comfortable folding station. A lower dresser may still work, but adding sturdy feet or a properly constructed base can reduce bending. Do not balance the furniture on improvised blocks just to gain a few inches. Laundry day is irritating enough without furniture gymnastics.
Investigate Old Paint Before Sanding
If the dresser has an old or unknown painted finish, especially one that is chipped or heavily layered, consider testing it for lead before scraping or sanding. Disturbing lead-containing coatings can create hazardous dust. Use an appropriate test method and follow lead-safe procedures, or consult a qualified professional when the finish is questionable. Never attack mysterious vintage paint with a power sander simply because a makeover video made it look therapeutic.
Choose the Best Laundry Station Layout
Option 1: Keep All the Drawers
This is the simplest conversion. Repair the dresser, refinish it, protect the top, and assign each drawer a purpose. It provides the greatest amount of concealed storage and keeps colorful packaging from making the room look like a grocery-store aisle.
Use the upper drawers for frequently used but nonhazardous supplies, such as dryer balls, stain-removal brushes, clothespins, mesh wash bags, and reusable cleaning cloths. Lower drawers are ideal for heavier items, folded towels, spare linens, or empty laundry bags. Keeping weight low also improves stability.
Option 2: Create Open Shelves
For a lighter, more modern appearance, remove one or two drawer boxes and install fixed shelves in the openings. The original drawer supports may need to be removed or modified. Cut plywood or edge-glued boards to fit, secure them to cleats, fill exposed holes, and finish the shelves to match the dresser.
Open cubbies are convenient for baskets labeled “Whites,” “Delicates,” “To Fold,” or “Things Everyone Claims Are Not Theirs.” Choose baskets that slide easily without scraping the finish. Leave enough space above each basket to lift it out comfortably.
Option 3: Build a Sorting Station
A wide dresser can become a family sorting station by removing several lower drawers and adding divided compartments for hampers. Before making structural cuts, verify that the drawer dividers are not supporting the frame. Add reinforcing rails or plywood panels where necessary.
Individual baskets can be assigned by color, fabric type, or family member. This reduces floor clutter and makes it easier to move completed loads out of the laundry room before they become permanent residents.
Tools and Materials
Your exact supply list will depend on the dresser’s condition and your preferred finish, but a typical project may require:
- Screwdrivers, drill, clamps, and basic hand tools
- Mild detergent, clean cloths, and a degreasing cleaner suitable for the surface
- Wood glue, wood filler, putty knife, and replacement screws
- Medium- and fine-grit sandpaper or sanding sponges
- Primer compatible with wood, veneer, laminate, or MDF
- Durable furniture or cabinet paint
- Brushes and a small foam or microfiber roller
- Clear protective topcoat or a separate sealed wood countertop
- Replacement knobs, pulls, drawer liners, labels, and baskets
- An anti-tip furniture anchoring kit
- Protective eyewear, gloves, and appropriate respiratory protection
How to Turn an Old Dresser Into a Laundry Station
Step 1: Remove the Hardware and Drawers
Take out every drawer and remove the knobs, pulls, and other detachable hardware. Label the drawers with painter’s tape so they return to their original openings. Older dressers are not always perfectly symmetrical, and drawer number three may refuse to cooperate when inserted into opening number five.
Store screws and small hardware in labeled bags or containers. If the existing hardware will be reused, clean it according to its material. Warm soapy water may be enough for many pieces, while brass, plated metal, and painted hardware may require more specialized care.
Step 2: Clean Every Surface
Vacuum dust from the interior, drawer cavities, underside, and back. Wash the exterior with a mild cleaning solution that removes dirt, grease, furniture polish, and laundry-room residue. Pay particular attention to the top and drawer pulls, where oils accumulate.
Rinse away cleaner residue when required and allow the dresser to dry completely. Paint applied over moisture, grease, or silicone-based polish may peel, separate, or develop crater-like defects. Those defects have a technical name among frustrated DIYers: “Why did I think this would be easy?”
Step 3: Make Structural Repairs
Reglue loose joints and clamp them until cured. Replace missing drawer stops, repair runners, tighten fasteners, and reinforce a flimsy back panel. Fill gouges, abandoned hardware holes, and deep scratches with a compatible wood filler. Allow the filler to dry before sanding it flush.
If the top is badly damaged, consider covering it with a fitted wood panel rather than spending hours chasing every stain. A sealed butcher-block-style top, plywood panel with finished edges, or edge-glued wood board can create a durable folding surface while hiding decades of cosmetic drama.
Step 4: Modify the Storage Configuration
Complete any shelf, cubby, divider, or hamper modifications before painting. Dry-fit all new components and test drawer movement. When adding shelves, use adequately sized cleats and fasteners rather than relying on glue alone. Sand cut edges, fill fastener holes, and slightly ease sharp corners.
A removable shelf liner can protect drawers from spills and lint. Drawer dividers help prevent small items from forming one large miscellaneous pile, which is the natural final stage of every unorganized drawer.
Step 5: Sand Without Overdoing It
For a sound painted or clear-coated surface, the goal is often to dull the sheen and create adhesion rather than strip the furniture to bare wood. Use medium-grit paper for repairs and rough areas, followed by fine-grit paper for smoothing. Sand in the direction of the grain when working with exposed wood.
Be gentle with veneer. Once you sand through it, the project changes rapidly from “easy dresser makeover” to “creative use of strategically placed baskets.” Vacuum the dust and wipe the surface with a clean, lint-free cloth or tack cloth appropriate for the chosen finish.
Step 6: Apply the Right Primer
Primer improves adhesion, creates a more uniform base, and can help block stains or wood tannins. Bare wood, repaired areas, dark stains, laminate, and MDF may require different primer formulations, so read the product instructions carefully.
Apply a thin, even coat with the grain. Avoid heavy buildup in corners and decorative details. After the primer dries for the manufacturer’s recommended time, lightly sand rough areas with fine-grit paper and remove all dust. A second primer coat may be useful when stains continue to bleed through.
Step 7: Paint in Thin Coats
Use durable furniture, cabinet, or trim paint suitable for an interior utility space. Satin and semi-gloss finishes are popular because they are easier to wipe clean than flat paint. Apply paint with a quality brush around edges and details, then use a small roller on broad surfaces for a smoother appearance.
Two thin coats usually perform better than one thick coat. Follow the specified drying and recoating times. Paint may feel dry to the touch long before it has fully cured, so resist the urge to load the drawers with detergent bottles the same evening.
Step 8: Protect the Folding Surface
The dresser top will encounter damp clothing, leaking bottles, baskets, zippers, and the occasional cup of coffee that wandered into the laundry room. Protect it with a compatible clear finish or install a separately sealed wood top. Apply clear coats in the direction of the grain, allowing each coat to dry before lightly sanding and recoating when instructed.
A removable waterproof mat can add protection beneath frequently used supplies. Wipe up spills promptly and keep the dresser away from plumbing leaks or direct water exposure. A protective finish is durable, not magical.
Step 9: Add Hardware and Anchor the Dresser
Reinstall the original hardware or replace it with pulls that are easy to grip. Long bar pulls provide a modern look, while cup pulls complement farmhouse and vintage styles. Confirm that replacement screws are the correct length so they do not protrude into the drawer.
Once the station is in its final position, attach it securely to a wall stud using an appropriate anti-tip system. Drawers change the furniture’s center of gravity when opened, and a loaded top can add more weight. Anchoring is particularly important in homes with children, pets, or adults who occasionally use furniture as an emergency ladder despite owning an actual step stool.
Organize the Finished Laundry Station Safely
Organization should follow the order of your laundry routine. Place pretreatment tools near the sorting area, washing supplies near the washer, and dryer accessories near the dryer. Keep everyday items within easy reach and reserve lower or less convenient drawers for backups and seasonal supplies.
Keep detergents, bleach, stain removers, and liquid laundry packets in their original labeled containers. Store them out of the sight and reach of children and pets, preferably in a high or locked cabinet. Although transferring detergent into matching glass jars may look attractive in photographs, it can remove essential instructions and make hazardous products resemble food or candy.
Use separate labeled drawers or baskets for:
- Mesh bags and delicate-washing supplies
- Dryer balls, clothespins, and reusable dryer sheets
- Ironing accessories and garment-care tools
- Cleaning cloths and utility towels
- Extra hangers and folding boards
- Items waiting for mending or stain treatment
- Small objects removed from pockets
A shallow container for pocket discoveries is surprisingly useful. Coins, receipts, toy parts, hair ties, and mysterious screws can wait there until someone identifies them or the household agrees they have become artifacts.
Design Ideas for a More Finished Look
Create Contrast With a Natural Wood Top
Paint the dresser body and preserve or add a stained wood top. The combination brings warmth to a utility room and makes the folding area visually distinct. A medium or dark stain can hide minor wear, while a lighter natural finish complements airy farmhouse, Scandinavian, and coastal interiors.
Use Color to Wake Up a Small Room
Laundry rooms are ideal places to try color because they are typically separate from the main living area. Deep green, navy, warm blue, muted terracotta, and soft yellow can turn an ordinary dresser into a focal point. White and pale gray create a cleaner, brighter effect but may show scuffs sooner.
Add Labels Without Making the Room Feel Industrial
Small metal label holders, removable vinyl lettering, chalkboard tags, or simple printed labels can keep the drawers organized. Use broad categories rather than assigning a label to every individual object. An organizational system should save time, not require a database administrator.
Use the Wall Above the Dresser
The wall above the new laundry station can provide additional vertical storage. Install shelves, hooks, a hanging rod, or a wall-mounted drying rack while leaving comfortable working space over the dresser. Frequently used items can remain accessible, while decorative baskets conceal backups and less attractive supplies.
Common Mistakes to Avoid
- Skipping the inspection: Paint cannot stabilize broken joints or repair water-damaged particleboard.
- Ignoring ventilation and utilities: Never position the dresser where it blocks a dryer vent, shutoff valve, outlet, drain, or appliance service access.
- Painting over furniture polish: Wax, oil, and silicone residue can prevent proper adhesion.
- Sanding veneer too aggressively: Thin veneer can disappear faster than expected.
- Using the wrong primer: Slick laminate and stain-prone wood need compatible products.
- Loading uncured paint: Drawers and baskets can stick permanently to a finish that has not hardened.
- Placing hazardous products in decorative jars: Keep chemical products in their original labeled packaging.
- Forgetting the wall anchor: A repurposed dresser remains a dresser and should be secured against tipping.
What the Project Experience Really Feels Like
The most important lesson from turning an old dresser into a laundry station is that preparation takes longer than painting. The glamorous portion of the project may involve choosing a color and attaching beautiful hardware, but most of the real work happens while cleaning grime from corners, repairing loose drawers, and wondering why one screw appears to have been installed during the Lincoln administration.
On an early furniture conversion, I assumed the dresser needed only a quick sanding and two coats of paint. The surface looked clean, so I skipped a serious degreasing step. The first coat developed small patches where the paint refused to level. The problem was probably years of furniture polish and hand oils. I had to stop, sand the affected areas, clean everything properly, reprime, and begin again. The experience was annoying, but it permanently cured me of believing that “looks clean” and “is ready for paint” mean the same thing.
Drawer fit can also become an unexpected adventure. Older wooden drawers often fit only one opening because the frame has shifted slightly over time. Labeling each drawer seems unnecessarily fussy until the final assembly, when an unlabeled drawer sticks halfway and refuses to move in either direction. A small strip of numbered painter’s tape saves a remarkable amount of muttering.
Another lesson involves storage planning. It is tempting to design the dresser around attractive baskets before measuring the objects that must actually fit. In practice, laundry supplies come in awkward shapes. Irons are tall, detergent bottles are heavy, hangers are wide, and drying racks behave as if they resent being stored anywhere. Inventorying the supplies first produces a much more useful layout.
Removing a few drawers to make open cubbies can be a great decision, but only when the dresser remains structurally sound. In one conversion, the horizontal rails between the drawers contributed more support than expected. After removing them, the front of the dresser flexed. Reinforcing the opening with internal cleats and a fixed plywood shelf corrected the problem. That experience reinforced a basic DIY rule: before cutting something out, determine what it has been quietly holding together.
The finishing stage rewards patience more than talent. Thin coats look unimpressive while they are being applied, but they level better and cure more reliably. Thick coats appear efficient until they sag around corners, remain soft for days, or glue the drawers shut. Allowing generous drying and curing time produces a finish that survives baskets, bottles, and damp towels rather than merely surviving the project photograph.
The protected top is usually the hardest-working part of the completed station. A sealed wood panel can transform a scarred dresser while providing a smooth surface for folding. I prefer a top with a slight overhang because it visually unifies the piece and protects the painted edges below. However, the overhang should not interfere with doors, appliance lids, or walking space.
Finally, the project succeeds when the storage system reflects real habits rather than an imaginary version of the household. If everyone drops dirty cleaning cloths beside the washer, give those cloths a basket beside the washer. If clean clothes regularly wait for different family members, assign each person a drawer or removable bin. Practical placement beats perfect styling every time.
The completed dresser may not make anyone fall passionately in love with laundry. That would be an unreasonable burden for one piece of furniture. It can, however, reduce clutter, create a reliable folding surface, and make supplies easier to find. When an old dresser performs those jobs while looking significantly better than it did in the garage, the makeover has earned all three exclamation points.
Conclusion
An old dresser turned laundry station is a practical furniture upcycling project that combines storage, organization, and style. The best results begin with a stable piece, careful measurements, appropriate surface preparation, structural repairs, and a finish durable enough for a busy utility room.
Customize the drawers and shelves around your household’s routine, protect the folding surface, store laundry chemicals safely, and anchor the completed furniture to the wall. With those details handled, a tired dresser can become one of the most useful pieces in the roomand avoid an undignified final trip to the curb.
SEO Information
Editorial note: This original article synthesizes practical guidance from established U.S. resources covering furniture upcycling, laundry organization, surface preparation, wood finishing, cleaning-product storage, lead safety, and furniture anchoring. Sources reviewed included This Old House, Family Handyman, Better Homes & Gardens, HGTV, Lowe’s, The Home Depot, the U.S. Environmental Protection Agency, the U.S. Consumer Product Safety Commission, Sherwin-Williams, Minwax, the American Cleaning Institute, and Real Simple.














