
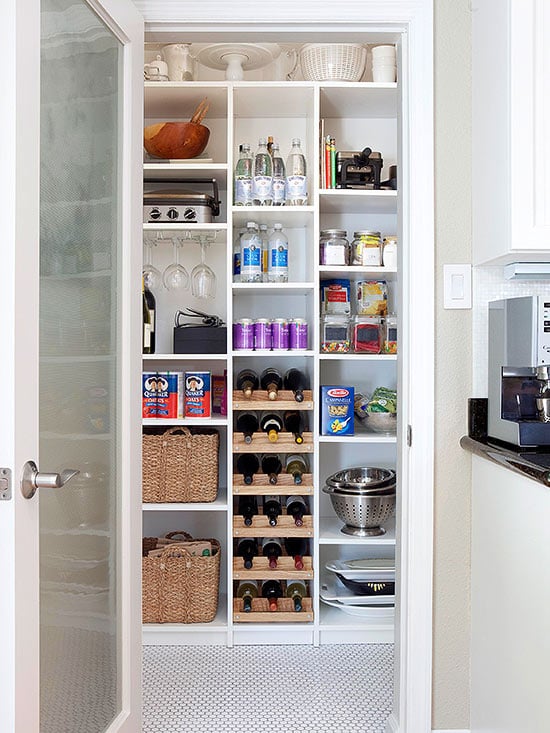
A smart pantry is not about owning 47 matching jars, a label maker with its own emotional support group, or a kitchen that looks like it was designed by a minimalist monk. It is about one simple thing: being able to find the rice before the water boils, the cinnamon before the cookies become “mystery spice bars,” and the extra can of tomatoes before you buy three more.
Pantry organization can save money, reduce food waste, make meal prep faster, and lower the daily kitchen chaos level by at least one dramatic sigh. Whether you have a walk-in pantry, one lonely cabinet, a few shelves, or a corner of the laundry room doing double duty, the right system can turn cluttered food storage into a practical, easy-to-maintain space.
The best pantry organization ideas are not just pretty; they are functional. They help you see what you own, use older food first, protect dry goods from pests, and build grocery lists that do not accidentally include your sixth bottle of soy sauce. These seven tips for smart pantry organization will help you create a pantry that works for real life, real meals, and real humans who sometimes shove granola bars onto a shelf while holding a phone, a grocery bag, and a half-eaten apple.
Why Smart Pantry Organization Matters
A disorganized pantry creates small problems that quietly become expensive ones. Food gets buried. Open packages go stale. Duplicate purchases pile up. Ingredients expire before you remember they exist. And when cooking feels inconvenient, takeout suddenly starts looking like a reasonable financial plan.
A well-organized pantry improves visibility, protects ingredients, and makes your kitchen easier to use. It also helps with food safety. Shelf-stable foods such as pasta, rice, canned goods, flour, sugar, oils, and spices can be stored at room temperature, but they still need proper conditions: cool, dry, clean spaces; tightly closed containers; and regular checks for damage, pests, or spoilage. Smart pantry organization is partly about beauty, but mostly about preventing your crackers from becoming a tiny insect hotel.
1. Empty the Pantry Before You Organize It
The first step in pantry organization is the least glamorous and the most important: take everything out. Yes, everything. Even that suspicious packet of taco seasoning from another era. You cannot organize around clutter and expect magic. A pantry reset works best when you start with a blank shelf and an honest look at what you actually own.
Sort Items Into Clear Categories
As you remove items, group them into categories such as baking supplies, breakfast foods, snacks, canned goods, pasta and grains, condiments, oils, spices, beverages, and back stock. This makes it easy to see duplicates, identify what you use often, and separate foods that belong elsewhere.
Check packages as you sort. Toss anything that is spoiled, infested, leaking, swollen, badly dented, rusted, or clearly no longer safe to use. For many shelf-stable foods, printed dates often refer to best quality rather than immediate danger, but condition matters. If a can is bulging or leaking, it does not deserve a second chance. It deserves a direct trip out of your kitchen.
Clean Before You Put Food Back
Once the shelves are empty, vacuum crumbs, wipe surfaces, and clean corners where flour dust, rice grains, and snack crumbs love to gather. Crumbs invite pantry pests, and pests are not charming little roommates. Let shelves dry completely before restocking. If you use shelf liners, choose ones that are easy to wipe clean and do not trap moisture.
2. Create Pantry Zones Based on How You Cook
Pantry zones are the secret behind a pantry that stays organized longer than one grocery trip. Instead of arranging food randomly, assign each area a job. Think of your pantry as a tiny grocery store designed just for your household.
Useful Pantry Zones to Try
Common pantry zones include a breakfast zone, snack zone, baking zone, dinner staples zone, canned goods zone, spices and seasonings zone, and back-stock zone. If you have children, a low snack shelf can make mornings and lunch packing easier. If you cook often, keep oils, grains, canned tomatoes, broths, and everyday seasonings close together.
The best pantry layout reflects your routine. A household that makes smoothies every morning may need a breakfast station with oats, protein powder, nut butter, and dried fruit. A family that cooks pasta twice a week may want noodles, sauces, canned tomatoes, and Parmesan crisps in one easy-to-grab section. Your pantry should support how you actually eat, not how an imaginary cooking show host eats.
Keep Frequently Used Items at Eye Level
Put everyday foods where you can see and reach them. Heavy items should sit lower, lightweight extras can go higher, and rarely used ingredients can live in less convenient spots. This small placement rule prevents both frustration and the dangerous sport of balancing on tiptoe while reaching for a glass jar of flour.
3. Use Clear Containers, Bins, and Baskets Wisely
Clear containers are popular for a reason: they let you see what you have. Pasta, rice, cereal, flour, sugar, oats, lentils, beans, nuts, and snack mixes are easier to track when they are not hidden inside half-empty bags and floppy boxes. Airtight containers also help protect dry goods from moisture, air, and pests.
Decant Only What Makes Sense
You do not need to decant every single food item. Nobody is grading your pantry from a helicopter. Decant foods you buy often, use often, or struggle to store neatly. Keep cooking instructions, nutrition details, or expiration information by cutting the label from the original package and taping it to the back or bottom of the container.
For loose packets, snack bars, seasoning envelopes, baking decorations, and small bags, bins are often better than jars. Use clear bins when visibility matters and opaque baskets when you want to hide visual clutter. A basket labeled “snacks” can make a shelf look calm even if it contains pretzels, applesauce pouches, and one emotionally important chocolate bar.
Choose Containers That Fit Your Shelves
Before buying containers, measure shelf height, depth, and width. Many pantry makeovers fail because the containers are attractive but too tall, too wide, or impossible to stack. Square or rectangular containers usually use space better than round ones. Stackable containers can help in small pantries, but avoid stacking too high if you need to move three containers just to get to rice.
4. Label Everything That Needs a Home
Labels are not just decorative. They tell everyone in the household where items belong. Without labels, pantry organization slowly turns into a food-based guessing game. With labels, pasta returns to pasta, snacks return to snacks, and the baking shelf does not mysteriously become home to barbecue sauce.
Label Containers and Shelves
Label airtight containers with the food name and, when useful, the purchase date or best-by date. Label bins by category: “Breakfast,” “Baking,” “Kids’ Snacks,” “Canned Beans,” “Grains,” “Sauces,” or “Back Stock.” Shelf labels are especially helpful because they create a map. Even when the bin is out, the shelf still says what belongs there.
Removable labels, chalk labels, dry-erase labels, masking tape, or simple paper labels can all work. The goal is not perfection. The goal is maintenance. A clear label that your family actually follows is better than a beautiful label that says “artisanal legumes” and confuses everyone.
5. Follow the First-In, First-Out Rule
The first-in, first-out rule is simple: older food goes in front, newer food goes behind it. Grocery stores use this system because it works, and your pantry can benefit from it too. When you bring home a new box of pasta, place it behind the older box. When you buy canned beans, rotate the older cans forward.
Create a Use-First Area
Set up a small “use first” bin for foods nearing their best quality date, open packages, or ingredients you want to finish soon. This prevents the dreaded pantry archaeology moment when you discover three open bags of rice, two stale sleeves of crackers, and a jar of almond butter that has seen things.
A use-first bin can also inspire meal planning. If it contains canned chickpeas, coconut milk, and rice noodles, dinner may become curry. If it contains oats, raisins, and walnuts, breakfast cookies might suddenly feel like a responsible life choice.
Do Not Overbuy Just Because There Is a Sale
Bulk buying can save money, but only if you have space and will actually use the food. Stocking twenty cans of something your family dislikes is not preparedness; it is a very slow argument with your future self. Buy extras of foods you love, use regularly, and can store safely.
6. Maximize Vertical and Hidden Space
Many pantries do not need more square footage. They need smarter use of vertical space. Shelf risers, stackable bins, turntables, tiered can organizers, pull-out drawers, and door racks can make a small pantry feel dramatically larger.
Use Shelf Risers and Tiered Organizers
Shelf risers create a second level for cans, jars, mugs, spices, or small boxes. Tiered organizers are helpful for canned goods and spices because they let you see items in the back. Without tiers, small jars hide behind taller jars, and suddenly you own four containers of cumin.
Add Turntables for Bottles and Jars
Turntables, often called lazy Susans, are ideal for oils, vinegars, sauces, nut butters, honey, and condiments. Instead of knocking over half the shelf to reach sesame oil, you spin the tray and feel like the pantry has finally decided to cooperate.
Use the Door Carefully
If your pantry has a door, use it for lightweight items such as spices, packets, snacks, wraps, foil, or small bottles. Avoid overloading the door with heavy glass jars or bulky cans unless the rack is designed for the weight. A pantry door should open smoothly, not announce itself with the sound of falling lentils.
7. Build a Simple Maintenance Routine
Pantry organization is not a one-time project. It is a small habit. The good news is that maintenance takes much less time than a full pantry rescue mission. A few minutes each week can keep your system from collapsing into snack rubble.
Reset After Grocery Shopping
When you unpack groceries, place new items in their zones, rotate older foods forward, refill containers, and update the use-first bin. Break down bulky packaging when it wastes space. For example, remove granola bars from a giant cardboard box and place them in a snack bin so you can see the actual quantity.
Do a Monthly Mini-Check
Once a month, scan shelves for spills, crumbs, open packages, duplicates, and foods that should be used soon. Wipe sticky spots immediately. Check flour, grains, cereal, nuts, dried fruit, pet food, and birdseed for signs of pantry pests. Store susceptible foods in tightly sealed glass, metal, or heavy plastic containers.
A quarterly deeper clean is also useful. Pull out bins, vacuum corners, check dates, and adjust zones if your habits have changed. Pantry systems should evolve. If your “healthy snack” bin becomes a museum of rejected protein bars, it is time to rethink what your household actually eats.
Smart Pantry Organization for Small Spaces
Small pantries need ruthless practicality. Use narrow bins, shallow baskets, stackable containers, risers, and door organizers. Store only what you can see and use. If an item is rarely needed, consider moving it to a secondary storage area, such as a utility shelf, basement cabinet, or kitchen cart.
For apartment kitchens or homes without a pantry, create a pantry zone in a cabinet, bookcase, rolling cart, or freestanding storage unit. Keep it tidy with the same rules: categories, containers, labels, and regular resets. A pantry does not have to be built-in to be brilliant.
Common Pantry Organization Mistakes to Avoid
Buying Organizers Before Decluttering
Containers do not solve clutter; they simply make clutter more expensive. Always sort and measure first, then buy only what fits your food and shelves.
Ignoring Food Safety
A beautiful pantry still needs clean shelves, sealed containers, and regular checks for pests, leaks, moisture, and damaged packaging. Pretty jars cannot rescue spoiled food.
Making the System Too Complicated
If the system requires a 12-step ritual to put away crackers, it will fail. Keep zones broad, labels clear, and everyday items easy to reach.
Stocking Food You Do Not Eat
A pantry should support your meals, not your fantasy version of yourself who makes lentil stew every Tuesday. Buy what fits your real cooking habits.
of Real-Life Experience: What Smart Pantry Organization Actually Feels Like
The biggest lesson from organizing a pantry is that the “perfect” pantry is usually not the one that stays perfect. It is the one that recovers quickly after real life happens. A real pantry gets rushed after grocery shopping. It gets raided during late-night snack missions. Someone will put cereal in the pasta zone. Someone else will open a new jar of peanut butter even though there is already one open. This is not failure. This is proof that people live in the house.
In practice, smart pantry organization works best when it removes tiny decisions. When breakfast foods are together, mornings are easier. When dinner staples are grouped, weeknight cooking feels less like a scavenger hunt. When snacks are visible, people stop opening five boxes just to find one granola bar. A pantry system should quietly answer the question, “Where does this go?” without requiring a family meeting.
One useful experience is starting with a “messy middle” stage. When everything comes out of the pantry, the kitchen may look worse before it looks better. This is normal. You may discover duplicates you did not expect: three bags of brown sugar, four types of pasta, two unopened jars of paprika, and enough tea to host a polite British ghost. Instead of feeling guilty, treat those discoveries as useful information. They show what you buy automatically, what you forget you own, and what needs a clearer home.
Another practical lesson is that clear containers are wonderful, but they are not magic. They work best for foods that are opened often or stored awkwardly in bags. Flour, sugar, oats, rice, pasta, and cereal are excellent candidates. But if you buy a specialty ingredient once a year, it may be better left in its original package inside a labeled bin. Decanting everything can create extra work, and extra work is the enemy of long-term organization.
Labels also become more important over time. At first, you may think, “Of course I know where the snacks go.” But two weeks later, after a busy grocery trip, labels become the quiet little traffic signs that keep the pantry from turning chaotic again. Shelf labels are especially helpful for shared kitchens because they make the system visible to everyone, not just the person who created it.
The most satisfying part of pantry organization is how quickly it changes daily cooking. You start using what you own. You plan meals around the use-first bin. You stop buying duplicates because you can see your inventory. You waste less food because older items are in front. You may even feel a tiny spark of joy when you open the pantry door and nothing falls out. That spark counts. In the kitchen, peace is sometimes spelled “l-a-b-e-l-e-d b-i-n.”
Conclusion
Smart pantry organization is not about creating a showroom. It is about building a pantry that helps you cook, shop, and store food with less stress. Start by emptying and cleaning the pantry, then create practical zones, use clear containers and bins, label everything, rotate older foods forward, maximize vertical space, and maintain the system with quick resets.
The best pantry is easy to understand at a glance. It keeps everyday foods within reach, protects ingredients from pests and staleness, and helps you avoid buying what you already own. Most importantly, it fits your real life. A smart pantry does not judge your snack shelf. It simply makes sure you can find it.
Note: This article is written from synthesized pantry organization, home storage, food safety, and food-waste reduction guidance from reputable U.S. consumer, home, university extension, and government resources.













