
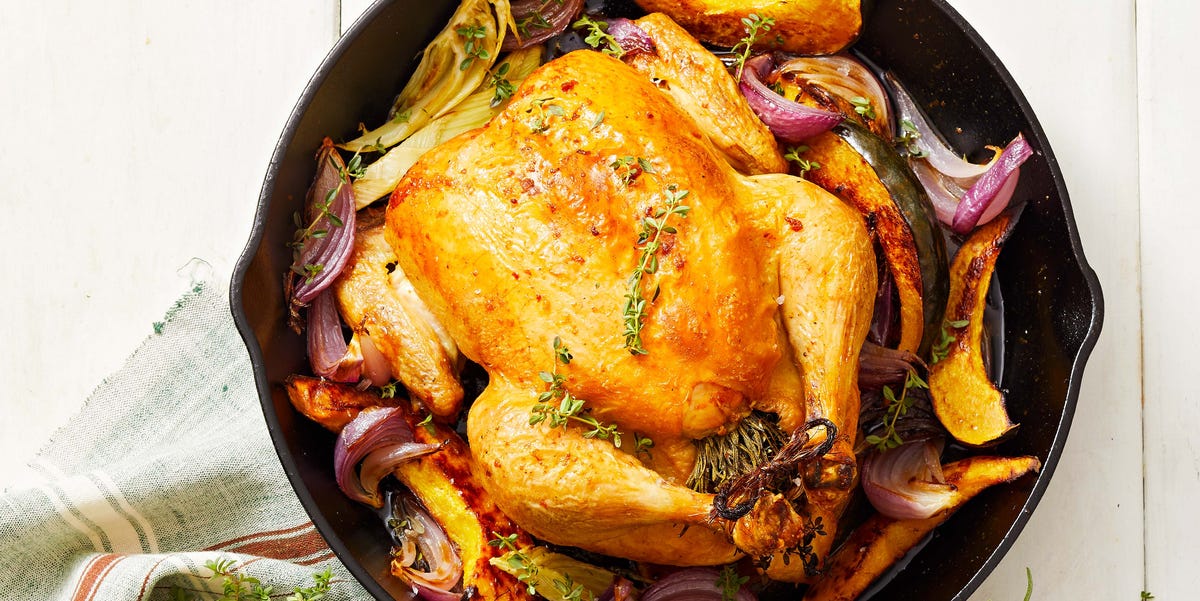
A beautifully roasted chicken is the little black dress of home cooking: classic, reliable, and appropriate for almost every occasion. This skillet roasted chicken recipe gives you crisp, golden skin, juicy meat, caramelized vegetables, and a bright lemon-herb pan sauceall with one oven-safe skillet and no ceremonial basting marathon.
The method combines the concentrated browning power of a heavy skillet with the steady heat of the oven. In culinary terms, pan roasting uses direct heat to develop color before or during oven roasting, creating a flavorful exterior while the interior cooks evenly. In practical terms, it means your chicken tastes like you worked much harder than you actually did.
Why This Is the Best Skillet Roasted Chicken Recipe
There are hundreds of ways to roast a chicken, ranging from brilliantly simple to “please prepare three marinades and locate a medieval poultry hook.” This version stays firmly on the practical side.
A preheated cast-iron skillet retains heat exceptionally well and begins browning the bottom of the chicken as soon as it touches the pan. That direct contact helps prevent the pale, soft underside sometimes produced by a room-temperature roasting dish.
This recipe delivers:
- Golden, crisp chicken skin without constant basting
- Moist breast meat and tender, flavorful thighs
- Potatoes and onions cooked in savory chicken drippings
- A simple lemon-Dijon pan sauce
- Minimal cookware and easier cleanup
- A dependable meal for Sunday dinner or a weeknight splurge
Skillet Roasted Chicken Recipe at a Glance
- Prep time: 25 minutes
- Optional dry-brining time: 4 to 24 hours
- Cooking time: Approximately 50 to 65 minutes
- Resting time: 15 minutes
- Total active time: About 35 minutes
- Servings: 4 to 6
- Best skillet: 12-inch cast-iron or heavy oven-safe skillet
- Oven temperature: 425°F
Ingredients for Skillet Roasted Chicken
For the chicken
- 1 whole chicken, approximately 4 to 4 1/2 pounds
- 2 teaspoons kosher salt, plus more as needed
- 1 teaspoon freshly ground black pepper
- 1 teaspoon smoked or sweet paprika
- 1 teaspoon garlic powder
- 1 tablespoon olive oil
- 2 tablespoons unsalted butter, softened
- 1 tablespoon chopped fresh thyme
- 1 tablespoon chopped fresh rosemary
- 1 lemon
- 1 head garlic, halved crosswise
For the vegetables
- 1 pound baby Yukon Gold potatoes, halved
- 1 medium yellow onion, cut into thick wedges
- 2 medium carrots, cut into 1-inch pieces
- 1 tablespoon olive oil
- 1/2 teaspoon kosher salt
- 1/4 teaspoon black pepper
For the optional pan sauce
- 1/2 cup low-sodium chicken broth
- 1 teaspoon Dijon mustard
- 1 tablespoon fresh lemon juice
- 1 tablespoon cold unsalted butter
- Salt and black pepper to taste
How to Make Skillet Roasted Chicken
Step 1: Dry the chicken thoroughly
Remove the chicken from its packaging and take out any giblets stored in the cavity. Do not rinse raw chicken; splashing water can spread bacteria onto nearby counters, utensils, and food. Pat the chicken dry inside and out with paper towels, then wash your hands and sanitize the work area.
Dry skin is essential because excess surface moisture must evaporate before browning can begin. A damp chicken steams first and crisps laterassuming it crisps at all.
Step 2: Season or dry-brine
Mix the kosher salt, black pepper, paprika, and garlic powder. Season the entire chicken, including the cavity and the area underneath the wings.
For the deepest seasoning and crispiest skin, place the seasoned chicken uncovered on a plate or rack in the refrigerator for 4 to 24 hours. This dry-brining period allows salt to penetrate the meat while the uncovered refrigerator air dries the skin.
No time for an overnight rest? Season the chicken 30 to 60 minutes before roasting. Dinner will still be excellent; the chicken simply missed its appointment at the luxury spa.
Step 3: Preheat the skillet and oven
Place a 12-inch cast-iron skillet on the center or upper-middle oven rack. Preheat the oven and skillet to 425°F for at least 20 minutes.
Make sure the skillet is genuinely oven-safe. A plastic handle at 425°F is not cookware; it is an upcoming household anecdote.
Step 4: Add the herb butter
Combine the softened butter with half of the chopped thyme and rosemary. Carefully loosen the skin over the chicken breasts with your fingers. Spread the herb butter underneath the skin, distributing it over the breast meat.
Rub the outside of the chicken with 1 tablespoon olive oil. Butter placed beneath the skin flavors and protects the breast, while oil on the exterior encourages browning without burning as quickly as exposed butter solids.
Step 5: Add the aromatics
Cut the lemon in half. Place one lemon half and both garlic-head halves loosely inside the cavity. Avoid packing the cavity tightly, which can slow cooking. Tie the legs loosely with kitchen twine if desired, or leave them untied to encourage faster heat circulation around the thighs.
Step 6: Arrange the chicken and vegetables
Toss the potatoes, onion, and carrots with olive oil, salt, and pepper. Wearing sturdy oven mitts, carefully remove the hot skillet from the oven.
Place the chicken breast-side up in the center of the skillet. Arrange the vegetables around it in a single layer. Keep as much of the skillet surface exposed as possible so the vegetables roast rather than simmer.
You should hear an immediate sizzle. That is the sound of your dinner developing self-confidence.
Step 7: Roast until golden and safely cooked
Return the skillet to the oven and roast for 50 to 65 minutes. Rotate the skillet after about 30 minutes if your oven browns unevenly. Stir or turn the vegetables carefully at the same time.
Begin checking the chicken early, especially if it weighs less than 4 pounds. Insert an instant-read thermometer into the thickest part of the breast and the innermost portion of the thigh without touching bone. USDA guidance recommends cooking all poultry to a minimum internal temperature of 165°F.
The breast should reach at least 165°F. The thighs may naturally climb to 170°F or slightly higher, where their connective tissue becomes especially tender. Do not rely solely on skin color, clear juices, or cooking time; a thermometer provides the most dependable answer.
Step 8: Rest the chicken
Transfer the roasted chicken to a cutting board. Rest it uncovered or very loosely tented with foil for 15 minutes before carving.
Resting gives the juices time to settle within the meat. Carve immediately and those juices will decorate the cutting board instead of flavoring your dinner.
Step 9: Finish the vegetables
Check the potatoes and carrots for tenderness. If they need more color, return the skillet to the oven while the chicken rests. Roast for another 8 to 12 minutes, stirring once, until browned around the edges.
Step 10: Make the lemon-Dijon pan sauce
Transfer the vegetables to a serving bowl, leaving approximately 1 tablespoon of rendered fat and the browned bits in the skillet. Spoon off excess fat if necessary.
Place the skillet over medium heat. Add the chicken broth and scrape up the flavorful browned bits with a wooden spoon. Simmer for 2 to 3 minutes, then whisk in the Dijon mustard and lemon juice.
Remove the skillet from the heat and swirl in the cold butter. Taste and adjust the salt, pepper, or lemon juice. Spoon the sauce over the carved chicken immediately before serving.
How to Get Extra-Crispy Chicken Skin
Start with a dry surface
Patting the chicken dry is not a fussy decorative step. Water inhibits browning, so removing surface moisture gives the skin a head start.
Season ahead when possible
An uncovered dry brine seasons the meat and dries the skin. Even four hours in the refrigerator can improve the final texture.
Use a hot, heavy skillet
Cast iron stores heat and transfers it directly to the chicken and vegetables. A heavy stainless-steel skillet also works, although browning may differ slightly.
Do not repeatedly open the oven
Basting looks impressive, but every open-door inspection releases heat and can extend the cooking time. USDA food-safety guidance also notes that frequent oven opening during basting lowers the oven temperature.
Avoid overcrowding the pan
Too many vegetables release moisture and trap steam. Use a large skillet and keep the vegetables in a loose single layer.
Broil only when necessary
If the meat is fully cooked but the skin needs more color, broil the chicken for 1 to 3 minutes. Watch continuously. The distance between “golden masterpiece” and “smoke detector solo” can be surprisingly short.
Should You Spatchcock the Chicken?
Spatchcocking means removing the backbone and flattening the bird before cooking. The flatter shape exposes more skin to heat and helps the breasts and legs cook more evenly. It can also shorten roasting time and produce especially crisp skin.
You can use the same seasoning mixture for a spatchcocked chicken. Roast it skin-side up in the preheated skillet, begin checking the temperature after 35 minutes, and cook until every tested section reaches a safe temperature.
The traditional whole-bird method looks more dramatic at the table. The spatchcocked version cooks more quickly. Choose based on whether your evening needs elegance or speed.
Common Skillet Roasted Chicken Mistakes
Using a chicken that is too large
A bird weighing around 4 to 4 1/2 pounds fits comfortably in a 12-inch skillet and cooks more evenly than a very large roasting chicken. A larger bird may require a longer cooking time and can crowd the vegetables.
Cooking by time alone
Chicken size, starting temperature, skillet material, and oven accuracy all affect cooking time. Use the clock as a guide and the thermometer as the decision-maker.
Touching bone with the thermometer
Bone can produce a misleading reading. Insert the probe into the thickest meat and reposition it to confirm the result.
Adding too much liquid
Wine, broth, and lemon juice are delicious, but adding them at the beginning can create steam and soften the skin. Save most liquid for the pan sauce.
Carving too soon
Rest the chicken for at least 15 minutes. Use that time to finish the vegetables, make the sauce, or stand near the oven looking deservedly accomplished.
Variations and Ingredient Substitutions
Garlic and lemon chicken
Increase the garlic to two heads and add finely grated lemon zest to the herb butter.
Smoky paprika chicken
Use smoked paprika, add 1/2 teaspoon ground cumin, and replace the rosemary with fresh oregano.
Honey-Dijon chicken
Mix 1 tablespoon Dijon mustard with 2 teaspoons honey. Brush it over the chicken during the final 10 minutes so the honey does not burn.
Italian-style skillet chicken
Season with garlic, rosemary, fennel seed, and crushed red pepper. Add fennel wedges and cherry tomatoes around the bird.
Chicken with crispy potatoes only
Skip the carrots and onion. Use 1 1/2 pounds of halved baby potatoes and toss them in the rendered drippings halfway through cooking.
Dairy-free option
Replace the butter under the skin with olive oil or a dairy-free cooking fat. Finish the pan sauce without butter or whisk in an additional spoonful of olive oil.
What to Serve With Skillet Roasted Chicken
Because the skillet already contains roasted vegetables, this meal needs very little supporting cast. A crisp green salad provides freshness, while crusty bread handles the important responsibility of collecting the pan sauce.
Other excellent side dishes include:
- Garlic mashed potatoes
- Roasted green beans
- Buttered peas with mint
- Simple arugula salad
- Honey-glazed carrots
- Creamy polenta
- Roasted Brussels sprouts
- Warm dinner rolls
How to Store and Reheat Leftover Roast Chicken
Remove the meat from the bones or refrigerate the carved pieces in a shallow airtight container. Store the chicken in the refrigerator and use it within three to four days.
For gentle reheating, place the chicken in a covered baking dish with a small splash of broth. Warm it in a 325°F oven until heated through. To revive the skin, uncover the dish during the final few minutes.
Leftover skillet roasted chicken is also excellent in chicken salad, sandwiches, tacos, soup, pasta, grain bowls, or a suspiciously luxurious midnight snack eaten beside the open refrigerator.
Save the bones for stock. Simmer them with onion, carrot, celery, herbs, and water, then strain. One roast chicken can quietly become several meals, which is the sort of kitchen mathematics everyone enjoys.
Frequently Asked Questions
Can I use a stainless-steel skillet?
Yes. Choose a heavy 12-inch stainless-steel skillet with an oven-safe handle. It may not retain heat exactly like cast iron, but it can still produce excellent results.
Can I roast chicken in a smaller skillet?
A 10-inch skillet may work for a chicken closer to 3 1/2 pounds, but the vegetables will be crowded. Roast the vegetables separately if necessary.
Do I need to sear the chicken on the stove first?
No. Preheating the skillet in a hot oven provides strong initial contact heat without requiring you to turn a whole chicken on the stovetop.
Why is my chicken skin not crispy?
The most common causes are wet skin, a cold pan, overcrowded vegetables, insufficient oven heat, or too much liquid in the skillet.
Can I prepare the chicken in advance?
Yes. Season it and refrigerate it uncovered for up to 24 hours. Prepare the herb butter separately and add it before roasting.
How do I know when roast chicken is done?
Use an instant-read thermometer in the thickest part of the breast and inner thigh, avoiding bone. Every checked area should reach at least 165°F under USDA guidance.
Practical Kitchen Experience: What Making Skillet Roasted Chicken Teaches You
The first lesson of skillet roasted chicken is that the simplest-looking recipes often reveal the most about your kitchen. A whole chicken, a few vegetables, salt, and heat do not provide many places for weak technique to hide. Fortunately, they also make improvement easy to notice.
One of the most common early experiences is discovering just how wet a packaged chicken can be. A quick pat with one paper towel is rarely enough. Drying every surface, including the folds near the legs and wings, makes a visible difference. The skin browns faster, the seasoning sticks more evenly, and the final texture becomes crisp rather than rubbery.
The next revelation usually involves salt. Chicken seasoned only seconds before roasting can taste flavorful on the surface but bland near the bone. Seasoning several hours ahead produces meat that tastes more consistently savory. It also removes some of the pressure to create an excessively salty sauce later.
Skillet size matters more than many cooks expect. When potatoes, carrots, onions, and chicken are packed together like rush-hour commuters, the vegetables release water and begin steaming. They remain soft and pale even though the chicken may cook correctly. Using a 12-inch skilletor moving some vegetables to a separate sheet pancreates better caramelization.
Another practical lesson is that ovens have personalities. Some run hot, some run cool, and some brown the left side of dinner as though they hold a personal grudge against the right. Rotating the skillet once can help, but an inexpensive oven thermometer offers even more useful information. When a chicken repeatedly cooks much faster or slower than expected, the recipe may not be the problem.
A meat thermometer quickly becomes the most valuable tool in this process. Visual signs can be misleading: deeply browned skin does not guarantee cooked meat, while a slight pink tone near a bone does not automatically prove the chicken is unsafe. Checking several locations removes the guessing game and makes future cooking more confident.
The resting period can feel painfully long when the kitchen smells like roasted garlic and rosemary. Yet carving too soon creates an immediate lesson: the cutting board floods with juice, and the breast meat seems drier than expected. Waiting 15 minutes improves the texture and conveniently provides enough time to turn the pan drippings into sauce.
Pan sauce is also where small adjustments become intuitive. Too rich? Add lemon. Too sharp? Swirl in butter. Too thin? Simmer another minute. Too salty? Add unsalted broth rather than more seasoning. This flexible finishing step teaches balance better than rigid measurements alone.
Finally, skillet roasted chicken teaches useful timing. During the second or third attempt, the process begins to feel less like a project and more like a routine: season the bird, heat the skillet, arrange the vegetables, roast, check, rest, and serve. The recipe becomes adaptable rather than intimidating.
That confidence is the real reason to master a whole roasted chicken. You gain a dependable centerpiece for family dinners, guests, meal preparation, and leftovers. The crisp skin and lemony sauce are excellent benefits, of course. But knowing that you can turn one humble chicken into a polished mealwithout dirtying every pan in the kitchenis even more satisfying.
Conclusion
The best skillet roasted chicken does not require complicated equipment or endless attention. Start with a manageable chicken, dry and season it thoroughly, use a hot oven-safe skillet, and confirm doneness with a food thermometer. The result is crisp skin, juicy meat, deeply browned vegetables, and a pan full of flavor ready to become sauce.
Once you understand the method, the recipe can follow the seasons. Add potatoes and rosemary in winter, fennel and lemon in spring, tomatoes and oregano in summer, or squash and sage in fall. The foundation stays dependable while the supporting flavors change.
This is the kind of recipe worth memorizing: impressive enough for company, practical enough for an ordinary evening, and generous enough to provide tomorrow’s lunch.
Note: This original article synthesizes established techniques and safety guidance from more than 10 reputable U.S. culinary and food-safety publications. Recipe wording and presentation have been written from scratch for web publication.













