
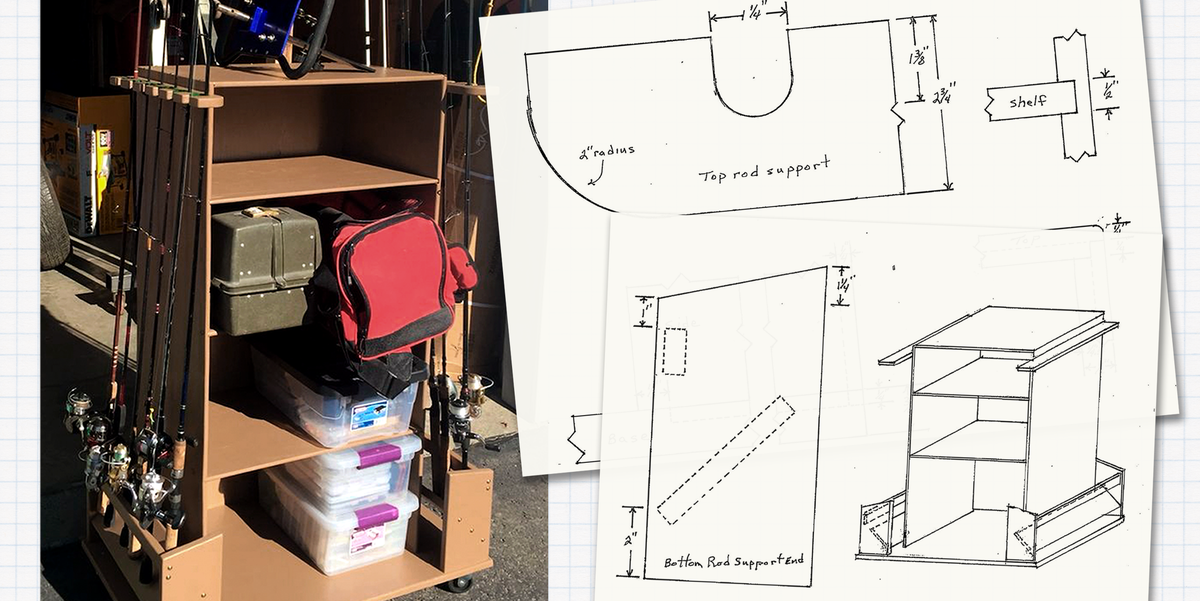
Every angler eventually reaches the same dramatic moment: the tackle box lid will not close, the crankbaits have formed a tiny barbed-wire rebellion, and the pliers have vanished into the same mysterious dimension that eats 10mm sockets. That is when a simple weekend project becomes a lifestyle upgrade: build a fishing tackle cabinet.
A well-designed fishing tackle cabinet does more than store lures. It protects hooks from rust, keeps soft plastics from melting into a colorful science experiment, gives rods and reels a safe home, and lets you find your favorite spinnerbait before the fish finish breakfast. Whether your gear lives in the garage, basement, mudroom, lake cabin, or boat shed, a custom cabinet can turn chaos into a clean, grab-and-go fishing station.
This guide walks through how to plan, design, build, finish, and organize a practical fishing tackle storage cabinet using common DIY materials. It is written for real people with real garages, real budgets, and at least one drawer full of mystery swivels.
Why Build a Fishing Tackle Cabinet Instead of Buying One?
Store-bought garage cabinets are useful, but fishing gear has special needs. Lures need divided storage. Rods need long, protected space. Reels need room so handles are not smashed. Spools of line should be kept out of direct sunlight. Hooks need secure compartments. Wet gear needs ventilation. And your “just a few extra baits” collection needs room to grow, because anglers are famously optimistic shoppers.
Building your own tackle cabinet allows you to customize every inch. You can include shallow drawers for terminal tackle, deep shelves for 3600 or 3700 utility boxes, pegboard doors for tools, vertical rod storage, a pull-out work tray, and even a small counter for tying leaders. Instead of forcing your fishing gear to fit a generic cabinet, you design the cabinet around the way you actually fish.
Planning Your Fishing Tackle Cabinet
Start With Your Gear, Not the Lumber
Before buying plywood, empty your current tackle boxes and sort everything into categories. This step is both useful and emotionally revealing. You may discover that you own 47 packs of green pumpkin soft plastics, three fish grippers, and a lure you bought in 2018 because “it looked lucky.” No judgment. The cabinet is here to help.
Group items into practical zones:
- Hard baits such as crankbaits, jerkbaits, topwaters, and swimbaits
- Soft plastics such as worms, craws, grubs, tubes, and creature baits
- Terminal tackle such as hooks, weights, swivels, snaps, beads, and split rings
- Tools such as pliers, scissors, hook files, scales, line cutters, and fish grips
- Line, leaders, scents, bobbers, floats, and specialty rigs
- Reels, spare spools, gloves, hats, rain gear, and small accessories
Once everything is sorted, measure the boxes and trays you already use. Many anglers build around standard utility boxes because they are durable, stackable, and easy to carry to the boat or bank. If your cabinet shelves are sized for those boxes from the beginning, the finished project will feel smart instead of improvised.
Choose the Right Location
The best location is dry, convenient, and easy to access before a trip. A garage wall near the door is excellent. A basement workshop works well if moisture is controlled. A lake cabin entry area can be perfect if the cabinet has doors to hide clutter. Avoid placing the cabinet where rain can blow in, where direct sunlight can bake fishing line, or where kids and pets can easily reach sharp hooks.
If the cabinet will be wall-mounted, make sure it can be fastened securely to wall studs. Fishing gear may look lightweight until you stack lead weights, reels, full tackle trays, and tools in one place. Suddenly your cabinet is not “just storage”; it is a small wooden gym membership.
Recommended Cabinet Design
A practical fishing tackle cabinet for most anglers can be built as a freestanding or wall-secured unit about 48 inches wide, 72 inches tall, and 18 inches deep. This size provides enough room for tackle trays, drawers, rods, and accessories without swallowing the whole garage.
Suggested Layout
- Top shelf: seasonal gear, spare reels, rain gear, hats, gloves, and extra line
- Middle shelves: labeled tackle boxes for hard baits, soft plastics, and terminal tackle
- Shallow drawers: hooks, weights, split rings, snaps, bobber stops, and small tools
- Pegboard door panels: pliers, scissors, lure retrievers, hook removers, and measuring tape
- Side rod rack: vertical slots or clips for rods and combos
- Bottom compartment: bulk plastics, tackle bags, waders, boots, or a small cooler
This layout works because it separates frequent-use items from backup gear. The items you grab every trip should live between waist and eye level. The items you use twice a year can live higher or lower. Your back will thank you, and so will your patience.
Materials and Tools
Materials
For a sturdy DIY fishing tackle cabinet, use 3/4-inch cabinet-grade plywood for the main case. It holds screws well, stays relatively flat, and is strong enough for shelves and drawers. For drawer bottoms and back panels, 1/4-inch plywood or hardboard can work well. If your cabinet will live in a damp garage or shed, choose materials carefully and seal all surfaces.
- 3/4-inch plywood for sides, shelves, top, bottom, and dividers
- 1/4-inch plywood or hardboard for cabinet back and drawer bottoms
- 1×2 hardwood or pine for face frame and trim
- Full-extension drawer slides for easy access
- Cabinet hinges for doors
- Pegboard panels for door interiors
- Screws, wood glue, brad nails, and pocket-hole screws if preferred
- Edge banding or trim for exposed plywood edges
- Primer, paint, polyurethane, or spar urethane depending on location
- Labels, bins, hooks, baskets, and utility boxes for organization
Tools
- Circular saw, table saw, or track saw
- Drill and driver
- Pocket-hole jig or clamps for square assembly
- Measuring tape, square, pencil, and level
- Clamps
- Sander and sandpaper
- Stud finder if mounting to a wall
- Safety glasses, hearing protection, dust mask, and proper work gloves for handling lumber
Safety matters. Wear eye protection when cutting, drilling, sanding, or using power tools. Use hearing protection around loud saws. Keep hands away from blades and bits, support large plywood sheets properly, and do not rush cuts. Fish may reward patience; woodworking absolutely demands it.
Step-by-Step: How to Build a Fishing Tackle Cabinet
Step 1: Sketch the Cabinet
Draw a simple front view and side view. You do not need an architectural masterpiece. A clear sketch with measurements is enough. Mark shelf spacing based on your tackle trays. For example, if your utility boxes are 14 inches wide, 9 inches deep, and 2 inches tall, plan shelves or cubbies that allow easy finger clearance. A cabinet that technically fits your boxes but requires tweezers to remove them is not a win.
Decide whether the cabinet will have one large door, two doors, or open shelving. Doors protect gear from dust and make the cabinet look tidy. Open shelving is faster to access. A hybrid design is often best: doors on the top and middle sections, open cubbies or drawers below.
Step 2: Cut the Main Cabinet Parts
Cut two side panels, one top, one bottom, fixed shelves, and any vertical dividers from 3/4-inch plywood. Label each part as you cut it. This is not overkill. It is future-you protection. Once six similar plywood rectangles are leaning against the wall, they all start pretending to be the top panel.
For a 48-inch-wide cabinet, you might cut:
- Two sides: 72 inches by 18 inches
- Top and bottom: 46 1/2 inches by 18 inches
- Fixed shelves: 46 1/2 inches by 17 1/4 inches
- Back panel: 48 inches by 72 inches from 1/4-inch plywood
Adjust these measurements based on your plywood thickness and final design. Always measure your actual materials because “3/4-inch plywood” is sometimes slightly thinner.
Step 3: Assemble the Cabinet Box
Lay one side panel on a flat surface and attach the top, bottom, and fixed shelves using wood glue and screws or pocket-hole joinery. Keep everything square as you work. Add the second side panel, then check diagonals from corner to corner. If the diagonal measurements match, the cabinet is square. If not, persuade it gently before the glue sets.
Install the back panel with glue and brad nails or screws. The back panel does more than close the cabinet; it helps lock the case square and adds strength. If the cabinet will be wall-mounted or wall-secured, include a strong hanging rail or cleat near the top back edge.
Step 4: Add Shelves and Cubbies
Adjustable shelves are ideal for tackle storage because fishing collections evolve. Today you need room for bass gear. Next year you may add trout spinners, saltwater jigs, or fly boxes. Drill shelf-pin holes or install shelf standards so you can change shelf height later.
For utility-box cubbies, create vertical dividers that form narrow slots. This lets tackle boxes slide in like files. Label the front of each box: “Jerkbaits,” “Topwater,” “Finesse Hooks,” “Weights,” “Panfish,” “Saltwater,” or whatever matches your fishing style. Labels prevent the classic pre-dawn garage shuffle, where you open every box while muttering like a detective in a bait-shop mystery.
Step 5: Build Drawers for Small Tackle
Small tackle is where organization either shines or collapses into madness. Shallow drawers are perfect for terminal tackle, spare hooks, bobber stops, leader material, and small repair items. Build simple drawer boxes from 1/2-inch or 3/4-inch plywood with 1/4-inch bottoms. Full-extension drawer slides are worth the upgrade because they allow the entire drawer to come forward, making it easier to find tiny items at the back.
Inside the drawers, use removable plastic dividers or small bins. Keep weights separate from hooks. Keep hooks in original packages or labeled containers. If you fish with multiple techniques, dedicate drawers by method: drop shot, Texas rig, Carolina rig, jigheads, walleye rigs, fly accessories, or saltwater leaders.
Step 6: Install Pegboard Doors
Cabinet doors can do more than swing around looking important. Mount pegboard on the inside of each door to create tool storage. Use hooks and small baskets for pliers, line cutters, scissors, hook files, split-ring pliers, fish grippers, and lure tuning tools. This design keeps frequently used tools visible while hiding them when the door closes.
Leave clearance between pegboard hooks and shelves so the doors close properly. Before installing final hardware, hold your tools on the pegboard and test the swing. A door that almost closes is just a cabinet with commitment issues.
Step 7: Add Rod Storage
If you want the cabinet to store rods, attach a vertical rod rack to one side. A simple version uses two horizontal boards: the lower board has shallow holes or cups for rod butts, and the upper board has notches or clips for rod blanks. Space the notches wide enough so reels do not collide.
For extra protection, line the rod slots with felt, rubber, or foam. Store rods vertically if ceiling height allows. If not, mount horizontal rod holders above or beside the cabinet. The goal is to prevent tangled guides, bent tips, and the heartbreaking crunch of a rod meeting a bicycle handlebar.
Step 8: Sand, Seal, and Finish
Sand sharp edges and exposed surfaces. Add edge banding or trim to plywood edges for a cleaner look and better durability. A fishing tackle cabinet does not need to look like fine furniture, but it should not look like it lost a fight with a lumber cart.
For a garage cabinet, a tough paint is practical. For a cabin or indoor mudroom, stain and polyurethane can look warm and polished. In damp locations, seal all faces and edges, including the bottom. Moisture is the enemy of wood, hooks, and fishing stories that begin with “I swear it was this big.”
Smart Organization Ideas for Fishing Gear
Use a Grab-and-Go System
The best tackle cabinet supports fast trip preparation. Keep core gear in labeled boxes that can move directly from cabinet to boat, kayak, backpack, or truck. For example, create separate boxes for “Pond Bass,” “River Smallmouth,” “Crappie,” “Surf Fishing,” “Trout,” and “Kids’ Gear.” When Saturday morning arrives, you grab the right boxes and go.
Separate Wet Gear From Dry Gear
Do not toss wet lures, damp gloves, or rain gear into closed drawers. Add a ventilated drying shelf or a small mesh basket near the bottom of the cabinet. Let wet items dry before sealing them away. This helps reduce rust, mildew, and the mysterious smell known as “garage swamp.”
Store Soft Plastics Carefully
Soft plastics can react with certain materials and with each other. Keep them in original bags when possible, especially scented or specialty baits. Store bags upright in bins by type and color. A simple file-folder style bin works beautifully. Label categories such as worms, craws, swimbaits, trailers, finesse baits, and creature baits.
Protect Fishing Line
Fishing line lasts longer when stored away from heat and sunlight. Add a drawer or closed shelf for monofilament, fluorocarbon, braided line, and leader spools. Use dowels to create a line-spool rack if you want a neat dispenser. Keep a pair of line scissors nearby, because biting line is bad for teeth and makes dentists richer than crankbait companies.
Budget-Friendly Upgrades
A fishing tackle cabinet can be simple or fancy. Start with the essentials and add upgrades later. Some of the most useful improvements are inexpensive:
- Magnetic strip for forceps, small tools, or hook files
- Battery-powered LED lights inside the cabinet
- Clear bins for spare reels, gloves, and sunglasses
- Chalkboard or dry-erase panel for trip checklists
- Small corkboard for licenses, lake maps, or tournament notes
- Locking latch if children are in the home
- Rubber mat on the work surface for reel maintenance
You can also repurpose materials. A leftover kitchen cabinet can become a tackle station. An old bookcase can become a lure cabinet with doors added. A salvaged drawer unit can store terminal tackle. DIY does not always mean starting from scratch; sometimes it means seeing potential in something your family wanted you to throw away last spring.
Common Mistakes to Avoid
Making Shelves Too Deep
Deep shelves sound good until small boxes disappear in the back. For tackle storage, visibility matters. If your cabinet is deeper than 18 inches, consider pull-out trays or bins so nothing gets buried.
Skipping Labels
Labels may feel unnecessary on day one. By day thirty, they are heroic. Label drawers, boxes, bins, and shelves. Keep the wording simple and consistent.
Ignoring Weight
Lead sinkers, tools, reels, and full utility boxes add weight quickly. Use strong shelves, secure fasteners, and wall anchoring when needed. For heavy drawers, use slides rated for the load.
Forgetting Ventilation
A sealed cabinet full of damp gear becomes a rust factory. Add small vents, leave slight airflow gaps, or dedicate one open area for drying.
Maintenance Tips for Long-Term Use
Once your cabinet is built, give it a quick reset after every few trips. Put lures back in the right boxes, remove damaged hooks, dry wet tools, and restock essentials. At the end of each season, do a deeper clean. Check for rust, replace weak line, sharpen hooks, organize soft plastics, and donate gear you no longer use.
A tackle cabinet works best when it stays active. Think of it as a command center, not a museum. It should help you fish more and search less.
Real-World Experience: What Building a Fishing Tackle Cabinet Teaches You
Building a fishing tackle cabinet sounds like a storage project, but it quickly becomes a lesson in how you actually fish. The first surprise is usually how much gear you own. Most anglers think they have “a few trays.” Then they start sorting and realize they could open a small roadside bait shop called Mostly Green Pumpkin. This is not a problem. It is simply evidence of enthusiasm.
The second lesson is that organization should follow behavior. A cabinet arranged by perfect retail-store categories may look nice, but it might not help you at 5:15 a.m. when coffee is still negotiating with your brain. The better system is based on trips. If you fish ponds after work, keep a pond box ready. If you take kids fishing, create a simple box with bobbers, small hooks, split shot, pliers, and snacks nearby. Yes, snacks count as fishing equipment. Anyone who has taken a hungry child bluegill fishing understands this deeply.
One useful experience is building a small work surface into the cabinet. At first, it seems optional. Then you use it to tie leaders, change hooks, oil reels, sort new lures, and repair skirts on jigs. Suddenly that little shelf becomes the most valuable part of the whole build. Add a rubber mat and a small light, and you have a mini tackle workshop that feels professional without requiring a second mortgage.
Another practical lesson is to leave extra space. Anglers are not static creatures. One year you are a bank fisherman with a backpack. Next year you own kayak crates, three new spinning combos, and an alarming interest in glide baits. Build the cabinet with adjustable shelves and at least one empty zone. Empty space may look inefficient on day one, but by month six it becomes proof that you were wise.
Rod storage also deserves more attention than many builders give it. Rods are long, fragile, and weirdly talented at tangling themselves. A side-mounted rack keeps them off the floor and away from danger. Space rods so reels do not bang together. If you store expensive rods, add soft padding where the blank touches wood. That small detail can prevent scratches and make the cabinet feel custom.
Moisture control is another hard-earned lesson. Fishing gear comes home wet. Even when you swear it is dry, hooks and tools may carry enough moisture to start rust. A small drying basket or ventilated shelf saves money over time. Leave wet lures out before returning them to sealed boxes. Open the cabinet doors after rainy trips. Treat rust prevention like brushing your teeth: not glamorous, but future-you will be grateful.
The best part of the project is the first real fishing trip afterward. Instead of digging through piles, you open the cabinet, grab the right trays, clip pliers from the pegboard, check the line drawer, and leave. It feels almost suspiciously smooth. You may even arrive at the water with everything you need, which is dangerous because now you can no longer blame poor organization for not catching fish.
In the end, a fishing tackle cabinet is not just about woodworking. It is about creating a ritual. Clean gear comes home. Used gear gets dried. Lures return to their boxes. Rods go back in their slots. The next trip starts before you ever leave the driveway. That rhythm makes fishing easier, calmer, and more fun. And if the cabinet also makes your garage look less like a raccoon hosted a yard sale, that is a pretty fine bonus.
Conclusion
Building a fishing tackle cabinet is one of the most useful DIY projects an angler can tackle. It protects your investment, saves time, reduces clutter, and makes every fishing trip easier to prepare for. The best design starts with your own gear: the boxes you carry, the rods you use, the tools you reach for, and the techniques you fish most often.
Use sturdy plywood, smart shelves, shallow drawers, pegboard doors, rod storage, and clear labels. Seal the cabinet well, plan for moisture, and leave room for future tackle because we both know another lure is coming home eventually. With a thoughtful build, your fishing tackle cabinet becomes more than storage. It becomes the launchpad for better mornings, smoother trips, and fewer frantic searches for the one bait that was “right here yesterday.”










