
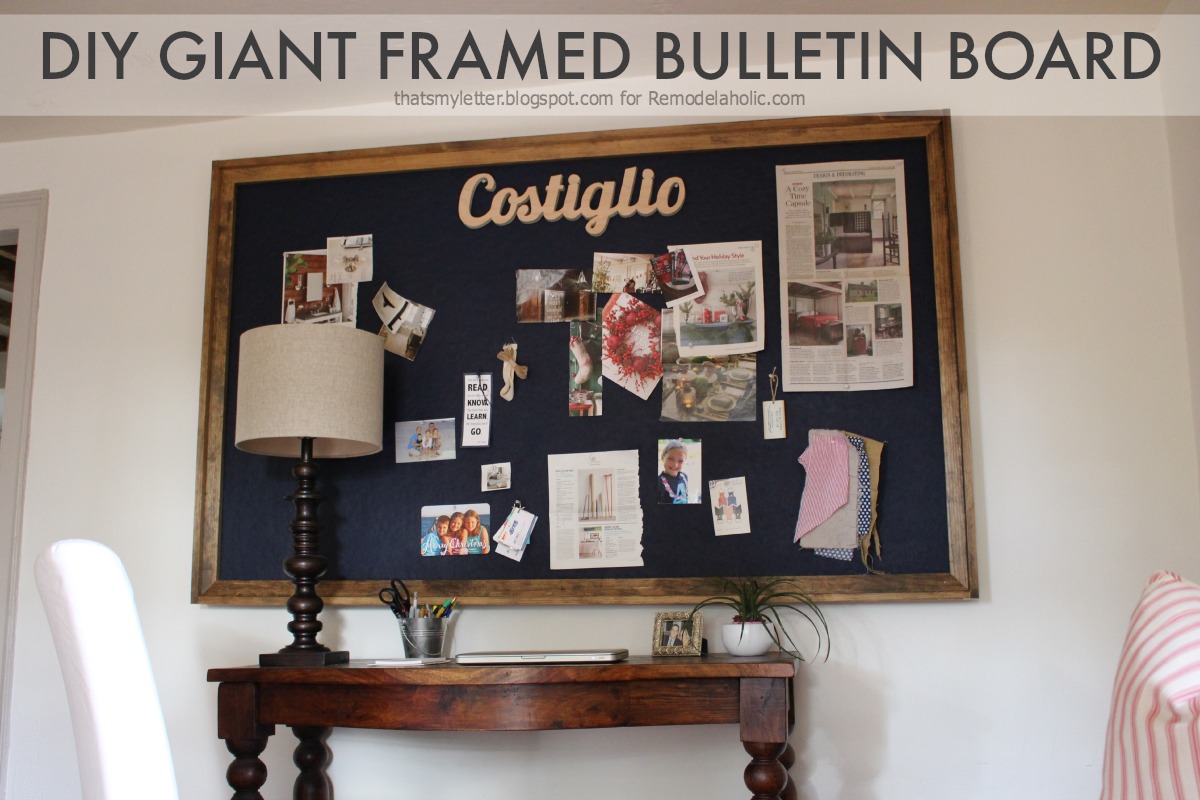
Note: This article is written for a practical DIY audience and uses realistic U.S. material options, common home improvement store pricing ranges, and budget-friendly building methods. Local prices vary, so treat the budget as a smart shopping targetnot a legally binding treaty with the lumber aisle.
Why Build a Giant Bulletin Board Instead of Buying One?
A giant bulletin board is one of those home projects that sounds suspiciously simple until you start shopping. Suddenly, a large cork board costs about as much as a weekend getaway, and the “extra-large” version is still too small to hold school calendars, fabric swatches, kids’ artwork, photos, schedules, reminders, and that one receipt you keep because you are convinced it will become important someday.
The good news? You can build a giant bulletin board for under $50 using affordable materials like rigid foam insulation board, canvas drop cloth, budget fabric, lightweight trim, and simple wall-mounting hardware. The result looks custom, fills a big wall beautifully, and gives you a practical command center for your home office, classroom, craft room, kitchen, homeschool space, dorm room, or entryway.
This project is especially useful if you want a large pin board without spending hundreds of dollars on a commercial cork bulletin board. Instead of paying for a pre-made frame and cork surface, you create a lightweight, fabric-covered board that accepts push pins easily and can be customized to fit your wall, your room style, and your budget. Translation: your wall gets organized, your wallet survives, and nobody has to pretend a tiny cork square is “plenty of space.”
Project Overview: What You’re Building
The basic build is a large fabric-covered bulletin board made from a sheet of rigid foam insulation board or similar lightweight backing. You wrap it in fabric, secure the fabric tightly on the back, add a simple wood frame if desired, and mount it safely to the wall.
The most budget-friendly size is usually around 4 feet by 6 feet, made by cutting a standard 4-by-8-foot foam insulation sheet down to size. If your budget and fabric deal are generous, you can go full 4-by-8 feet. However, a 4-by-6-foot board still feels enormous on the wall and is easier to cover, frame, carry, and hang.
Best Uses for a Giant DIY Bulletin Board
A large bulletin board can work in almost any room. In a home office, it becomes a visual project planner. In a kitchen, it can hold menus, school papers, sports schedules, and family notes. In a craft room, it becomes a mood board for paint colors, fabric samples, patterns, and sketches. In a classroom or homeschool room, it gives you a rotating display area for lessons, vocabulary cards, calendars, artwork, and reminders.
Basically, if your refrigerator is currently wearing 47 magnets and looking emotionally exhausted, this DIY giant bulletin board may be its retirement plan.
Budget Breakdown: How to Stay Under $50
The secret to building a giant bulletin board under $50 is choosing materials that are large, lightweight, and inexpensive. Real cork can get pricey fast, especially in large sizes. Foam insulation board, canvas drop cloths, clearance fabric, and simple furring strips are usually much cheaper.
Estimated Materials List
- Rigid foam insulation board, 4 ft. x 8 ft.: about $12–$20 depending on thickness and store
- Canvas drop cloth or 3 yards of budget fabric: about $10–$20
- Wood trim or 1×2 furring strips: about $10–$15
- Packing tape, staples, or adhesive: about $3–$8
- Basic hanging hardware or screws: about $3–$10
A realistic budget might look like this: $15 for foam board, $14 for a canvas drop cloth, $12 for trim, and $6 for fasteners or tape. That lands around $47 before tax. If you already own staples, screws, wood glue, stain, or leftover fabric, the project gets even cheaper. If you buy premium linen, fancy trim, spray adhesive, and a heavy-duty French cleat, the budget may wander past $50 with the confidence of a toddler in a candy store.
Budget Tip: Use a Canvas Drop Cloth
A painter’s canvas drop cloth is one of the best fabric hacks for this project. It is usually wide enough to cover a large board, has a neutral linen-like look, and costs less than many decorator fabrics. Wash and dry it first if you want a softer, more relaxed texture. Iron it before wrapping the board unless you enjoy the “wrinkled laundry but make it wall decor” aesthetic.
Choosing the Right Board Material
The backing material is the heart of the project. You need something lightweight enough to hang, thick enough to hold pins, and affordable enough to keep the project under $50.
Option 1: Rigid Foam Insulation Board
Rigid foam insulation board is the most budget-friendly choice for a large DIY bulletin board. It usually comes in big sheets, is easy to cut with a utility knife, and is light enough for one or two people to handle. Push pins go in easily, and the board can be wrapped in fabric without complicated tools.
The downside is that foam can dent if handled roughly, so you should protect the front with fabric and avoid crushing the edges while building. A wood frame helps make the board look finished and adds protection around the perimeter.
Option 2: Homasote or Fiberboard
Homasote is a compressed fiberboard often used in soundproofing and craft pin boards. It holds pins well and feels more substantial than foam. It is a favorite among DIYers who want a professional-looking fabric pin board. However, it can cost more, weigh more, and may be harder to find locally. If your goal is strictly under $50, foam board is usually the safer choice.
Option 3: Cork Tiles or Cork Roll
Cork looks traditional and works beautifully for push pins, but large cork surfaces can quickly blow the budget. Thin cork rolls may also need a sturdy backing because they can curl, crack, or fail to hold pins deeply enough on their own. Cork is excellent, but for a giant budget bulletin board, it is not always the hero of the story.
Tools You’ll Need
You do not need a professional workshop to build this giant bulletin board. Most of the project can be handled with basic household tools.
- Measuring tape
- Pencil
- Utility knife with a sharp blade
- Straightedge or long ruler
- Staple gun, packing tape, duct tape, or hot glue
- Scissors
- Sandpaper
- Small saw or miter box if adding wood trim
- Drill or screwdriver for mounting
- Level
- Stud finder
If you do not own a saw, many home improvement stores can cut boards or trim for you, or you can keep the frame simple with straight cuts. A no-frame version is also possible, especially if you wrap the fabric neatly and mount the board inside a nook or above a desk.
Step-by-Step: How to Build a Giant Bulletin Board for under $50
Step 1: Choose Your Size
Measure the wall where the bulletin board will hang. A 4-by-6-foot board is a great size for most rooms because it is big enough to feel custom but not so massive that it takes over the wall like a very organized billboard.
If you start with a 4-by-8-foot foam insulation sheet, measure 72 inches along the long side and mark your cut line. Use a straightedge to keep the line clean. If you want the full 4-by-8-foot size, make sure you have enough fabric to wrap around the edges with at least 2–3 extra inches on all sides.
Step 2: Cut the Foam Board
Place the foam board on a protected surface, such as a garage floor, large table, or scrap cardboard. Score along your marked line with a sharp utility knife. You do not have to cut through the entire board in one pass. Make several light passes, then gently snap the board along the cut line if the material allows.
Trim any rough edges with the utility knife. Do not worry if the edge is not museum-perfect; the fabric and frame will cover minor imperfections. This is DIY, not open-heart surgery.
Step 3: Prepare the Fabric
Lay your fabric face down on a clean floor. If you are using a canvas drop cloth, wash, dry, and iron it first. If you are using patterned fabric, take a moment to line up the design. A crooked stripe on a giant bulletin board will haunt you from across the room while you drink coffee.
Place the foam board on top of the fabric. Cut the fabric so it extends at least 2–3 inches beyond every edge. This extra fabric lets you pull it around the back and secure it tightly.
Step 4: Wrap the Board
Start on one long side. Pull the fabric over the edge and secure it to the back using staples, packing tape, duct tape, or hot glue. If your foam is too soft for staples, use strong tape or adhesive on the back. Work from the center outward, smoothing the fabric as you go.
Move to the opposite side and pull the fabric snug, but not so tight that it warps the board. Secure it in the same way. Repeat with the short sides. Fold the corners like wrapping a present: pull the corner fabric in, fold one side over, smooth the other side, and secure everything flat. If your corners look a little bulky, congratulationsyou have discovered why upholstery is a profession.
Step 5: Add a Simple Wood Frame
A frame is optional, but it makes the board look far more finished. Budget 1×2 furring strips are usually enough. Cut two pieces to match the height of the board and two pieces to match the width. Sand the rough edges, then paint or stain the wood before attaching it.
You can attach the frame with small screws, brad nails, construction adhesive, or a combination of glue and fasteners. If using screws, be gentle. Foam board does not have the same holding power as plywood, so the frame should be attached carefully and supported by the mounting method. Another option is to build the wood frame separately and set the wrapped board into it like a shallow picture frame.
Step 6: Mount the Board Safely
Because this bulletin board is large, safe mounting matters. Even lightweight materials can become awkward when they cover a big area. The best method is to attach the board to wall studs using screws and washers through the board, or to use a French cleat system if the board has a sturdy frame.
For a very lightweight foam board without a heavy frame, you may be tempted to use removable strips. That can work for smaller boards, but a giant board should be mounted more securely. Use a level, mark your wall studs, and get help holding the board in place. Your future self will appreciate not hearing a mysterious midnight crash followed by 84 push pins rolling under the desk.
Design Ideas to Make It Look Custom
Use Neutral Fabric for a Clean Look
Natural canvas, beige linen-look fabric, gray cotton, or soft white duck cloth gives the bulletin board a calm, modern style. This works well in home offices, kitchens, and living areas where you want organization without visual chaos.
Try Bold Fabric for a Classroom or Kids’ Room
If the board is going in a classroom, playroom, or creative space, patterned fabric can make it fun. Try gingham, colorful stripes, small florals, or geometric prints. Choose a pattern that will not fight with whatever you pin on the board.
Add Ribbon for a Memo Board Style
For a more decorative look, add ribbon in a crisscross pattern before securing the fabric to the back. You can tuck photos, cards, and notes behind the ribbon without using pins. This works especially well for bedrooms, dorm rooms, and family photo displays.
Paint the Frame
A black frame gives the board a modern gallery look. A white frame feels clean and classic. A stained wood frame adds warmth. If you want a playful look, paint the trim in a bold color that matches your room. Paint is one of the cheapest ways to make a budget project look intentional instead of “I found this behind the garage.”
How to Use Your Giant Bulletin Board
Once the board is mounted, give it a purpose. A giant empty bulletin board can become cluttered quickly if everything gets pinned randomly. Divide it into zones to keep it useful.
Home Office Layout
Create sections for current projects, deadlines, inspiration, notes, and reference papers. Use small labels or strips of washi tape to separate areas. Keep the most urgent items at eye level and the pretty inspiration images higher or to the side.
Family Command Center
Use one area for school papers, one for calendars, one for meal plans, and one for reminders. Add a small envelope or clip for coupons, permission slips, and receipts. This keeps the kitchen counter from becoming a paperwork swamp.
Craft Room Mood Board
Pin fabric swatches, paint chips, sketches, magazine clippings, pattern notes, and project timelines. A giant pin board helps you see everything at once, which is especially useful when planning quilts, room makeovers, sewing projects, or handmade gifts.
Common Mistakes to Avoid
Using Fabric That Is Too Thin
Very thin fabric can show the color or texture of the foam underneath. Choose canvas, duck cloth, upholstery fabric, or a lined fabric if possible. If your fabric is thin but beautiful, add a layer of white batting or an old sheet underneath.
Skipping the Iron
Wrinkles become much more noticeable once fabric is stretched across a large flat surface. Iron before wrapping. It is annoying for five minutes and rewarding for years.
Mounting Only with Weak Adhesive
A giant board needs secure support. Adhesive strips may fail over time, especially in humid rooms or on textured walls. Use screws into studs, a proper cleat, or hardware rated for more than the weight of the board.
Forgetting About Doorways
Before building a full 4-by-8-foot board, make sure it can travel from your workspace to the final room. Measure stairways, hallways, and doorways. Nothing humbles a DIYer faster than building something majestic in the garage and realizing it cannot turn the corner into the office.
Can You Really Build It for under $50?
Yes, but the budget depends on smart choices. The easiest under-$50 version uses foam insulation board, a canvas drop cloth, basic trim, and hardware you already have or can buy cheaply. If you select premium linen, thick cork, decorative molding, and specialty hanging hardware, the cost will rise.
To keep the project affordable, shop clearance fabric, use leftover paint or stain, choose simple wood strips, and avoid overbuilding. A giant bulletin board does not need expensive materials to look good. It needs clean fabric, straight edges, safe mounting, and a little patience.
Extra Experience: What I Learned Building a Giant Bulletin Board on a Budget
The biggest lesson from building a giant bulletin board for under $50 is that the “boring” steps are the ones that make the final board look expensive. Measuring carefully, ironing fabric, sanding trim, and checking level lines are not glamorous. No one posts a dramatic before-and-after photo of themselves ironing canvas on the floor while questioning every life choice. But those small steps are exactly what turn a cheap foam board into something that looks custom.
One practical experience worth sharing: do not buy fabric before deciding the final board size. Fabric width matters. A 48-inch-wide board needs fabric wide enough to wrap around the edges. Many fabrics are 44 or 45 inches wide, which is not enough for a 4-foot-tall board unless you rotate the fabric, piece it together, or accept a seam. For a cleaner finish, look for 54-inch or 60-inch-wide fabric, or use a canvas drop cloth. The drop cloth trick is popular for a reason: it gives you lots of material for little money, and the neutral color works in almost any room.
Another lesson: lightweight does not mean flimsy if you mount it correctly. Foam board feels almost too light when you first pick it up, but once it is covered in fabric and framed with simple trim, it looks surprisingly polished. The key is supporting the board across a wide area. If you only hang it from two tiny points, the board can bow or shift. A cleat, screws into studs, or a simple wood support rail can make the entire project feel sturdier.
It is also helpful to plan what the board will hold before you hang it. A board used for kids’ artwork can be lower on the wall. A home office project board should sit where you can see it from your desk. A family command center should be near the place where papers naturally pile up. Do not fight household habits too much. If everyone drops school forms near the kitchen, put the board near the kitchen. Organization works better when it meets people where they already are, not where your fantasy version of the family calmly files paperwork alphabetically.
One more real-world tip: buy more push pins than you think you need. A giant bulletin board makes you suddenly ambitious. You will pin calendars, photos, notes, lists, paint chips, postcards, and possibly a motivational quote that says something like “Simplify,” while standing in front of a board containing 73 separate items. That is fine. The whole point of a giant board is to get visual clutter off flat surfaces and onto one organized wall.
Finally, remember that this project does not have to be perfect to be useful and beautiful. A slightly imperfect corner will disappear once the board is full of memories, plans, and ideas. A budget frame can still look high-end with paint. A canvas drop cloth can look like designer linen from three feet away. The magic of this DIY bulletin board is not that it pretends to be expensive. It is that it solves a real problem, fills a big wall, and gives you a custom piece for a fraction of the store-bought price.
Conclusion
Building a giant bulletin board for under $50 is one of the best DIY projects for anyone who wants more organization, more display space, and more style without spending a small fortune. With rigid foam insulation board, budget fabric or a canvas drop cloth, simple wood trim, and secure mounting hardware, you can create a large custom bulletin board for a home office, classroom, kitchen, craft room, or family command center.
The project is beginner-friendly, flexible, and easy to personalize. Keep it simple with neutral canvas, make it bold with patterned fabric, add a clean frame, or divide it into zones for daily planning. The final result is practical, attractive, and big enough to handle real lifeschool papers, creative ideas, reminders, photos, schedules, and all.
Best of all, this DIY giant bulletin board proves that useful home upgrades do not have to be expensive. Sometimes all you need is a foam board, a piece of fabric, a few tools, and the confidence to say, “Yes, I can absolutely make that wall more organized before lunch.”













