
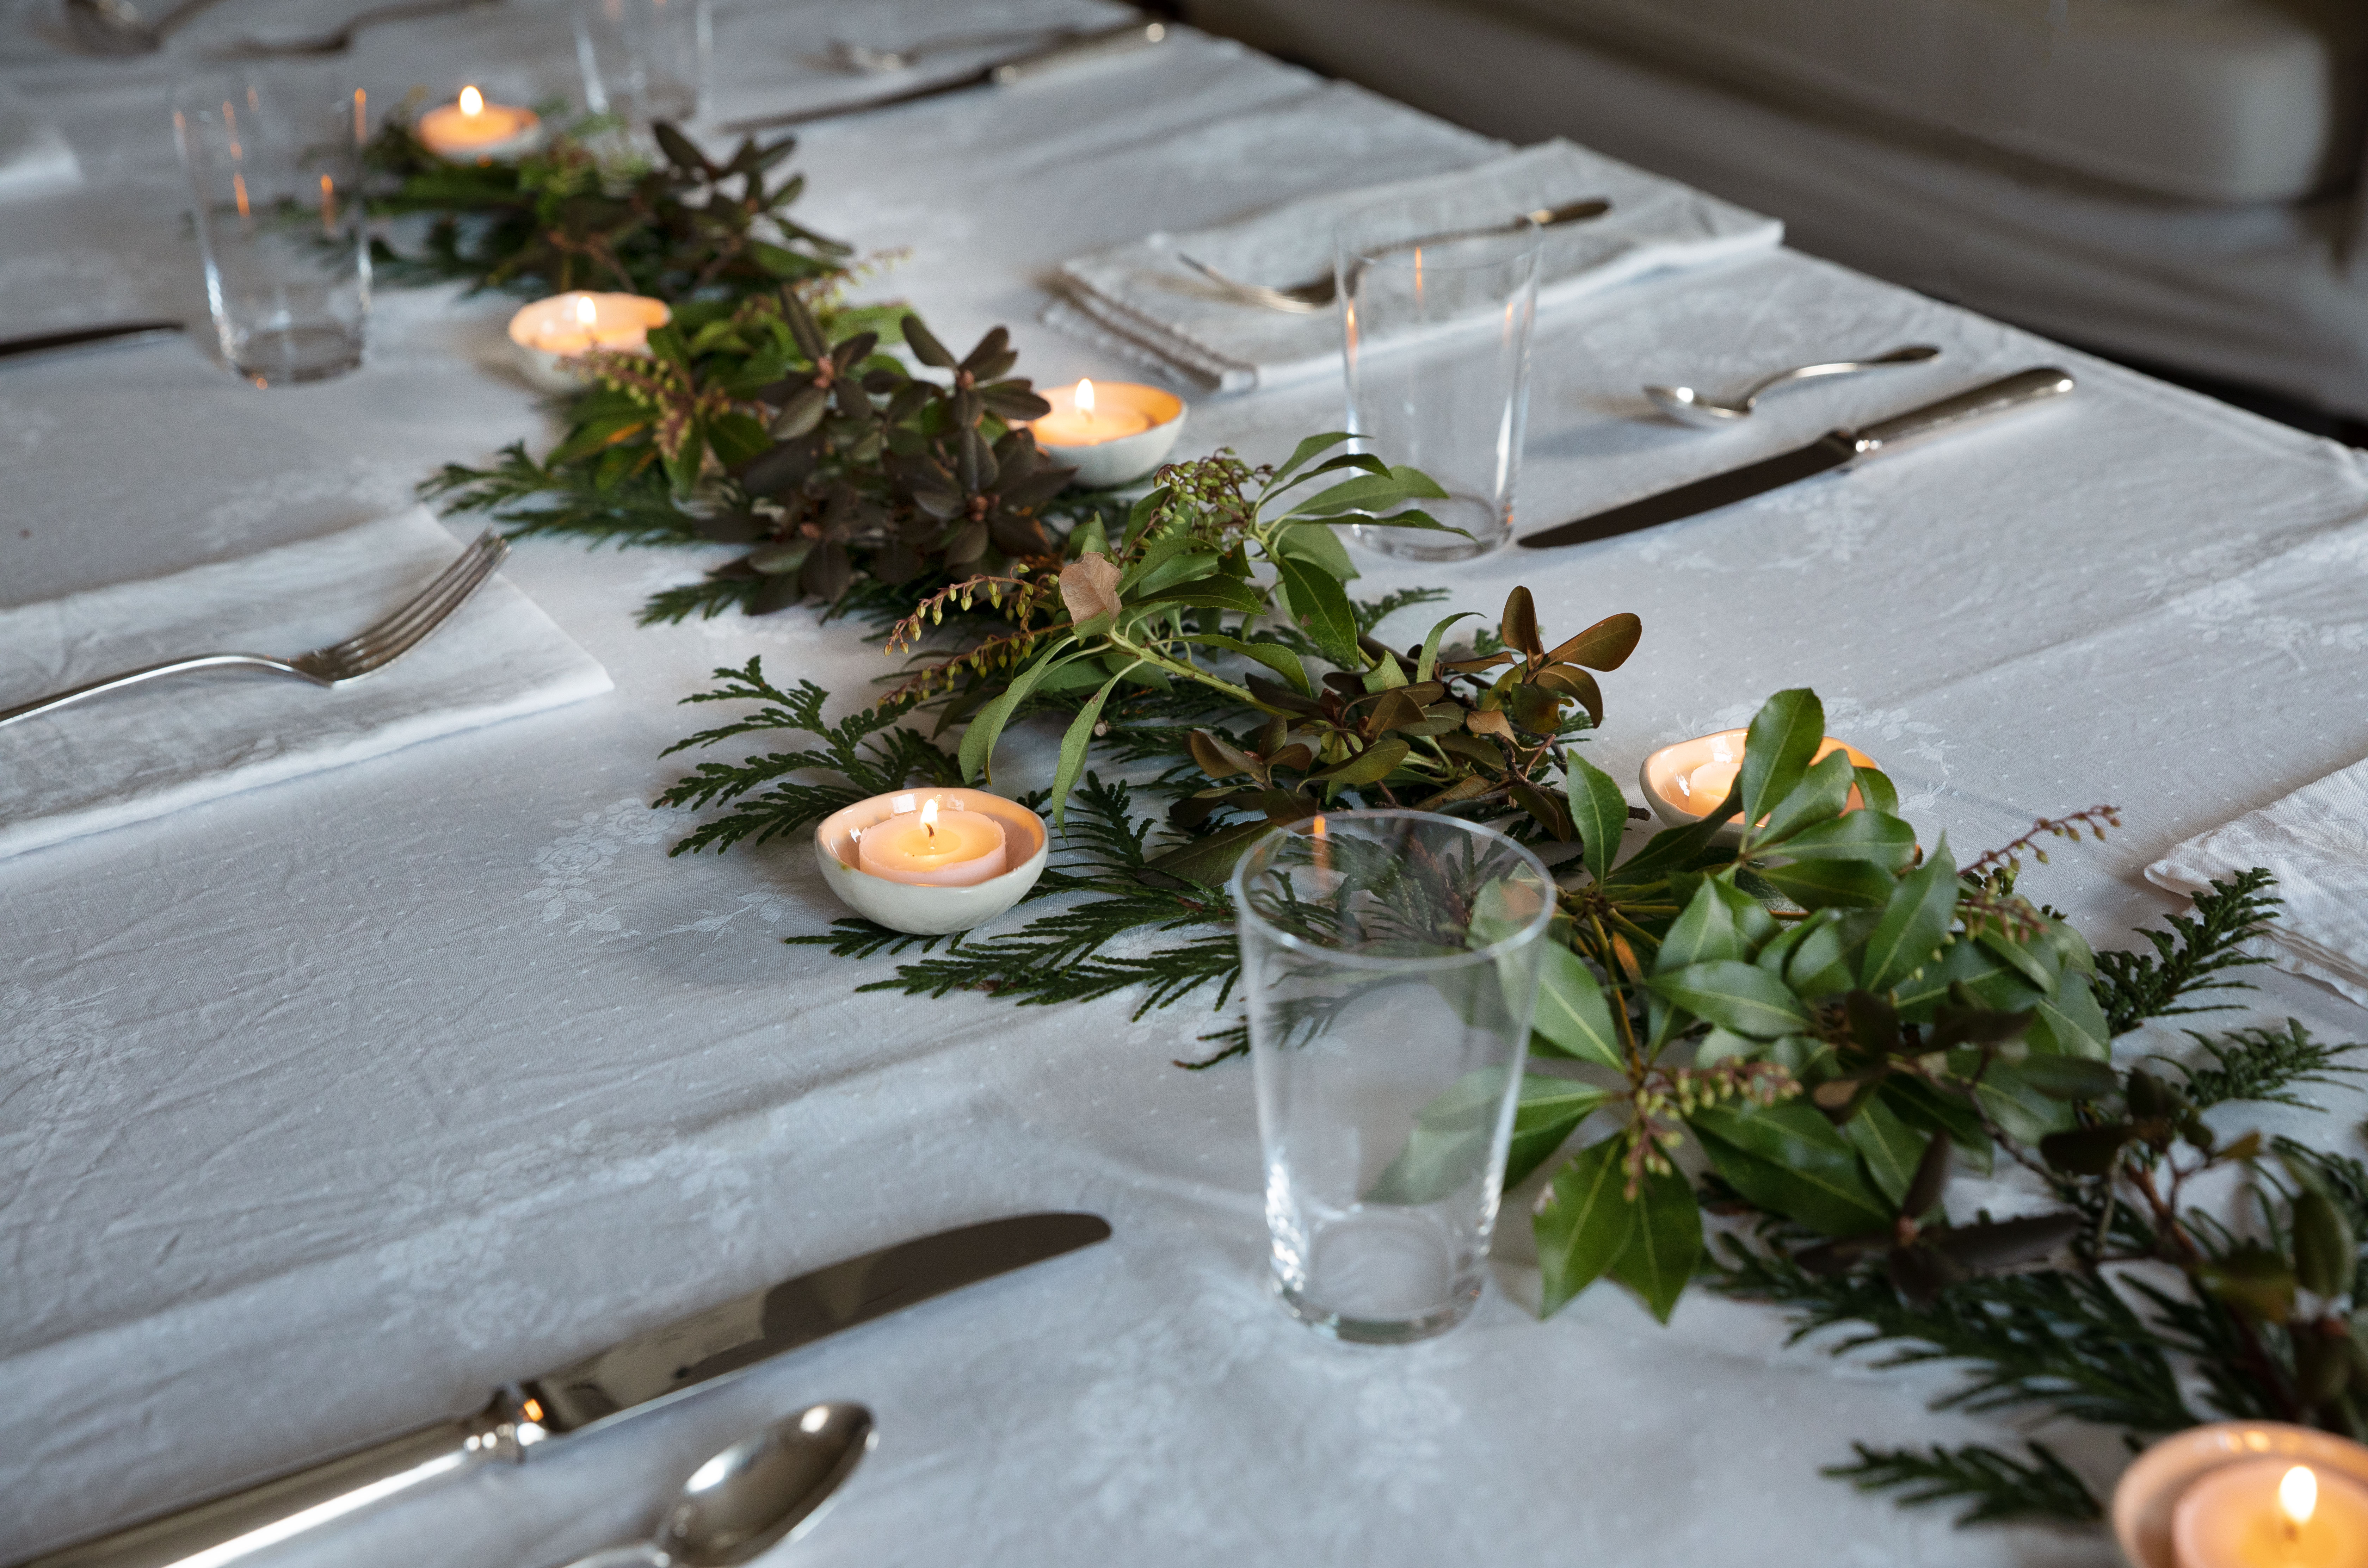
If your holiday table is feeling a little too “nice plates, now what?”, DIY ceramic votive holders are the kind of project that fixes the mood fast. They are small, charming, useful, and just artsy enough to make guests think you casually spend weekends in a sunlit pottery studio wearing linen and making beautiful things on purpose. In reality, you can create the same warm, handcrafted look at home with beginner-friendly clay, a few simple tools, and a healthy respect for candles and gravity.
These easy ceramic-style votive holders are perfect for a festive table because they do three jobs at once: they add glow, texture, and personality. Store-bought candleholders can be lovely, but handmade ones have a softer, more collected feel. A slightly uneven rim, a thumb-pressed surface, a matte painted finish, or a tiny stamped pattern makes the table feel personal instead of over-rehearsed. That is the sweet spot. You want “stylish host,” not “museum exhibit where no one is allowed to touch the bread.”
For this easy version, the goal is a ceramic look without making life complicated. Traditional ceramic clay usually requires firing in a kiln, which is wonderful if you have access to one, but not exactly ideal when you are decorating the table between grocery runs and playlist debates. So this project focuses on air-dry clay or oven-bake clay for a ceramic-inspired finish, plus a safer setup that uses a glass insert or flameless votive. The result still looks elegant, textured, and holiday-ready.
Why DIY Votive Holders Work So Well on a Festive Table
A festive table needs contrast. You want smooth glass next to soft linens, shiny flatware next to organic greenery, and a little glow to keep everything from looking flat. Handmade votive holders add exactly that. They bring in shape, shadow, and texture without taking over the whole centerpiece. They are also low enough that guests can still see each other, which is a surprisingly underrated feature at dinner.
Another reason these holders work is flexibility. You can make them in winter white, stone gray, warm terracotta, soft sage, dusty blush, or metallic-brushed cream. You can keep them minimal for a modern table or give them stamped patterns for a cozy holiday look. If your decorations change from Thanksgiving to Christmas to New Year’s Eve, the same basic holder can adapt with different paint, ribbon, greenery, or candle color.
And then there is the budget factor. A handcrafted table does not have to mean expensive. A small amount of clay can go a long way, especially if you make several petite holders instead of a few large pieces. When grouped together, even simple shapes feel elevated. It is one of those magical decorating tricks where repetition makes you look more sophisticated than you felt while elbow-deep in clay.
The Easiest “Ceramic” Approach for Beginners
If you want true kiln-fired pottery, absolutely go for it. But if you want a project that is realistic for home crafters, use air-dry clay to make ceramic-look sleeves or shallow pinch-pot style holders around a small glass votive insert. This method gives you the handcrafted appearance of ceramic while keeping the actual flame inside heat-safe glass. It is practical, pretty, and much less stressful than wondering whether your centerpiece is about to become the evening’s main event.
Air-dry clay is especially beginner-friendly because it is easy to shape, dries at room temperature, and can be painted after it cures. It also allows lovely hand-built textures, from pressed lace and linen patterns to simple finger-pinched edges. If you prefer a more durable finish and do not mind curing pieces in a home oven, oven-bake clay is another solid option. Either way, the aesthetic is the same: softly imperfect, matte, tactile, and charming.
Materials You’ll Need
- Air-dry clay or oven-bake clay in white, natural, or terracotta
- Small glass votive cups or tealight holders
- Rolling pin or smooth bottle
- Craft knife or clay cutter
- Small bowl of water
- Sandpaper, fine grit
- Texture tools such as lace, linen, stamps, leaves, or a fork
- Acrylic paint or mineral-style craft paint
- Matte sealer or acrylic varnish for fully dried pieces
- Tea lights, votives, or flameless candles
If you want the holders to look more upscale, keep your supply list simple and your finish restrained. Matte white, chalky taupe, sand, charcoal, soft olive, and stone-inspired speckles tend to look more designer than loud glossy colors. Not every craft project needs to scream, “I own glitter.”
How to Make Easy Ceramic Votive Holders
1. Start With the Shape
Decide whether you want a straight-sided cylinder, a soft organic cup, a scalloped shape, or a little pinch-pot silhouette. For the easiest version, roll the clay into an even slab about a quarter inch thick. Wrap it loosely around a glass votive cup to estimate size, then trim a rectangle that overlaps slightly. Remove the glass, join the seam with a little water, and smooth the connection with your fingers.
If you prefer a more organic look, form a small pinch pot by hand. Press your thumb into a ball of clay and slowly rotate while pinching outward. This creates lovely, irregular curves that feel handmade in the best way. Just be sure the base is wide enough to sit flat and stable.
2. Add Texture Before the Clay Dries
This is where the project goes from “cute craft” to “I cannot believe you made these.” Press a piece of linen into the outer surface for a woven texture. Roll lace over the clay for a vintage pattern. Use a leaf for natural veining. Tap a fork around the rim for subtle lines. Or press the end of a paintbrush into the surface to create a dotted pattern.
The best textures are not too busy. One controlled detail, like a ribbed band near the bottom or a softly stamped motif around the sides, usually looks more elegant than covering every inch like the clay owes you rent.
3. Refine the Edges
Use your fingers and a tiny bit of water to smooth the rim, soften sharp seams, and clean up rough spots. If you want a gently rustic look, leave faint finger marks. If you want a cleaner contemporary finish, smooth the surface more carefully. Either approach works; the difference is in the mood. Rustic says “cozy holiday dinner.” Smooth and minimal says “I have matching cloth napkins and opinions about taper candles.”
4. Let the Pieces Dry Completely
This part is not glamorous, but it matters. Set the pieces on a flat surface and let them dry thoroughly before painting or sealing. Thin pieces will dry faster; thicker or larger ones need more time. Turn them occasionally if needed so they dry evenly. Rushing this stage is how you end up with cracks, warped bases, or the kind of disappointment that makes you open a snack you were saving for guests.
5. Sand and Paint for a Ceramic Finish
Once the clay is completely dry, lightly sand rough edges. Then paint the holders if you want a finished ceramic-style surface. Matte white is timeless. A soft wash of diluted gray or beige gives a weathered stone effect. A sponged layer of cream over terracotta can mimic rustic earthenware. For a modern holiday table, try chalky black with a brushed gold rim. For something softer, use warm ivory and leave the texture to do the talking.
If you like the natural clay color, you can skip paint and simply seal the piece once fully dry. That understated, earthy finish looks especially beautiful with linen runners, brass flatware, and fresh greenery.
6. Seal and Assemble Safely
After the paint dries, apply a light coat of sealer if desired. Then place a glass votive insert inside the holder if you plan to use a real candle. For the easiest and safest holiday setup, use flameless votives. You still get the glow, the mood, and the compliments, but no one has to monitor the centerpiece like it is a live science experiment.
Design Ideas That Look Elevated, Not Overdone
If you want your DIY ceramic votive holders to look stylish rather than overly crafty, stick with one of these design directions and repeat it across the set.
Minimal Matte White
Create simple cylinder holders with faint linen texture and a chalky white finish. These look polished, modern, and easy to style with almost any seasonal palette.
Rustic Terracotta
Leave the clay close to its natural tone, then lightly dry-brush the surface with cream paint. The effect feels earthy, warm, and perfect for wood tables, fall centerpieces, or cozy winter dinners.
Stamped Holiday Detail
Use a tiny star, berry, leaf, or dot motif around the middle of each holder. Keep the pattern subtle and tone-on-tone for a festive touch that does not go full craft-store aisle.
Scalloped Boutique Style
Cut a scalloped rim before the clay dries. Paint the holder in soft stone, ivory, or sage, and suddenly your homemade candleholders look like they wandered in from a very expensive home décor boutique.
How to Style Votive Holders on a Festive Table
The secret to a beautiful table is not just what you put on it. It is how you group it. Votive holders look best when arranged in odd numbers or loose clusters, with a little variation in height and spacing. A row of identical holders can feel stiff. A relaxed grouping feels collected and warm.
Layer them with natural materials. Tuck in evergreen sprigs, eucalyptus, rosemary, or olive branches. Scatter a few dried orange slices, pomegranates, pears, walnuts, or mini ornaments nearby if the season calls for it. Add linen napkins, a runner with texture, and maybe one metallic element like brass candlesticks or gold-rimmed glassware. Suddenly the table has depth.
Keep centerpieces low enough for conversation. No one wants to yell across a forest of decorative ambition. Votives shine here because they sit low, glow beautifully, and make everything around them look more thoughtful. Even supermarket flowers become dramatically more charming next to candlelight. It is unfair, really.
Candle Safety That Actually Matters
Festive does not mean reckless. If you use real candles, keep them in stable holders and away from anything flammable, including dried foliage, paper place cards, loose ribbon, and dramatic napkins that billow like they are in a music video. Never leave lit candles unattended, and do not place them where kids, pets, or elbows can knock them over.
For handmade clay projects, the smartest setup is a decorative outer holder with a glass insert inside. If your table includes lots of greenery, paper décor, or a narrow runner, flameless candles are the easier choice. They still create that cozy sparkle without adding a side dish of anxiety.
Common Mistakes to Avoid
Making the walls too thin: Thin clay looks delicate at first and tragic later. Aim for enough thickness to feel sturdy.
Ignoring the base: A wobbling votive holder is not charming. Flatten and test the bottom before the clay dries.
Overdecorating the surface: Too many textures, stamps, and paint techniques fight each other. Pick one main detail and let it shine.
Painting before the clay is fully dry: Patience wins here. Damp clay and paint are not a glamorous duo.
Forgetting the actual table: Your holders should match the mood of the meal. A rustic Thanksgiving supper and a sleek New Year’s Eve table may want different finishes, even if the base shape is the same.
Why Handmade Votive Holders Feel Special
What makes these DIY ceramic votive holders so satisfying is not just that they are affordable or attractive. It is that they add intention to the table. Handmade objects slow a space down in the best way. They remind people that someone thought about the evening before the first plate hit the table. That matters. A festive table is not only about decorations; it is about atmosphere. Candlelight, texture, and little handmade details tell guests, “You are welcome here, and yes, I did make these, thank you for noticing.”
My Experience Making DIY Ceramic Votive Holders for a Festive Table
The first time I made DIY ceramic-style votive holders for a holiday table, I was aiming for “effortlessly artisanal” and landed somewhere closer to “small lumpy potatoes with ambition.” The clay was uneven, two of the holders leaned slightly left, and one had a rim so wavy it looked emotionally unstable. But the funny part is that once they were painted, grouped together, and glowing on the table, they looked far better than they had any right to. That was the moment I understood the magic of this project: handmade candleholders do not need to be perfect to be beautiful. In fact, perfection can make them feel less warm.
I learned quickly that the finish changes everything. My earliest versions were overpainted because I thought more color would make them look polished. It did not. It made them look like they had gone through a very confusing makeover. The versions I liked best had softer, chalkier finishes with a little texture still visible underneath. A thin wash of off-white over natural clay gave the pieces a subtle ceramic look, while a lightly sanded matte surface made them feel much more expensive than the supply cost suggested. That became my favorite trick: do less, but do it neatly.
I also discovered that votive holders are at their best when they are part of a full table story. On their own, they are lovely. But once I placed them on a runner with greenery, folded linen napkins, and a few brass accents, they suddenly looked intentional rather than random. Even the meal seemed more inviting in that kind of light. Soup looked cozier. Bread looked more important. People lingered longer. It is hard to explain without sounding dramatic, but candlelight has a way of convincing everyone that the evening is going better than expected.
One of the most useful lessons came from a near-miss with styling. I once tucked dried foliage too close to the candles because it looked gorgeous in the late afternoon. Then I lit the table and immediately realized I had designed something visually charming and practically foolish. Since then, I have become a big believer in either using glass inserts for real flames or switching to flameless candles when the centerpiece includes anything delicate, drapey, leafy, or suspiciously eager to burn. The vibe should be festive, not “someone please find the baking soda.”
Guests always notice the handmade holders more than I expect. They pick them up, ask where they came from, and seem genuinely delighted to hear they were homemade. That reaction is part of why I keep coming back to this project. The holders are small, but they create a sense of care. They turn a regular dinner into something that feels hosted. And unlike many seasonal decorations, they do not have to stay in a holiday-only box. I have used the same basic design for autumn dinners, winter brunches, spring celebrations, and even quiet weeknight meals that needed a little help. That is the beauty of a simple DIY done well. It keeps earning its place long after the party ends.
Final Thoughts
DIY ceramic votive holders are one of those rare decorating projects that check every box. They are easy enough for beginners, stylish enough for a special occasion, affordable enough to make in multiples, and versatile enough to use all year. Most of all, they make a festive table feel warm, layered, and personal. Whether you keep them modern and minimal or textured and rustic, the real goal is the same: create a table that glows a little, welcomes people in, and looks like you meant every detail. Even the slightly crooked one. Especially the slightly crooked one.










