
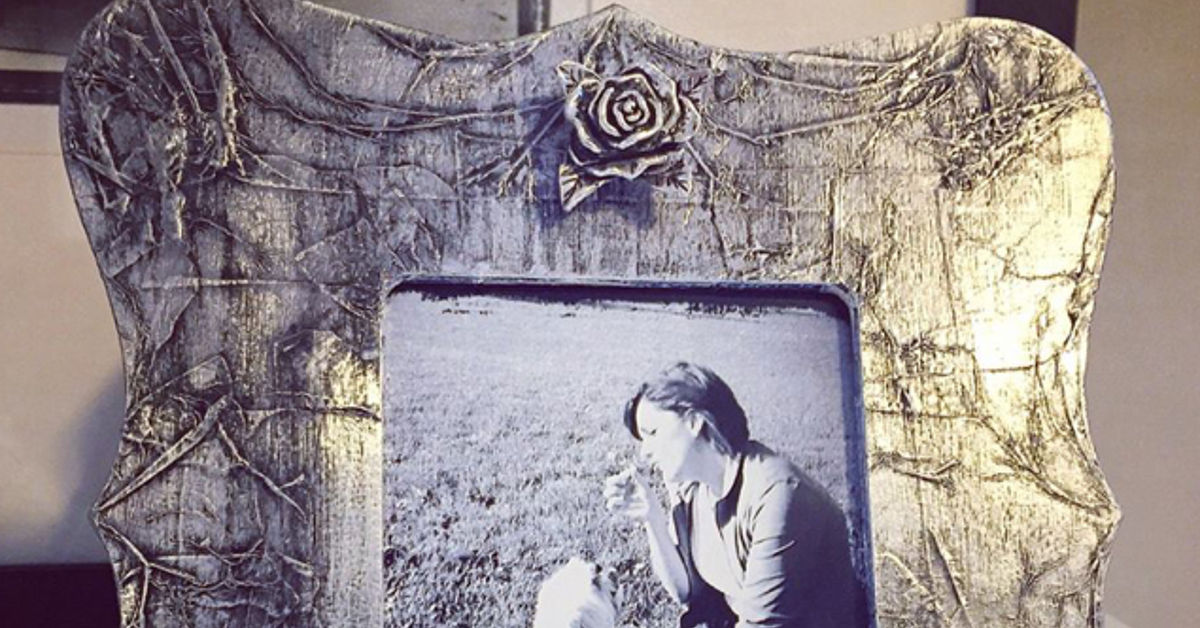
A one-dollar picture frame rarely enters your home looking glamorous. It may be shiny in all the wrong places, suspiciously lightweight, or dressed in a faux-wood finish that resembles a tree only because both are technically brown. Still, beneath that bargain-bin personality is a surprisingly useful decorating blank canvas.
With basic preparation, leftover paint, decorative paper, and a little patience, an inexpensive frame can become modern wall art, a vintage-style photo display, a personalized gift, or even a miniature message board. The secret is not spending more money. It is choosing a finish that works with the frame’s material and taking enough time to prepare the surface properly.
This DIY picture frame makeover walks through a versatile painted-and-distressed design while also offering several alternative styles. No advanced woodworking skills are required. Your most complicated tool may be a foam brush, which is wonderfully unlikely to demand a safety certification.
Why a $1 Picture Frame Is Perfect for a DIY Makeover
Cheap frames are excellent practice pieces. You can experiment with bold colors, metallic finishes, paper patterns, and textured effects without feeling as though one mistake has destroyed a family heirloom. If the first design fails, sand it lightly and try again. The frame will not file a complaint.
A coordinated paint color can also make mismatched frames appear intentional. Painting several inexpensive frames in one color or a limited palette is a common strategy for building a cohesive gallery wall from different shapes and sizes. Decorative frames can also be repurposed as memo boards, shadow boxes, layered art displays, and small functional organizers.
Choose a Frame With Potential
Look beyond the original color and examine the shape. Raised edges, carved details, wide borders, and beveled corners become much more noticeable after painting. Confirm that the corners are reasonably secure and that the backing can still be removed. Minor scratches are easy to repair, but a frame twisted like a potato chip may not be worth rescuing.
Determine whether the frame is unfinished wood, painted wood, MDF, laminate, metal, or plastic. The material affects the type of primer and paint you should use. Paint can adhere to many surfaces, including plastic and laminate, but slick finishes usually need cleaning, light abrasion, and a compatible bonding primer.
Materials and Tools
- One inexpensive picture frame
- Gentle cleaner or diluted dish soap
- Soft cloth or lint-free rag
- Fine-grit sanding sponge, approximately 180 to 220 grit
- Tack cloth or clean, dry paintbrush
- Surface-appropriate primer
- Acrylic craft paint, chalk-style paint, or spray paint
- Small foam brush or soft craft brush
- Painter’s tape
- Cardboard, kraft paper, fabric, or scrapbook paper
- Decoupage medium or craft glue, if decorating with paper
- Clear protective topcoat, optional
- Drop cloth and protective gloves
You do not need every item on the list. A simple makeover may require only a frame, a sanding sponge, and leftover paint. Decorative additions should support the design rather than turn the frame into a craft-supply traffic jam.
Prepare the Frame Before Painting
1. Disassemble Everything
Remove the backing, photo insert, glass, stand, and any loose hardware. Keep small tabs and screws in a cup so they do not disappear into the mysterious dimension where missing buttons and single socks apparently live.
Painting a disassembled frame gives you cleaner edges and prevents overspray or brush marks on the glass. Removing the contents before refinishing is also recommended in many professional frame-painting projects.
2. Clean Away Dust and Grease
Wipe the frame with a soft cloth and a mild cleaning solution. Pay special attention to decorative grooves, corners, and the upper edge, where dust tends to settle. Follow with a clean damp cloth if the cleaner leaves residue, then allow the frame to dry completely.
Paint adheres better to a clean surface. Dirt, skin oils, polish, and grease can interfere with adhesion or become trapped beneath the finish. Paint manufacturers generally recommend cleaning before sanding so grime does not clog the sandpaper or spread across the surface.
3. Repair Loose Corners and Dents
Add a small amount of wood glue to loose wooden joints and clamp or tape them until dry. Fill obvious dents with lightweight wood filler, let it harden, and sand it flush. For plastic frames, avoid aggressive filling or sanding unless the material is sturdy enough to tolerate it.
4. Lightly Scuff Glossy Surfaces
Use fine-grit sandpaper to dull the existing shine. You are not trying to carve a new frame from scratch. A light, even scuff is usually enough to help primer grip the surface. Sand detailed areas gently so you do not flatten the design.
After sanding, remove every trace of dust with a tack cloth, clean brush, or lint-free rag. Professional surface-preparation guidance consistently emphasizes smoothing imperfections and removing sanding residue before applying primer.
5. Prime When Necessary
Primer is especially helpful when the frame is glossy, dark, stained, plastic, laminate, or made from an unknown composite material. It can improve adhesion, block discoloration, and make a lighter topcoat cover more evenly. Use a primer labeled for the frame’s surface.
Unfinished wood may accept acrylic or chalk-style paint without a separate primer, although priming can still produce a smoother, more uniform result. When in doubt, test your products on the back edge before committing to the front.
Step-by-Step $1 Picture Frame Transformation
Step 1: Apply the Base Color
Place the prepared frame flat on a protected work surface. Apply a thin coat of paint with a foam brush, following the longest edges of the frame. Work paint into decorative grooves with a smaller brush, then smooth the visible surface before it begins to dry.
Two or three thin coats usually look better than one thick coat. Heavy applications can create drips, fill carved details, and remain soft longer. Allow each coat to dry according to the product label.
Spray paint is another efficient option for frames with elaborate details. Use steady, overlapping passes rather than holding the nozzle in one spot. Frame projects from major paint brands similarly recommend light, controlled coats and continuous back-and-forth movement.
Step 2: Add Depth With a Contrasting Finish
Once the base coat is dry, add a second color with a dry-brush technique. Dip only the tips of a dry brush into the accent paint, wipe most of it onto scrap paper, and drag the remaining color lightly over raised edges.
For a modern antique look, try a black or deep green base with a small amount of warm gold on the high points. For farmhouse decor, use charcoal beneath off-white. For coastal decor, layer pale blue over warm beige and sand selected edges afterward.
Dry brushing works because the nearly empty brush deposits color on raised areas while leaving recessed details darker. It is a useful method for creating an aged appearance without burying the frame beneath a solid metallic coat.
Step 3: Distress the Edges, If Desired
When the paint is fully dry, gently rub a fine sanding sponge along corners and raised details. Stop as soon as the base layer or original finish begins to appear. Natural-looking distressing is usually concentrated where an object would realistically receive wear.
Avoid sanding every inch equally. That produces less of a “beloved vintage treasure” effect and more of an “encounter with an angry house cat” effect.
Step 4: Protect the Finish
A clear topcoat is optional for a frame that will hang untouched on a wall. It is more useful for tabletop frames, children’s rooms, kitchens, or pieces decorated with fragile details. Choose matte, satin, or gloss based on the desired appearance and confirm that the sealer is compatible with the paint.
Let the paint dry fully before sealing. A surface may feel dry while the coating beneath it is still soft. Follow the product’s curing instructions before reassembling the frame.
Step 5: Upgrade the Mat or Backing
The insert is often what makes an inexpensive frame look inexpensive. Replace the printed paper with heavyweight cardstock, linen-textured paper, wallpaper, fabric, or a simple custom mat.
Trace the backing onto your chosen material and cut it carefully. For fabric, leave a small margin to wrap around the edges. For scrapbook paper, apply a thin, even layer of decoupage medium, position the paper, and smooth from the center toward the edges. Apply another thin coat on top only when the product is intended to function as a sealer.
Fabric and paper are both widely used to customize picture frames and mats. Smoothing the material carefully and allowing each adhesive layer to dry helps prevent bubbles, wrinkles, and lifted corners.
Step 6: Reassemble the Frame
Clean both sides of the glass before replacing it. Allow the glass to dry completely so moisture is not trapped with the photo. Insert the artwork, add the refreshed backing, secure the tabs, and inspect the front for dust before closing everything.
For valuable photographs or original artwork, use archival-quality materials and avoid attaching adhesive directly to the front of the image. Positioning artwork carefully and keeping tape away from the visible face helps protect the piece during framing.
Seven Easy Design Variations
1. Minimalist Matte Frame
Paint the frame matte black, warm white, mushroom beige, or muted olive. Pair it with simple line art or black-and-white photography. This is the easiest style for making a lightweight frame appear cleaner and more substantial.
2. Antique Gold Frame
Start with dark brown or black paint. Add gold only to raised details with a dry brush or soft cloth. A little metallic color creates dimension; too much may make the frame resemble a trophy awarded for competitive coupon clipping.
3. Decoupage Frame
Cover the border with maps, book-page copies, floral napkins, wrapping paper, or scrapbook paper. Apply the pieces in small sections, smoothing them before the adhesive begins to set. Seal the finished surface after it dries. Decoupage projects commonly use paper, fabric, and napkin designs to transform basic wooden frames.
4. Fabric-Wrapped Frame
Use thin cotton fabric rather than heavy upholstery material. Cut strips that follow the frame’s shape, wrap the material around the edges, and keep seams on the back. Small patterns are easier to align and less likely to overwhelm the photograph.
5. Color-Blocked Frame
Paint the frame one color, let it dry, then use painter’s tape to create corners, stripes, or asymmetrical blocks. Press the tape down firmly and apply thin coats to reduce bleeding. Remove the tape carefully after the final coat has set enough to avoid smearing.
6. Mini Memo Board
Remove the glass and cover the backing with cork, fabric, or sturdy cardboard. Add crossed ribbon, twine, clips, or pushpins. Repurposed frames are frequently used as inexpensive photo displays and memo boards for desks, entryways, and children’s rooms.
7. Textured Coastal Frame
Apply a thick textured medium to selected areas and press in small shells, beads, or smooth pebbles. Keep embellishments away from the inner edge so they do not block the photo opening. Decorative shell frames can be personalized with pearls, beads, and other lightweight accents.
Common Picture Frame Makeover Mistakes
- Skipping cleaning: Paint placed over dust or grease may peel surprisingly quickly.
- Using the wrong paint: Standard craft paint may not bond well to slick plastic without surface preparation.
- Applying heavy coats: Thick paint creates drips and hides decorative details.
- Rushing drying time: Handling soft paint can leave fingerprints, dents, or marks from the backing.
- Sealing too early: A topcoat can trap moisture or disturb paint that has not dried properly.
- Overdecorating: The frame should complement the picture rather than challenge it to a visual wrestling match.
- Ignoring the back: Loose tabs, weak stands, and poor hanging hardware can ruin an otherwise successful makeover.
Safety and Display Tips
Use aerosol paints and strong adhesives only with adequate ventilation, preferably outdoors or in a workspace recommended by the manufacturer. Protect nearby surfaces, keep products away from flames, and follow all label instructions. The U.S. Environmental Protection Agency recommends maximum practical ventilation when painting or using products that can release volatile organic compounds.
When hanging the finished frame, check the condition of its hardware and consider the total weight of the frame, glass, backing, and embellishments. Adhesive picture-hanging products have specific weight and frame-size limits, so match the product to the finished piece rather than assuming every strip can support every frame.
How Much Does the Makeover Cost?
| Item | Typical Budget Approach |
|---|---|
| Picture frame | $1 bargain, thrift, or discount-store frame |
| Paint | Use leftover wall paint, craft paint, or a shared sample container |
| Primer | Use a small amount from another project when compatible |
| Decorative paper | Use wrapping-paper scraps, maps, or leftover wallpaper |
| Backing | Reuse clean cardboard or heavyweight packaging |
| Topcoat | Optional for low-contact wall displays |
The project remains inexpensive when you design around supplies already available. Buying a new container for every step can turn a one-dollar frame into a surprisingly well-funded executive frame. Select one primary finish and add only materials that noticeably improve the result.
Real-World Experience Notes: What Usually Happens During a $1 Frame Makeover
The most important lesson from budget frame transformations is that the frame’s price does not determine the final appearance nearly as much as preparation does. A one-dollar frame can look polished after careful cleaning and several thin coats of paint. The same frame can look worse than it did originally when painted directly over dust, fingerprints, or a glossy factory coating.
The first surprise is often how long preparation takes compared with painting. Removing the backing may reveal bent tabs, cardboard dust, dried adhesive, or a stand attached with more enthusiasm than engineering. It is tempting to leave everything assembled and paint around it. That shortcut usually creates rough inner edges and paint on the glass. Taking the frame apart feels slower, but it saves cleanup later.
The second common experience involves choosing a color based on the paint container rather than the room. A bright teal or metallic copper may look exciting on the craft table but compete with the photograph and nearby decor. Testing a small amount on the back helps reveal whether the finish suits the frame’s shape. Ornate frames often look convincing in black, aged gold, cream, or muted green. Simple frames can handle stronger color blocking and graphic patterns.
Another lesson appears during the first coat: inexpensive materials may not behave like solid wood. Some bargain frames are molded plastic, laminated fiberboard, or lightweight composite material. Water-heavy paint can cause exposed cardboard-like edges to swell. Aggressive sanding can remove a thin decorative layer. Gentle cleaning, light scuffing, and a compatible primer are safer than attacking the frame as though it owes you money.
Dry brushing is one of the most forgiving finishing techniques. An imperfect application often looks intentional because the goal is uneven highlighting. The biggest mistake is failing to remove enough paint from the brush. The brush should appear almost empty before it touches the frame. Building the accent slowly creates more realistic depth than applying one bright metallic stripe.
Decoupage projects introduce a different challenge: bubbles. Decorative paper may look perfectly flat when first positioned and develop wrinkles a minute later. Working in small sections, applying a thin adhesive layer, and smoothing from the center outward generally gives better results. Very thin napkins require an especially gentle touch because repeated brushing can tear the damp paper.
The backing frequently becomes the unexpected hero of the makeover. Replacing a flimsy printed insert with textured cardstock or fabric can make the entire frame feel more expensive. A properly sized mat also gives a small photograph more visual importance. Even an inexpensive printable looks more deliberate when it has clean margins and a coordinated background.
Finally, budget-frame projects are good reminders that DIY perfection is not the same as factory perfection. A tiny brush mark or slightly distressed corner can add character. The goal is not to convince a museum curator that the frame was carved in Florence. The goal is to create an attractive object that suits your home, displays something meaningful, and costs less than lunch.
Conclusion
Transforming a $1 picture frame is a small project with plenty of creative room. Start by identifying the material, disassembling the frame, cleaning it thoroughly, and lightly sanding glossy surfaces. Add primer when needed, build the color with thin coats, and use dry brushing, paper, fabric, or simple embellishments to personalize the design.
The best makeover is not necessarily the most complicated one. A restrained color palette, a clean backing, and a carefully displayed photograph can give a bargain frame a convincing designer look. Better still, the project is easy to repeat. Once one lonely discount frame receives its makeover, every outdated frame in the house may suddenly begin auditioning for paint.
SEO Information
Note: Product drying times, surface compatibility, ventilation requirements, and hanging limits vary. Always follow the instructions printed on the paint, adhesive, sealer, and mounting products used for the project.














