
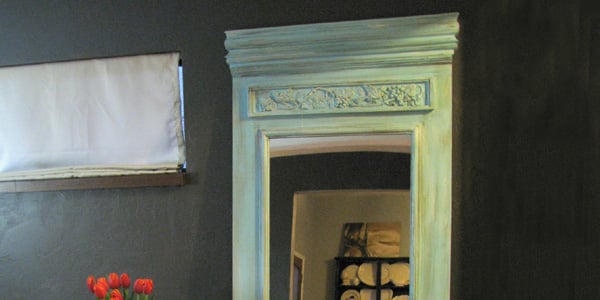
A full-length mirror is practical. A trumeau floor mirror is practical while also behaving as though it inherited a French château. With its tall proportions, decorative upper panel, architectural molding, and aged finish, this statement piece can make an ordinary bedroom corner look wonderfully intentional.
The good news is that you do not need antique-shop luck or a furniture-maker’s workshop to create one. This DIY trumeau floor mirror tutorial uses a large mirror, a sturdy wood backer, ready-made trim, and decorative appliqués. The result has the character of an old European architectural mirror without the antique-store price tagor the anxiety of transporting a fragile 200-year-old object in a compact car.
What Is a Trumeau Mirror?
A trumeau mirror is a tall, traditionally rectangular mirror associated with French interiors. Historic examples were often incorporated into paneled walls, positioned above mantels, or placed between windows. The word “trumeau” originally referred to the section of wall or architectural support between openings.
What makes the mirror distinctive is its decorative panel above the reflective glass. That upper section might feature a painting, carved garlands, musical instruments, floral motifs, classical figures, or ornamental plasterwork. The mirror and decorative panel are visually connected by one substantial frame.
Modern versions take plenty of creative liberties. Your upper panel can hold a wooden appliqué, a hand-painted motif, wallpaper, fabric, a small landscape painting, or simple layered molding. There is no royal inspector arriving to measure your scrollwork.
DIY Trumeau Floor Mirror Project Overview
This tutorial creates a floor mirror approximately 32 inches wide and 78 inches tall. The lower portion holds a 24-by-50-inch mirror, while the upper portion becomes the decorative trumeau panel.
Suggested Finished Dimensions
- Overall height: 78 inches
- Overall width: 32 inches
- Mirror glass: 24 by 50 inches
- Upper decorative area: approximately 16 inches high
- Side frame width: approximately 4 inches
These measurements are flexible. Before purchasing materials, measure the wall, doorway, stairwell, and vehicle involved in the project. Building a magnificent mirror that cannot leave the garage is a memorable experience, but not in the preferred way.
Materials and Tools
Materials
- One 32-by-78-inch sheet of 3/4-inch cabinet-grade plywood
- One 24-by-50-inch mirror with polished or safely finished edges
- Wood molding for the inner mirror frame
- Wider casing, baseboard, or decorative trim for the outer frame
- Small crown molding or decorative cap molding
- Wooden or resin appliqué for the upper panel
- 1-by-2-inch lumber for optional rear braces
- Wood glue
- 1-inch and 1 1/4-inch brad nails
- Paintable caulk
- Wood filler
- Mirror-safe adhesive or mirror clips
- Primer
- Furniture paint or interior enamel
- Glaze, dark wax, or antiquing wax
- Clear protective topcoat, if appropriate for the chosen paint
- Heavy-duty French cleat or anti-tip furniture straps
Tools
- Tape measure
- Pencil and combination square
- Miter saw or miter box with a hand saw
- Jigsaw or circular saw if cutting the backer at home
- Brad nailer or hammer and finish nails
- Clamps
- Drill and bits
- Level
- Orbital sander or sanding block
- 120-, 180-, and 220-grit sandpaper
- Paintbrush and small foam roller
- Safety glasses, hearing protection, and a dust mask
Many home-improvement stores will cut plywood and mirror glass to size. Professional mirror cutting is worth considering because large glass panels are heavy, sharp, and impressively uninterested in second chances.
Step 1: Plan the Trumeau Mirror Design
Lay the plywood backer flat and place the mirror on top without adhesive. Center it horizontally, leaving equal space on both sides. For the sample dimensions, a 24-inch-wide mirror on a 32-inch-wide backer leaves approximately 4 inches per side.
Position the mirror about 5 inches above the bottom edge. Leave 2 to 3 inches between the top of the mirror and the beginning of the decorative panel. The remaining space becomes the upper trumeau section.
Mark the mirror outline lightly in pencil. Then arrange the trim and appliqué without attaching anything. Take a photograph of the layout. This simple step is surprisingly helpful after the pieces have been moved, stacked, painted, and apparently relocated by tiny workshop goblins.
Choosing the Upper Panel Style
For a traditional French-style mirror, use a centered floral swag, shell, wreath, urn, or ribbon appliqué. For a cleaner interpretation, create a rectangular panel with narrow molding and one restrained ornament. A small painted landscape or printed pastoral scene can also work beautifully.
Keep the upper design symmetrical unless you are deliberately creating a more relaxed, artistic look. Symmetry helps inexpensive molding feel architectural and polished.
Step 2: Prepare the Wood Backer
Inspect the plywood and select the smoother face for the front. Sand the front, edges, and corners with 120-grit sandpaper, followed by 180-grit. Remove all dust with a vacuum and a clean, slightly damp cloth.
If the plywood has visible voids along the edges, fill them with wood filler. Let the filler dry, sand it smooth, and repeat if necessary. The edges will eventually be covered by trim, but correcting obvious gaps now produces a cleaner final result.
Large plywood panels can flex, especially when they are moved. Add two vertical 1-by-2 braces to the back if the panel feels unstable. Position them several inches from the outer edges so they do not interfere with wall-mounting hardware.
Step 3: Build the Outer Architectural Frame
The outer trim gives the DIY floor mirror its furniture-like presence. Wide door casing, flat stock layered with small molding, or decorative baseboard can all work.
Measure each side directly from the backer rather than relying only on the original dimensions. Cut the two vertical pieces first. Then cut the top and bottom pieces to fit between them or miter all four corners at 45 degrees.
Dry-fit the frame before attaching it. Small gaps become much more noticeable after paint, especially when they are at eye level and you have already told everyone the project is “almost finished.”
Apply a thin bead of wood glue to the back of each trim piece. Secure the trim with brad nails, checking alignment as you work. Use clamps where possible and wipe away squeezed-out glue before it dries.
Add a Decorative Top and Base
To create a grander silhouette, add a small crown molding cap at the top and a slightly wider plinth at the bottom. These pieces can extend 1/2 inch beyond each side of the main frame.
The top cap visually finishes the decorative panel, while the lower plinth makes the mirror look grounded. Keep the projection modest if the mirror will hang flat against a wall.
Step 4: Frame the Mirror Opening
Use narrow molding to create an inner border around the penciled mirror outline. This detail separates the glass from the wider outer frame and gives the piece a layered, professionally built appearance.
Leave approximately 1/8 inch of clearance around the glass. The mirror should fit without being forced between the trim pieces. Cut the inner molding with mitered corners, dry-fit it around the mirror, and label each piece on the back.
Remove the mirror before attaching the molding. Glue and nail the pieces to the plywood, keeping nails safely outside the mirror area. Fill visible nail holes after the glue has set.
Step 5: Create the Decorative Trumeau Panel
Measure the open area above the mirror and create a rectangular border using small picture-frame molding. Center the border between the side rails and leave enough breathing room for the appliqué.
Cut the molding at 45-degree angles, dry-fit all four pieces, and attach them with glue and short brad nails. Avoid using nails that could pass through the back of the plywood.
Center the decorative appliqué inside the panel. Lightweight wooden or resin ornaments can usually be attached with a suitable adhesive. Use painter’s tape to hold the ornament in position while the adhesive sets.
Alternative Decorative Panel Ideas
- Apply botanical wallpaper inside the molding.
- Paint a simple laurel wreath using a stencil.
- Insert a vintage-style landscape print mounted on thin hardboard.
- Add linen or patterned fabric over a removable panel.
- Create a sunburst from small pieces of wood trim.
- Use one oversized medallion for a minimal neoclassical look.
Step 6: Fill, Caulk, Sand, and Prime
Fill nail holes and obvious seams with wood filler. Once dry, sand the filled areas with 180- or 220-grit sandpaper.
Apply a narrow bead of paintable caulk wherever trim meets the plywood backer. Smooth it with a damp finger or caulk tool. Caulk is not a substitute for accurate cutting, but it is an excellent diplomat between two pieces of molding that disagree by 1/16 inch.
Vacuum the entire project and remove remaining dust. Apply a quality primer suitable for bare wood, plywood, and decorative resin if resin appliqués were used. Brush primer into carved details and use a small foam roller on the flat surfaces.
Allow the primer to dry fully. Lightly sand rough areas with 220-grit paper, then clean the surface again.
Step 7: Paint and Antique the Frame
Apply two thin coats of furniture paint or durable interior enamel. Thin coats create a smoother finish and reduce drips around detailed molding. Let each coat dry according to the manufacturer’s instructions.
Classic Color Options
- Warm ivory with brown glaze
- Muted French gray with white dry brushing
- Dusty blue with dark wax
- Soft sage with subtle gold accents
- Matte black with restrained brass highlights
- Natural wood stain with a clear protective finish
For an aged effect, work a small amount of glaze or dark wax into the corners, carvings, and molding profiles. Wipe the high points with a lint-free cloth so darker color remains mainly in the recesses.
Use a nearly dry brush to add a lighter tone across raised edges. This emphasizes the ornament without making the frame look as though it lost an argument with a bucket of white paint.
Optional gold wax can be applied sparingly to the appliqué and inner mirror molding. A little creates elegant dimension. Too much may cause the mirror to begin requesting its own velvet rope.
Step 8: Install the Mirror Glass
Place the painted frame faceup on a padded, level surface. Confirm that the mirror fits inside the opening before applying adhesive.
Use only adhesive specifically labeled as safe for mirrors. Some general-purpose adhesives can damage the reflective backing. Follow the product directions for bead size, spacing, surface preparation, curing time, and ventilation.
Lower the mirror carefully into position with assistance. Do not slide it aggressively across the backer. Apply gentle, even pressure without pressing hard enough to stress the glass.
Mirror clips, retaining blocks, or a rear support system can provide additional mechanical security. Do not rely on decorative molding alone to hold a large mirror. Allow the adhesive to cure completely before standing, lifting, or installing the finished piece.
Step 9: Secure the Floor Mirror Safely
A completed trumeau floor mirror can be heavy. Its exact weight depends on the glass thickness, plywood, molding, and ornamentation. Have another adult help move it.
For a wall-mounted installation, a properly rated metal or hardwood French cleat offers strong, level support. Fasten the wall portion into studs whenever possible. Use hardware designed for the wall material and rated above the mirror’s total weight.
If the mirror will lean against the wall, attach anti-tip straps or brackets to studs. A leaning mirror should never depend on friction alone, particularly in a home with children, pets, or enthusiastic vacuuming.
Check that the bottom sits on a stable, nonslip surface. Felt pads can protect hardwood floors, while rubber furniture pads can reduce movement.
How to Customize the Mirror for Your Home
For a Romantic Bedroom
Choose warm white paint, delicate floral ornament, and light distressing. Place the mirror near a window where it can reflect natural light and soft textiles.
For a Moody Entryway
Use charcoal, deep olive, or black paint with antique brass accents. A dramatic dark frame looks especially effective against pale walls.
For a Cottage Interior
Try faded blue or sage green with visible brush texture. Replace the classical appliqué with a carved botanical element or a small landscape panel.
For a Modern Traditional Room
Keep the trumeau proportions but simplify the decoration. Use flat stock, one narrow molding profile, and a single-color satin finish. The result feels architectural without becoming overly ornate.
Common DIY Trumeau Mirror Mistakes
Choosing a warped backer: A twisted plywood panel can make the trim difficult to align and may place uneven pressure on the glass. Inspect the sheet before purchasing it.
Attaching the mirror too early: Paint, primer, sanding dust, and caulk are much easier to manage before the glass is installed.
Using overly long nails: Nails should not pass through the plywood or enter the marked mirror area.
Skipping the dry fit: Test every trim piece, ornament, and mirror placement before reaching for glue.
Using incompatible adhesive: Select a mirror-safe product and follow its label rather than assuming every construction adhesive is suitable.
Ignoring the finished weight: Plan the mounting system during construction, not after the mirror is leaning nervously against the hallway wall.
Overdoing the distressed finish: Concentrate aging around edges, recesses, and areas that would naturally receive wear. Random scratches everywhere rarely look convincingly antique.
Builder’s Experience: Lessons That Make the Project Easier
The most important lesson from building a DIY trumeau floor mirror is that the project is less about complicated woodworking and more about careful sequencing. Each individual taskcutting trim, filling nail holes, rolling on paintis manageable. Trouble usually begins when enthusiasm changes the order of operations.
It is tempting to install the mirror immediately because seeing the glass in place makes the project feel almost complete. Waiting is smarter. With the mirror removed, the frame can be rotated, sanded, caulked, and painted without constantly protecting a large reflective surface. It also prevents primer mist, wax fingerprints, and mysterious dots of paint from becoming permanent members of the household.
Another useful lesson is to design with the available trim rather than becoming emotionally attached to one exact inspiration photo. Home-improvement stores do not always stock matching molding profiles, and some beautiful trim is surprisingly expensive. Layering basic flat boards with inexpensive half-round or panel molding can create more depth than one costly piece. Once everything is painted the same color, separate materials begin to look like one carved architectural frame.
Dry-fitting deserves more time than most beginners expect. On a tall mirror, a difference of even 1/8 inch can become visible when two long vertical pieces are compared. Measuring both sides independently is more reliable than assuming the plywood is perfectly square. Marking the back of every cut piece also avoids the classic workshop puzzle titled, “Which Nearly Identical Piece Was Supposed to Go on the Left?”
The antiquing stage is where restraint becomes valuable. A first layer of glaze may look too subtle while it is wet, encouraging the application of more. After drying, however, dark wax and glaze usually become more noticeable. Building the effect gradually creates believable age. It is much easier to add another thin layer than to remove a thick brown cloud from every corner.
Decorative appliqués often look slightly artificial before primer. This can cause unnecessary doubt. Once the appliqué, trim, and backer receive the same primer and paint, they visually merge. Caulking small perimeter gaps strengthens the illusion that the ornament was carved as part of the frame.
Moving the finished mirror is also a project step, not an afterthought. Clear the route before lifting it. Measure doorways, remove breakable objects, protect corners, and have a second person guide the top. Carry the mirror upright whenever practical and avoid placing pressure on the center of the glass.
Finally, mounting hardware deserves the same attention as decorative details. The prettiest floral swag in the world cannot compensate for an unstable floor mirror. A French cleat or anti-tip system may be invisible after installation, but it is arguably the most important part of the build.
The finished piece is worth the methodical work. A DIY trumeau mirror has enough scale to transform a room, yet nearly every visual detail can be adjusted. It can look authentically aged, freshly traditional, dramatically dark, or quietly modern. Better still, the completed mirror feels personal because its proportions, ornament, and finish were chosen for a specific home rather than selected from a warehouse catalog.
Final Thoughts
This DIY trumeau floor mirror tutorial proves that statement furniture does not always require advanced joinery or a luxury budget. A sturdy backer, correctly fitted mirror, layered decorative molding, and thoughtful finish can create an impressive French-inspired focal point.
Take time with the layout, complete the dusty work before installing the glass, and secure the finished mirror with properly rated hardware. The result will reflect more than outfits and afternoon light. It will reflect your patience, creativity, and ability to turn several suspiciously ordinary pieces of trim into something delightfully grand.
Note: Adapt all dimensions, adhesives, fasteners, and mounting hardware to the actual materials, wall construction, and finished weight of your mirror. Follow product instructions and local safety requirements.










