
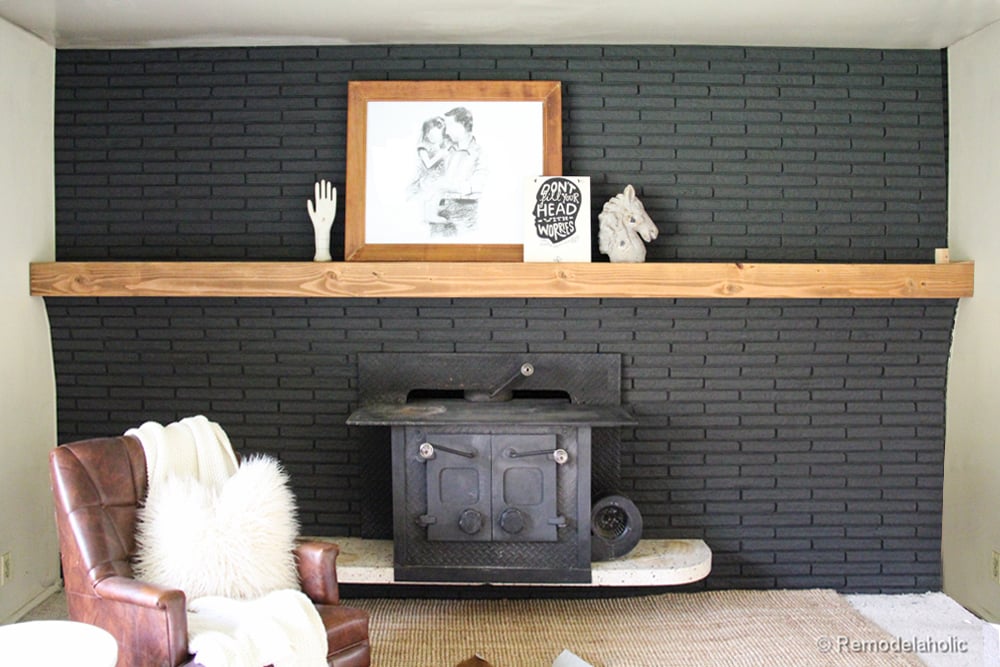
A brick fireplace already has personality. It has texture, history, and just enough “grand old house” energy to make even a Tuesday night feel like a movie scene. But without a mantel, it can also look a little unfinishedlike it got dressed for dinner and forgot its shoes. That is where an easy wood mantel for a brick fireplace comes in.
A wood mantel adds warmth, balance, and a practical display shelf without requiring a full fireplace renovation. You do not need to demolish brick, hire a parade of contractors, or learn ancient masonry secrets from a bearded wizard. With the right measurements, safe clearance, a simple design, and solid mounting hardware, a DIY wood fireplace mantel can be a realistic weekend project for many homeowners.
This guide walks through how to plan, build, install, finish, and style a simple wood mantel on a brick fireplace. It also covers safety rules, material choices, common mistakes, and real-world experience from doing this kind of project the practical way: carefully, patiently, and with at least one moment of standing back and saying, “Wait, is that level?”
Why Add a Wood Mantel to a Brick Fireplace?
A wood mantel is one of the fastest ways to change the mood of a brick fireplace. Brick can feel rustic, traditional, industrial, cozy, or even modern depending on the room. Wood softens the hard surface and gives the fireplace a visual “cap,” helping it feel intentional instead of accidental.
The biggest benefit is style. A thick pine beam can create a farmhouse fireplace mantel. A clean oak shelf can look modern and minimal. A painted poplar mantel can feel classic and built-in. Reclaimed wood can add character, especially if your brick has age, color variation, or charming imperfections. In short, the mantel tells the brick what outfit it is wearing.
The second benefit is function. A mantel gives you a place for framed art, candles, greenery, seasonal decor, a mirror, or a carefully arranged stack of books that implies you read more poetry than you actually do. It also creates a natural focal point in a living room, family room, bedroom, or den.
Most importantly, a wood mantel can be easier than a full surround. Instead of framing the entire fireplace opening, you can install a floating mantel shelf directly above the firebox. This keeps the project manageable while still delivering a dramatic before-and-after result.
Safety First: Wood Mantel Clearance Matters
Before choosing wood, stain, or decorative brackets, start with safety. A fireplace produces heat, and wood is combustible. That means a mantel cannot be placed wherever it “looks cute.” Local building codes, fireplace manufacturer instructions, and national fire safety standards all matter.
For many traditional wood-burning fireplaces, a common rule of thumb is that combustible materials should be kept at least 6 inches from the fireplace opening, with additional restrictions for materials that project outward. A mantel shelf above the opening is often placed at least 12 inches above the top of the firebox opening, and deeper mantels may require more clearance. Gas fireplaces, inserts, and electric fireplaces may have their own clearance requirements, so always check the manual for your specific unit.
Here is the homeowner-friendly translation: do not guess. Measure the firebox opening, measure your mantel depth, and confirm the safe distance before drilling into brick. If your fireplace has an insert, call the manufacturer’s documentation the boss. If your city has stricter local rules, local code wins. The mantel may be the star of the room, but fire safety is the director.
Choosing the Best Wood for a Fireplace Mantel
The best wood for a fireplace mantel depends on your budget, tools, room style, and finishing plan. Fortunately, you have plenty of good options.
Pine
Pine is affordable, widely available, and easy to work with. It is great for rustic mantels, painted mantels, and budget-friendly DIY projects. It can dent more easily than hardwood, but that can be part of its charm. If pine were a person, it would say, “Relax, the scratch gives me character.”
Poplar
Poplar is a smart choice if you plan to paint the mantel. It has a smoother surface than construction-grade pine and usually takes paint well. It is often used for trim and built-in details, making it a good pick for a classic mantel shelf.
Oak
Oak is strong, attractive, and durable. It has a visible grain that looks beautiful with stain. It costs more than pine or poplar, but it gives the mantel a polished, furniture-quality feel.
Alder, Maple, and Reclaimed Wood
Alder offers a warm, rustic look. Maple feels clean and modern. Reclaimed wood brings instant age and texture, but it should be inspected carefully for cracks, pests, old nails, and structural weakness. Reclaimed wood is lovely, but nobody wants a surprise nail ruining a saw blade or a Saturday afternoon.
Easy Mantel Design Options
There are three beginner-friendly ways to create a wood mantel for a brick fireplace.
1. Solid Wood Beam Mantel
A solid beam mantel is thick, simple, and dramatic. It looks especially good on red brick, whitewashed brick, or painted brick. The downside is weight. A heavy beam needs strong anchoring, and installation may require two people unless you enjoy wrestling lumber in front of your fireplace.
2. Hollow Box Beam Mantel
A hollow box beam looks like a thick solid beam but weighs much less. It is usually made by joining boards into a three-sided or four-sided box that slides over a cleat attached to the brick. This is one of the best easy DIY mantel designs because it offers a chunky look without the heavy lifting.
3. Simple Shelf Mantel
A simple shelf mantel uses a board, support cleat, and optional trim. It is clean, affordable, and beginner friendly. If your goal is “nice mantel by Sunday evening,” this is a strong candidate.
Tools and Materials You May Need
The exact list depends on your mantel design, but most brick fireplace mantel projects use common DIY tools and supplies.
- Tape measure
- Level
- Pencil or painter’s tape
- Stud finder if the wall area includes framing beyond the brick
- Hammer drill or drill with masonry setting
- Masonry drill bit
- Masonry screws or suitable masonry anchors
- Wood cleat, often a 2×4 or similar board
- Mantel boards or beam
- Wood screws
- Wood glue
- Clamps
- Sandpaper or orbital sander
- Stain, paint, or clear protective finish
- Safety glasses and dust mask
Do not skip safety glasses when drilling into masonry. Brick dust has no respect for eyeballs, and neither should your project plan.
How to Measure for a Wood Mantel on Brick
Good mantel installation starts with accurate measuring. First, measure the width of the firebox opening. Many mantels look balanced when they extend 3 to 6 inches beyond each side of the firebox, though wider mantels can work if the brick fireplace is large or the room has high ceilings.
Next, decide the mantel height. Many mantels sit around 54 inches from the floor, but there is no single magic number because fireplace sizes, hearth heights, ceiling heights, and safety clearances vary. The bottom of the mantel must meet clearance requirements above the firebox opening.
Then measure the depth. A common mantel depth is around 6 to 7 inches, which gives enough room for decor without sticking out so far that it traps heat or looks bulky. For a small brick fireplace, a slimmer shelf may feel more proportional. For a large brick fireplace wall, a deeper beam can look more substantial.
Finally, use painter’s tape to outline the mantel directly on the brick. Step back and look at it from across the room. This low-tech trick prevents high-regret drilling. If it looks too high, too low, too skinny, or too wide in tape, it will probably look that way in wood too.
Step-by-Step: Installing an Easy Wood Mantel on Brick
Step 1: Confirm Clearance and Fireplace Type
Before cutting wood, confirm the correct clearance for your fireplace. Check whether it is wood-burning, gas, electric, or an insert. Read the manual if available and follow local code. When in doubt, ask a qualified fireplace professional or local building department.
Step 2: Mark the Mantel Location
Use a tape measure and level to mark the mantel height. Mark the centerline of the firebox and the centerline of the mantel. This keeps the finished shelf from drifting to one side like it is trying to leave the room.
Step 3: Prepare the Wood Cleat
A cleat is the hidden support board that carries the mantel. For a hollow box beam, the cleat fits inside the mantel and allows the mantel to slide over it. Cut the cleat slightly shorter than the inside width of the mantel so it is hidden after installation.
Step 4: Drill Pilot Holes in the Brick
Hold the cleat against the brick at the marked line. Mark anchor locations, spacing them so the mantel will be well supported. Drill into solid brick when possible rather than weak or crumbling mortar. Use a masonry bit sized for the anchors or masonry screws you selected. Keep the drill steady, and clear dust from the holes before fastening.
Step 5: Attach the Cleat
Fasten the cleat to the brick with masonry screws or appropriate anchors. Make sure the cleat is level and secure. If the brick surface is uneven, use shims where needed so the cleat sits straight. This is the moment when patience pays rent.
Step 6: Build or Prepare the Mantel
If you are using a prebuilt mantel, sand and finish it before installation if possible. If you are building a hollow box beam, assemble the top, front, and bottom boards with wood glue and screws or nails. Fill holes, sand edges, and test-fit it over the cleat.
Step 7: Slide the Mantel Over the Cleat
Place the mantel over the cleat and check that it sits level. Secure it from the top or bottom with screws driven into the cleat where they will be less visible. Countersink screws if needed and fill the holes with wood filler.
Step 8: Finish the Details
Touch up stain or paint, caulk small gaps only where appropriate, and clean the brick dust. Let finishes cure fully before decorating. Then enjoy the satisfying moment when the fireplace suddenly looks like it belongs in a magazine instead of a “before” photo.
Finishing Ideas: Stain, Paint, or Natural Wood?
The finish determines the final personality of your mantel. A dark walnut stain can make red brick feel rich and traditional. A natural clear coat works well with modern, Scandinavian, or organic interiors. White paint creates a crisp, classic look, especially against darker brick. Black paint can feel bold and architectural.
If your brick is busy with many color variations, a simple mantel finish often works best. If the brick is painted white or neutral, the wood mantel can provide contrast. For rustic rooms, leave some grain visible. For formal rooms, smooth the edges and choose a refined finish.
Always use a finish suitable for interior wood and follow the product’s drying and curing instructions. Avoid placing decor, candles, or electronics on the mantel until the finish has hardened properly. Fresh stain plus a ceramic vase can become a sticky little tragedy.
Styling a Brick Fireplace With a Wood Mantel
Once the mantel is installed, styling it is the fun part. Start with one anchor piece, such as a mirror, framed artwork, or large clock. Then add smaller objects in groups of varying height. Try a vase, a stack of books, a small plant, or a sculptural object.
For a balanced look, use symmetry: matching candlesticks on each side, similar vases, or paired frames. For a more relaxed look, use asymmetry: one tall item on one side and two or three shorter items on the other. The goal is visual balance, not a mantel lineup that looks like it is waiting for school pictures.
Seasonal decor works beautifully on a wood mantel. In fall, try pumpkins, dried branches, and warm-toned ceramics. In winter, use greenery, lights, and stockings, but keep combustible decorations safely away from active flames and heat. In spring, fresh flowers and lighter colors can soften the brick. In summer, go minimal with art and greenery.
Common Mistakes to Avoid
The first mistake is ignoring clearance. A mantel that looks good but sits too close to heat is not a design win. It is a future problem wearing a nice stain.
The second mistake is choosing the wrong anchors. Brick, block, mortar, and old masonry behave differently. Use anchors rated for the material, the load, and the application. Consider the weight of the mantel plus anything you plan to display on it.
The third mistake is making the mantel too deep. A very deep mantel can look awkward and may require additional clearance. It can also make decorating harder because objects disappear into shadow.
The fourth mistake is skipping a test layout. Painter’s tape is cheap. Regret is expensive. Tape the mantel shape on the brick before drilling.
The fifth mistake is rushing the finish. Sanding between coats, wiping off dust, and allowing proper dry time can make the difference between “custom feature” and “I fought a board and lost.”
Budget-Friendly Tips for a DIY Fireplace Mantel
If you want an affordable fireplace mantel makeover, keep the design simple. A hollow box beam made from common boards can look expensive after sanding and staining. Painted poplar can mimic a custom built-in look without hardwood pricing. Pine can work beautifully for rustic or farmhouse style.
Reuse materials where possible, but inspect them carefully. Salvaged wood can be gorgeous, yet it needs to be clean, dry, and structurally sound. If you buy a premade mantel shelf, compare dimensions, weight limits, installation hardware, and clearance information before purchasing.
Another budget tip is to spend money where it matters: anchors, drill bits, and finish. A dull masonry bit can turn a simple project into a brick-dust opera. Quality fasteners and a clean finish make the mantel safer and better looking.
Real Experience: What Installing an Easy Wood Mantel Teaches You
The first thing you learn when installing a wood mantel on a brick fireplace is that brick is not perfectly flat. It may look flat from the sofa, but once you hold a straight board against it, the truth arrives wearing work boots. Some bricks sit proud, some dip back, and mortar lines may create tiny gaps. This is normal. The trick is not to panic. Use a level, use shims if needed, and focus on making the mantel visually straight from the room’s main viewing angle.
The second lesson is that measuring once is adorable, but measuring three times is better. Mantel height affects everything: safety, proportion, TV placement, artwork, and how natural the fireplace feels in the room. A mantel that is too low can feel cramped and unsafe. A mantel that is too high can look like it is trying to escape into the ceiling. Painter’s tape is the simplest way to preview the final size before you commit.
The third lesson is that drilling into brick requires confidence, but not aggression. A hammer drill helps, but the goal is controlled pressure. Let the bit do the work. If you push too hard, you can widen the hole, wear out the bit, or chip the brick. Clean dust from the holes before installing screws or anchors because masonry dust can reduce holding power. This is one of those small steps that feels unnecessary until it becomes very necessary.
The fourth lesson is that a hollow beam mantel is often the sweet spot for DIYers. It gives the chunky look people love without the weight of a solid timber. It is easier to lift, easier to fit over a cleat, and easier to adjust. A well-built box beam can look like a serious architectural feature, even if it started life as a few humble boards at the home improvement store.
The fifth lesson is that finishing takes longer than expected, but it is worth it. Raw wood can look nice, but sanding, staining, sealing, or painting gives the mantel durability and polish. Test stain on scrap wood first because pine, oak, poplar, and alder all absorb finish differently. A stain that looks warm and elegant on the can may look orange on your wood. The can is optimistic. The scrap board is honest.
The sixth lesson is that styling should come after safety. It is tempting to load the new mantel with candles, garlands, picture frames, and enough seasonal decor to make a craft store nervous. But if the fireplace is active, combustible items need safe placement. Battery candles, ceramic pieces, framed art, and greenery used carefully can create a cozy look without turning the mantel into a hazard.
The final lesson is that an easy wood mantel for a brick fireplace changes the whole room. It frames the firebox, warms up the brick, and gives the eye a natural resting place. Even a simple shelf can make the fireplace feel finished. It is one of those projects where the result looks bigger than the effort. You may start with a plain brick wall and end with a living room centerpiece that makes guests ask, “Was that always there?” At that point, you are legally allowed to smile modestly and say, “Oh, just a little weekend project.”
Conclusion
An easy wood mantel for a brick fireplace is one of the most rewarding DIY upgrades you can make. It adds warmth, structure, and function without requiring a full remodel. The key is to plan carefully: measure the firebox, confirm clearance, choose the right wood, use proper masonry anchors, and install a secure cleat. From rustic pine beams to sleek painted shelves, the design can be as simple or polished as your room requires.
A wood mantel does more than decorate a brick fireplace. It turns it into a focal point. It gives your living space a finished look, creates a place for meaningful decor, and adds a layer of craftsmanship that feels personal. Just remember: safety first, level second, styling third, and bragging rights quietly thereafter.
Note: Always verify local building codes and fireplace manufacturer clearance requirements before installing any combustible wood mantel near an active fireplace.













