
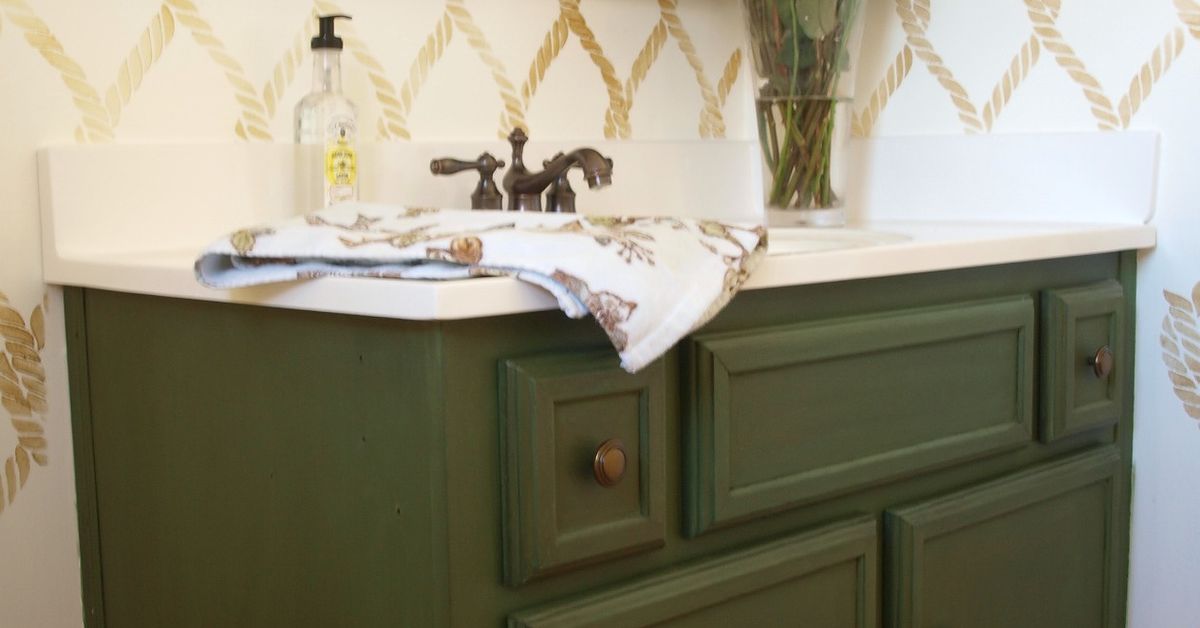
A green bathroom vanity makeover is one of those rare home projects that feels dramatic without requiring a dramatic bank account. You do not need to rip out tile, call three contractors, or whisper goodbye to your weekend savings. Sometimes, the fastest way to make a bathroom look fresh, custom, and magazine-ready is to take that tired vanity, give it a good scrub, dress it in the right shade of green, and let it re-enter society with confidence.
Green is having a serious design moment, but it is not just a trendy color splashed across social media for two weeks and then quietly abandoned like a bread machine. Green works because it is flexible. Sage green feels calm and spa-like. Olive green adds earthy warmth. Forest green brings depth and luxury. Emerald green makes a small powder room feel like a jewel box. Whether your bathroom is tiny, outdated, builder-basic, or simply begging for personality, a green vanity can become the anchor that pulls the whole room together.
This guide covers how to plan, paint, style, and maintain a green bathroom vanity makeover using practical DIY methods, smart color choices, and real design principles. By the end, you will know how to choose the right green, prep the cabinet properly, avoid common painting mistakes, and create a bathroom that looks intentional instead of “I saw a paint can and got brave.”
Why a Green Bathroom Vanity Works So Well
A bathroom vanity is usually one of the largest visual elements in the room. It sits right under the mirror, catches the eye when you walk in, and quietly judges your toothpaste habits. Changing its color can shift the entire mood of the bathroom without replacing plumbing, flooring, or tile.
Green Feels Natural and Relaxing
Bathrooms are personal spaces where people start and end the day, so calming colors make sense. Green connects visually with nature, plants, water, herbs, moss, and garden tones. That natural association helps a bathroom feel softer and more restful, especially when paired with white walls, warm wood, stone-look tile, or brushed metal hardware.
Green Adds Character Without Overpowering the Room
Unlike bright red or neon yellow, green can be colorful while still feeling grounded. A muted green vanity can act almost like a neutral, especially when the rest of the bathroom uses simple finishes. That is why shades such as sage, eucalyptus, olive, rosemary, and deep forest green are popular for bathroom cabinets. They bring personality, but they do not shout across the room like a paint color with a megaphone.
Green Works With Many Design Styles
A green bathroom vanity can lean farmhouse, modern, vintage, coastal, traditional, organic, or glam depending on the shade and styling. Sage green with matte black hardware feels modern and relaxed. Olive green with brass pulls feels warm and classic. Deep emerald green with a marble countertop and polished nickel faucet feels elegant and bold. The same basic project can produce very different results depending on the supporting details.
Choosing the Best Green for Your Bathroom Vanity
The best green bathroom vanity color depends on the size of the room, lighting, wall color, tile undertones, countertop material, and the overall mood you want. Paint chips can look innocent in the store and wildly different once they meet your bathroom lighting, so always test samples before committing.
Sage Green for a Soft Spa Look
Sage green is one of the safest and most versatile choices for a bathroom vanity makeover. It has gray undertones that keep it muted and sophisticated. It pairs beautifully with white, cream, light gray, natural wood, woven baskets, and brushed nickel or brass hardware. If your bathroom is small or does not get much natural light, a soft sage can add color without making the room feel closed in.
Olive Green for Warmth and Depth
Olive green is earthier and warmer than sage. It works especially well with beige tile, cream walls, wood mirrors, aged brass hardware, and natural textures. If your bathroom has warm flooring or a vintage feel, olive green can make the vanity look intentional instead of outdated. It is also forgiving, which is useful in a room where water spots, fingerprints, and daily chaos are basically roommates.
Forest Green for a Dramatic Statement
Forest green is bold, rich, and timeless. It is a great choice for larger bathrooms, powder rooms, or spaces with plenty of light. A deep green vanity can look stunning against white walls, marble-look countertops, black-and-white tile, or warm wood floors. The key is balance. If the vanity is dark, keep surrounding surfaces lighter or add reflective elements like a large mirror, glass sconces, or metallic hardware.
Emerald Green for a Jewel-Box Bathroom
Emerald green is the glamorous cousin who shows up overdressed and somehow makes it work. This color is excellent for powder rooms, guest bathrooms, or any space where you want impact. Emerald looks especially polished with brass hardware, a white sink, dramatic wallpaper, or a statement mirror. For a full bathroom used daily, choose a durable cabinet paint finish so the color stays beautiful through humidity, splashes, and repeated cleaning.
Blue-Green for Coastal or Fresh Style
Blue-green shades, including eucalyptus, sea glass, and muted teal, are excellent for bathrooms because they feel clean and watery without being predictable. These shades pair nicely with white subway tile, pale wood, chrome fixtures, and soft gray floors. A blue-green vanity can make a bathroom feel fresh, open, and quietly cheerful.
Before You Paint: Plan the Makeover Like a Pro
A successful green bathroom vanity makeover starts before the brush touches the cabinet. Planning helps prevent color regret, peeling paint, mismatched hardware, and the classic DIY moment where you realize the drawers are drying in the hallway and dinner guests arrive in twenty minutes.
Check the Vanity Material
Most bathroom vanities are made of wood, plywood, MDF, laminate, thermofoil, or a combination of materials. Wood and plywood are usually the easiest to paint. MDF can paint well if it is sealed and primed correctly. Laminate and thermofoil need extra attention because glossy or slick surfaces do not naturally grip paint. For those surfaces, a bonding primer is essential.
Look at the Existing Countertop and Tile
Your green vanity should cooperate with what is staying in the room. If the countertop has cool gray veining, consider sage, eucalyptus, or blue-green. If the tile is cream, beige, terracotta, or warm stone, olive or muted moss green may look more balanced. If the bathroom has black-and-white tile, nearly any green can work, from soft sage to deep forest.
Choose Hardware Early
Hardware changes the personality of the vanity. Brass warms up green and adds a classic or modern-luxe feel. Matte black creates contrast and works well in contemporary bathrooms. Polished nickel feels timeless and slightly dressier. Chrome looks clean and budget-friendly. Before drilling new holes, check whether the new pulls match the old hardware spacing. Measuring first is much less exciting than patching surprise holes later, but it is also much less annoying.
Tools and Supplies for a Green Bathroom Vanity Makeover
You do not need a professional workshop, but you do need the right supplies. Bathroom cabinets deal with moisture, cleaning products, toothpaste smears, and daily handling, so quality matters.
- Screwdriver or drill for removing doors and hardware
- Painter’s tape
- Drop cloth or protective paper
- Degreasing cleaner or mild cabinet cleaner
- Wood filler for dents or old hardware holes
- Sandpaper or sanding sponge, usually medium and fine grit
- Tack cloth or microfiber cloth
- Bonding, shellac-based, or stain-blocking primer
- Durable cabinet, door, trim, enamel, or hybrid alkyd paint
- High-quality angled brush
- Foam roller or microfiber roller for smooth surfaces
- New knobs, pulls, hinges, or soft-close hardware if desired
Step-by-Step Green Bathroom Vanity Makeover
Step 1: Remove Doors, Drawers, and Hardware
Start by removing cabinet doors, drawers, knobs, pulls, and hinges. Label each door and drawer with painter’s tape so you know where everything belongs. This may feel overly organized, but future you will be grateful when the doors go back on without turning into a puzzle designed by someone with a grudge.
Step 2: Clean Every Surface Thoroughly
Bathroom vanities collect hand lotion, soap residue, makeup dust, hairspray, and general mystery film. Paint does not stick well to grime, even if the grime has been part of the family for years. Clean all surfaces carefully, including edges, corners, and recessed panels. Let everything dry fully before sanding.
Step 3: Repair Dents and Old Holes
If you are switching from knobs to pulls or changing hardware spacing, fill old holes with wood filler. Also fill dents, scratches, and chipped corners. Once the filler dries, sand it smooth. Good prep work is what makes a painted vanity look custom instead of crafty in the suspicious sense.
Step 4: Sand for Better Adhesion
Light sanding removes gloss and gives primer a better surface to grip. You do not need to sand the cabinet down to raw wood unless the finish is damaged. The goal is to scuff the surface evenly. After sanding, wipe everything with a tack cloth or damp microfiber cloth and allow it to dry.
Step 5: Prime the Vanity
Primer is not optional in a bathroom vanity makeover. It helps block stains, improves adhesion, and creates a stable base for paint. For slick laminate or thermofoil, use a bonding primer. For stained wood or moisture-prone cabinets, a high-quality stain-blocking or shellac-based primer is often a smart choice. Apply a thin, even coat and let it dry according to the product instructions.
Step 6: Paint Thin Coats
Apply the first coat of green paint using a brush for corners and details, then a small roller for flat areas. Thin coats are better than thick coats. A thick coat may look satisfying at first, but it can drip, bubble, show brush marks, or cure poorly. Most vanities need two coats, and some deep greens may look best with three light coats.
Step 7: Let the Paint Cure
Dry and cured are not the same thing. Paint can feel dry to the touch but still be soft underneath. Give the vanity time before reinstalling hardware or placing items back inside. If possible, wait several days before heavy use. This patience helps prevent scratches, dents, and the heartbreaking mark of a drawer pull pressed into paint that was not ready for responsibility.
Step 8: Reinstall Hardware and Style the Vanity
Once the paint has cured, reinstall the doors, drawers, hinges, knobs, and pulls. Adjust hinges so the doors sit evenly. Add finishing touches such as a new mirror, updated faucet, fresh hand towels, a small tray, or a plant that can handle bathroom humidity. The styling should support the green vanity rather than compete with it.
Design Ideas to Make a Green Vanity Look Expensive
Pair Green With Warm Metals
Brass and champagne bronze hardware are popular choices with green because they add warmth and contrast. A sage vanity with brushed brass knobs feels soft and elegant, while a forest green vanity with antique brass pulls can look rich and traditional.
Use White for Clean Contrast
White walls, white countertops, and white sinks keep green feeling crisp. This combination works especially well in small bathrooms because the white surfaces reflect light while the green vanity adds depth.
Add Natural Texture
Green looks beautiful with woven baskets, rattan mirrors, wood shelves, linen towels, stone trays, and ceramic accessories. These textures reinforce the nature-inspired quality of green and keep the bathroom from feeling flat.
Try a Green Vanity With Patterned Tile
If your bathroom has patterned floor tile, choose a green that appears somewhere in the tile or complements its undertone. A muted vanity color can calm a busy pattern, while a deep green can make black-and-white tile feel more dramatic.
Small Bathroom Tips for a Green Vanity Makeover
In a small bathroom, green can still work beautifully. The trick is choosing the right shade and balancing the room with light, reflection, and simple styling.
For tiny bathrooms, consider soft sage, pale eucalyptus, or muted gray-green. These colors add freshness without making the vanity feel heavy. If you love dark green, use it confidently but keep the walls light, choose a large mirror, and avoid clutter on the countertop. A dark vanity in a powder room can look intentional and stylish, especially when paired with strong lighting and metallic accents.
Floating shelves, wall-mounted storage, and drawer organizers also help small bathrooms feel more open. A beautiful green vanity loses some charm when the countertop is covered with fourteen bottles, three hair ties, and a toothpaste tube that gave up on dignity last Tuesday.
Common Mistakes to Avoid
Skipping Primer
Skipping primer is the fastest way to make a vanity makeover fail early. Paint may peel around edges, scratch near handles, or show stains through the finish. Primer is the quiet hero of the project.
Choosing a Wall Paint Instead of Cabinet Paint
Bathroom vanities need durable paint made for trim, cabinets, or high-touch surfaces. Standard wall paint may not stand up well to moisture, cleaning, and daily use. Look for a washable, durable finish such as satin, semi-gloss, enamel, or hybrid alkyd paint.
Ignoring Lighting
Green changes under different lighting. A beautiful sage in natural daylight can look gray under cool bulbs or muddy under yellow bulbs. Test samples near the vanity and check them morning, afternoon, and evening before making a final decision.
Reassembling Too Soon
Fresh paint needs time. Reinstalling hardware too early can damage the finish. Give the vanity enough curing time so the makeover lasts.
Budget-Friendly Upgrade Ideas
A green bathroom vanity makeover can stay affordable while still looking polished. Paint is the biggest transformation, but small upgrades help complete the look.
- Replace dated knobs with brass, black, or nickel hardware.
- Swap an old mirror for a framed round or arched mirror.
- Install a new faucet that matches the hardware finish.
- Add peel-and-stick backsplash tile behind the sink.
- Use drawer organizers to improve daily function.
- Style with fresh towels, a soap dispenser, and a simple tray.
- Add a humidity-friendly plant such as pothos or snake plant.
If the vanity top is dated but still functional, consider working around it. A warm olive green can make beige counters look intentional. A blue-green vanity can freshen up gray counters. A deep forest green can elevate a basic white sink top. The goal is not to pretend the old countertop is marble from a boutique hotel. The goal is to make it look like it was invited to the design meeting.
How to Maintain a Painted Green Bathroom Vanity
Once your vanity looks gorgeous, protect the finish with gentle maintenance. Wipe water splashes quickly, especially around the sink edge. Use mild cleaners instead of harsh abrasives. Avoid scrubbing pads that can dull or scratch the paint. Add felt bumpers inside doors and drawers to reduce impact. Keep a small amount of leftover paint for touch-ups.
Good ventilation also matters. Run the exhaust fan during and after showers to reduce humidity. If the bathroom does not have a fan, open a window when possible. Moisture is normal in bathrooms, but trapped moisture can shorten the life of paint, caulk, wood, and even your patience.
Best Green Bathroom Vanity Color Pairings
For a calm spa bathroom, pair sage green with warm white walls, light oak accents, brushed nickel fixtures, and soft beige towels. For a vintage-inspired bathroom, combine olive green with cream walls, aged brass hardware, a wood mirror, and patterned floor tile. For a modern bathroom, try eucalyptus green with matte black hardware, white quartz, simple lighting, and clean-lined accessories. For a dramatic powder room, use emerald or forest green with wallpaper, brass accents, a bold mirror, and warm lighting.
Color pairing is not only about beauty. It is also about creating a room that feels balanced. If the vanity is bold, let something else be quiet. If the vanity is soft, you can add contrast through hardware, lighting, or tile. The best bathrooms usually have one main character and a good supporting cast.
Experiences From Real Green Bathroom Vanity Makeovers
One of the biggest lessons from green bathroom vanity makeovers is that the color often looks scarier in the can than it does in the room. Many homeowners start with a tiny paint sample, panic slightly, and wonder whether they are about to turn their bathroom into a salad. Then the color goes onto the vanity, the hardware is added, the mirror is cleaned, and suddenly the whole space feels designed. Green has a way of calming down once it is surrounded by the right materials.
A common experience is that prep takes longer than painting. Removing doors, cleaning corners, filling holes, sanding, taping, and priming can feel slow, especially when the exciting part is obviously the color. But the final result depends heavily on those unglamorous steps. A vanity that is cleaned and primed properly looks smoother, resists chipping better, and feels more like a factory finish. DIY painting rewards patience, which is rude but true.
Another useful lesson is to test green paint vertically. A paint chip lying flat on the counter does not show how the color will behave on cabinet doors. Tape samples directly to the vanity or paint sample boards and stand them upright. Check them next to the countertop, floor, wall, and mirror. Green can reveal blue, gray, yellow, or brown undertones depending on the light. A sage that looks perfect at noon may look too minty at night. An olive that seems sophisticated in the store may look muddy beside cool gray tile. Testing prevents a surprising number of design heartbreaks.
Hardware also changes everything. A basic vanity painted green can look charming with simple round knobs, modern with slim bar pulls, traditional with cup pulls, or luxurious with unlacquered brass. Many people underestimate hardware because it is small, but on a vanity, it functions like jewelry. The wrong hardware can make even a beautiful paint color feel unfinished. The right hardware makes the whole makeover look more expensive than it was.
Storage improvements are another practical bonus. Once the drawers are removed for painting, it is the perfect time to declutter. Most bathroom vanities contain expired products, half-used bottles, mystery cords, and at least one item nobody remembers buying. Adding drawer dividers, clear bins, or small baskets after the makeover makes the vanity feel new inside and out. A beautiful green exterior is lovely, but opening a drawer that does not attack you with loose cotton swabs is a luxury experience.
Finally, many successful makeovers prove that you do not need to change everything. A green vanity can make old tile look fresher, a plain mirror look more intentional, and basic white walls feel crisp. The smartest projects work with the existing bathroom instead of fighting it. Choose a green that respects the fixed finishes, upgrade a few details, and let the vanity become the focal point. The result can feel personal, stylish, and surprisingly high-end without requiring demolition dust in your toothbrush.
Conclusion
A green bathroom vanity makeover is a smart, stylish, and approachable way to transform a bathroom without a full renovation. Whether you choose soft sage, warm olive, fresh eucalyptus, bold forest, or glamorous emerald, green can bring depth, calm, and personality to one of the hardest-working rooms in the home. The secret is not just the color. It is the preparation, the primer, the durable paint, the right hardware, and the thoughtful styling that make the project look polished.
Take your time with samples, respect the existing tile and countertop, and do not rush the curing process. With careful planning and a little patience, your vanity can go from tired and forgettable to fresh, custom, and charming. In other words, your bathroom can finally stop looking like a rental afterthought and start looking like it has its own tiny design team.













