
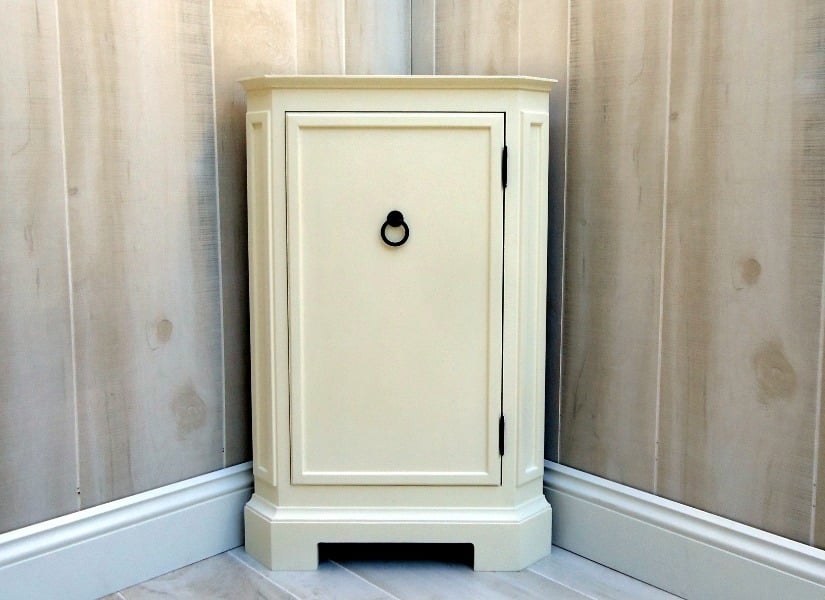
A corner cabinet is one of those furniture pieces that looks wildly sophisticated in a catalog and strangely impossible in real life. It sits there in a perfectly styled room, holding linen napkins, old books, or a vase containing one heroic branch. Meanwhile, your corner is holding a dust bunny with a lease agreement.
The good news: building a catalog-inspired corner cabinet is much more approachable than it looks. The secret is not magical woodworking wizardry. It is careful measuring, a simple cabinet box, clean proportions, and a few finish details that make the final piece look intentional rather than “I had leftover plywood and a very optimistic Saturday.”
This guide walks through how to design, build, finish, and install a stylish corner cabinet with a classic angled front. The plan works well for a dining room, entryway, bedroom, bathroom, or any corner that deserves better than a lonely plant stand.
What Makes a Corner Cabinet Look Catalog Inspired?
A catalog-inspired corner cabinet usually has a few things in common: balanced proportions, a simple silhouette, a door that sits neatly within or over the cabinet face, and trim that feels polished without becoming fussy. The piece should look like it belongs in the room, not like it was dropped from a spaceship full of clearance-bin hardware.
Most attractive corner cabinets use an angled front rather than a square box shoved into a corner. The cabinet’s rear panels meet at a 90-degree angle, while the front spans diagonally across the opening. That diagonal front creates a triangular cabinet footprint, making good use of a forgotten corner without swallowing the entire room.
For a classic furniture-catalog look, use furniture-grade plywood for the cabinet carcass, solid wood or hardwood edging for visible edges, a clean face frame, concealed hinges, adjustable shelves, and a durable painted or stained finish. You can keep the design traditional with crown molding and a framed door, or make it modern with a flat slab door and slim hardware.
Choose the Right Type of Corner Cabinet
Before buying materials, decide whether you are building a freestanding cabinet, a wall-mounted cabinet, or a tall floor-to-ceiling-style unit. Each has a different personality and a different relationship with gravity.
Freestanding Corner Cabinet
A freestanding cabinet sits on the floor and is usually secured to the wall for stability. This style works well in dining rooms, hallways, and bedrooms. It can include a lower storage cabinet, upper display shelves, or both. A freestanding unit is often easier to build because you are not relying entirely on wall support.
Wall-Mounted Corner Cabinet
A wall-mounted cabinet is excellent for bathrooms, kitchens, small offices, and compact entryways. It keeps the floor open and can make a small room feel less crowded. However, it must be securely attached to wall studs or proper structural blocking. Drywall alone is not an enthusiastic participant in holding a cabinet full of dishes.
Tall Display Corner Cabinet
A tall corner cabinet is ideal for displaying glassware, books, collectibles, or decorative objects. It can have a solid lower door and open shelves above, creating a furniture-store look without requiring a furniture-store budget. This style is especially useful when you want storage but do not want to add another large rectangular cabinet to the room.
Measure the Corner Before You Design Anything
The most important part of this project happens before you cut a single panel. Measure the corner carefully. Check the distance from the corner to nearby doors, windows, outlets, baseboards, radiators, vents, and furniture. A cabinet may look compact on graph paper but become surprisingly enormous once it starts blocking the path to the refrigerator.
Most room corners are supposed to be 90 degrees, but walls are not always emotionally prepared to behave like geometry textbooks. Measure the angle with a carpenter’s square or make a cardboard template. This extra step can save you from building a beautiful cabinet that leaves a mysterious wedge-shaped gap behind it.
For a practical medium-size corner cabinet, a good starting footprint is two 18-inch sides that meet at the rear corner. The diagonal front will measure roughly 25 1/2 inches across. A cabinet about 70 to 74 inches tall can provide meaningful storage without becoming a wooden skyscraper.
Materials for a Catalog-Inspired Corner Cabinet
You do not need exotic lumber or a workshop that looks like a television set. Good materials, accurate cuts, and patient assembly matter more than owning every tool ever invented.
- 3/4-inch furniture-grade plywood for the cabinet sides, top, bottom, shelves, and door panels
- 1/2-inch plywood for a back panel if your design includes one
- Solid wood boards or veneer edge banding for exposed plywood edges
- 1×2 or 1×3 lumber for the face frame and trim
- Wood glue and cabinet-grade screws
- Adjustable shelf pins and shelf supports
- Concealed European-style hinges or decorative semi-concealed hinges
- Door pull, knob, or latch hardware
- Wood filler, sandpaper, primer, paint, stain, and clear protective topcoat
- Wall-mounting hardware or anti-tip hardware for final installation
For beginners, prefinished plywood can reduce finishing work on the interior. For a painted cabinet, birch or maple plywood often gives a cleaner face than low-grade construction plywood. If you are under 18, new to power tools, or working with large panels, have an experienced adult or a lumberyard cutting service handle the sheet-goods cuts.
A Simple Example Layout and Cut Plan
This example uses a triangular cabinet footprint with two 18-inch rear sides and a 25 1/2-inch diagonal front. The dimensions are flexible; use them as a design starting point rather than a commandment carved into a workbench.
Suggested Cabinet Dimensions
- Overall height: 72 inches
- Rear side depth: 18 inches on each wall
- Diagonal front width: approximately 25 1/2 inches
- Cabinet depth at the center: approximately 18 inches
- Face-frame width: 1 1/2 to 2 1/2 inches
- Door width: about 24 to 24 1/2 inches, depending on your frame and hinge style
The cabinet box can be made from two vertical rear panels, a triangular top, a triangular bottom, and triangular shelves. The front receives a face frame that hides plywood edges and gives the cabinet a finished furniture look. A single diagonal door then covers the opening.
Build a cardboard or inexpensive hardboard mock-up before cutting plywood. It may feel silly to build a fake cabinet first, but it is much less silly than discovering your real cabinet cannot clear the baseboard or open its door without punching a nearby lamp.
Step 1: Make a Full-Size Template
Use cardboard, craft paper, or thin hardboard to create the cabinet footprint. Mark two lines representing the walls and draw the diagonal front. Place the template in the actual corner. Check the cabinet’s door swing, trim clearance, and relationship to nearby furniture.
If your walls are uneven, add a small scribe strip along the rear edges. A scribe strip is a narrow piece of wood that can be trimmed to follow a wavy wall. It helps the cabinet look fitted instead of looking like it gave up halfway through moving day.
Step 2: Cut and Dry-Fit the Cabinet Panels
Cut the two rear vertical panels, the triangular top and bottom, and the shelves. Keep every panel labeled as soon as it is cut. Plywood pieces have a magical ability to look identical until the exact moment you assemble one upside down.
Dry-fit the pieces on a flat surface before applying glue. Confirm that the rear panels meet squarely at the corner and that the front edges line up with the diagonal face-frame location. Check the top, bottom, and shelf panels with a square before fastening anything permanently.
Use a straightedge, a reliable square, and clamps to hold the cabinet in position during assembly. Pocket-hole joinery can work well for hidden connections, especially when building with plywood. Glue plus properly placed screws creates a strong cabinet box, but avoid over-tightening fasteners, which can damage plywood faces or pull joints out of alignment.
Step 3: Assemble the Cabinet Carcass
Start by joining the two rear vertical panels at the corner. Then attach the bottom panel, followed by the top panel. Add fixed shelf supports or horizontal stretchers where needed. These parts keep the cabinet rigid and give you solid locations for attaching the face frame and mounting hardware.
Check for square repeatedly. Measure from one front corner to the opposite rear corner, then compare it with the other diagonal measurement. If the measurements match, the box is square. If they do not, pause and correct the problem before the glue sets. Cabinets are surprisingly judgmental about tiny errors.
For adjustable shelves, drill shelf-pin holes before assembly when possible. It is easier to keep the rows straight while the side panels are lying flat. Use a shelf-pin jig or a carefully marked guide so the holes on both sides line up.
Step 4: Add the Face Frame
The face frame is where the cabinet begins to look expensive. It covers exposed plywood edges, creates a clean opening for the door, and gives the front a more traditional furniture profile.
Build a simple face frame from solid wood. Use two vertical stiles and two horizontal rails. The outer dimensions should match the diagonal front of the cabinet. Attach the face frame with glue and clamps, then reinforce it from inside the cabinet with screws or pocket screws where they will not be visible.
For a more formal catalog style, make the stiles slightly wider than the rails. Add a small decorative molding around the inside opening, or use a simple bead detail. For a modern cabinet, keep the face frame narrow and use a flat door with minimal hardware.
Step 5: Build and Fit the Door
A single diagonal door is the visual star of the cabinet. You can build a flat plywood slab door for a clean look, or make a frame-and-panel door for a more traditional appearance. A slab door is easier for beginners and works beautifully when edge-banded or framed with thin solid-wood strips.
Choose your hinge style before drilling for hardware. Concealed European hinges are popular because they are adjustable and hidden when the door is closed. Overlay hinges allow the door to cover part of the cabinet frame, while inset hinges place the door flush within the frame. Do not guess the overlay measurement; confirm it with the hinge specifications before cutting your final door width.
Hang the door before applying the final finish. Adjust the hinges until the gaps look even. Then remove the door for painting or staining. This is easier than trying to paint around hinges while muttering increasingly creative phrases at tiny screws.
Step 6: Hide Plywood Edges and Add Trim
Raw plywood edges can make even a carefully built cabinet look unfinished. Cover visible edges with iron-on veneer tape, solid wood edging, or thin hardwood strips. Veneer tape is convenient and affordable, while solid wood edging provides a more substantial furniture look.
Trim the edging flush after the adhesive has cooled, then sand lightly. Keep the sanding gentle around veneer faces because plywood veneers are thin and unforgiving. One overly enthusiastic sanding session can turn a beautiful birch surface into a surprise abstract art project.
Add base molding, crown molding, or a small decorative cap if you want the cabinet to feel more built-in. A simple plinth base can make a freestanding cabinet look grounded, while crown molding can help a tall cabinet visually connect with traditional room trim.
Step 7: Finish the Cabinet Like It Belongs in the Room
Sand all visible surfaces before finishing. Work through progressively finer sandpaper, remove dust thoroughly, and inspect the cabinet under good lighting. A finish is extremely honest. It will reveal glue smears, scratches, and fingerprints from three counties away.
For paint, use a stain-blocking primer followed by durable cabinet or furniture paint. Soft white, warm gray, muted green, navy, charcoal, and deep brown all work well for catalog-inspired cabinetry. Choose a color that connects with the room’s trim, wall color, or hardware.
For stain, test the color on offcuts from the exact plywood and solid wood you used. Different woods absorb stain differently, and plywood veneer may not match solid edging perfectly. Apply a clear protective topcoat after staining to improve durability and make cleaning easier.
Step 8: Install and Secure the Cabinet
Set the cabinet in place and check it with a level. Shim underneath or behind the cabinet as needed so the face frame is plumb and the door hangs correctly. Uneven floors and bowed walls are common, not personal insults from your house.
For a freestanding cabinet, secure the unit to wall studs with appropriate cabinet mounting hardware or anti-tip hardware. For a wall-mounted cabinet, use a strong mounting rail or solid cabinet back and fasten through structural material into wall studs. Do not load the cabinet with heavy dishes, books, or glassware until it is securely installed and checked for movement.
Catalog-Inspired Details That Make a Big Difference
Small design choices can turn a basic cabinet into a piece that looks thoughtfully styled. Try one or two details rather than adding every decorative option in the hardware aisle.
- Use aged brass, matte black, or brushed nickel hardware that matches nearby fixtures.
- Add one glass-front door for a display-cabinet look.
- Install a small puck light or rechargeable interior light for evening ambiance.
- Use a contrasting cabinet interior color for a subtle designer touch.
- Add beadboard, fluted trim, or a simple routed edge to the door.
- Place baskets on lower shelves to hide practical but visually chaotic items.
- Style the top with a lamp, framed print, ceramic bowl, or trailing plant.
Common Corner Cabinet Mistakes to Avoid
The most common mistake is assuming the corner is perfectly square. Measure it. Template it. Respect it. A second frequent mistake is ignoring baseboard trim. Either notch the cabinet, remove a short section of baseboard, or use filler strips so the cabinet can sit properly against the wall.
Another mistake is making the cabinet too deep. Corner storage is useful, but a deep triangular cabinet can become a black hole where holiday dishes disappear until the next administration. Keep shelf depth practical, and consider shallow shelves for items you need to reach often.
Finally, do not rush the door fitting. A cabinet with slightly uneven shelves may survive. A cabinet with a crooked door will stare at you every time you enter the room. Take your time adjusting hinges, checking gaps, and confirming that the door opens smoothly.
Conclusion
Building a catalog-inspired corner cabinet is a smart way to turn overlooked square footage into useful storage and a genuine design feature. Start with careful measurements, use a simple triangular cabinet box, choose hardware before finalizing the door, and spend extra time on the face frame, edge treatment, and finish.
The best corner cabinet is not necessarily the most ornate one. It is the one that fits the room, stores what you need, opens without drama, and makes the corner look like it was always meant to be there. With a thoughtful plan and patient assembly, you can create a custom piece that looks far more expensive than the pile of lumber it started as.
Experience-Based Lessons From Building a Catalog-Inspired Corner Cabinet
Hands-on cabinet building teaches a useful lesson very quickly: corners are never as simple as they look. On paper, a corner cabinet is just a triangle with shelves. In a real house, that triangle has to coexist with crooked walls, baseboards, outlets, uneven flooring, door swing, and the mysterious reason one wall appears to lean just enough to question your confidence. The builders who get the best results are not necessarily the fastest. They are the ones who test-fit often and treat measurements as clues rather than guarantees.
One practical habit is to make a temporary mock-up before committing to plywood. Cardboard, foam board, hardboard scraps, or even painter’s tape on the floor can reveal whether the cabinet feels too large. A cabinet can technically fit in a corner and still make the room feel cramped. The mock-up lets you stand back, walk through the room, and decide whether the proportions look elegant or whether the cabinet is beginning to resemble a polite wooden traffic cone.
Another lesson is that the front of the cabinet receives almost all the attention. People rarely inspect the hidden rear corner, but they absolutely notice the door gaps, hardware placement, finish quality, and visible plywood edges. That means effort should be spent where the eye naturally lands. A clean face frame, a well-fitted door, and carefully finished edging can make a modest cabinet look custom. A beautiful cabinet box with a crooked door will still look like a beautiful cabinet box wearing mismatched socks.
Experienced DIYers also learn not to choose hinges at the end. Hinge selection affects door width, door overlay, drilling location, opening clearance, and the relationship between the door and face frame. Buying a hinge first may feel backward, but it prevents a frustrating situation where the perfect door becomes the wrong size because the hardware has other ideas. Hardware is small, but it has opinions.
Finishing is another area where patience pays off. Paint and stain make the cabinet look complete, but they also highlight every shortcut. Sanding dust, glue squeeze-out, uneven edge banding, and rushed brush marks may hide in raw wood, then suddenly become the main characters after a coat of paint. Taking time to inspect under bright light, fill small gaps, and sand between coats creates a result that looks smoother and more intentional.
Finally, the most satisfying moment usually comes after installation. Once the cabinet is leveled, secured, and styled with useful objects, it stops feeling like a woodworking project and starts feeling like part of the room. That is the real goal of a catalog-inspired corner cabinet: not copying a picture perfectly, but creating a practical piece that makes your home feel more finished, more personal, and much less dependent on that one lonely corner plant.














