
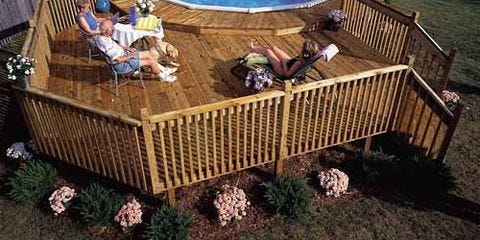
An above ground pool is already a backyard hero. It cools the kids, rescues summer weekends, and gives adults a reason to own oversized towels. But without a deck, it can feel a little like climbing into a giant soup can. A well-built pool deck changes everything. It creates safer access, gives swimmers a place to sit, hides some of the pool wall, and makes the entire yard look more finished.
This guide explains how to build a pool deck for an above ground pool, how to choose the right above ground pool deck plans, and what details matter before the first board is cut. It is written for homeowners planning a DIY-friendly project, but here is the grown-up reminder before we grab the tape measure: decks are structural. Local building codes, permits, inspections, frost-depth rules, electrical clearances, and pool-barrier requirements vary by location. When in doubt, involve your local building department or a qualified deck contractor. Future you, standing on a solid deck with lemonade in hand, will approve.
Why Build a Deck Around an Above Ground Pool?
The biggest reason to build an above ground pool deck is convenience. Ladders work, but they are rarely graceful. A deck gives swimmers a stable platform for entering and exiting the pool, creates room for chairs and towels, and helps adults supervise without hovering awkwardly at ground level.
A pool deck also improves design. Instead of a pool that looks dropped into the yard by a helicopter, the deck helps connect the pool to the patio, lawn, fence, and house. Even a small 10-by-10 access deck can make a round 24-foot pool feel intentional. A larger wraparound or partial-wrap design can feel almost like an in-ground pool area, without the excavation bill that makes wallets quietly weep.
Start With the Right Above Ground Pool Deck Plan
Before choosing lumber, fasteners, or railing style, decide what type of deck fits your pool and your yard. Above ground pool deck plans usually fall into four practical categories.
1. Small Platform Deck
A small platform deck is often the simplest option. It usually sits beside one section of the pool and provides enough room for steps, a gate, a landing, and maybe a couple of chairs. This is a smart plan for homeowners with limited space or a smaller budget.
2. Side Deck or Rectangular Deck
A side deck runs along one side of the pool. It offers more lounging space than a basic platform and works well when the pool sits near a fence, patio, or back door. A rectangular plan is easier to frame than a curved wraparound deck, which makes it a practical choice for many DIY builders.
3. Partial Wraparound Deck
A partial wraparound deck follows part of the pool’s shape. For round pools, this might mean a quarter-round or half-round deck. It looks more custom and gives swimmers more entry points, but it also requires more careful layout, especially where straight deck framing meets the curved pool wall.
4. Full Wraparound Deck
A full wraparound deck surrounds the pool and creates the most polished look. It also requires the largest budget, more footings, more railings, more boards, and more planning. If the phrase “more everything” makes your coffee taste stronger, consider starting with a partial deck and expanding later.
Check Permits, Codes, and Pool Barrier Rules First
Many homeowners want to start with lumber. Start with paperwork instead. It is less fun than power tools, but it can save you from rebuilding the deck later. Many areas require permits for decks over a certain height or size, decks attached to a house, decks serving an entrance, or walking surfaces more than 30 inches above grade. Because above ground pools are often 48 to 54 inches high, the deck platform may trigger guardrail and stair requirements.
Pool safety rules are just as important. Residential pools often need barriers that help prevent unsupervised access. That may include fencing, self-closing and self-latching gates, minimum barrier heights, and restrictions on climbable openings. If the pool wall itself is used as part of the barrier, the deck, ladder, steps, and gate still need to meet local rules. Think of the deck as part of the pool safety system, not just a pretty place to park flip-flops.
Measure the Pool, Yard, and Elevation
Good above ground pool deck plans begin with accurate measurements. Measure the pool diameter or length and width, the height from grade to the top rail, and the slope of the yard. Also note equipment locations, including pump, filter, hoses, skimmer, return fittings, electrical service, and any buried utilities.
Most pool decks are built as freestanding structures beside the pool, not attached to the pool wall. The pool needs room to move slightly as water shifts and temperatures change. Leave a small gap between the decking and the pool top rail, and avoid fastening the deck frame directly to the pool. Your pool is designed to hold water, not to act as a deck foundation. It has enough emotional responsibility already.
Choose Materials for a Pool-Friendly Deck
Pool decks live a harder life than ordinary backyard decks. They deal with water, sun, wet feet, pool chemicals, and the mysterious ability of children to splash in every direction at once. Choose materials that can handle moisture and regular cleaning.
Pressure-Treated Wood
Pressure-treated lumber is common, available, and usually the most budget-friendly framing material. It is also widely used for deck surfaces. If you use wood decking, plan to seal or stain it regularly and inspect it for splinters, raised fasteners, and weathering. Around bare feet, smoothness matters.
Composite Decking
Composite decking costs more upfront but requires less routine maintenance than wood. It resists rot and does not need staining. For pool decks, choose boards with good slip resistance and heat performance. Some darker deck boards can get hot in direct sun, so color selection matters unless you enjoy the backyard version of “floor is lava.”
PVC Decking
PVC decking is another moisture-resistant option. It is lightweight, low-maintenance, and often performs well near water. As with composite, compare slip resistance, warranty details, color, and heat buildup before buying.
Plan the Foundation and Footings
The foundation supports the entire deck, so this is not the place for creative shortcuts. Most elevated pool decks use concrete footings, posts, beams, and joists. Footing depth depends on local frost lines and soil conditions. In cold climates, footings usually need to extend below frost depth to reduce movement from freeze-thaw cycles.
Deck blocks may be allowed for some low, floating decks, but they are not automatically appropriate for elevated pool decks. A pool deck carrying people, furniture, railings, and stairs needs a foundation approved for the site and design. Your local building department can tell you what is acceptable.
Frame the Deck Correctly
A basic freestanding above ground pool deck includes posts set on footings, beams that carry the joists, joists that support the decking, and blocking that stiffens the frame. Joist spacing is commonly 16 inches on center for many deck-board systems, but the correct spacing depends on the decking product, joist size, span, angle of installation, and local code.
Use corrosion-resistant hardware and fasteners rated for treated lumber and exterior exposure. Pool areas are wet, and chemical exposure can accelerate corrosion. Joist hangers, post bases, beam connectors, stair hardware, and guardrail connections should be selected carefully. A beautiful deck held together by the wrong fasteners is just a future repair with better lighting.
Keep the Deck Level With the Pool Rim
Most pool decks are built close to the height of the pool’s top rail, but not so tight that the deck interferes with the pool. Leave enough clearance to remove or service pool parts, winter covers, top rails, and liners. If your deck boards sit too high, they can trap debris against the pool. If they sit too low, swimmers may step awkwardly over the rail.
A good plan creates a comfortable transition while protecting the pool structure. Many builders frame the deck independently and carefully cut deck boards near the pool curve for a clean finish. For round pools, this requires patience. Measure twice, cut once, and keep a spare board nearby for the one cut that decides to become “modern art.”
Install Deck Boards With Drainage in Mind
Deck boards need spacing that allows water to drain and debris to fall through. Follow the decking manufacturer’s spacing instructions. Wood boards may shrink or swell depending on moisture content, while composite and PVC products expand and contract with temperature changes.
Install boards so the surface feels stable underfoot and fasteners sit flush. Around pools, avoid sharp edges, splinter-prone boards, and awkward gaps where toes can catch. If you use hidden fasteners, confirm they are approved for the decking product and the poolside environment.
Add Stairs, Gates, and Railings
Stairs and railings deserve serious attention. Elevated decks typically need guardrails, and stairs often require handrails. Many residential deck guards are 36 inches high, though local requirements may vary. Openings between balusters are commonly limited so a small child cannot pass through. Stair dimensions, landing sizes, handrail grip, and gate design may all be regulated.
For pool decks, gates are especially important. A self-closing, self-latching gate can help prevent unsupervised access. Place latches where they meet local safety rules and keep climbable objects away from the outside of the barrier. Patio chairs, planters, coolers, and storage boxes can become accidental “ladders” if placed poorly.
Design for Pool Equipment Access
Never design a deck that traps the pump, filter, skimmer, valves, hoses, or electrical components behind boards you cannot remove. Pool equipment needs routine maintenance. Filters need cleaning, hoses need inspection, and winterizing often requires access around the pool.
If the deck is near equipment, include access panels, removable skirting, or a clear service path. A deck that looks great but requires a yoga pose to reach the filter is not a luxury feature. It is a prank with joists.
Smart Above Ground Pool Deck Ideas
Build a Towel and Toy Zone
Add a bench with storage or a weather-resistant deck box near the entrance. This keeps goggles, sunscreen, and pool toys from migrating across the yard like colorful wildlife.
Create a Shaded Corner
If your deck is large enough, plan space for an umbrella, shade sail, or pergola. Check fastening requirements and wind exposure before installing shade structures. Around pools, shade is not just comfort; it helps reduce sun fatigue during long swim days.
Use Skirting Carefully
Deck skirting can make an above ground pool deck look finished, but it should allow ventilation and access. Lattice, slatted panels, or removable sections can hide framing without creating a damp, sealed cavity.
Add Low-Glare Lighting
Step lights, post-cap lights, and low-voltage path lighting can improve evening safety. Use fixtures rated for outdoor and damp or wet locations as required, and keep electrical work compliant with local code.
Common Mistakes to Avoid
The first common mistake is building too close to the pool without allowing room for movement and maintenance. The second is skipping permits because the deck “looks simple.” The third is underbuilding the stairs or railings, which are often the parts people touch, push, lean on, and use most.
Another mistake is forgetting drainage. Water should not collect against framing, stair stringers, or the pool wall. Proper board spacing, airflow, flashing where needed, and smart grading around the deck all help the structure last longer.
Finally, do not ignore the future. If you plan to replace the pool liner, upgrade equipment, add a heater, or expand the deck later, design with those changes in mind. A little planning now can prevent a big “why did we do this?” moment later.
Basic Step-by-Step Overview
Step 1: Sketch the Deck Plan
Draw the pool, house, fence, equipment, stairs, gate, and deck footprint. Mark dimensions and note slopes. Decide whether you want a platform, side deck, partial wrap, or full wraparound design.
Step 2: Confirm Code and Permit Requirements
Contact your local building department. Ask about deck permits, footing depth, guardrail height, stair rules, pool barrier requirements, electrical clearances, and inspections.
Step 3: Mark Footing Locations
Use stakes and string lines to square the layout. Keep the structure independent of the pool unless a professional design says otherwise. Confirm all underground utility locations before digging.
Step 4: Install Footings and Posts
Dig footings to the required depth and size. Set post bases or posts according to approved plans. Keep posts plumb and properly aligned.
Step 5: Build Beams and Joists
Install beams, joists, hangers, blocking, and bracing as required. Check level frequently. Use approved connectors and fasteners.
Step 6: Install Decking
Lay deck boards with proper spacing and smooth edges. Cut carefully around the pool curve while preserving maintenance clearance.
Step 7: Add Railings, Stairs, and Gate
Install guardrails, handrails, stairs, landings, and self-closing gate hardware where required. Check that openings, heights, and latch locations meet local rules.
Step 8: Inspect, Clean, and Maintain
Schedule required inspections. After approval, clean the deck, seal wood if needed, and create a seasonal maintenance routine.
Maintenance Tips for a Longer-Lasting Pool Deck
Rinse the deck regularly to remove pool chemicals, dirt, and sunscreen residue. Sweep leaves from between boards. Inspect fasteners, railings, stairs, and gate hardware at the beginning of each swimming season. Wood decks may need staining or sealing every few years, depending on product, climate, and sun exposure.
Composite and PVC decks still need cleaning, even if they do not need staining. Use manufacturer-approved cleaners and avoid harsh tools that can damage the surface. Keep the area below the deck ventilated and avoid piling wet items against framing.
Real-World Experience: What Homeowners Learn After Building a Pool Deck
The first lesson many homeowners learn is that access matters more than size. A giant deck sounds exciting, but a well-placed medium deck can be more useful than a huge platform in the wrong spot. The best location is usually where people naturally enter the yard, where adults can supervise easily, and where pool equipment remains reachable. A deck should improve the flow of the backyard, not force everyone into a daily parade around the filter hose.
Another experience-based tip is to plan for wet traffic. People do not step out of a pool politely dry. They drip on stairs, sit on railings, drop towels, and leave puddles exactly where puddles are most annoying. Wider stairs, slip-conscious decking, and a landing large enough for two people passing each other can make the deck feel safer and more comfortable. If the stairs are too narrow, every pool party becomes a tiny traffic jam with sunscreen.
Homeowners also discover that storage is not optional. Pool floats, test strips, skimmer nets, goggles, brushes, and toys need a home. Without storage, the deck becomes a colorful obstacle course. A bench with storage, a deck box, or an under-deck access area can keep the space tidy. Just make sure storage does not block ventilation or create a climbable object near the pool barrier.
Shade is another feature people often wish they had planned earlier. A pool deck in full afternoon sun can become too hot to enjoy, especially with darker deck boards. Even a simple umbrella sleeve, a shaded seating corner, or a nearby pergola can make the deck more usable. If you live in a windy area, choose shade solutions carefully and anchor them properly.
Many DIY builders underestimate curves. Building a straight rectangular deck is one thing. Cutting boards around a round pool is another. The easiest approach is to frame the deck square or rectangular, then trim the decking carefully near the pool. Use a consistent gap, take your time, and accept that the last few cuts may require patience. Curves reward calm people. They punish rushing.
Finally, experienced homeowners learn that maintenance is easier when the deck is designed for it. Leave access to the skimmer, pump, filter, drain plugs, and winter cover hardware. Do not permanently bury anything you will need to touch later. If you want skirting, build removable panels. If you want lighting, plan wiring before decking is installed. If you want a future expansion, leave the framing layout understandable. A pool deck should feel like an upgrade, not a locked puzzle box.
Conclusion
Learning how to build a pool deck starts with a good plan, not a shopping cart full of lumber. The best above ground pool deck plans consider safety, permits, structure, drainage, materials, pool access, and long-term maintenance. Whether you build a small platform deck or a wraparound backyard centerpiece, the goal is the same: a stable, attractive, code-conscious space that makes swimming easier and summer more enjoyable.
Take your time with layout, use proper footings and connectors, protect the pool structure, and follow local rules for stairs, railings, gates, and barriers. Do that, and your deck can become the place where towels dry, friends gather, and every hot day suddenly has a better plan.














