
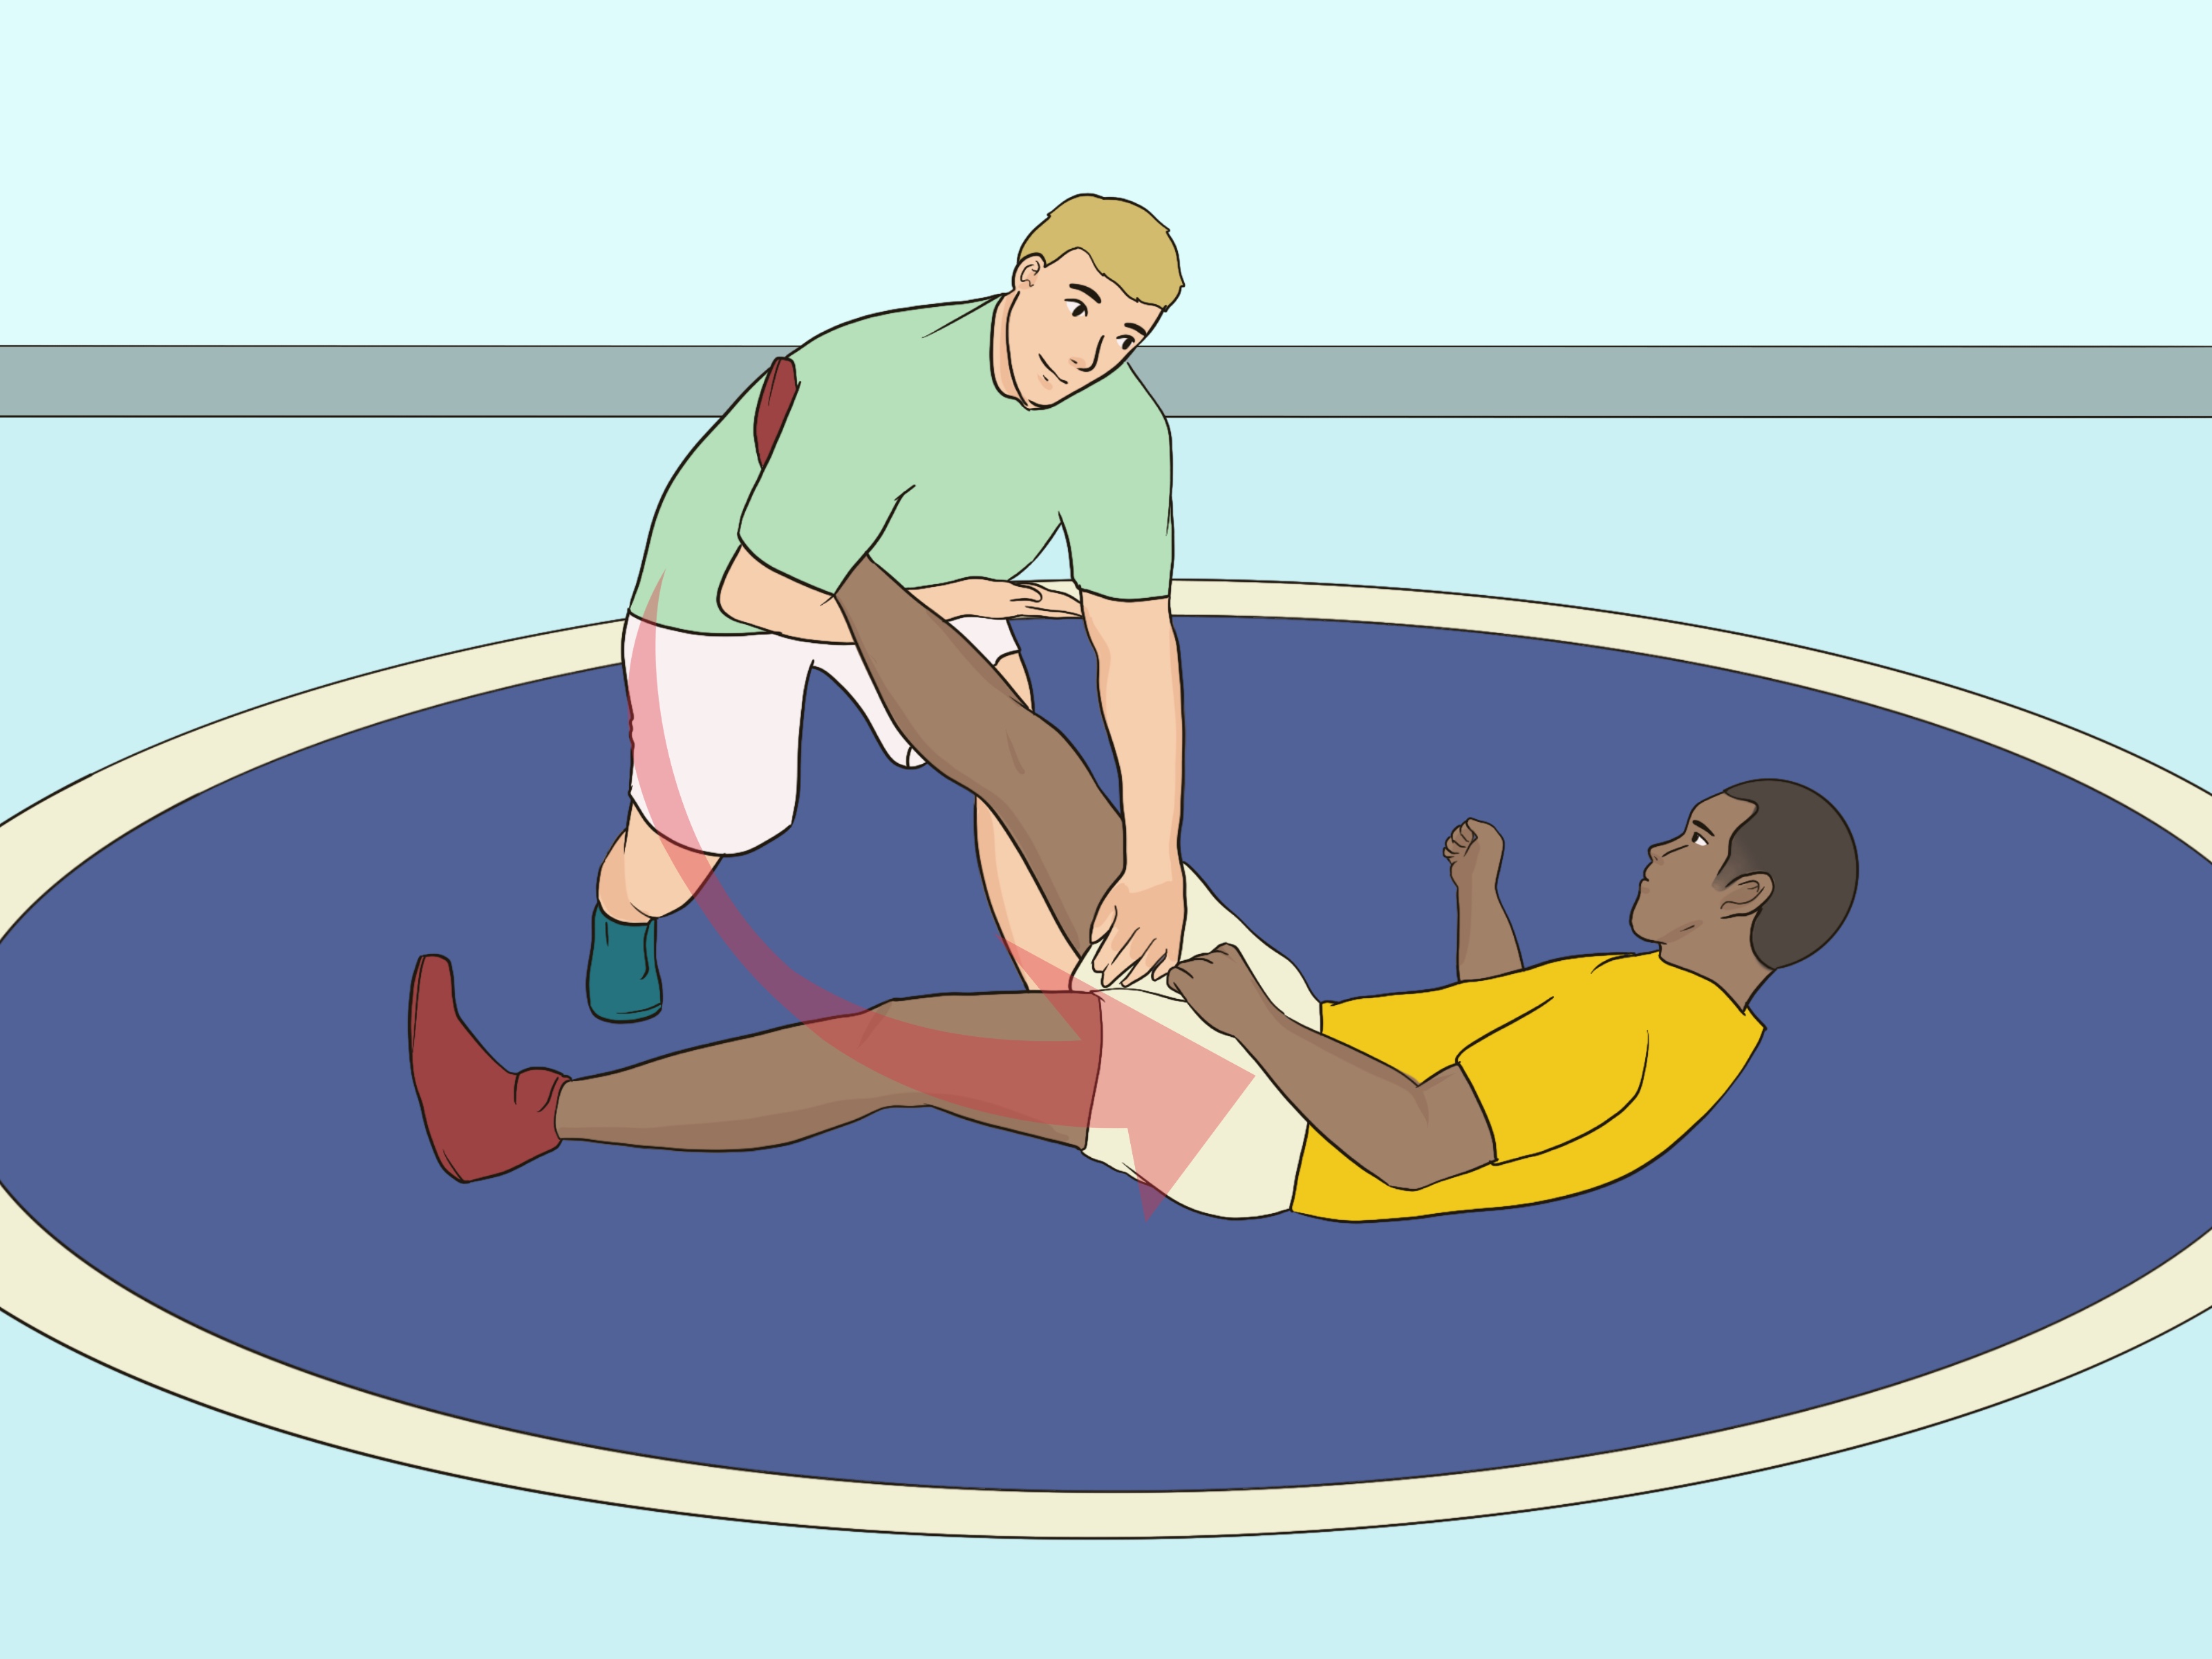
The single leg takedown is one of grappling’s most dependable techniques. Wrestlers use it, Brazilian Jiu-Jitsu athletes build entire standing games around it, and MMA fighters rely on it when tackling two legs feels like ordering the family-size meal.
The basic idea sounds simple: isolate one leg, disrupt your opponent’s balance, and finish with control. However, a successful single leg is not merely a dramatic ankle hug. It depends on distance, timing, posture, head position, footwork, and a finish that matches your opponent’s reaction.
This step-by-step guide explains how to perform a beginner-friendly head-inside single leg takedown, how to set it up, which finishes to practice, and how to correct the mistakes that commonly turn a promising shot into an exhausting scramble.
What Is a Single Leg Takedown?
A single leg takedown is a grappling technique in which you control one of your opponent’s legs and use leverage, pressure, and movement to bring them to the mat. Unlike a double leg takedown, which attacks both legs, the single leg allows you to concentrate your control on one side of the body.
The technique appears in folkstyle wrestling, freestyle wrestling, Brazilian Jiu-Jitsu, submission grappling, and mixed martial arts. Its exact execution changes with the rules. A wrestler may prioritize immediate control, while a BJJ athlete must also consider guillotines, guard entries, and the position that follows the takedown.
In current American scholastic and collegiate wrestling, a secured takedown is worth three points. Scoring definitions and legal finishes can change, however, so competitors should always consult their organization’s latest rules.
Common Single Leg Variations
- Head-inside single: Your head stays against the opponent’s torso on the inside of the captured leg.
- Sweep single: You attack from an angle and circle around the outside of the leg.
- Low single: You target the ankle or lower leg with a quick, low entry.
- High single: You elevate the captured leg and stand in a strong finishing position.
- Run-the-pipe finish: You rotate and lower the trapped leg while pressuring the opponent off balance.
Beginners should usually start with a head-inside single because its positions are relatively easy to recognize and it teaches the essential relationship between posture, leg control, and forward pressure.
Why the Single Leg Works
Human beings are reasonably stable on two feet. Remove one of those feet from the floor and suddenly the engineering becomes less impressive.
A good single leg takedown works by controlling the opponent’s base while applying pressure in another direction. You might elevate the leg while driving into the upper body, circle while pulling the leg inward, or block the standing foot while steering the torso. The finish comes from conflicting forces rather than raw strength.
This is why a smaller athlete with clean technique can finish against a larger partner. Strength certainly helps, but positioning gets the first invitation to the party.
Preparation: Stance, Distance, and Safety
Start in a Balanced Wrestling Stance
Place your feet approximately shoulder-width apart, bend your knees, lower your hips, and keep your chest proud rather than folded toward the floor. Your weight should rest on the balls and midsections of your feet so you can move in any direction.
Keep your elbows close and your hands available for hand fighting. Your head should be up, with your eyes focused around the opponent’s chest and shoulders. Looking at the feet may seem logical, but it often pulls your posture down and makes your intentions obvious.
Find the Correct Shooting Distance
A frequent beginner mistake is shooting from the next ZIP code. If you must dive to reach the leg, you are probably too far away.
Use short stance movements and hand fighting to enter a range where you can touch the opponent’s shoulder, arm, or head without leaning. From there, a setup can create the opening needed for your penetration step.
Warm Up Before Drilling
Prepare your hips, knees, ankles, neck, and shoulders with light movement and dynamic mobility. Useful warm-up exercises include stance-and-motion drills, hip rotations, controlled lunges, penetration steps, sprawls, and technical stand-ups.
Wear suitable wrestling or grappling gear, remove jewelry, trim your nails, and train on clean mats. Stop if you experience sharp pain, weakness, dizziness, confusion, or unusual neck or head symptoms. A suspected concussion requires immediate removal from practice and evaluation under appropriate medical guidance.
How to Do a Single Leg Takedown Step by Step
Step 1: Create a Reaction
Do not simply stare at the target leg and hope your opponent politely hands it over. Begin with a setup that moves their head, hands, or weight.
A simple beginner setup uses a collar tie and wrist control. Gently pull or snap the opponent forward. When they straighten their posture or step to recover balance, attack the leg that becomes available.
Other effective setups include an inside tie, wrist drag, arm drag, underhook, fake shot, or level-change feint. The goal is consistent: clear the opponent’s defensive hands and make their feet predictable.
Step 2: Change Levels
Lower your body by bending your knees while keeping your head up and back reasonably straight. A level change is not the same as bending at the waist. If your hips stay high while your face points at the mat, your opponent can push down on your head and sprawl with enthusiasm.
Your shoulders, hips, and knees should descend together. Think of lowering an elevator rather than tipping over a refrigerator.
Step 3: Take a Penetration Step
Step your lead foot between or just outside your opponent’s feet, depending on the entry being practiced. Bring your lead knee toward the mat under control, close enough that your shoulder reaches the thigh.
Your trail leg should follow immediately. Do not leave it stretched behind you, because a long, split stance makes it difficult to drive, turn, or recover if the first attempt stalls.
The penetration step should carry your hips underneath your torso. You are entering through the opponent’s stance, not collapsing in front of it.
Step 4: Connect to the Leg
Wrap both arms around the targeted leg. Depending on the position, your hands may lock behind the knee or higher on the thigh. Use a secure palm-to-palm or approved wrestling grip rather than interlacing your fingers loosely.
Pull the leg close to your chest. Space is the opponent’s escape route, so do not hold the leg at arm’s length as though it has questionable table manners.
Your shoulder should contact the thigh, and your head should remain upright and tight against the opponent’s ribs or upper torso. Keep the head on the inside for this fundamental variation. Good head position strengthens your posture and helps steer the opponent.
Step 5: Bring Up the Trail Leg
Step your outside foot forward and begin rising into a stable stance. Drive from your legs instead of trying to curl the opponent’s entire body with your arms.
As you stand, keep your elbows tight, hips under you, and captured leg pinched against your body. Avoid lifting with a rounded back. The goal is controlled elevation and balance, not an improvised strongman competition.
Step 6: Secure the High Single Position
Once upright, hold the opponent’s leg between your thighs or against your hip. Keep your head up and apply steady shoulder pressure into their body.
Your feet should continue moving. A stationary attacker gives the defender time to establish an overhook, push the head away, hop to the boundary, or free the trapped leg. Small circling steps keep the opponent reacting.
Step 7: Finish the Takedown
The easiest finish depends on how your opponent balances and defends. Begin by mastering one controlled finish, then add alternatives.
Three Reliable Single Leg Finishes
Finish 1: Run the Pipe
- Keep the captured leg tight and stand with strong posture.
- Step slightly away from the opponent’s free leg.
- Rotate your body while lowering the trapped leg toward the mat.
- Use your shoulder and head position to turn the opponent’s upper body.
- Follow them down and establish top control.
This finish should feel like turning a large steering wheel while sitting your weight beneath the leg. Do not violently twist the knee or spin without control.
Finish 2: Outside Trip
- Elevate the opponent’s captured leg and keep it close.
- Drive your upper body into their torso so their weight shifts backward.
- Step your leg behind or outside their supporting leg.
- Block the foot while guiding the upper body over the blocked base.
- Land with control and clear your legs before settling on top.
The trip succeeds because the opponent cannot move the supporting foot where balance demands. The upper-body pressure and foot block must work together.
Finish 3: Shelf the Leg and Circle
- Place the captured leg high across your thigh or hip.
- Clamp it with your elbow and keep your chest close.
- Circle toward the opponent’s back while pushing their upper body away.
- Guide their hands toward the mat and cover the hips.
This option is especially useful when an opponent hops well and resists a direct finish. Instead of chasing them in a straight line, make them turn on one foot until gravity submits its scorecard.
How to Maintain Control After the Takedown
Putting the opponent on the mat is only part of the job. Follow the fall without crashing your full weight onto a knee, neck, or extended arm. Keep your chest connected, control the hips, and move behind the legs when possible.
In wrestling, establish the control required by the applicable rule set. In BJJ, protect your neck, avoid falling directly into a guillotine, and be prepared for guard recovery. In MMA training, posture and positional control matter because striking changes the consequences of a loose finish.
Never assume the technique is complete simply because the opponent touches the mat. A takedown without follow-up control is often just an exciting way to begin another scramble.
Common Single Leg Takedown Mistakes
| Mistake | Why It Fails | Correction |
|---|---|---|
| Shooting from too far away | The opponent sees the entry and sprawls. | Use hand fighting and close the distance first. |
| Bending at the waist | Your head drops and your hips remain too far back. | Change levels by bending the knees. |
| Looking at the floor | Your posture weakens and the opponent can push your head down. | Keep the head up and eyes forward. |
| Leaving space around the leg | The opponent can kick free or insert defensive hooks. | Clamp the leg to your chest and hips. |
| Stopping after the entry | The defender has time to sprawl, overhook, or turn away. | Connect the entry, elevation, and finish continuously. |
| Trying to lift with the arms | Your grip tires before the opponent does. | Rise through your legs with your hips underneath you. |
| Using only forward force | A balanced opponent can hop backward. | Circle, rotate, or block the supporting foot. |
Drills for Learning the Single Leg Faster
Solo Penetration Steps
Practice the level change, penetration step, trail-leg recovery, and return to stance without a partner. Move slowly enough to keep your posture clean. Perform sets on both sides, even if one side initially feels as coordinated as a shopping cart with a bad wheel.
Entry-and-Freeze Drill
Have a cooperative partner provide a realistic stance. Perform the setup and entry, then freeze when you connect to the leg. Your coach or partner can check your head position, back angle, grip, knee placement, and trailing foot.
Progressive Resistance
Begin at roughly 20 percent resistance. The defender gives normal balance reactions but does not fully fight the technique. Gradually increase resistance as the attacker demonstrates control and safe finishing mechanics.
Finish-Only Rounds
Start with the attacker already holding a high single. The defender may hop, turn, establish an overhook, or push on the shoulders. The attacker works through approved finishes without resetting after the first unsuccessful attempt.
Situational Sparring
Begin each round from a defined single leg position. Award the attacker a win for securing the takedown and control; award the defender a win for escaping, countering, or returning to a stable neutral stance. Short rounds encourage purposeful movement without turning every repetition into a survival documentary.
Experience-Based Lessons From Practicing the Single Leg
A common beginner experience is believing the shot must be faster. Sometimes it doesbut the larger problem is usually what happens before the shot. When a wrestler attacks without moving the opponent’s hands or weight, even a quick entry can be obvious. After several frustrating rounds, many athletes discover that a modest snap, wrist pull, or believable feint makes the takedown feel dramatically faster. The entry did not acquire a turbocharger; it simply stopped arriving with an announcement.
Another early lesson concerns posture. New grapplers often know they should keep their head up, yet their eyes drift toward the leg as soon as sparring begins. The body follows the eyes, the back rounds, and the opponent’s sprawl suddenly feels like a sofa landing on the shoulders. Entry-and-freeze drills reveal this habit quickly. When the athlete learns to see the opponent’s whole body while lowering through the knees, the position becomes stronger and far less exhausting.
The grip provides a similar surprise. Beginners frequently squeeze the leg with maximum arm strength, expecting enthusiasm to replace mechanics. Their forearms become tired while the opponent calmly works free. Better results appear when the leg is connected to the chest, the elbows are tight, and the shoulder pressures the thigh. The arms still contribute, but the torso and hips carry more of the workload.
Finishing practice also teaches that a single leg is not one move with one ending. An opponent who stands tall may be vulnerable to a trip. Someone who bends forward may be easier to circle behind. A skilled hopper can often be finished by shelving the leg, changing direction, and making repeated small adjustments. The important habit is reading balance instead of forcing a favorite finish against every reaction.
Many athletes experience a breakthrough when they stop pausing between phases. At first, the sequence looks like separate photographs: setup, stop, level change, stop, grab, admire the achievement, then attempt a finish. Unfortunately, the defender is not contractually obligated to remain still between photographs. Smooth drilling connects the phases into one continuous action.
Training both sides can initially feel awkward, but it offers practical benefits. Opponents change stances, injuries sometimes limit a preferred side, and predictable attacks become easier to defend. The weaker side does not need to become identical overnight. A few technically careful repetitions in every practice gradually create a usable second option.
Finally, experienced grapplers learn that safe control is a mark of technical quality. A clean takedown does not require wrenching the captured knee, slamming a cooperative partner, or driving through the edge of the mat. Good partners communicate, increase resistance gradually, and release unsafe positions early. That approach may produce fewer spectacular practice-room crashes, but it produces more healthy athletes who can return tomorrowwhich is an impressively useful training strategy.
Conclusion
To perform a dependable single leg takedown, begin in a balanced stance, use hand fighting to create a reaction, change levels without folding forward, and take a deep penetration step. Connect your arms and torso tightly to the leg, recover your trail foot, rise with strong posture, and finish by rotating, circling, or blocking the opponent’s supporting foot.
Practice each phase slowly before adding resistance. Once the mechanics become consistent, connect the setup, entry, and finish into one fluid sequence. The single leg is easy to understand but wonderfully stubborn to master. That is precisely why it remains useful from beginner practice rooms to elite competition.














