
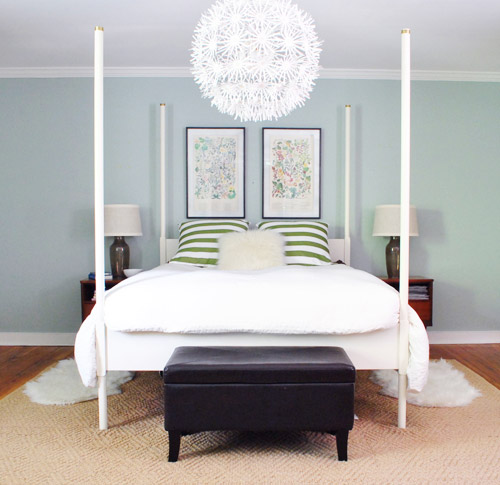
Hanging pictures over the bed sounds simple until you are standing on a mattress, holding a frame in one hand, a pencil in the other, and wondering why your bedroom suddenly feels like a geometry exam. The good news: you do not need to be an interior designer, a carpenter, or someone who owns seventeen types of measuring tape to get it right. You only need a few reliable rules, a sense of scale, and the humility to measure twice before creating a tiny “oops” gallery of nail holes.
Pictures above the bed can make a bedroom feel finished, personal, cozy, and intentionally styled. The wrong placement, however, can make the art look like it is floating away, crushing the headboard, or waiting to bonk you at 2 a.m. This guide explains how to hang pictures over the bed with the right height, size, spacing, style, and safety so your wall looks polished instead of puzzled.
Why the Space Above the Bed Matters
The bed is usually the largest piece of furniture in a bedroom, which makes the wall above it a natural focal point. When you add artwork there, you are not just filling blank space. You are creating a visual anchor for the whole room. A well-placed picture can make a small room feel more designed, soften a plain headboard, add color to neutral bedding, or bring personality into a space that otherwise says, “I bought sheets and stopped there.”
Because the bed already has strong visual weight, the art above it should feel connected to the furniture below. If it is too small, it looks lonely. If it is too high, it looks like it is trying to escape. If it is too heavy or poorly secured, it becomes a safety concern. Bedroom wall decor should be beautiful, but above all, it should stay on the wall like it signed a lease.
The Golden Rule: Keep the Art Connected to the Bed
One of the most reliable rules for hanging pictures above a bed is to leave about 6 to 10 inches between the top of the headboard and the bottom of the frame. This keeps the picture visually connected to the bed while giving it enough breathing room. Think of this gap as a polite handshake between your furniture and your artwork: close enough to feel related, not so close that things get awkward.
If your bed does not have a headboard, measure from the top of the mattress or pillows when the bed is made. In that case, the bottom of the artwork usually works best around 12 to 18 inches above the mattress line. You may need slightly more space if you sit up in bed often, have tall pillows, or enjoy dramatic bedtime reading poses.
How High Should Pictures Hang Over the Bed?
For most beds with a headboard, the sweet spot is simple: hang the bottom edge of the picture roughly 6 to 10 inches above the headboard. For beds without a headboard, aim for a position that keeps the art visually tied to the bed while safely above your head and pillows.
General art-hanging advice often says artwork should be centered around eye level, usually around 57 to 60 inches from the floor. That rule is helpful for hallways and empty walls, but over a bed, the furniture matters more. The art should relate to the bed first and the wall second. Do not center the picture between the headboard and ceiling unless the proportions truly call for it. That is how art ends up looking like it is stranded in decorative outer space.
Quick Height Examples
If your headboard is 48 inches tall, try placing the bottom of the frame around 54 to 58 inches from the floor. If your headboard is low, around 36 inches tall, the art may sit lower than you expect, but that is usually what makes it look intentional. If your ceiling is very high, resist the urge to chase the ceiling upward. The art belongs to the bed zone, not the attic zone.
Choose the Right Picture Size
Scale is where many bedroom walls go from “designer-inspired” to “why does this tiny print look scared?” A good guideline is for the artwork, or the total width of a grouping, to span about two-thirds to three-quarters of the width of the bed or headboard. This proportion creates balance without overpowering the furniture.
For a queen bed that is about 60 inches wide, artwork between 40 and 45 inches wide often works well. For a king bed that is about 76 inches wide, look for one large piece or a grouping around 50 to 60 inches wide. These are not prison rules. They are visual guidelines. A slightly narrower piece can work if it has strong color, a bold frame, or is balanced by lamps, sconces, or tall nightstands.
One Large Picture vs. Multiple Frames
A single large picture gives a clean, calm, hotel-style look. It works especially well in modern, minimalist, coastal, transitional, and contemporary bedrooms. A pair of matching frames creates symmetry and looks excellent above queen or king beds. Three frames in a row can feel polished and structured, especially when the frames are identical and evenly spaced.
A gallery wall above the bed can also work, but it needs discipline. Keep spacing consistent, repeat at least one design element, and treat the whole arrangement as one large piece. Otherwise, it can start to look like your wall is holding a family reunion and nobody knows where to stand.
Best Picture Arrangements Over the Bed
1. One Oversized Statement Piece
This is the easiest way to create impact. Choose one large canvas, framed print, textile art, or photograph that is wide enough to hold its own above the bed. Center it over the headboard, keep the bottom edge 6 to 10 inches above the top, and let it do the heavy lifting. This approach is great when your bedding already has patterns and you want the wall to feel calm.
2. A Pair of Matching Frames
Two frames above the bed create instant order. This layout is ideal for botanical prints, black-and-white photography, abstract art, or simple line drawings. Leave about 2 to 4 inches between the frames. The outside edges of the pair should still feel balanced with the bed width.
3. Three Pictures in a Row
Three frames can stretch nicely across a wide headboard. This arrangement works best when the frames are the same size and the artwork feels related. For example, use three coastal prints, three architectural photos, or three abstract pieces in the same color palette. Keep the spacing tight enough that the group reads as one unit.
4. A Relaxed Gallery Wall
A gallery wall adds personality, but above the bed it should still feel calm enough for a sleeping space. Mix frame sizes carefully, repeat colors, and map the layout on the floor before touching the wall. Keep the entire gallery centered above the bed, and avoid letting pieces climb too high unless you have a tall headboard or dramatic ceiling height.
5. A Picture Ledge
A picture ledge is a flexible option if you like changing art often. It lets you layer frames without committing to a dozen nail holes. However, make sure the ledge is securely mounted into studs or strong anchors, especially over a bed. Avoid placing heavy glass frames on a shallow ledge above where you sleep. Pretty is nice. Gravity is undefeated.
Safety First: How to Secure Pictures Over the Bed
When hanging pictures over the bed, safety matters more than style. This is not the place for a wobbly nail, mystery hook, or “it feels sturdy enough” confidence. Use hanging hardware rated for the weight of the frame, and when possible, anchor into wall studs. For drywall, choose appropriate drywall anchors, toggle bolts, or picture-hanging hooks designed for the load.
Before drilling, check the wall for electrical wiring, plumbing, or anything else that should not meet a drill bit. Use a stud finder, measure carefully, and follow the hardware manufacturer’s instructions. For large, heavy, antique, glass-covered, or valuable pieces, consider professional installation. There is no shame in hiring someone whose entire personality is “level and secure.”
Should You Hang Heavy Art Above a Bed?
You can hang heavier art above a bed if it is installed correctly, but lighter pieces are often the smarter choice. Canvas art, lightweight framed prints with acrylic instead of glass, fiber art, tapestries, and wood panels can all give style without unnecessary risk. If you live in an earthquake-prone area, have kids who bounce on the bed, or own a cat with parkour ambitions, lightweight and extra-secure is the better plan.
Tools You Need
You do not need a professional workshop to hang bedroom pictures neatly. Gather a tape measure, pencil, painter’s tape, level, stud finder, hammer or drill, proper hooks or anchors, and a helper if the art is large. A paper template is also useful. Trace the frame on kraft paper or newspaper, mark the hanger location, then tape the template to the wall to test placement before making holes.
Painter’s tape can also help you visualize the final width and height. Tape the outline of the artwork above the bed, step back, and look at it from the doorway, from both sides of the bed, and while standing near the footboard. If it looks too high in the tape version, it will look too high in the real version. Tape is honest like that.
Step-by-Step: How To Hang Pictures Over The Bed
Step 1: Measure the Bed or Headboard
Start by measuring the width of the bed or headboard. Multiply that number by about two-thirds to find a good minimum art width. For a more dramatic look, aim closer to three-quarters. This helps you choose art that feels proportional instead of accidental.
Step 2: Decide the Bottom Edge Height
Measure 6 to 10 inches above the top of the headboard and mark a light pencil line. This line represents the bottom of the artwork or the bottom edge of the entire arrangement. If you do not have a headboard, measure from the top of the made bed and leave enough room for pillows and comfortable sitting.
Step 3: Find the Center
Find the center of the bed and mark that point on the wall. The center of your art or arrangement should align with this mark. Do not center the picture on the wall if the bed is not centered on the wall. Center it over the bed. The bed is the boss here.
Step 4: Mark the Hanging Hardware
Turn the frame over and measure from the top of the frame to the hanging wire, D-ring, sawtooth hanger, or mounting bracket. Transfer that measurement to the wall so the frame lands where you planned. This is the step people skip right before saying words not found in decorating magazines.
Step 5: Install the Hook or Anchor
Use the correct hardware for your wall and frame weight. If you hit a stud, use a proper screw or hook. If you are hanging on drywall without a stud, use a quality anchor rated above the frame’s weight. For extra security, use two hooks instead of one when the frame allows it. Two hooks help distribute weight and keep the frame level.
Step 6: Hang, Level, and Test
Hang the picture, place a level on top, and adjust as needed. Gently test the frame to make sure it sits securely. Add small rubber bumpers to the back corners to protect the wall and keep the frame from shifting. Then step back and admire your work like you meant to do it perfectly all along.
Common Mistakes to Avoid
The most common mistake is hanging pictures too high. When art floats far above the bed, it disconnects from the furniture and makes the room feel awkward. Another mistake is choosing art that is too small. A tiny frame above a king bed can look like a postage stamp with confidence issues.
A third mistake is ignoring safety. Bedroom art needs secure hardware, especially if it hangs above your head. Avoid flimsy adhesive strips for heavy frames over the bed. They may work for lightweight items in some spaces, but over a sleeping area, mechanical hardware is usually the safer choice.
Also avoid overly busy art if your bedding, wallpaper, or headboard already has strong patterns. The bedroom should feel restful, not like five design ideas are arguing before breakfast. Balance bold art with quiet bedding, or pair patterned bedding with simpler wall decor.
Best Types of Pictures for Over the Bed
The best pictures for over the bed are pieces that support the mood you want in the room. For a peaceful bedroom, try abstract art in soft colors, landscape photography, botanical prints, line drawings, or neutral textile art. For a bolder room, choose one dramatic piece with strong contrast or saturated color, then repeat one or two of those colors in pillows, throws, or lamps.
Family photos can work, but be selective. A calm black-and-white set feels more bedroom-friendly than a giant vacation photo where everyone is sunburned and holding funnel cake. Personal art is wonderful, but the bed wall usually benefits from pieces that feel soothing, cohesive, and slightly edited.
How to Match Art With Bedroom Style
Modern Bedroom
Choose oversized abstract art, black frames, thin metal frames, or simple photography. Keep the layout clean and avoid too many small pieces.
Farmhouse Bedroom
Try soft landscapes, vintage-style prints, botanical sketches, or textured wall hangings. Wood frames and warm neutrals pair well with linen bedding and natural finishes.
Coastal Bedroom
Use beach photography, soft blue abstracts, woven textures, or watercolor prints. Avoid going too theme-heavy unless you want your bedroom to feel like it sells postcards.
Traditional Bedroom
Consider classic landscapes, framed textiles, symmetrical pairs, or elegant botanical prints. Gold, wood, or antique-style frames can add polish.
Boho Bedroom
Mix framed art with woven baskets, macrame, textile panels, or earthy abstract prints. Keep the arrangement intentional so it feels collected, not cluttered.
Lighting Pictures Above the Bed
Good lighting can make bedroom art look more expensive than it is, which is one of life’s small decorating victories. If you use picture lights, choose a fixture that suits the width of the artwork and mount it securely. Wall sconces on either side of the bed can also frame the art beautifully while adding functional reading light.
Avoid harsh glare on glass-covered frames. If glare is a problem, consider non-glare acrylic, a matte finish, or a different location. Bedrooms usually look best with soft, warm lighting that flatters the art without turning the wall into a museum interrogation room.
Renter-Friendly Ideas
If you rent, you can still decorate the wall above the bed without turning move-out day into a plaster repair marathon. Lightweight canvas art, fabric wall hangings, removable hooks rated for the item’s weight, and picture ledges installed with landlord-approved hardware can all help. Always check your lease before drilling, and save paint information if you need to patch small holes later.
Another smart renter trick is to use a tall headboard or freestanding screen as the visual feature instead of hanging heavy art. You can also lean a large lightweight canvas on a secure ledge or shelf, but only if it cannot slide forward. Over-bed decor should never depend on wishful thinking.
Real-World Experience: What Actually Works When Hanging Pictures Over The Bed
In real bedrooms, the “perfect” measurement sometimes needs a little adjustment. Bedding height, pillow thickness, headboard shape, ceiling height, nightstand scale, and even the style of the frame can change how the final placement feels. The best experience-based advice is to test the layout visually before making holes. Painter’s tape is your friend. It is cheap, removable, and much less judgmental than a misplaced screw.
One practical approach is to make the bed first, including the pillows you use every day. This matters because the made bed is what you actually see, not the bare mattress. A picture that looks perfectly placed above an empty bed may suddenly feel cramped once pillows are stacked against the headboard. If you use large European shams or decorative pillows, leave a bit more breathing room.
Another lesson: do not choose art only while standing two feet away from it in a store or scrolling on your phone. Bedroom art needs to work from across the room. Stand at the doorway and imagine the piece above your bed. If it has tiny details that only look good up close, it may not have enough presence for the main wall. Larger shapes, clear contrast, and a simple color story usually work better above a bed than fussy details.
It also helps to consider your habits. If you sit up in bed every night to read, avoid hanging the frame too low. If kids climb into the bed, skip heavy glass frames. If your bed shakes when a pet jumps on it, use extra-secure hardware and rubber bumpers. Design advice is helpful, but your actual life gets a vote too.
Symmetry is another real-world lifesaver. When in doubt, two matching frames over a queen bed or three matching frames over a king bed almost always look neat. The arrangement feels intentional, and measuring is easier. Just keep the spacing consistent. A 3-inch gap between frames is often enough to make separate pieces feel connected without crowding them.
For people decorating on a budget, oversized art does not have to be expensive. A large downloadable print, a framed poster, a stretched canvas, or even fabric mounted in a frame can look stylish when the scale is right. The frame can matter as much as the art. A clean frame in black, white, brass, oak, or walnut can make affordable artwork look far more polished.
The final experience tip is to live with the taped outline for a day before hanging the real picture. Look at it in the morning, at night, with lamps on, and from different angles. If it still looks right, install the hardware. If it bothers you, adjust the tape. Walls forgive tape much faster than they forgive enthusiasm with a drill.
Conclusion
Learning how to hang pictures over the bed is mostly about balance: the right size, the right height, the right spacing, and the right hardware. Keep the art close enough to the headboard to feel connected, choose a width that suits the bed, center the arrangement over the furniture, and secure everything properly. Once those basics are handled, the fun part begins: choosing artwork that makes your bedroom feel calm, personal, and finished.
The wall above your bed should not feel empty, awkward, or risky. With a measuring tape, a level, and a little patience, you can turn that blank space into a beautiful focal point. And yes, you are allowed to step back afterward, nod thoughtfully, and act like you have always been this good at interior design.
Note: This article synthesizes widely accepted U.S. interior design and home improvement guidance. Always follow the weight limits and installation instructions provided with your specific hanging hardware.










