
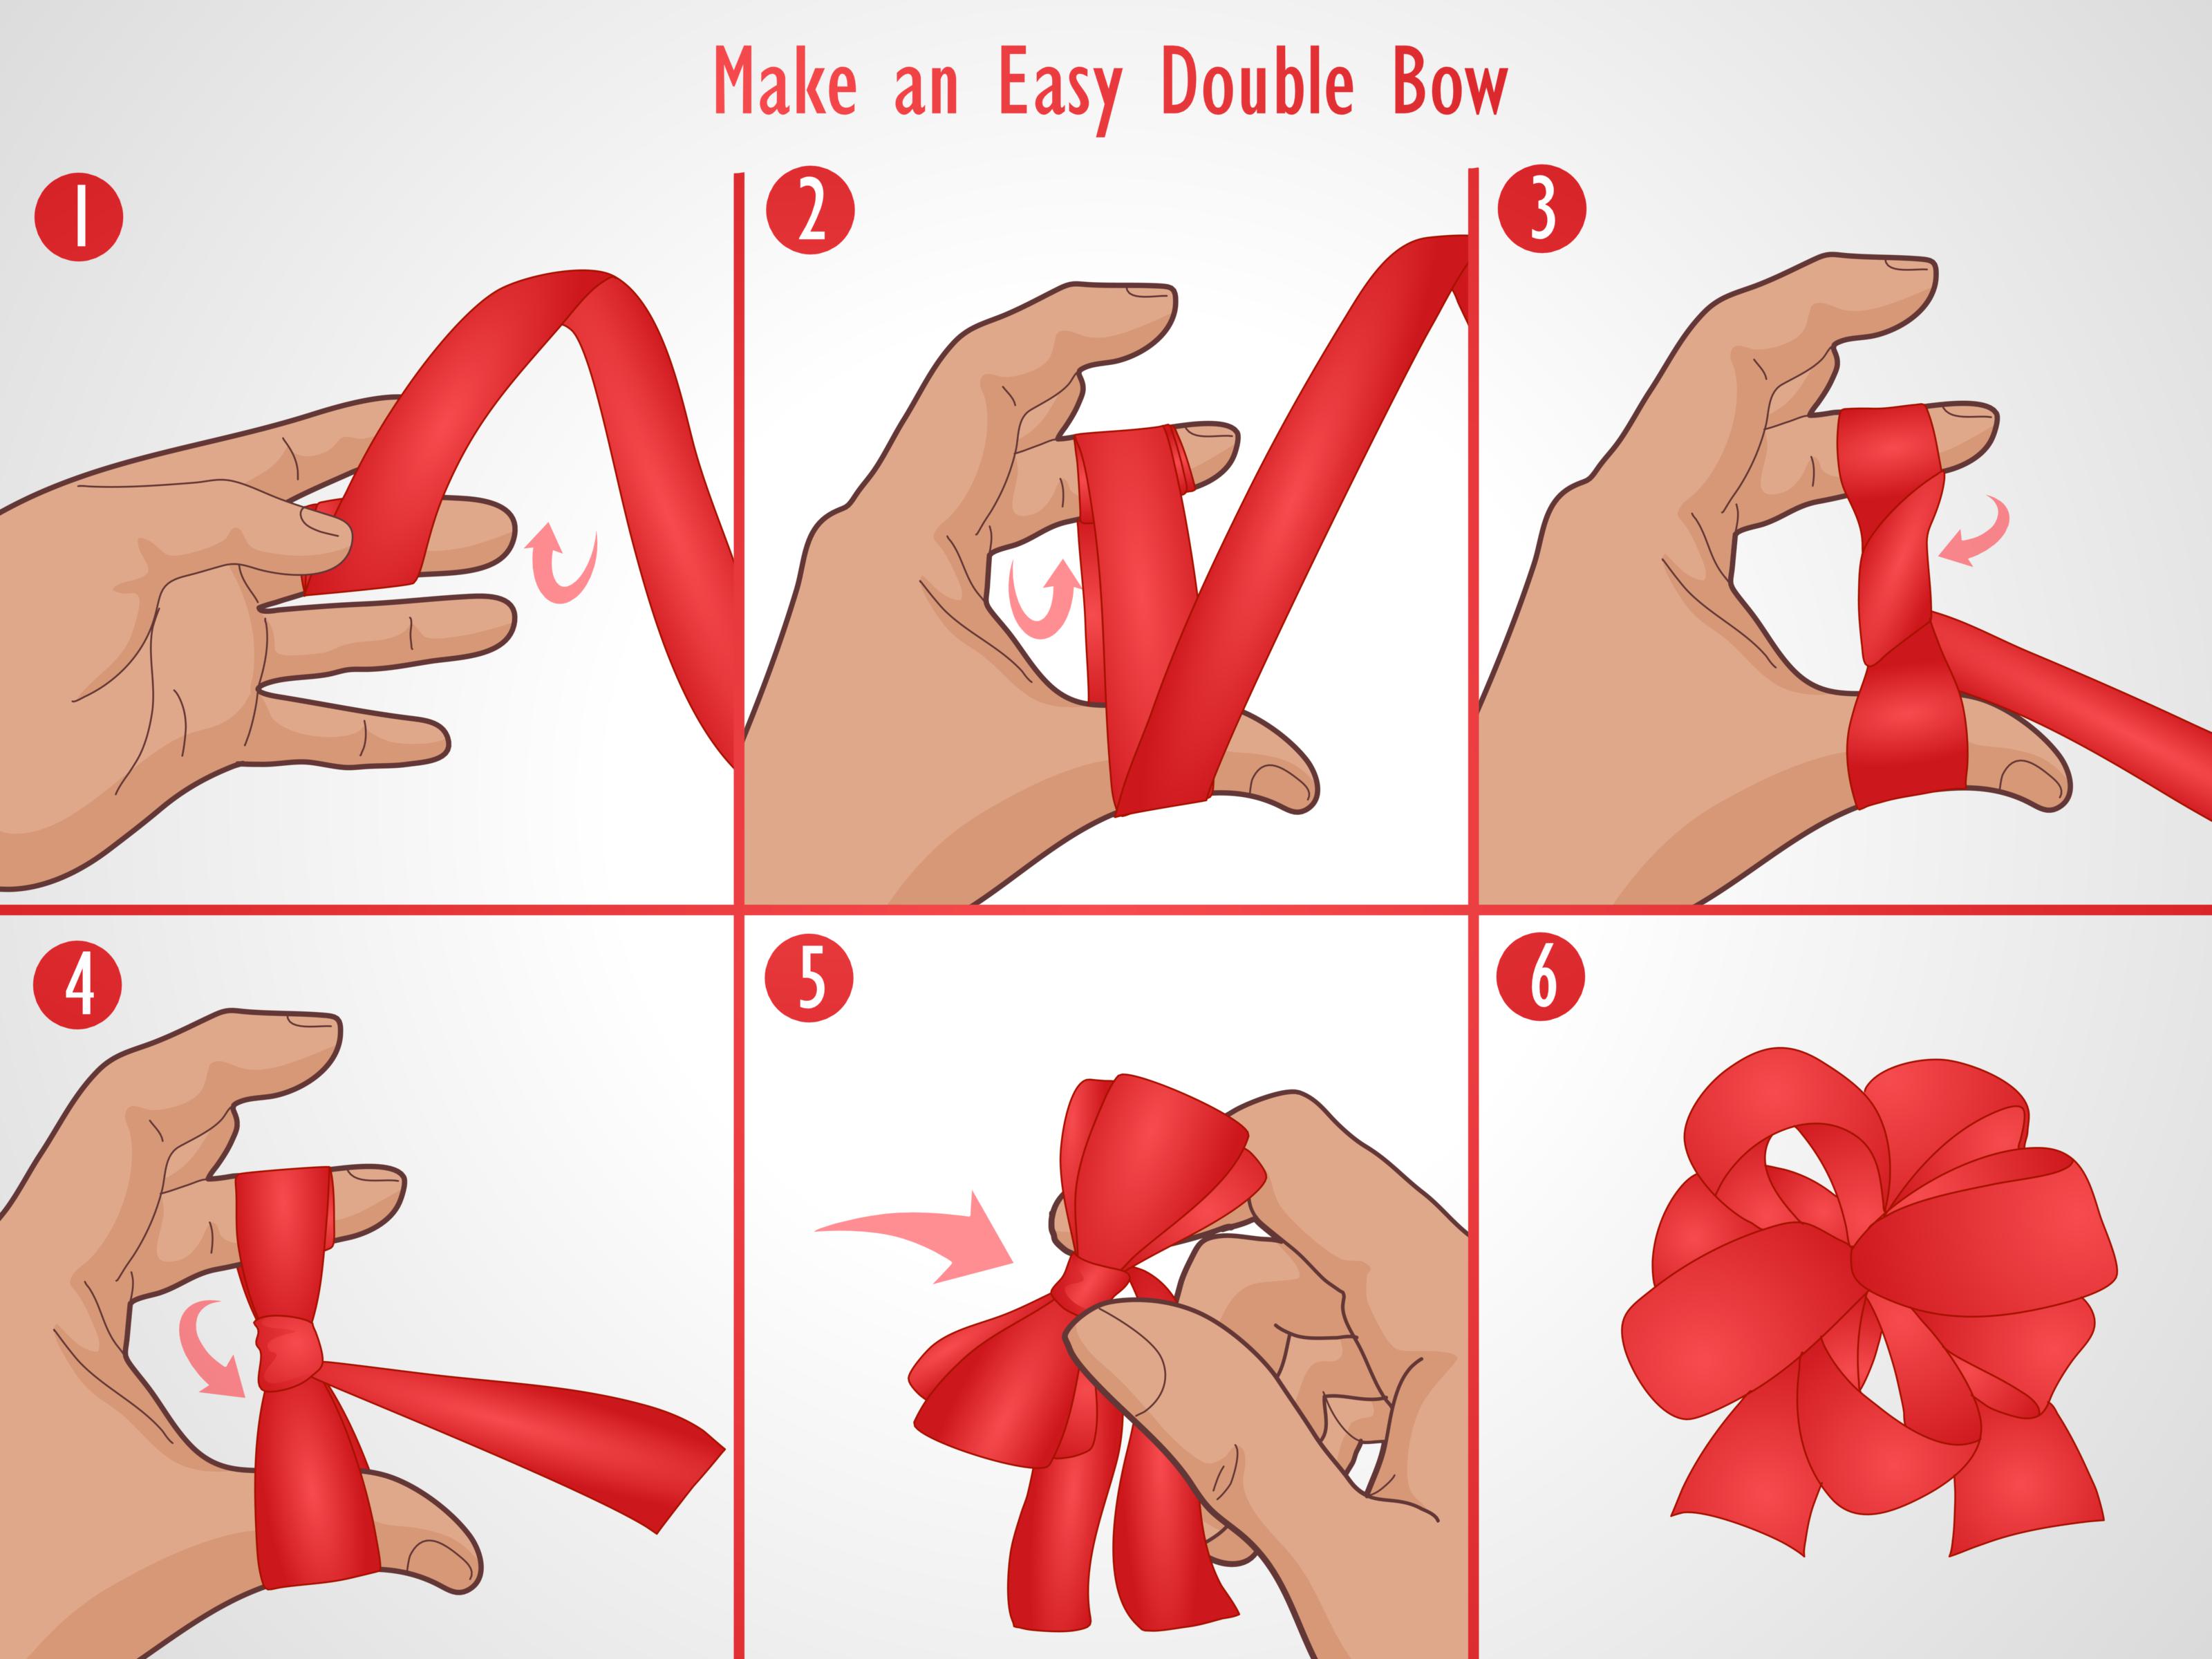
If you have ever stared at a strip of ribbon and thought, “Cute. Now what?” you are in the right place. Learning how to make a bow out of ribbon is one of those small skills that looks oddly fancy, costs almost nothing, and makes gifts, wreaths, bouquets, and holiday decor look like they got dressed up for a party. The good news: you do not need magical crafting powers, eight elbows, or a glue gun that obeys your every command.
In this guide, you will learn four easy ribbon bow styles that actually look festive instead of “I wrestled this in the car.” We will cover a classic bow, a florist bow, a fluffy layered bow, and a curly ribbon bow. Along the way, you will also learn which ribbon works best, how to keep your loops even, and what to do when your bow starts looking more like a limp noodle than a gift topper.
Whether you are wrapping birthday presents, decorating a Christmas wreath, styling a wedding favor, or just trying to make a grocery-store bouquet look more expensive than it was, these easy ribbon bow ideas can help you pull it off with confidence.
What You Need Before You Start
One of the best things about making a DIY ribbon bow is that the supply list is short. You probably already have most of it at home.
- Ribbon in your preferred width and material
- Sharp scissors
- Floral wire, pipe cleaner, twine, or thin ribbon for securing the center
- Hot glue or clear tape for some styles
- Ruler, if you like precision more than surprise
Wider ribbon usually creates a fuller, more dramatic bow. Wired ribbon is especially helpful for holiday bows and wreath bows because it holds its shape better. Satin ribbon gives a softer, dressier look, while grosgrain ribbon tends to feel more structured and casual. Curly ribbon, of course, is the drama queen of the bunch and exists to be fabulous.
Bow-Making Basics That Make Every Style Better
Before jumping into the four festive styles, it helps to know a few simple rules. These little details are what separate a polished ribbon bow from something that looks like it gave up halfway through.
Keep the Right Side of the Ribbon Facing Out
If your ribbon has a front and back, make sure the pretty side stays visible. Twisting the ribbon at the center helps with this, especially when making a florist bow.
Pinch the Center Firmly
The center pinch is the boss of the whole operation. If that pinch slips, your loops drift, your tails wander, and suddenly your bow has no leadership.
Trim the Ends Neatly
Cut ribbon tails straight, diagonally, or into a V-shaped fishtail notch. That one finishing move makes the bow look much more intentional.
Fluff Last
Do not panic if your bow looks flat right after tying it. Most ribbon bows only come to life after you spread, separate, and fluff the loops. Think of it as styling the hair after the haircut.
Style 1: The Classic Two-Loop Ribbon Bow
If you want to know how to make a bow out of ribbon for a gift, start here. This is the most traditional style, and it works for birthdays, baby showers, party favors, and everyday wrapping.
Best For
Gift boxes, favor bags, jars, small wreaths, and simple decor.
How to Make It
- Cut a length of ribbon long enough to create two loops and two tails.
- Make one loop on the left and one on the right, like bunny ears.
- Cross one loop over the other.
- Tuck the top loop behind and through the center opening.
- Pull both loops gently until the knot tightens.
- Adjust the loops so they are even, then trim the tails.
Why It Works
The classic bow is quick, familiar, and hard to beat when you want something clean and timeless. It also uses very little ribbon, which is helpful if you are on your last decent spool and the craft store is not exactly around the corner.
Make It Look Better
Use a ribbon that is wide enough to hold a soft shape. If your tails are different lengths, fix them after tying instead of trying to predict perfection beforehand. Nobody wins that game.
Common Mistakes
The most common issue is pulling one loop too hard and ending up with one tiny ear and one giant ear. If that happens, loosen the knot slightly and rebalance. Ribbon is forgiving. Unlike group chats, it usually lets you recover.
Style 2: The Florist Bow
A florist bow looks fuller, fancier, and more decorative than a simple gift bow. It is a favorite for bouquets, wreaths, baskets, and holiday packages because it creates multiple loops without looking stiff or bulky.
Best For
Bouquets, wreaths, hostess gifts, centerpieces, and Christmas decorating.
How to Make It
- Leave the ribbon attached to the spool if possible.
- Twist the ribbon in the center so the right side faces outward.
- Make one loop on one side, then twist again at the center.
- Make a matching loop on the opposite side.
- Repeat this pattern until the bow looks full enough.
- Secure the center tightly with thin ribbon, floral wire, or pipe cleaner.
- Cut the ribbon from the spool and leave enough length for tails.
- Fluff each loop individually and spread them in different directions.
Why It Works
This style gives you volume without needing several separate pieces of ribbon. Wired ribbon works beautifully here because the loops stay lifted instead of collapsing into a sleepy little pile.
Easy Example
Imagine a bouquet wrapped in kraft paper with a velvet or satin florist bow tied around the stems. Instantly, the flowers look more thoughtful, more polished, and significantly less like you grabbed them while buying toothpaste.
Helpful Tip
Keep your loops roughly the same size for a balanced bow, or gradually increase the loop size if you want a more dramatic, layered look. Both options work. Just choose one on purpose.
Style 3: The Fluffy Layered Bow
This is the festive show-off of the group. A layered ribbon bow has more structure than a florist bow and more visual impact than a classic bow. It is ideal when you want your package, wreath, or door decor to say, “Yes, I absolutely planned to be this extra.”
Best For
Front-door wreaths, oversized gifts, party decor, holiday centerpieces, and tree toppers.
How to Make It
- Cut two or three separate pieces of ribbon in slightly different lengths.
- Glue or tape each piece into a loop.
- Stack the loops from largest to smallest.
- Pinch the center into an accordion fold.
- Wrap the middle tightly with wire, twine, or a pipe cleaner.
- Add a narrow strip of ribbon around the center to hide the fastening.
- Attach separate ribbon tails behind the bow if you want extra length.
- Fan out the layers until the bow looks full and balanced.
Why It Works
Because it is built in layers, this bow keeps a crisp shape and photographs well. That matters for holiday decor, wedding details, and online shop packaging where presentation is doing half the talking.
Ribbon Pairing Ideas
- Velvet and gold for a rich holiday look
- Plaid and burlap for rustic decor
- White satin and sheer ribbon for weddings or baby showers
- Red grosgrain and candy-striped ribbon for cheerful gift wrapping
Pro Tip
If you are using two different ribbons, place the sturdier one on the bottom and the more delicate one on top. Structure underneath, prettiness on top. It is basically the crafting version of good posture.
Style 4: The Curly Ribbon Bow
Curly ribbon bows are playful, bright, and perfect for celebrations. This is the bow style most people associate with birthdays, party gifts, and cheerful packaging. It looks complicated, but it is surprisingly easy once you know the trick.
Best For
Birthday presents, graduation gifts, party favors, school events, and colorful seasonal packages.
How to Make It
- Wrap curling ribbon loosely around the gift box several times.
- Slide the loops off carefully so they stay together.
- Tie the center with a short separate piece of ribbon.
- Cut through all the loops on both ends to create many strands.
- Use the blade edge of scissors to curl each strand outward.
- Repeat until the bow looks full, springy, and party-ready.
- Tape or tie the finished bow onto the gift.
Why It Works
The curled strands create instant volume and movement. Even a small present can look festive with a big burst of curly ribbon on top. It is especially useful when the wrapping paper is simple and the bow needs to provide most of the excitement.
Safety and Sanity Tip
Use sharp scissors and curl away from your body. Also, expect ribbon strands to cling to you, the table, and possibly your soul. Curly ribbon has a strong personality.
How to Choose the Right Ribbon for Each Bow
If your bow keeps flopping, twisting, or refusing to cooperate, the ribbon may be the problem rather than your technique.
Use Wired Ribbon For
Florist bows, wreath bows, and layered bows that need body and shape.
Use Satin Ribbon For
Soft, elegant bows on gift boxes, bouquets, and formal occasions.
Use Grosgrain Ribbon For
Structured bows with a casual or preppy look, especially for crafts and gift wrapping.
Use Curling Ribbon For
Birthday gifts, party decor, and bright, playful bows with lots of movement.
Troubleshooting: How to Fix a Bow That Looks Off
Even a simple ribbon bow can go sideways. Here is how to rescue it without pretending it was “supposed to look organic.”
- Loops are uneven: loosen the center slightly and rebalance them.
- Tails are too short: add separate tails behind the bow instead of starting over.
- Bow looks flat: fluff each loop individually and rotate them outward.
- Ribbon twists awkwardly: twist at the center after every loop so the front side stays visible.
- Bow slides around: secure it with floral wire, double-sided tape, or hot glue.
When to Use Each Festive Ribbon Bow Style
If you are not sure which bow to make, this quick matching guide helps:
- Classic bow: everyday wrapping, party favors, simple packages
- Florist bow: bouquets, wreaths, baskets, holiday gifts
- Layered bow: statement decor, front doors, oversized presents
- Curly ribbon bow: birthdays, graduations, playful gifts, kid-friendly packages
Real-World Bow-Making Experiences: What People Usually Learn After the First Few Tries
One of the funniest things about learning how to make a bow out of ribbon is how confident people feel before they begin. It is ribbon. It is a strip of fabric. How hard could it be? Then ten minutes later, there is ribbon all over the table, one loop is the size of a dinner roll, and someone is whispering, “Why are you like this?” to an inanimate object. That is a completely normal part of the process.
A common experience for beginners is realizing that ribbon choice matters more than expected. Many people start with whatever ribbon is lying around at home, only to discover that ultra-thin satin slips, stiff ribbon kinks, and bargain-bin ribbon frays if you look at it too hard. Once people try a wired ribbon for wreaths or a decent satin ribbon for gift wrapping, the whole experience gets easier. The bow is not fighting back as much, and that alone feels like progress.
Another real-life lesson is that the center pinch determines almost everything. People often focus on the loops because they are the glamorous part, but the center is where the bow either succeeds or quietly falls apart. Crafters who get in the habit of pinching firmly, securing the middle tightly, and fluffing only after the center is stable usually end up with cleaner results. It is not the most exciting tip, but it is the one that saves the most frustration.
Many people also discover that bow making gets easier when they stop chasing perfection. The first bow may be uneven. The second may be too tight. The third might somehow look both too flat and too wild at the same time, which feels mathematically rude. But by the fourth or fifth try, your hands begin to understand the rhythm: loop, twist, pinch, secure, fluff. That muscle memory is real. What felt awkward at first starts to feel quick and almost automatic.
Seasonal decorating creates another useful kind of experience. During the holidays, people often make multiple bows in one sitting for gifts, wreaths, stair rails, chair backs, and tree branches. That is when efficiency matters. Many experienced decorators cut all ribbon lengths first, prepare their wire pieces in advance, and make bows assembly-line style. It sounds a little intense, but it is actually smart. When you repeat the same steps several times, your bows become more consistent and the project moves faster.
Gift wrapping brings its own lessons too. A bow can completely change how a present feels. A plain kraft-paper package tied with a velvet bow looks warm and thoughtful. A shiny birthday bag topped with a curly ribbon bow suddenly feels more festive. A florist bow on a bouquet can make even simple flowers look intentional and polished. That is why people come back to this skill year after year. It is small, but the visual payoff is huge.
Perhaps the most relatable experience is the moment when someone who “is not crafty” makes a bow that actually looks good. That little success tends to unlock more confidence. Suddenly they are adding ribbon to candles, wreaths, party chairs, cookie boxes, and favor jars. Bow making becomes one of those practical creative skills that can be reused across birthdays, weddings, showers, Christmas decorating, and everyday gift wrapping. Not bad for a humble strip of ribbon with dramatic tendencies.
Final Thoughts
Knowing how to make a bow out of ribbon is one of those delightfully useful skills that pays off all year long. Once you learn the classic bow, the florist bow, the fluffy layered bow, and the curly ribbon bow, you can dress up almost anything: presents, front doors, flower bouquets, party tables, and holiday decor. Start simple, use the right ribbon, and do not underestimate the power of fluffing. A bow rarely looks impressive before the fluff. Much like throw pillows, it needs a moment.
The best part is that every bow can be customized. Go minimal with satin, rustic with burlap, dramatic with velvet, or playful with curling ribbon. After a little practice, you will not just know how to make a ribbon bow. You will know how to make the right ribbon bow for the occasion.














