
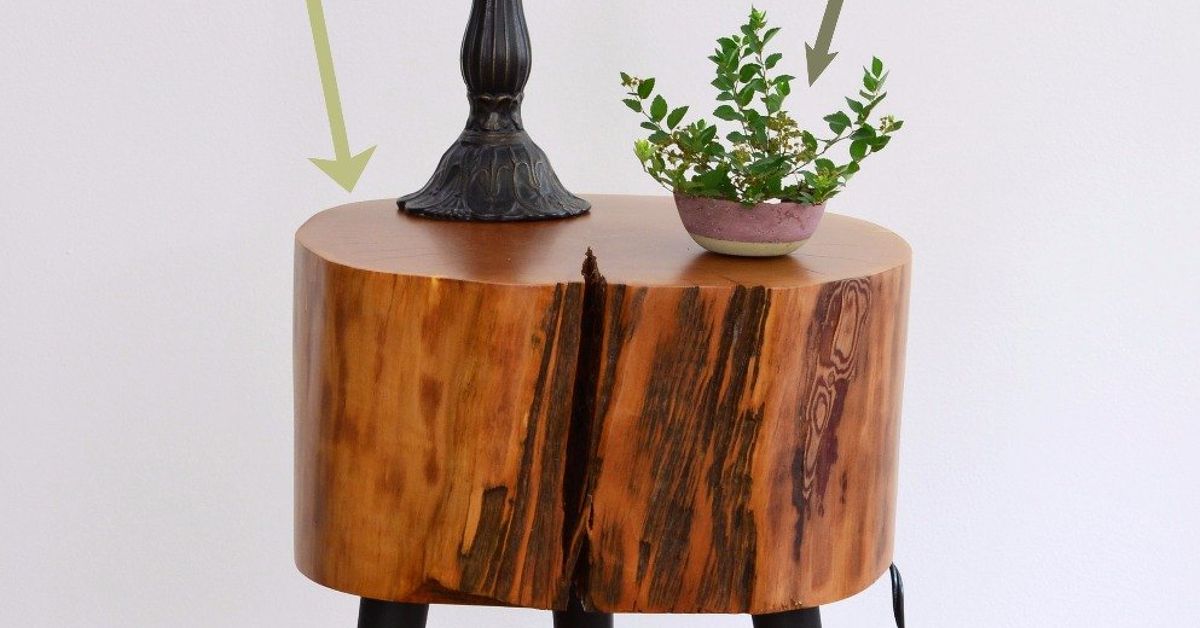
A tree stump side table is the kind of DIY project that makes guests say, “Wait, you made that?” It looks expensive, organic, and charmingly rugged, but the materials can be surprisingly simple: one dry stump, a few legs, some screws, sandpaper, and a protective finish. Basically, you are turning a retired piece of tree into a living room celebrity.
This guide walks you through how to make a tree stump side table with DIY legs from start to finish. You will learn how to choose the right stump, dry it, remove bark, sand it smooth, seal it properly, and attach sturdy legs so the table looks rusticnot wobbly, dusty, or suspiciously like firewood that got promoted too quickly.
Why a Tree Stump Side Table Works So Well
A stump table brings natural texture into a room without trying too hard. It fits farmhouse, modern rustic, boho, cabin, Scandinavian, industrial, and even minimalist interiors. The secret is contrast. A raw wood stump has rings, cracks, knots, and personality, while metal or wood DIY legs give it height and polish.
It is also practical. A stump side table can sit beside a sofa, serve as a nightstand, hold a plant, support a lamp, or become the official parking spot for coffee mugs that swear they are “just resting.” With the right finish, it becomes durable enough for everyday use while keeping its organic character.
Tools and Materials You Will Need
Materials
- One dry tree stump, roughly 14 to 20 inches tall before legs
- Three or four table legs, such as hairpin legs, tapered wood legs, or short metal furniture legs
- Wood screws sized for your leg mounting plates
- Wood filler or epoxy filler, optional
- Clear polyurethane, polycrylic, tung oil, or furniture wax
- Wood stain, optional
- Felt pads or rubber feet
Tools
- Chisel, pry bar, or flat screwdriver for bark removal
- Hammer or mallet
- Orbital sander or sanding block
- Sandpaper in 60, 80, 120, 180, and 220 grit
- Drill and drill bits
- Screwdriver or driver bit
- Level
- Tape measure
- Brush, foam brush, or lint-free cloth
- Dust mask, gloves, and eye protection
Step 1: Choose the Right Tree Stump
The best stump for a DIY side table is solid, dry, and not rotten. Hardwood species such as oak, maple, walnut, ash, or cherry are excellent because they are dense and durable. Softer woods like pine can still work, but they may dent more easily and can release more sap if not properly dried.
Look for a stump with an interesting shape, but avoid one that is deeply cracked from top to bottom. Small checking cracks are normal and often beautiful. Large structural splits, however, can make the table unstable. Also check for soft spots, loose punky wood, fungus, or insect activity. If the stump looks like it is already hosting a tiny woodland apartment complex, let it stay outside.
Step 2: Dry the Stump Properly
Drying is the step many impatient DIYers skip, and the stump will absolutely remember. Fresh wood contains moisture. As it dries, it shrinks and may crack. If you seal a wet stump too early, moisture can become trapped inside, which may lead to mold, odors, finish failure, or a table that behaves like it has unresolved emotional issues.
For best results, let the stump air-dry in a covered, ventilated place. Keep it off the ground using scrap wood or blocks so air can move around it. A stump may need several weeks to several months to dry, depending on size, species, climate, and how recently it was cut. If you can use a moisture meter, aim for a reading close to indoor furniture conditions before finishing.
Do not rush the process with extreme heat. Placing a wet stump beside a heater can create aggressive cracking. Slow drying is boring, yes, but boring is better than turning your side table into a wooden potato chip.
Step 3: Remove the Bark
Bark gives a stump a wild, forest-floor look, but it is usually better to remove it for indoor furniture. Bark can loosen over time, trap moisture, hide insects, and shed debris. Removing it creates a cleaner, more stable surface for sanding and sealing.
Start by placing the stump on a drop cloth. Work a chisel or flat pry tool under the bark and gently tap with a hammer. If the stump is dry, the bark may come off in satisfying sheets. If it fights you like a tiny wooden dragon, take your time. Avoid gouging too deeply into the wood unless you want a rough-hewn texture.
After the bark is gone, scrape away stringy fibers and loose material. A wire brush can help clean stubborn areas, but use it lightly so you do not create scratch marks that will be hard to sand out later.
Step 4: Level the Top and Bottom
A tree stump table needs a flat top and a stable bottom. If your stump was cut evenly, you may only need sanding. If it wobbles badly, you can use a hand plane, belt sander, or have a local lumberyard or woodshop flatten it for you. A chainsaw can work for rough leveling, but it is not the ideal tool for a smooth furniture surface unless you are very experienced.
Set the stump on a flat floor and test for wobble. Mark high spots with pencil. Sand or plane gradually, checking often with a level. The goal is not laboratory perfection. The goal is that your coffee cup does not slide off dramatically like it is in an action movie.
Step 5: Sand the Stump Smooth
Sanding transforms the stump from “yard cleanup” to “boutique furniture.” Start with 60 or 80 grit sandpaper to remove rough saw marks and leftover bark fibers. Move to 120 grit to refine the surface, then 180 and 220 grit for a smooth finish.
Use an orbital sander on the top and bottom if possible. For curves, edges, cracks, and character areas, switch to hand sanding. Always remove dust between grits with a vacuum, brush, or tack cloth. Skipping grits may save a few minutes, but it often leaves scratches that magically appear once the finish goes on. Wood finish has a talent for revealing every shortcut you hoped nobody would notice.
Step 6: Decide Whether to Fill Cracks
Cracks in a stump are normal. They happen as wood dries and shrinks. Whether you fill them depends on the look you want. For a rustic side table, small cracks can stay. They add charm and prove your table was once a tree, not a factory rectangle with trust issues.
If a crack is deep enough to collect crumbs, dust, or jewelry, consider filling it with clear epoxy, tinted epoxy, or wood filler. Epoxy works especially well for dramatic cracks because it stabilizes the surface while preserving the natural shape. Wood filler is better for small holes or minor defects, but it can look obvious if the color match is poor.
Let any filler cure completely, then sand it flush. Do not attach legs or apply finish until filler is fully hardened.
Step 7: Stain or Keep It Natural
Many stump tables look best with a clear finish because the wood grain, growth rings, and natural color already do the design work. However, stain can help if the stump looks pale, uneven, or too raw for your room.
Test stain on the underside first. End grain can absorb finish quickly, sometimes becoming much darker than expected. Apply stain lightly with a cloth or brush, let it penetrate according to the product directions, and wipe away excess. If the color looks blotchy, stop before the table starts resembling a sad pancake. A clear coat may be the better choice.
Step 8: Seal the Wood
Sealing is essential for a tree stump side table. It protects the wood from moisture, dust, stains, and daily use. Polyurethane is a strong choice for durability, especially if the table will hold drinks, lamps, or plants. Water-based polycrylic dries clear and is useful when you want to avoid amber tones. Oil-based polyurethane adds warmth and depth but may slightly darken the wood.
Apply the first coat with a foam brush, natural bristle brush, or lint-free cloth, depending on the finish. Cover the top, sides, bottom, and cracks. The top end grain may absorb more finish than the sides, so it may need extra coats.
Let each coat dry according to the product label. Lightly sand between coats with fine sandpaper, such as 320 or 400 grit, to remove dust nibs and improve smoothness. Wipe clean before applying the next coat. Three coats are a good minimum for most side tables. Add more if the surface still feels thirsty or uneven.
Step 9: Choose the Best DIY Legs
The legs determine the final personality of your stump table. Hairpin legs are popular because they are easy to install, widely available, and create a clean midcentury-modern look. They also visually lighten the stump, which is helpful because a solid chunk of wood can look heavy enough to require its own gym membership.
Hairpin Legs
Hairpin legs are great for beginners. Most come with mounting plates and pre-drilled holes. Choose shorter legs if your stump is tall, or taller legs if your stump is short. For a typical side table, aim for a finished height of about 20 to 26 inches.
Wooden Tapered Legs
Wood legs create a warmer, more traditional look. You may need angled mounting plates or threaded inserts, depending on the style. This option works beautifully for farmhouse, Scandinavian, or natural interiors.
Pipe Legs
Black iron pipe legs give the stump an industrial edge. They are sturdy, bold, and slightly more complicated to assemble, but the result can look custom and substantial.
Step 10: Mark the Leg Placement
Flip the stump upside down on a soft surface. Place the legs evenly around the underside. Three legs can be very stable on uneven natural shapes because all three points touch the floor. Four legs offer a more traditional look but require more careful leveling.
Keep the legs close enough to the edge for stability but not so close that screws split the wood. Use a tape measure to space them evenly. Mark each screw hole with a pencil. Step back and check the placement before drilling. This is the moment to fix awkward geometry, not after the screws are in and the table looks like it is trying to walk away.
Step 11: Drill Pilot Holes
Pilot holes are small starter holes that help screws enter cleanly and reduce the chance of splitting. Choose a drill bit slightly smaller than the screw shank. Drill straight into each marked hole, being careful not to drill through the top of the stump.
Use screws that are long enough to hold securely but short enough to stay hidden inside the wood. For heavy stumps, strong coarse-thread screws are usually better than tiny decorative screws. If you plan to remove the legs later, threaded inserts can make the connection more durable.
Step 12: Attach the Legs
Line up each leg plate with the pilot holes. Drive the screws snugly, but do not over-tighten. Over-driving screws can strip the hole or stress the wood. Once all legs are attached, flip the table upright and test it.
If the table wobbles, check whether the floor is uneven first. Many floors are secretly dramatic. If the table itself is uneven, add felt pads, adjustable levelers, or small rubber feet. You can also lightly sand the bottom contact points if needed.
Step 13: Add Floor Protection
A stump side table can be heavier than it looks. Add felt pads or rubber feet to protect hardwood, tile, and laminate floors. If the table will sit on carpet, wider glides may keep it from sinking or tilting.
This small detail makes the table easier to move and safer for your flooring. It also prevents that awful scraping noise that makes everyone in the room suddenly become a flooring inspector.
Design Ideas for Your Tree Stump Side Table
Modern Rustic
Use black hairpin legs and a matte clear finish. Keep cracks visible and let the wood grain stay natural. Pair it with a linen sofa, woven basket, and ceramic lamp.
Boho Natural
Choose light wood legs and a satin finish. Add a trailing plant, a stack of books, and a small candle. This style looks relaxed without feeling unfinished.
Industrial Cabin
Use pipe legs and a darker stain. This works well in rooms with leather furniture, exposed brick, metal shelves, or warm Edison-style lighting.
Minimalist Statement
Use slim legs, sand the stump very smooth, and apply a low-sheen finish. Let the organic shape be the main decorative feature.
Common Mistakes to Avoid
Using a Wet Stump
A wet stump may shrink, crack, grow mold, or reject the finish. Dry it first. Your future self will send a thank-you card.
Leaving Loose Bark Attached
Bark often separates indoors. Remove it unless you are intentionally preserving it with a very thorough sealing method.
Skipping Sanding Between Finish Coats
Light sanding between coats helps create a smooth, furniture-quality surface. Do not use aggressive sanding after finish coats; you only want to smooth tiny imperfections.
Using Screws That Are Too Long
Measure carefully. Screws poking through the top of your new table are not “rustic.” They are a tiny construction tragedy.
Ignoring Balance
Tree stumps are irregular. Check level, leg spacing, and weight distribution before calling the project finished.
How to Care for a Tree Stump Side Table
Dust the table regularly with a soft cloth. Use coasters under drinks, especially during the first few weeks after finishing. Avoid placing wet planters directly on the surface unless you use a waterproof saucer. If the table gets scratched, lightly sand the damaged area and reapply finish.
Keep the table indoors or in a protected covered area. A stump table can survive many things, but constant rain, direct sun, and extreme humidity swings can cause cracking or finish failure. Remember, it is furniture now. It has retired from outdoor life.
Real-World Experience: What This Project Teaches You
Making a tree stump side table with DIY legs teaches patience more than anything else. The first lesson is that nature does not operate on weekend-project timing. A stump may look dry on the outside while still holding moisture deep inside. When you wait for it to dry properly, the final table feels more solid, takes finish better, and has fewer unpleasant surprises.
The second lesson is that imperfections are not always problems. In many DIY furniture projects, a crack or knot feels like something to hide. With a stump table, those details are often the whole point. Growth rings show time. Small splits show drying. Curves and bumps make the piece feel authentic. The goal is not to erase nature; it is to make nature safe, functional, and coffee-friendly.
Another useful experience is learning how much sanding changes a project. At first, the stump may look dull, dusty, and rough. After the first sanding pass, the grain begins to appear. After finer grits, the surface feels like furniture. Then the first coat of finish hits, and suddenly the color deepens, the rings glow, and you start acting like a professional craftsperson even if twenty minutes earlier you were searching the floor for the drill bit you just had in your hand.
Attaching the legs also teaches practical problem-solving. A manufactured tabletop is predictable. A stump is not. The underside may slope. The weight may not be centered. The shape may make perfect spacing impossible. This is where DIY becomes less about strict instructions and more about judgment. You learn to test, adjust, and check from multiple angles before drilling.
One of the best parts of this project is how personal the finished table feels. Two people can follow the same steps and still end up with completely different pieces. One stump may look sleek and modern with black hairpin legs. Another may look cozy and cabin-ready with chunky wooden legs. A third might become a dramatic statement table with visible cracks filled in dark epoxy.
The project is also a good reminder that sustainable decorating does not have to look like a compromise. You are reusing natural material that might otherwise become firewood, yard waste, or mulch. With a careful finish and a smart leg choice, that discarded stump becomes useful furniture. It is recycling with better lighting.
Finally, this DIY project gives you confidence. It does not require advanced joinery, expensive machinery, or a workshop that looks like a television set. It asks for patience, sanding, measuring, and a willingness to get a little dusty. The reward is a side table with a story, and that story is much better than “I clicked add to cart at 11:47 p.m.”
Conclusion
Learning how to make a tree stump side table with DIY legs is a satisfying way to bring natural style into your home. The process is simple, but the details matter: choose a solid stump, dry it well, remove loose bark, sand patiently, seal every surface, and attach legs with careful spacing and pilot holes.
The finished result is practical, durable, and full of character. It can serve as a sofa table, bedside table, plant stand, reading corner accent, or conversation piece. Best of all, it proves that great furniture does not always begin in a showroom. Sometimes it begins in the yard, looking like a log with potential.
With the right preparation, your tree stump side table will look intentional instead of improvised, rustic instead of rough, and handmade instead of homemade-in-a-panic. Add your favorite lamp, a coaster, and maybe a book you fully intend to read someday. Your stump has officially earned its legs.













