
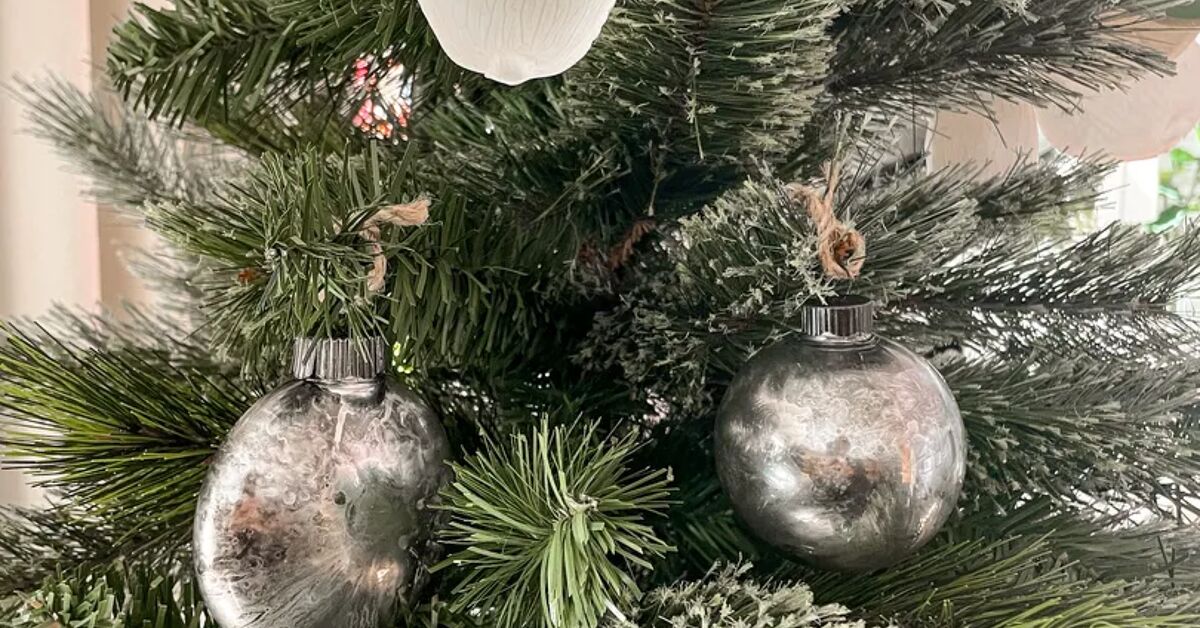
Vintage mercury glass Christmas ornaments have a special talent: they make a tree look as though it inherited excellent taste from a glamorous great-aunt. Their mottled silver surfaces catch holiday lights beautifully, while the worn patches and smoky shadows create the illusion that each ornament has survived decades of Christmas parties, attic storage, and at least one disagreement involving tangled lights.
Authentic antique mercury glass can be delicate and expensive, but you can recreate its softly distressed, reflective appearance with clear ornaments, mirror-effect spray paint, and a vinegar-and-water solution. The method is inexpensive, beginner-friendly, and flexible enough for traditional silver, antique gold, champagne, smoky bronze, or jewel-toned Christmas decorations.
Historically, mercury glass appeared in the 1800s as a decorative alternative to solid silver. Despite the name, modern decorative mercury glass does not use elemental mercury. Contemporary commercial versions typically rely on safer reflective finishes, while DIY projects imitate the appearance with mirror-finish paint applied behind or inside clear glass.
Why the Faux Mercury Glass Technique Works
A normal metallic ornament has a smooth, uniform coating. Mercury glass looks older because its reflective layer appears interrupted. Some areas shine like a mirror, while others look cloudy, transparent, oxidized, or almost bare.
The DIY technique creates those irregularities intentionally. Mirror-effect spray paint supplies the reflective finish. Tiny droplets of diluted vinegar interrupt the coating, producing spots, cracks, and translucent patches. Several thin applications build depth without turning the ornament into a solid silver ball.
Manufacturers of mirror-effect paint generally recommend applying the product to the reverse side or inside of clear glass. That placement is especially useful for ornaments because the glass protects the fragile-looking finish while maintaining a glossy exterior. Light coats are preferable to one heavy coat, which is more likely to run, pool, or dry unevenly.
Supplies for DIY Vintage Mercury Glass Ornaments
Essential materials
- Clear glass Christmas ball ornaments with removable caps
- Mirror-effect or looking-glass spray paint
- White vinegar
- Clean water
- A small fine-mist spray bottle
- Paper towels or lint-free cloths
- Disposable gloves
- Protective eyewear and appropriate respiratory protection
- Cardboard, a drop cloth, or a spray-painting box
- Paper cups or an ornament drying rack
Optional aging and decorating supplies
- Black, brown, bronze, gold, or copper craft paint
- A small natural sponge or cotton swabs
- Metallic wax or gilding paint
- Fine glitter, mica flakes, or imitation gold leaf
- Velvet ribbon, satin ribbon, twine, or metallic cord
- Replacement ornament caps in antique brass or dark silver
Choose real glass ornaments for the most convincing reflective result. Clear plastic ornaments can work for some decorative projects, but always confirm that the specific paint is compatible with plastic before applying it. Major U.S. craft retailers sell clear fillable glass ornaments in round and flattened shapes, giving you room to experiment with different silhouettes.
Prepare a Safe and Efficient Work Area
Spray outside whenever weather and product directions allow. Set a cardboard box on a protected table to catch overspray, and arrange your ornaments, vinegar solution, paint, towels, and drying cups before opening the spray can. Once the process begins, you will be rotating, misting, spraying, and draining the ornaments in quick succession. This is not the ideal moment to discover that your paper towels are still in the kitchen.
Government and home-improvement guidance emphasizes fresh-air ventilation when using products that may release vapors or airborne spray particles. Protective gloves, safety glasses, a suitable respirator, and careful adherence to the label are sensible precautions. Keep the work area away from heat, flames, sparks, and anything else that could turn a relaxing Christmas craft into a neighborhood news item.
How to Make DIY Vintage Mercury Glass Christmas Ornaments
Step 1: Remove the ornament caps
Carefully pull the metal cap and wire hanger from each clear ornament. Hold the ornament around its body rather than gripping the narrow neck. Thin glass can crack if the cap is twisted or forced sideways.
Place the caps in a small container so none vanish into the mysterious dimension where ornament hooks, batteries, and matching socks apparently live.
Step 2: Clean the glass
Any dust, fingerprints, manufacturing residue, or grease inside the ornament can interfere with the finish. Rinse the interior with mild soap and water if necessary, then allow it to dry completely. A small amount of rubbing alcohol can also be swirled inside to remove residue, provided it is fully evaporated before painting.
Craft and paint instructions consistently stress beginning with clean glass. A clean surface promotes better adhesion and prevents random greasy circles from becoming permanent members of your design.
Step 3: Mix the vinegar solution
Combine equal parts white vinegar and water in a fine-mist spray bottle. For six to twelve ornaments, a few tablespoons of each is usually sufficient. Shake gently to combine.
Test the nozzle on a piece of cardboard. You want a delicate mist with small droplets, not a powerful stream. Large puddles remove too much paint and can leave the ornament looking accidentally unfinished rather than attractively antique.
Step 4: Mist the inside of the ornament
Hold the ornament at a slight angle and spray one or two light mists through the opening. Slowly rotate the ball so droplets settle in different areas. Do not completely wet the interior. The most natural finish comes from irregular beads with clear spaces between them.
Some mercury glass methods apply the mirror paint first and immediately follow it with the vinegar mixture. Others mist the glass before spraying. Both sequences can create distressing, so test your preferred approach on one ornament before processing the entire set. Established DIY instructions commonly combine mirror paint with a 1-to-1 vinegar-and-water solution and blot or disturb the coating while it is fresh.
Step 5: Spray the mirror-effect paint
Shake the spray paint for the full time required by the label. Position the nozzle near the ornament opening without pushing it into the glass neck. Apply a very short burst, rotate the ornament, and apply another short burst.
The goal is not complete coverage. The first coat should look thin and inconsistent. A heavy blast may create a thick pool at the bottom, and pooled mirror paint tends to produce a dull metallic patch instead of a crisp reflective surface.
Step 6: Create the distressed pattern
Wait briefly while the paint and vinegar react, following the general timing on your product label and chosen method. Turn the ornament upside down over a paper towel and let the excess drain. Gently tap or rotate the ornament to encourage a few droplets to travel across the wet coating.
For stronger distressing, twist a narrow piece of paper towel and carefully insert only the tip through the opening. Lightly touch selected wet areas without wiping the entire interior. Randomness is your friend. A perfectly repeated pattern looks manufactured; uneven spots look convincingly aged.
Step 7: Repeat with thin layers
Apply two to four additional light rounds of misting, spraying, rotating, and draining. Allow the brief interval directed by the paint manufacturer between coats. Stop when the ornament is reflective but still contains visible transparent and cloudy areas.
Mirror-effect paint manufacturers recommend multiple light coats rather than one thick application. Building the finish gradually provides more control over opacity and reduces dripping.
Step 8: Add antique shadows
After the mirror coating has dried according to the label, add age with a tiny amount of dark craft paint. Mix black or brown acrylic paint with a little water, place a few drops inside, and rotate the ornament so the color settles behind selected distressed patches.
Use this step sparingly. You are suggesting a century of oxidation, not reenacting an oil spill. Warm brown produces a traditional antique look, black creates dramatic contrast, and bronze or copper makes the ornament feel richer and less icy.
Step 9: Dry the ornaments upside down
Place each ornament neck-down in a paper cup so excess liquid can drain without the ball rolling across the table. Protect the glass from the cup’s edge with a folded paper towel if necessary.
Leave the ornaments undisturbed until the paint is fully cured, not merely dry to the touch. Interior-painted ornaments can take longer to release trapped moisture because air circulation through the narrow opening is limited. Craft-paint instructions for glass ornaments similarly recommend draining them upside down in cups and allowing extended drying time before replacing the caps.
Step 10: Replace the caps and add ribbon
Once the ornaments are completely dry and no paint odor remains, reinstall the metal caps carefully. Replace bright new caps with antique brass or dark silver versions for a more convincing vintage effect.
Finish each ornament with velvet ribbon, narrow satin ribbon, metallic cord, or soft twine. Dusty rose, forest green, burgundy, navy, champagne, and black velvet all pair beautifully with aged silver.
Five Vintage Mercury Glass Color Variations
Classic antique silver
Use mirror paint, a moderate amount of distressing, and a few diluted black or brown shadows. This version works with almost every Christmas color palette, from farmhouse neutrals to traditional red and green.
Champagne gold
Create the silver base first. Once dry, add a translucent wash of pale gold craft paint behind the mirrored coating. Keep portions silver so the final result has more dimension than a standard gold ornament.
Smoky pewter
Use fewer reflective coats and a slightly stronger gray-black wash. Pewter ornaments look especially sophisticated on trees decorated with white lights, black ribbon, dried oranges, and natural greenery.
Antique jewel tones
Add thin washes of emerald, ruby, sapphire, plum, or teal behind the distressed mirror layer. Vintage-inspired holiday decorating often combines metallic ornaments with deep, colorful finishes, while modern displays also use mercury glass in pink, blue, and other nontraditional palettes.
Heavily weathered heirloom finish
Use only two thin mirror coats, remove more paint with the vinegar droplets, and add small areas of brown, bronze, and black. This style is perfect for an old-world tree, but avoid making every ornament equally distressed. A collection looks more believable when some pieces are brighter and others appear older.
Common Problems and How to Fix Them
The finish looks like plain silver spray paint
You probably used too much paint or too little vinegar solution. On the next coat, add a few small droplets and remove selected wet areas. Preserving transparent patches is what creates the mercury glass effect.
The paint collects at the bottom
Your spray bursts are too long, or the ornament is not being rotated quickly enough. Drain the excess immediately and switch to shorter bursts. Several nearly transparent coats are safer than one enthusiastic blast.
The ornament looks cloudy instead of reflective
Cloudiness may result from excessive moisture, dirty glass, thick coats, unsuitable temperature or humidity, or insufficient drying time. Let the ornament dry before deciding whether it needs another coat. Mirror paint often becomes more reflective as it dries.
The distressing looks too regular
Change the angle of the ornament, vary the number of vinegar droplets, and rotate in different directions. Do not place identical spots at evenly spaced intervals unless your decorating theme is “vintage ornament designed by a geometry teacher.”
The ornament opening becomes clogged
Wipe the neck carefully before the paint hardens, taking care not to disturb the visible exterior. Keeping the opening clear improves ventilation and makes it easier to reinstall the cap.
How to Decorate With Mercury Glass Ornaments
Position reflective ornaments close to warm white tree lights so they catch and scatter the glow. Combine them with matte ornaments, velvet bows, wooden beads, pinecones, or paper decorations to prevent the tree from becoming one enormous reflective surface.
You can also arrange mercury glass ornaments in a wooden bowl, silver tray, clear cloche, or greenery-filled centerpiece. Designers frequently pair mercury glass with fresh evergreens, metallic accents, and candlelight because the irregular surface creates a warm, layered shimmer. Vintage ornaments can also be grouped in wreaths, garlands, tabletop trees, and decorative containers instead of being limited to the Christmas tree.
Cleaning and Storing Your Handmade Ornaments
Handle the ornaments by their glass bodies rather than lifting them by the caps. The cap can separate unexpectedly, leaving gravity to complete the least festive part of the decorating process.
Dust the exterior gently with a dry microfiber cloth. Do not submerge the ornaments or pour cleaning liquid inside, since moisture may soften or damage the decorative coating. Wrap each ornament loosely in acid-free tissue and place it in a divided, rigid storage box. Store the box in a dark, temperature-controlled closet rather than a hot attic or humid garage. Preservation specialists similarly recommend gentle dry cleaning, individual wrapping, limited pressure, and stable storage conditions for delicate glass ornaments.
My Experience Making DIY Vintage Mercury Glass Christmas Ornaments
The first time I attempted faux mercury glass ornaments, I approached the spray paint with the confidence of someone who had watched several tutorials and therefore believed the laws of physics had been temporarily suspended. I sprayed far too much paint into the first glass ball. Instead of delicate antique silver, I created a shiny puddle with an ornament attached to it.
That first failure taught me the most useful lesson in this project: a coat that looks too thin is usually just right. Mirror-effect paint behaves differently from ordinary metallic paint. You are not trying to hide the glass immediately. You are building a broken reflective layer, and every transparent patch contributes to the final vintage appearance.
My second discovery involved the spray bottle. The original nozzle produced droplets roughly the size of small lakes. Those large beads stripped away broad circles of paint and made the ornament look polka-dotted. Switching to a cosmetic-style fine-mist bottle gave me smaller, more natural speckles. I still allowed a few larger drops to form, but they became accents rather than the entire design.
Working in small batches also improved the results. When I tried to process twelve ornaments at once, I forgot which ones had received vinegar, which ones had been sprayed twice, and which ornament was simply sitting there judging me. Groups of three or four were much easier to control. I could mist, paint, rotate, and drain each ball before the coating changed too much.
I also learned not to chase perfection. One ornament had a nearly bare crescent along one side, so I initially considered repainting it. After placing it near a tree light, that clear section became my favorite detail. Light passed through the opening, reflected from the surrounding silver, and gave the ornament far more depth than the evenly coated versions.
Color experiments were most successful when the mirror layer remained the star. A heavy coat of red paint made one test ornament look like a normal red bauble wearing silver underneath. A very thin ruby wash, however, settled behind the distressed areas and produced the rich appearance of faded vintage glass. The same principle worked with emerald green and smoky blue.
Drying time required more patience than the active crafting. An ornament may feel dry around the neck while moisture remains trapped at the bottom. Reinstalling the cap too early can seal in odor or cause the coating to shift. I now leave the ornaments upside down overnight, then turn them upright for additional ventilation before adding caps and ribbons.
The final presentation matters almost as much as the paint. New silver caps looked too bright against the distressed finish, so I darkened them with a small amount of brown and black craft paint. Velvet ribbon immediately made the ornaments appear more expensive. Burgundy created a traditional look, dusty pink felt romantic, and black velvet made the silver finish surprisingly modern.
Most importantly, I stopped expecting every ornament to match. True vintage collections develop variation over time. Some pieces are brighter, some are darker, and some have scars that make them interesting. A handmade set should have the same personality. The ornament with an extra drip or an unusually transparent patch often becomes the one everyone notices first.
Conclusion
DIY vintage mercury glass Christmas ornaments deliver an impressive holiday transformation from a remarkably simple group of materials. Clear glass balls, mirror-effect paint, diluted vinegar, and a little patience can produce decorations that feel collected rather than mass-produced.
The secret is restraint. Work safely, prepare clean glass, use fine droplets, build several thin reflective layers, and preserve plenty of irregularity. Once the finish is dry, antique shadows, aged caps, and velvet ribbons can turn each ornament into a convincing heirloom-style piece. Make a coordinated set for your tree, personalize a few as gifts, or experiment with jewel tones until your workspace resembles Santa’s slightly eccentric restoration studio.













