
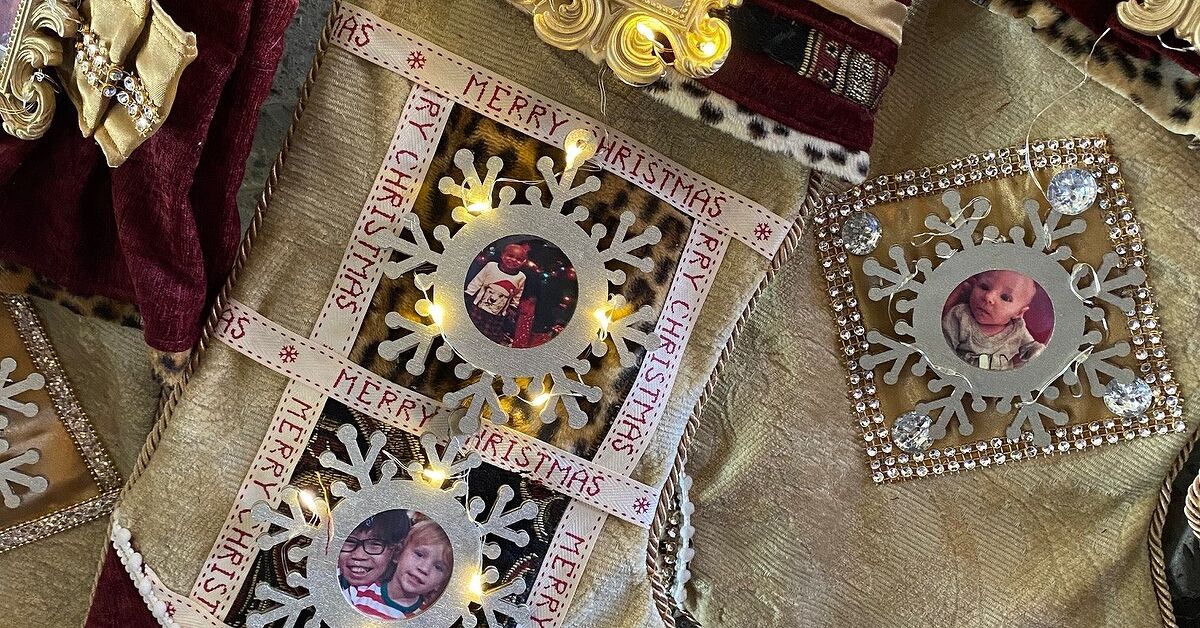
Some Christmas decorations politely sit in the background. Others march into the room wearing jingle bells and demand compliments. Photo Christmas stockings that light up belong to the second group, and honestly, they have earned it. They combine three things people already love during the holidays: family photos, cozy handmade stockings, and tiny twinkling lights that make everything look like it was blessed by a very organized elf.
The best part? You do not need to be a professional seamstress, electrician, or person who owns fifteen kinds of scissors. This project is surprisingly beginner-friendly if you break it into simple steps: make or buy a plain stocking, add a photo panel, decorate around it, then install a safe battery-powered LED light strand. The result is a personalized Christmas stocking that glows on the mantel, staircase, bookshelf, or wherever Santa does his logistical planning in your home.
In this guide, you will learn how to make photo Christmas stockings that light up using easy materials, practical safety tips, and creative design ideas. We will cover no-sew and sewn options, photo transfer methods, LED placement, troubleshooting, and the little finishing touches that make a homemade stocking look charming instead of “I panicked at midnight with a glue gun.”
Why Photo Christmas Stockings That Light Up Are So Special
A traditional Christmas stocking is already personal. It hangs there year after year, waiting for candy canes, tiny gifts, and maybe one lonely orange from someone who believes in vitamins. But adding a photo turns the stocking into a keepsake. Add lights, and suddenly it becomes a mini memory lantern.
These stockings are especially fun for families because each person can have a design that reflects their personality. A baby’s stocking can feature a first Christmas photo surrounded by soft white lights. A pet stocking can include a goofy dog picture with red and green trim. A grandparent’s stocking can show an old family photo framed with warm golden LEDs. You can even make matching photo stockings for a couple, siblings, roommates, or friends.
They also solve a classic holiday problem: store-bought personalized stockings can be expensive, and custom light-up versions are not always easy to find. Making your own lets you choose the size, fabric, photo style, color palette, and lighting effect. It is a small DIY project with a big emotional payoff.
Materials You Will Need
Before you start, gather your supplies. You can make this project as simple or as fancy as you like. If you already have a plain stocking, you are halfway there. If not, you can sew one from felt, cotton, flannel, velvet, fleece, or quilted fabric.
Basic Supplies
- Plain Christmas stocking or fabric to make one
- Printed photo, printable fabric sheet, or iron-on transfer paper
- Battery-powered LED fairy lights or micro string lights
- Felt, cotton, flannel, or fleece for photo backing
- Fabric scissors
- Needle and thread, sewing machine, or fabric glue
- Ribbon, pom-pom trim, lace, rickrack, or holiday embellishments
- Small piece of cardboard or template paper
- Fabric clips or pins
- Hook-and-loop tape or a small fabric pocket for the battery pack
Optional Supplies
- Fusible interfacing for structure
- Heat-transfer vinyl for names or shapes
- Mini clothespins for a photo-collage look
- Clear vinyl to protect a printed photo
- Embroidery floss for hand-stitched details
- Awl or small sharp scissors for tiny light holes
Choose LED lights labeled for indoor use, and select a small battery pack that can fit inside the stocking cuff or a hidden back pocket. Avoid plug-in lights for this project. A stocking is fabric, it moves around, and it may hang near children or pets. Battery-powered LED micro lights are neater, safer, and much easier to hide.
Step 1: Choose or Make the Stocking Base
You have two good options: decorate a store-bought stocking or make your own from scratch. A purchased plain stocking is perfect if you want a fast project. Look for one made from felt, canvas, cotton, flannel, or fleece. Avoid heavily ribbed knit stockings if you plan to attach a photo panel because the surface may stretch and wrinkle.
If you want to sew your stocking, draw a simple stocking shape on paper, making it about 16 to 20 inches long. Cut two outer fabric pieces and two lining pieces. Place the outer pieces right sides together, stitch around the sides and foot, and leave the top open. Repeat with the lining, leaving a small gap at the bottom so you can turn the stocking later. Slide the outer stocking into the lining with right sides facing, sew around the top edge, turn everything through the gap, then close the lining and tuck it inside.
For a no-sew version, cut two felt stocking shapes and glue the edges together with fabric glue, leaving the top open. Press the seams with books while the glue dries. Felt is forgiving, cheerful, and does not fray, which makes it the golden retriever of craft fabrics.
Step 2: Pick the Perfect Photo
The photo is the star, so choose one with good lighting, clear faces, and a simple background. A close-up works better than a distant group shot because the image will be viewed from several feet away. If the stocking will hang on a mantel, remember that people will see it while standing, walking by, or pretending not to steal another cookie.
Black-and-white photos look classic and elegant. Warm-toned photos feel nostalgic. Bright color photos are best for kids, pets, and playful designs. For a vintage look, use a sepia filter and pair it with cream fabric, gold trim, and warm white lights. For a modern look, use a square photo with clean borders and cool white LEDs.
Photo Size Tip
For most full-size stockings, a photo panel between 4 by 4 inches and 5 by 7 inches works well. It should be large enough to see but not so large that it overwhelms the stocking shape. Leave room for a name, lights, trim, and a cuff.
Step 3: Transfer or Attach the Photo
There are several ways to add a photo to fabric. Your best choice depends on your printer, tools, and how polished you want the final stocking to look.
Option A: Printable Fabric Sheet
Printable fabric sheets are one of the cleanest methods. They are usually designed for inkjet printers and have a paper backing that feeds through the printer. After printing, you peel away the backing and either sew or fuse the fabric photo onto your stocking. This gives the photo a soft, textile look that feels built into the project rather than stuck on top.
Option B: Iron-On Transfer Paper
Iron-on transfer paper is another easy option. Choose transfer paper made for your printer type and for the color of your fabric. Light-fabric transfers and dark-fabric transfers behave differently, so read the package instructions before printing. If your design includes text, mirror the image before printing unless the product directions say otherwise.
Always test the transfer on scrap fabric first. Use a firm surface, not a padded ironing board, and avoid steam. Let the transfer cool or peel according to the product instructions. This is not the step where we “wing it.” Heat-transfer paper has strong opinions.
Option C: Printed Photo in a Fabric Frame
If you do not want to print directly on fabric, print a regular photo on matte photo paper, cover it with clear flexible vinyl or laminating film, and stitch or glue it into a fabric frame. This creates a cute patch-style look. It is less washable, but for decorative stockings that do not need laundering often, it works beautifully.
Step 4: Create a Photo Frame on the Stocking
A photo looks more intentional when it has a border. Cut a felt or fabric rectangle about one inch larger than the photo on all sides. Center the photo on the rectangle, then attach it with fabric glue, fusible web, or stitching. Add trim around the edge, such as ribbon, lace, mini pom-poms, or metallic rickrack.
Place the framed photo on the stocking front before attaching it permanently. Move it around until the layout feels balanced. Usually, the best spot is the middle of the stocking body, slightly above the widest part of the foot. If you put it too low, gifts may distort the image. If you put it too high, the cuff may steal the spotlight like a diva in faux fur.
Step 5: Plan Where the Lights Will Go
Before poking holes or gluing anything, plan the light path. Lay the LED strand over the stocking and decide whether you want the lights to frame the photo, sparkle around the cuff, outline the stocking shape, or peek through small decorative shapes like stars and snowflakes.
The easiest design is a glowing photo frame. Arrange the lights around the border of the photo and secure the wire behind trim. Another beginner-friendly layout is a scattered star effect. Make tiny holes in the stocking front, push one LED through each hole from the inside, and leave the wire hidden inside the stocking.
Smart Light Placement Ideas
- Frame the photo with warm white micro lights.
- Place lights inside felt stars around the photo.
- Run lights along the cuff seam for a glowing top edge.
- Create a Christmas tree shape with green felt and tiny lights.
- Use red and white trim with warm lights for a candy-cane effect.
Step 6: Attach the LED Lights Safely
Use only battery-powered LED lights for this project. LEDs are efficient and stay cooler than old-style incandescent bulbs, but you should still treat them with care. Inspect the strand before installing it. Do not use lights with cracked wires, loose bulbs, exposed metal, or a damaged battery case.
If you are pushing lights through the fabric, make each hole tiny. The opening should be just large enough for the LED bulb, not the whole battery pack’s hopes and dreams. Push the bulb from the inside to the outside, then secure the wire on the inside with small hand stitches, fabric tape, or dots of hot glue placed carefully away from the bulb itself.
Do not sew through the electrical wire. Stitch around it instead, making little thread bridges that hold the wire in place. Keep the battery pack accessible so you can turn the lights on and off and replace batteries. A hidden pocket on the back of the stocking or inside the cuff works well.
Battery Pack Pocket
Cut a small rectangle of felt slightly larger than the battery pack. Stitch or glue three sides to the back of the stocking, leaving the top open. Add hook-and-loop tape if you want extra security. The battery pack should not dangle, pull, or swing like a tiny holiday wrecking ball.
Step 7: Add Names and Decorative Details
Now comes the fun part: personality. Add a name to the cuff using felt letters, embroidery, iron-on vinyl, paint, or wooden alphabet beads. Keep the lettering readable. Fancy script can look beautiful up close but become “Merry Christmas, Brayden” from two feet away and “Merry Christmas, Broccoli” from across the room.
Decorate around the photo with felt holly leaves, snowflakes, stars, candy canes, bells, tiny bows, or miniature ornaments. If the stocking is for a child, add playful shapes and bright colors. If it is for an adult, try velvet ribbon, metallic thread, muted plaid, or a clean neutral palette.
The trick is not to bury the photo. Let the image remain the emotional center. Think of the lights and trim as backup singers: sparkly, important, but not supposed to grab the microphone.
Step 8: Test the Stocking Before Displaying It
Once everything is attached, turn on the lights and dim the room. Check whether the photo is visible, the lights are evenly spaced, and the battery pack is hidden. Gently flex the stocking to make sure the wires stay in place. If you plan to add small gifts, test the stocking with tissue paper or lightweight items first.
A light-up photo stocking is mostly decorative, so avoid stuffing it with heavy objects. If you want it to hold gifts, keep the electronics on the front panel and place the battery pack in a secure pocket away from the main storage area. Heavy items can tug at the lights, bend wires, or make the stocking hang strangely.
Safety Tips for Light-Up Christmas Stockings
Holiday crafts should be festive, not suspenseful. Follow these simple safety rules whenever you combine fabric, photos, and lights.
- Use battery-powered LED lights only, not plug-in strands.
- Keep coin-cell and button batteries away from children and pets.
- Choose lights labeled for indoor decorative use.
- Turn the lights off before leaving home or going to sleep.
- Remove the battery pack before storing the stocking long-term.
- Do not wash the stocking unless all electronics are removable.
- Do not hang light-up stockings directly over open flames, candles, or active fireplaces.
If the stocking will be displayed in a home with toddlers, curious pets, or enthusiastic holiday guests who touch everything, hang it higher or use it as wall decor rather than a reachable stocking. Also avoid heavy mantel stocking holders if children may pull on the stocking. A secure hook, ribbon tie, or wall-mounted hanger is usually safer.
No-Sew Version: The Fast Weekend Method
If sewing is not your favorite holiday activity, you can still make a beautiful photo Christmas stocking that lights up. Start with a plain felt stocking. Print your photo on printable fabric or matte photo paper. Glue the photo to a felt backing, then glue trim around it. Attach the framed photo to the stocking front with strong fabric glue.
Next, arrange battery-powered micro lights around the photo frame. Hide the wire under ribbon or rickrack and glue the trim over the wire, leaving the bulbs visible. Place the battery pack in a small felt pocket on the back. Let everything dry fully before hanging.
This method is quick, inexpensive, and perfect for making several stockings in one afternoon. It is also a great family craft if adults handle the cutting, hot glue, and batteries.
Sewn Version: The Keepsake Method
If you want a stocking that lasts for years, sew the base and stitch the photo panel in place. Choose sturdy cotton, flannel, denim, or velvet for the exterior, then add lining for a finished interior. Use batting or interfacing if you want the stocking to hold its shape.
Print the photo on fabric, frame it with a border, and topstitch the panel to the stocking front before sewing the front and back together. This lets you hide knots, thread ends, and some light wiring between layers. For the LEDs, create tiny buttonhole-style openings or place the lights around the surface trim after the stocking is assembled.
The sewn version takes longer, but the final result looks polished and gift-worthy. It is ideal for baby’s first Christmas, newlywed stockings, memorial stockings, or matching family sets.
Creative Design Examples
Baby’s First Christmas Stocking
Use soft cream fleece, a pastel photo frame, warm white lights, and embroidered lettering. Add tiny felt stars around the photo and keep the design gentle. This makes a sweet keepsake that parents will absolutely cry over, so have tissues nearby.
Pet Photo Stocking
Use red felt, paw-print trim, a funny pet photo, and colorful LEDs. Add a bone, fish, or paw-shaped name tag. Keep the battery pocket secure and display the stocking out of chewing range unless your dog has signed a written agreement.
Vintage Family Stocking
Print an old family photo in sepia, place it on plaid or burlap-style fabric, and frame it with lace or velvet ribbon. Use warm white lights and antique gold accents. This style looks beautiful on a mantel with greenery and pinecones.
Modern Minimal Stocking
Choose white canvas or charcoal felt, print a square black-and-white photo, and use a simple stitched border. Add a single strand of warm micro lights around the photo. The finished stocking feels clean, stylish, and not allergic to good taste.
Common Mistakes to Avoid
The first mistake is using a photo that is too dark. Once it is printed on fabric, it may look even darker. Brighten the image before printing and increase contrast slightly. The second mistake is placing the photo too close to the stocking edge. Leave enough seam and trim space so the photo does not look cramped.
The third mistake is gluing down the entire LED strand before testing it. Always test the lights first, then test them again after placement, and once more after the glue dries. Holiday lights enjoy dramatic timing, and it is better to catch problems before everything is attached.
The fourth mistake is hiding the battery pack too well. If you need tweezers, a flashlight, and emotional support to turn on the stocking, the pocket is not practical. Make it hidden but reachable.
Care and Storage
Before packing the stocking away, remove the batteries. This helps prevent corrosion and protects the battery case. Wrap the stocking loosely in tissue paper and store it flat or gently rolled. Avoid crushing the photo panel or bending the LED wires sharply.
If the stocking gets dusty, spot-clean the fabric with a barely damp cloth after removing the battery pack. Do not soak the photo area, especially if you used paper, vinyl, or transfer sheets. For sewn fabric-photo stockings, follow the printable fabric or transfer product’s care instructions.
Experience Notes: What Actually Makes This Project Look Good
After making a few light-up photo stockings, one thing becomes obvious: the small choices matter more than the expensive supplies. You can buy the fanciest velvet in the craft aisle, but if the photo is blurry or the lights are placed randomly, the stocking will still look unfinished. On the other hand, a simple felt stocking with a sharp photo, neat trim, and well-spaced lights can look like something from a boutique holiday market.
The most helpful experience tip is to build the design in layers. Do not start by attaching everything permanently. Lay the stocking flat, place the photo, add the trim, arrange the lights, then step back. Take a quick phone picture of the layout before moving anything. For some reason, the human brain forgets perfect craft placement the moment scissors appear. A reference photo saves you from asking, “Was the bow here, or did I invent that?”
Another lesson is that warm white lights are the safest design choice. Multicolor lights are fun, especially for kids’ stockings, but warm white tends to flatter photos and match more holiday decor styles. It also gives the stocking that cozy Christmas-movie glow, as if someone is about to learn the true meaning of family while holding a mug of cocoa.
When working with printed photos, matte usually looks better than glossy. Glossy photo paper can reflect the LEDs too strongly and create glare. Printable fabric has the softest look, but it can slightly mute the image, so brightening the photo before printing helps. If the face in the picture is the main attraction, crop close and avoid busy backgrounds.
The battery pack pocket is also worth taking seriously. On early attempts, it is tempting to just tuck the battery pack inside the stocking and call it a day. That works until someone fills the stocking, moves it, or accidentally turns it upside down. A stitched or glued pocket keeps the pack steady and makes the whole project feel cleaner. Put the pocket on the back near the cuff so you can reach it without disturbing the front design.
If you are making several stockings, create an assembly line. Print all photos at the same size, cut all frames, attach all names, then install all lights. This keeps the set consistent and saves time. Matching does not mean identical, either. You can use the same stocking shape and light color while changing each person’s fabric, trim, and photo style.
Finally, give yourself permission to embrace handmade charm. A tiny uneven stitch or slightly tilted felt star is not a disaster. It is proof that a real person made the stocking with actual hands, holiday music in the background, and possibly cookie crumbs on the table. That is the magic of this project. The lights catch attention, the photo brings emotion, and the handmade details give it heart.
Conclusion
Learning how to make photo Christmas stockings that light up is easier than it looks, and the finished result feels wonderfully personal. You can keep the project simple with a no-sew felt stocking, printable photo, and battery-powered LED strand, or create a long-lasting keepsake with sewn fabric, lining, trim, and carefully placed lights. The key is to choose a clear photo, use safe indoor LED lights, hide the battery pack neatly, and let the design support the memory rather than overwhelm it.
Whether you are making one stocking for a baby’s first Christmas or a full glowing set for the whole family, this DIY project brings warmth, humor, and personality to holiday decorating. It is practical enough for beginners, customizable enough for serious crafters, and sentimental enough to become part of your yearly Christmas tradition. In other words, it is exactly the kind of holiday craft that makes people say, “You made that?” while you pretend to be humble and absolutely do not mention the glue on your sleeve.
Note: For best results, use removable battery-powered LED lights, keep batteries away from children and pets, and remove all electronics before cleaning or storing the stocking.










