
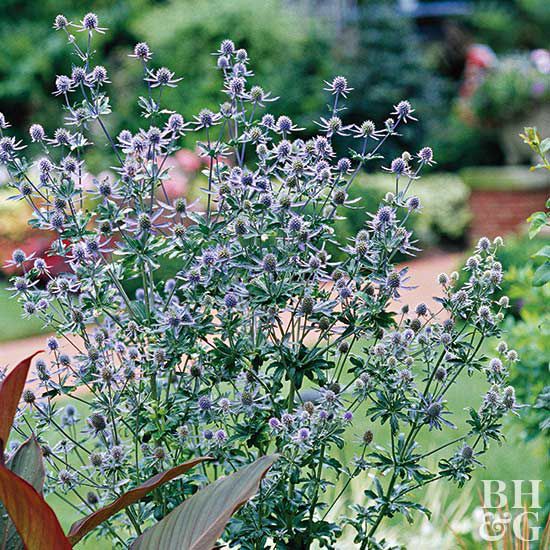
If your garden has one brutally sunny corner where delicate flowers go to file a formal complaint, sea holly may be your new best friend. This striking perennial brings steel-blue blooms, spiky texture, and a gloriously unfussy attitude to the landscape. It looks like a plant that should demand velvet ropes and a security team, yet it thrives in spots where other flowers throw a dramatic fainting spell.
Sea holly, usually grown from species and cultivars in the Eryngium genus, is loved for its architectural shape, pollinator appeal, and drought tolerance once established. It also happens to be one of those rare plants that looks amazing fresh in the garden, excellent in a vase, and weirdly fabulous when dried. In other words, it is not here to be ordinary.
In this guide, you will learn how to plant and grow sea holly the smart way, from choosing the right site to watering, pruning, propagation, and solving the common mistakes that keep this bold beauty from showing off.
What Is Sea Holly?
Sea holly is a sun-loving perennial known for its thistle-like flower heads, metallic blue or silvery bracts, and stiff upright stems. Despite the name, it is not a true holly, and despite the look, it is not a true thistle either. It simply borrowed the best parts of both personalities and made them more stylish.
Many gardeners grow Eryngium planum and its cultivars, such as ‘Blue Glitter’ or ‘Blue Hobbit,’ because they offer intense blue color, long bloom periods, and excellent heat tolerance. Some sea holly types are also tolerant of salty air or sandy soil, which makes them useful in coastal gardens. Others are prized in inland landscapes for their ability to handle poor soil and dry spells without turning into a botanical soap opera.
Why Gardeners Love Sea Holly
There are plenty of reasons sea holly earns a permanent place in sunny borders, gravel gardens, and cottage-style plantings:
It handles tough sites
Sea holly performs best where many soft, thirsty plants struggle: full sun, lean soil, heat, wind, and dry conditions. If you have an area that feels like a baking sheet in July, sea holly may look at that location and say, “Perfect.”
It adds major texture
The plant’s spiny-looking bracts and upright stems create contrast among mounded perennials, ornamental grasses, and broad-leaved foliage plants. It gives a border backbone without feeling stiff or boring.
Pollinators love it
Bees and butterflies are often drawn to sea holly blooms, which makes it a strong option for pollinator-friendly gardens.
Deer and rabbits usually leave it alone
Its coarse, prickly texture tends to make browsing animals think, “Let’s eat literally anything else.” That alone makes it worthy of applause.
It works as a fresh or dried flower
Sea holly is popular in cutting gardens because the blooms are long-lasting and hold their form well. They also dry beautifully, giving you arrangements with a little edge and a lot of personality.
Best Conditions for Growing Sea Holly
Sunlight
Sea holly needs full sun for the best growth, strongest stems, and richest blue color. Aim for at least six hours of direct sunlight a day, though more is usually better. In too much shade, plants may become floppy, bloom less, and lose some of that intense coloration that makes them stand out.
Soil
This is where many gardeners accidentally go wrong. Sea holly does not want rich, soggy, pampered soil. It prefers well-drained soil, often sandy or loamy, and it performs especially well in average to poor soil. Wet or heavy soil can lead to root rot, weak growth, and the sad gardening realization that kindness is not always helpful.
If your soil is dense clay, improve drainage before planting. Raised beds, berms, or planting on a slight slope can help. Adding too much compost to create a fluffy luxury condo is not necessary. Sea holly is more of a “tiny modernist house in a windy place” kind of plant.
Water
Newly planted sea holly needs regular watering until it establishes a healthy root system. After that, it is relatively drought tolerant and usually performs better with less water than more. The goal is moisture during establishment, then restraint. Overwatering is one of the easiest ways to make this plant unhappy.
Airflow and spacing
Give sea holly enough room for good air circulation, especially in humid climates. Crowded plants stay damp longer and are more likely to develop leaf issues or flop. Check the mature width of your chosen cultivar and space accordingly, rather than planting like you are trying to seat extra relatives at Thanksgiving.
How to Plant Sea Holly Step by Step
1. Choose the right location
Pick a sunny site with excellent drainage. This matters more than almost anything else. Sea holly can forgive average soil, but it rarely forgives wet feet.
2. Plant at the right time
Spring is generally the best time to plant nursery-grown sea holly, giving it time to settle in before summer heat or winter cold. In warm climates, early fall can also work if the soil drains well and the plant has time to establish before freezing temperatures.
3. Prepare the planting hole
Dig a hole about twice as wide as the root ball but no deeper than the plant’s current soil line. You want the crown to sit at the same level it was growing in the pot. Planting too deep can invite rot and weak growth.
4. Handle roots gently
Sea holly develops a deep taproot and generally dislikes disturbance. Loosen circling roots lightly if needed, but avoid rough handling. This is not the moment for aggressive gardening enthusiasm.
5. Backfill and water in
Backfill with the native soil unless drainage is truly terrible. Water well after planting to settle the soil around the roots, then allow the top layer to dry slightly before watering again.
6. Mulch carefully
Use a light mulch if needed, but keep it away from the crown. A thick, moisture-holding mulch piled against the plant can create the kind of damp conditions sea holly dislikes. Gravel mulch often works better than heavy organic mulch in very dry, sunny beds.
How to Grow Sea Holly from Seed
Sea holly can be grown from seed, but patience helps. Some varieties benefit from a period of cold treatment, also called stratification, before they germinate well. Gardeners often sow seed outdoors in fall or stratify it indoors before spring sowing.
If starting indoors, use a free-draining seed-starting mix and avoid keeping the medium constantly wet. Once seedlings are large enough to handle, transplant them carefully into individual pots. Because sea holly resents root disturbance, it is smart to move seedlings gently and plant them out while they are still relatively young.
Not every seed-grown plant will look exactly like its parent, especially with named cultivars. If you want very specific height, color, or bloom traits, buying a plant may be the simpler path. If you enjoy surprise and mild botanical suspense, seed is a good option.
How to Care for Sea Holly
Watering
Water regularly during the first growing season, especially during dry stretches. Once established, reduce watering and let the soil dry somewhat between soakings. Mature sea holly usually needs less attention than gardeners expect.
Fertilizing
Go easy on fertilizer. In rich soil or with heavy feeding, sea holly may grow lush, weak stems that flop instead of standing proudly. This is a plant that often performs better on a modest diet. Think “espresso and determination,” not “all-you-can-eat buffet.”
Pruning and deadheading
Deadheading can tidy the plant and may reduce unwanted self-seeding. Some gardeners also cut stems for fresh or dried arrangements, which doubles as a form of cleanup. At the end of the season, you can cut the plant back or leave the seed heads for winter interest if you like the sculptural look.
Staking
Sea holly generally does not need staking when grown in full sun and lean, well-drained soil. If stems flop, the usual culprit is too much shade, too much fertility, or too much moisture rather than a lack of support.
How to Propagate Sea Holly
Propagation is usually done by seed, and that is often the easiest path. Some sea holly types may also produce small offsets or plantlets near the base that can be separated carefully. Division is trickier than it is with many perennials because of the taproot, so it is not always the most reliable method.
If your plant self-seeds lightly in the garden, you may find volunteer seedlings nearby. Those can sometimes be moved when very young, but once roots get long and established, sea holly becomes less cooperative about relocation.
Common Problems and How to Avoid Them
Root rot
The biggest enemy is soggy soil. Improve drainage, avoid overwatering, and do not bury the crown under mulch.
Floppy stems
This usually points to shade, overly rich soil, or too much fertilizer. Move future plantings to a sunnier site and skip the heavy feeding.
Leaf spots or mildew
Humid conditions and poor airflow can increase disease pressure. Space plants well and water the soil rather than soaking foliage when possible.
Slugs, snails, or aphids
Sea holly is not usually a pest magnet, but occasional visitors may show up. Healthy, well-sited plants usually outgrow minor pest issues without much drama.
Best Companion Plants for Sea Holly
Sea holly looks especially good with plants that enjoy similar conditions and provide contrast in form or color. Great companion plants include:
- Yarrow
- Catmint
- Lavender
- Russian sage
- Salvia
- Coreopsis
- Ornamental grasses
- Blanket flower
- Coneflower
Use it in prairie-style plantings, xeriscapes, gravel gardens, pollinator borders, and cutting gardens. It also shines in coastal or seaside-inspired designs because its texture feels wild, windblown, and beautifully unapologetic.
Harvesting Sea Holly for Fresh and Dried Arrangements
For fresh arrangements, cut stems when blooms are fully colored and firm. Use clean pruners and place stems in water right away. For dried arrangements, hang stems upside down in a dark, dry, well-ventilated place. Sea holly keeps its shape impressively well, which is one reason florists and home gardeners keep coming back to it.
If you plan to dry the stems, harvest before the blooms become weathered or faded. The color and structure are part of the show, and you want them at their best before they begin their graceful slide into crunchy retirement.
Experience Notes: What Growing Sea Holly Really Feels Like
One of the most useful things gardeners learn about sea holly is that it rewards restraint. People often start with understandable good intentions: richer soil, more compost, more frequent watering, maybe a little fertilizer for encouragement. Then sea holly responds by getting floppy, duller, or just vaguely disappointed. The real breakthrough usually comes when gardeners stop treating it like a thirsty cottage-garden diva and start treating it like the tough, sun-loving perennial it is.
In real garden settings, sea holly often becomes the plant that surprises people. At first, it can look almost too unusual, especially when planted among softer flowers. Then summer arrives, the metallic blooms catch the light, pollinators begin visiting, and suddenly the plant becomes the conversation starter. It has that rare quality of looking both elegant and slightly rebellious, as if it showed up to the border wearing silver jewelry and refusing to apologize.
Another common experience is learning the importance of site selection the hard way. A sea holly planted in average garden soil with excellent sun may become a star. The same plant tucked into a damp bed near thirsty companions may sulk, rot, or lean like it is reconsidering every life choice that led it there. Gardeners who succeed with sea holly usually mention the same lesson: drainage first, admiration second.
Many growers also notice that sea holly improves with time if left alone. Because of its taproot, it is not a plant that enjoys being dug up and shuffled around every season. Once it settles into a spot it likes, it often becomes more dependable, tougher in dry weather, and more generous with bloom. This is one of those perennials that teaches patience in a slightly prickly accent.
There is also the visual experience. Sea holly changes how a planting feels. In mixed borders, it adds tension and contrast. In hot, dry gardens, it looks perfectly at home. In bouquets, it makes everything around it seem more intentional. Gardeners often discover that even one plant can anchor a design, especially when paired with softer companions like yarrow, salvia, or ornamental grasses.
And then there is the seasonal bonus. Long after some summer flowers collapse into a tired mess, sea holly often keeps its structure. Even dried on the stem, it can remain handsome enough to justify leaving it in place. That makes it satisfying not only during peak bloom, but also in late-season beds when texture matters as much as color.
Perhaps the most relatable experience of all is this: once gardeners get sea holly right, they usually want more of it. Not because it is needy, but because it is useful, beautiful, and wonderfully self-possessed. It asks for sun, drainage, and a little respect for its roots. In return, it offers dramatic color, strong form, pollinator activity, and the smug satisfaction of growing something that looks fancy without being fussy. Frankly, that is a deal most plants should study more carefully.
Final Thoughts
If you want a perennial that thrives in full sun, laughs at poor soil, and brings bold blue texture to the garden, sea holly deserves a spot on your planting list. The secret is simple: give it sunlight, sharp drainage, and a light hand. Do that, and this spiky standout will reward you with striking blooms, pollinator visits, and enough dried-flower potential to make your scissors feel important.
Plant it once in the right place, avoid overwatering, and resist the urge to overpamper it. Sea holly is proof that some of the most unforgettable garden performers are the ones that prefer a little toughness over a lot of fuss.










